Various authentication methods are used in all wired network connections on campus to ensure Information and Network security. 802.1x is one of the secure authentication methods in wired and wireless network connections.
You need to make the following configurations on your personal Windows computers to connect to the wired network within Koç University Campus.
The 802.1x authentication method is explained in detail below. After making these settings;
-
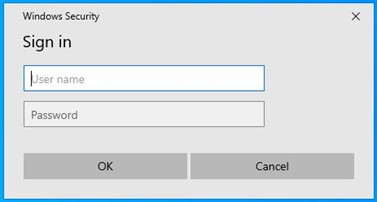
A popup will appear, asking you for your credentials.
-
You need to enter your KU NetID as your username and password in this field without the @ku.edu.tr part.
-
In case you want to reconnect to the wired network, you won't need to enter your account information unless you've changed your password.
-
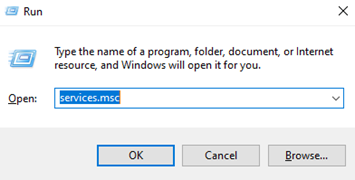
With the Windows + R key combination, Run is opened and services.msc is written.
-
Type in services.msc and press “OK”
-
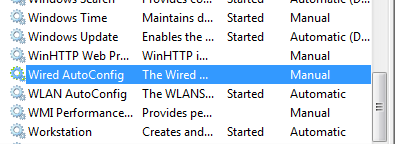
Select “Wired Autoconfig.”
-
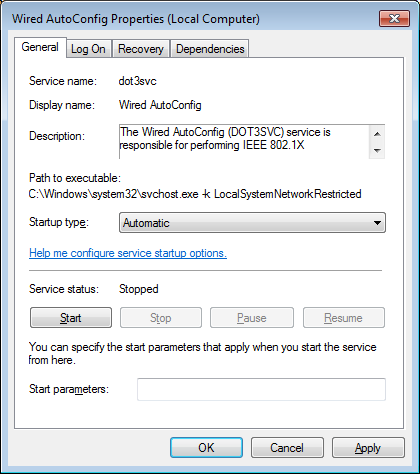
Set the startup type to Automatic.
-
Start the service and click apply.
-
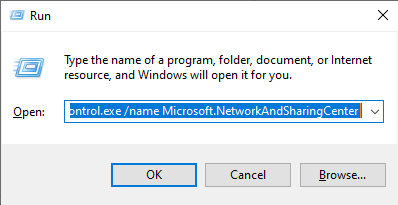
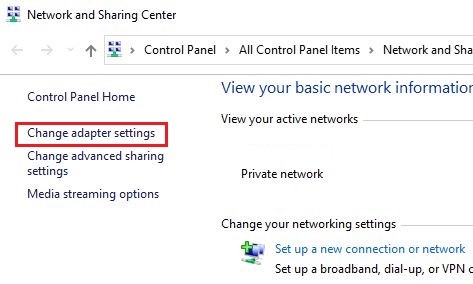
Go to Network and Sharing Control Panel. ( Win+R type
control.exe /name Microsoft.NetworkAndSharingCenter and press enter)
-
Click on the “Change adapter settings” line in the left-hand column.
-
Right-click on the local network connection port and select Properties.
-
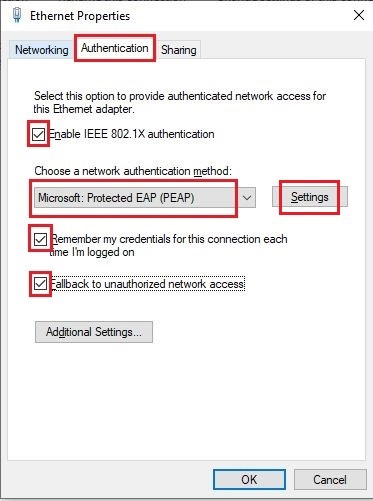
In the Ethernet Properties dialog box, select the Authentication tab and check “Enable IEEE 802.1x authentication.”
-
In the “Choose a network authentication method” dropdown, select “Microsoft Protected EAP (PEAP).”
-
Check “Remember my credentials for this connection each time I'm logged on” and “Fallback to unauthorized network access.”
-
Click Settings and proceed to the next step.
-
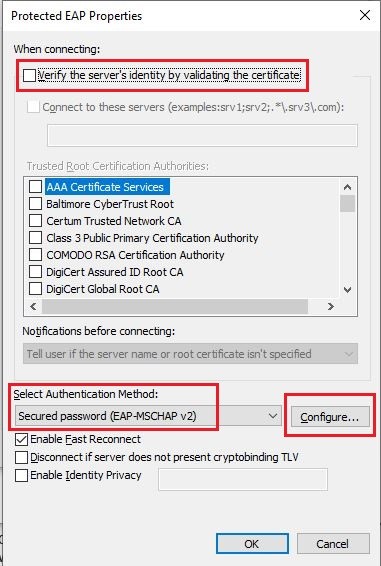
Uncheck the box next to "Validate server certificate."
-
In the "Select Authenitcation Method", make sure to select "EAP-MSCHAP v2." (It should be there by default).
-
Click Settings and proceed to the next step
-
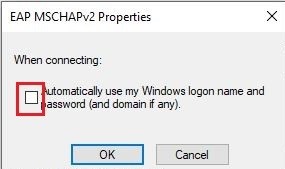
Make sure that "Automatically use my Windows logon and password.." is not selected and then click OK.
-
Now scroll to the bottom of the main interface window, (refer to the image at step 9) and click on the button labeled "Additional Settings."
-
In the new window, choose "User or Computer Authentication" at the top and then click on "Delete Credentials."
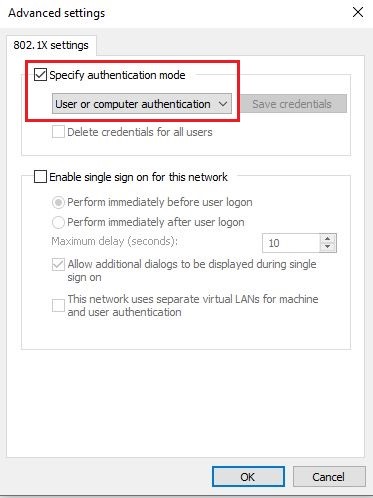
-
Click "Apply", or "OK", in every open box as you exit. If you click on the red X, your changes will NOT be saved.
-
When you plug the data cable into your computer, it should then ask you for username, and password. Enter your KU NetID as your username and your KU NetID password.
If you need additional support, you can contact the Service Desk or create ITTRACKIT.
Information Technology
For questions and help:
Ticket: https://trackit.ku.edu.tr
E-mail: it@ku.edu.tr
Phone: 1111 or +90-212 338 1111
- How to connect to KU Wireless Network with Windows 10?
- How to connect to KU Wireless Network with MacOS?
- How to connect to the Guest Wireless Network?
- How to connect to the Wired (802.1x) network with your personal Windows 10 | 11 computer?
- Internet, Network and WiFi
- How to connect to the Wired Network?
- How to connect to KU Wireless Network with iOS?
- How to connect to KU Wireless Network with Android?