
In order for expense requests to be evaluated in accordance with the relevant procedures, the request type and expense type appropriate to the nature of the expenditure must be selected before the request is created.
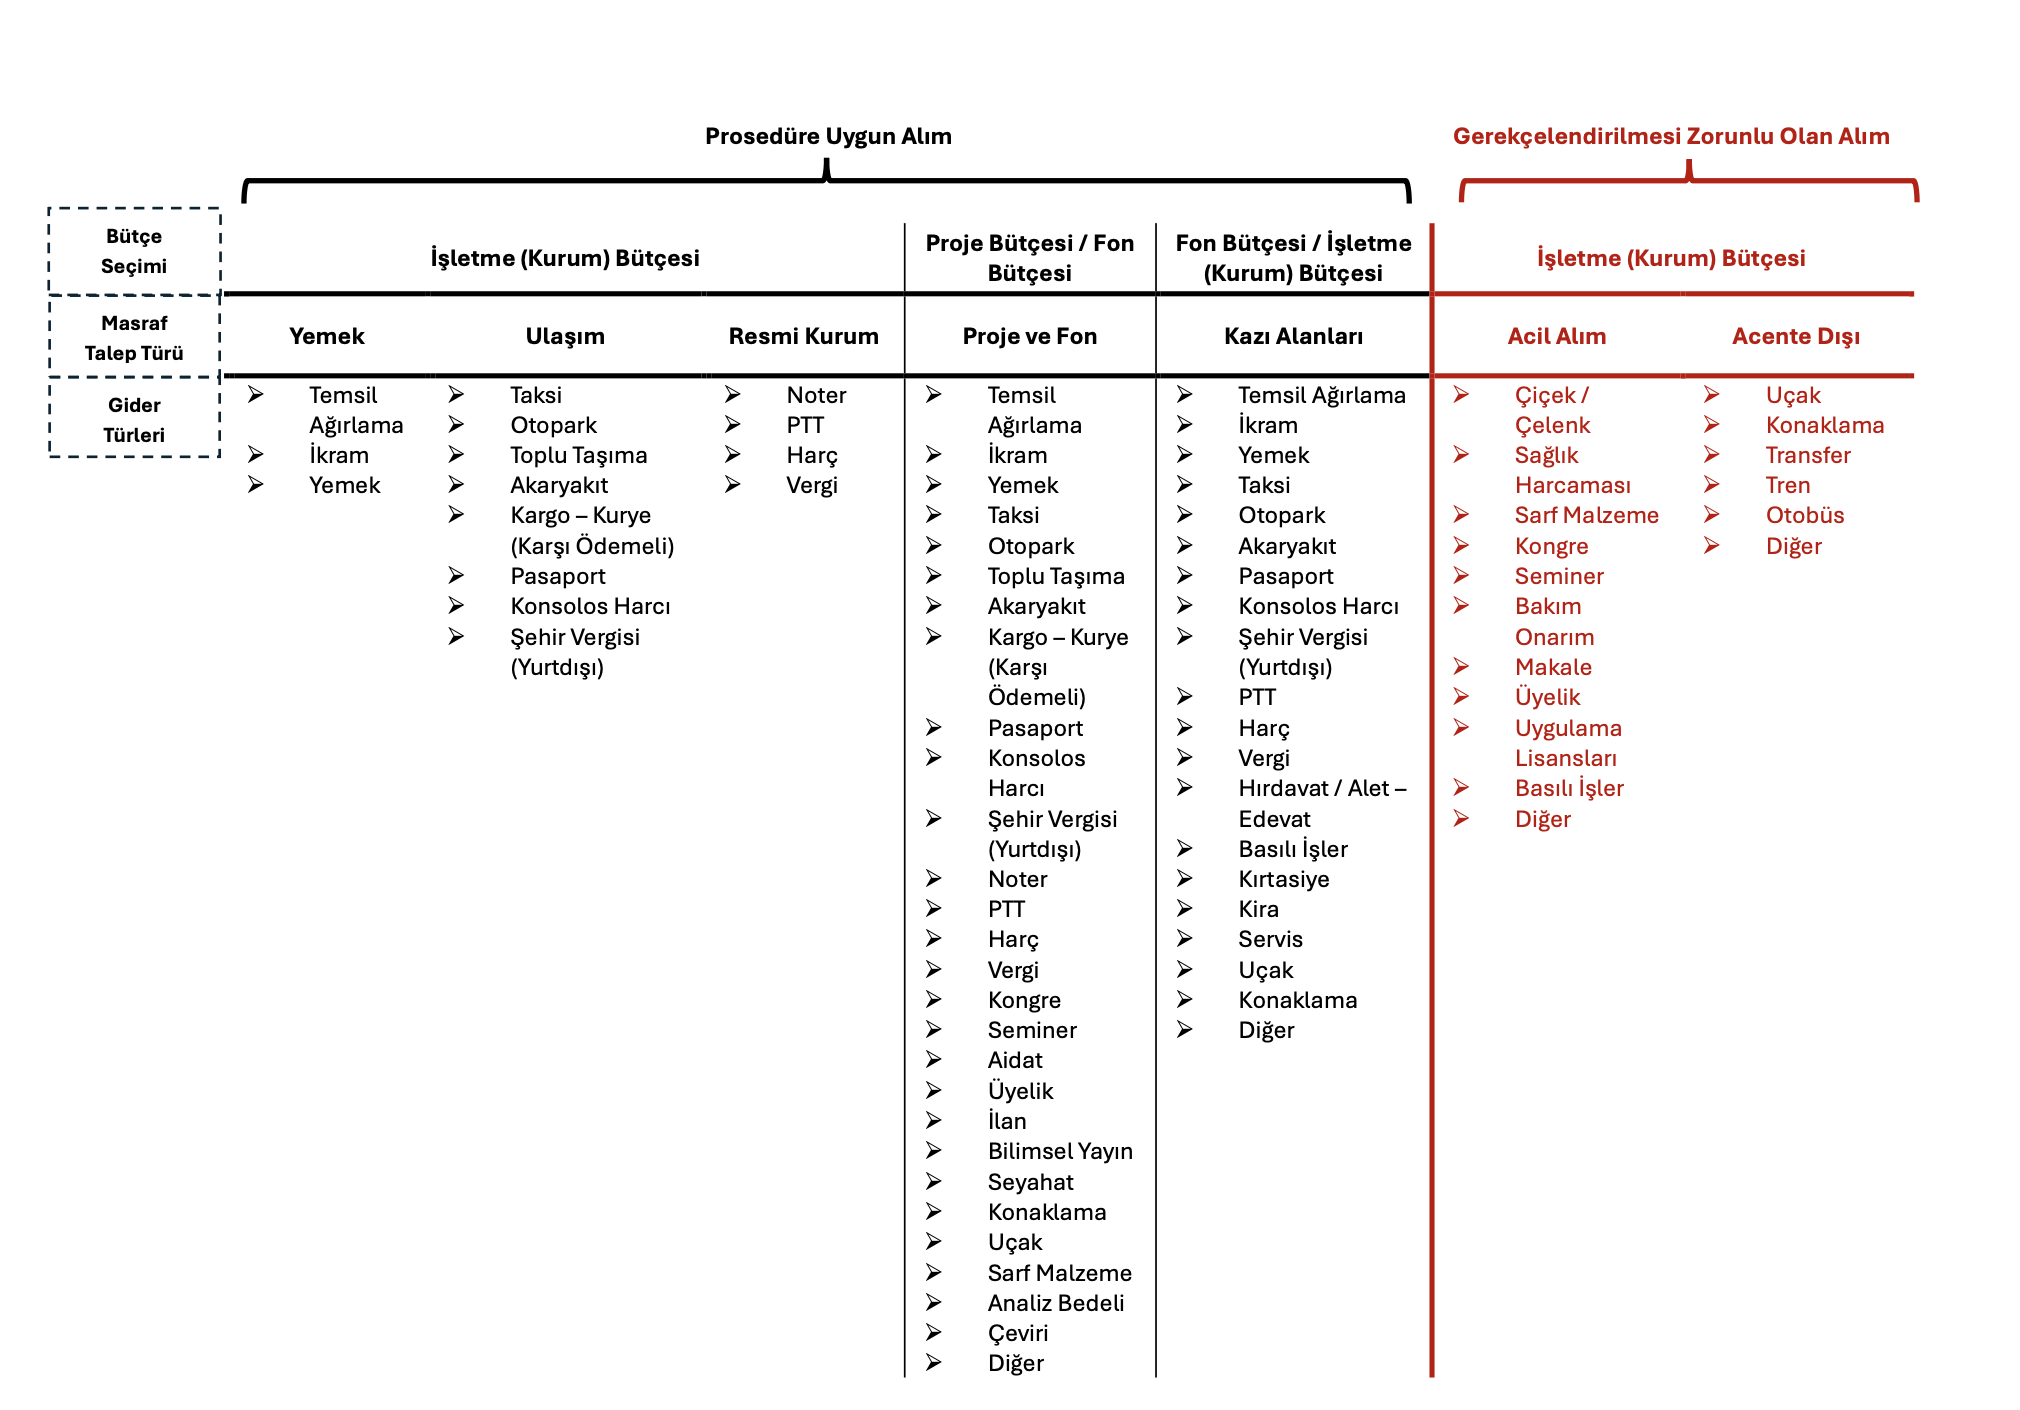
The general list of request/expense type matchings for purchases that are evaluated in accordance with the procedure and that require justification is provided in the Expense Request Scope ("Masraf Talep Kapsamı") document. Before creating a request, please review the document and categorize the expenditure in accordance with the rules it specifies.
1. Expense Request Entry
-
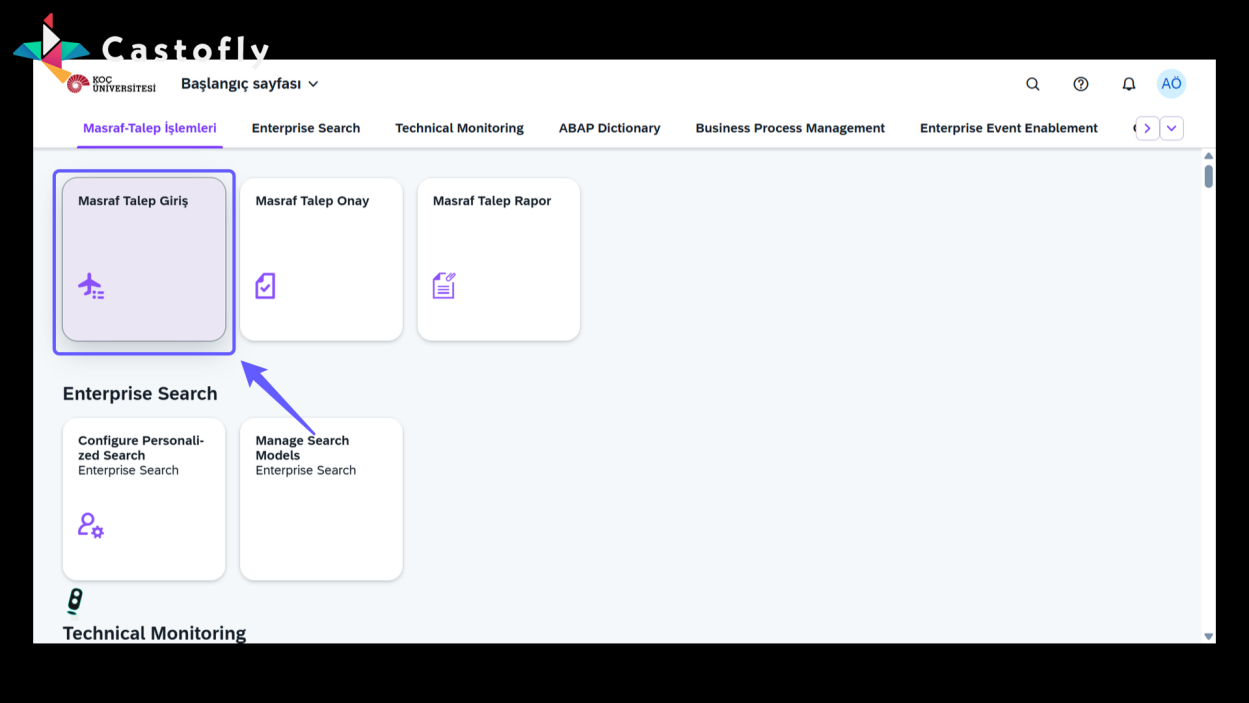
First, click the "Expense Request Entry" button to start entering your expenses.
2. Submit a Request
-
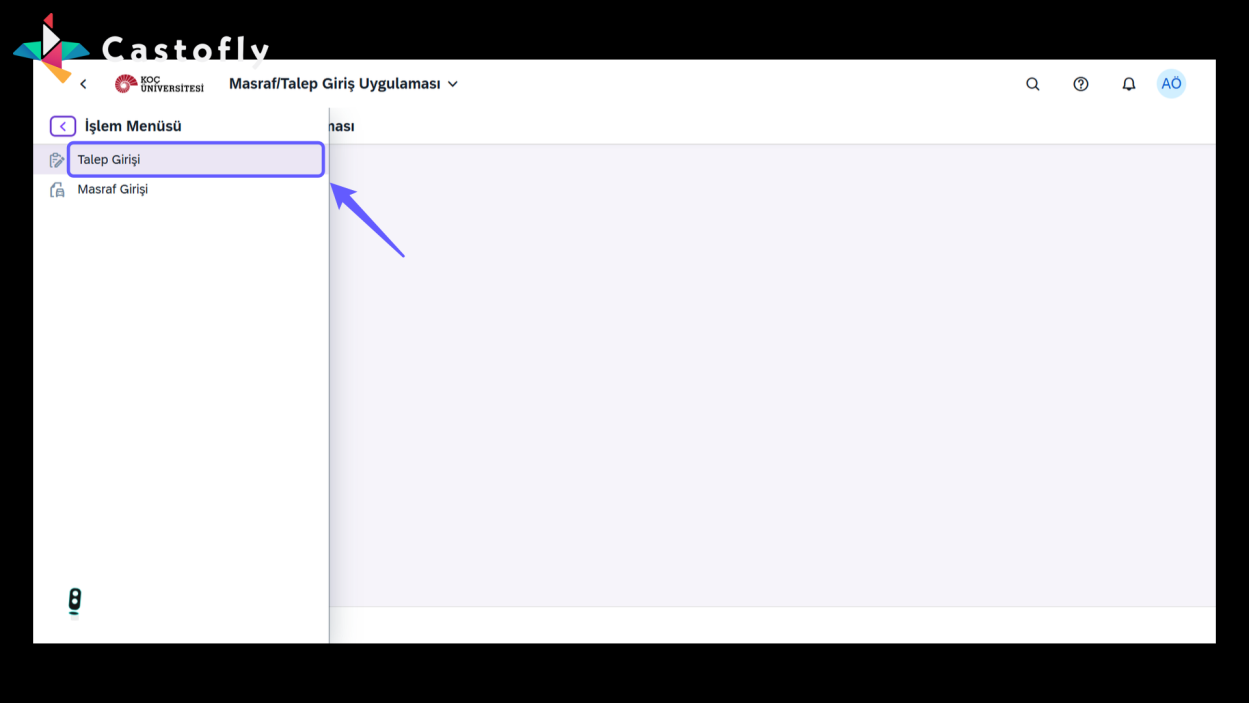
Continue by selecting the "Request Entry" option.
3. Select Company Code
-
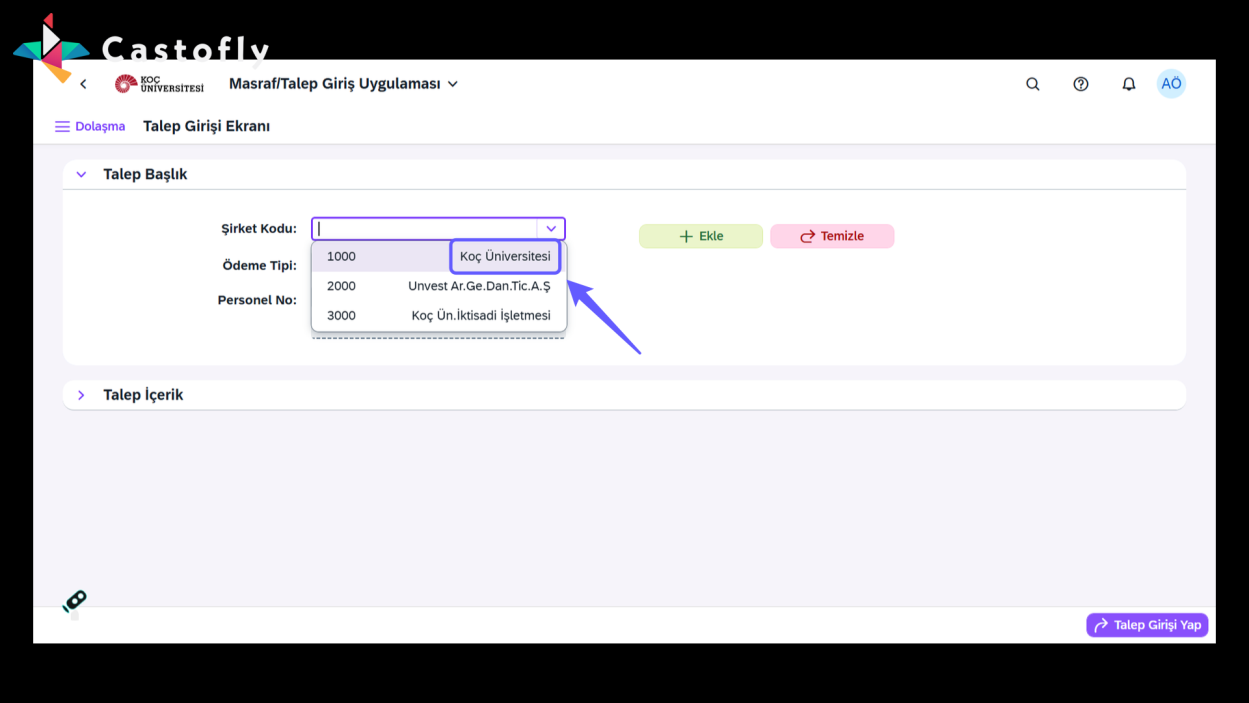
Continue by selecting your relevant company code.
4. Select Payment Type
-
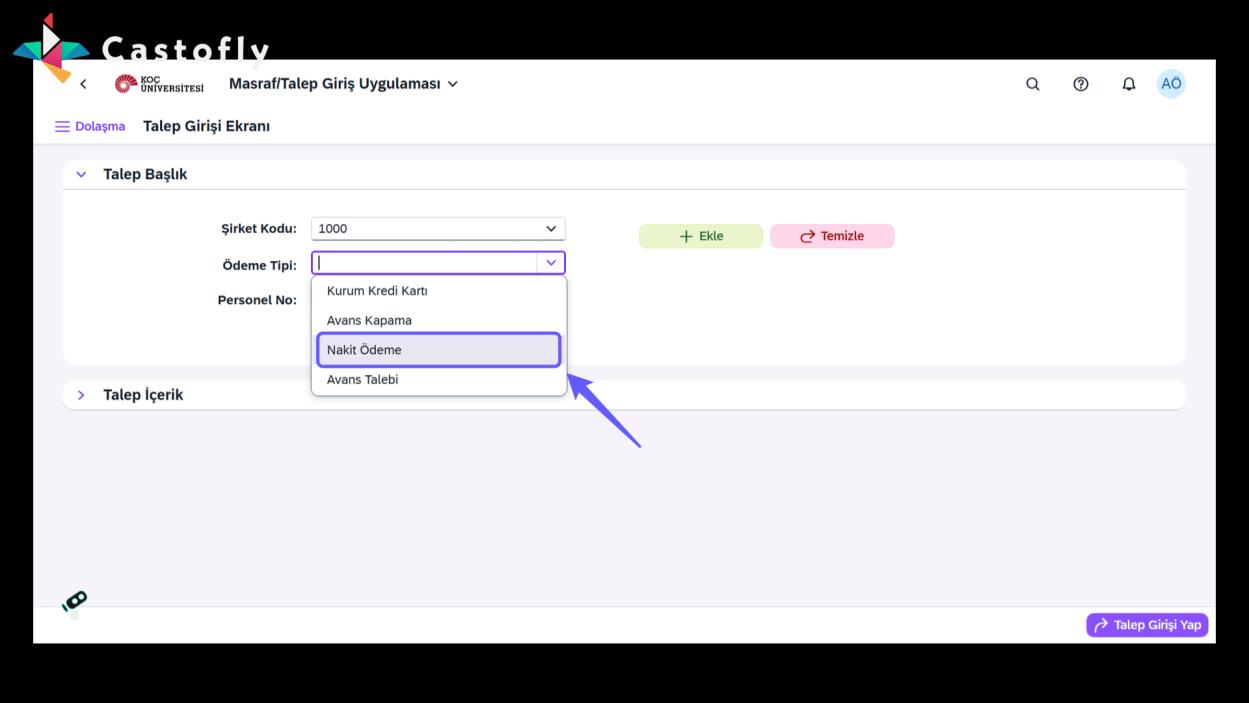
Continue by making your selection from the Payment Type menu.
5. Select Personnel
-
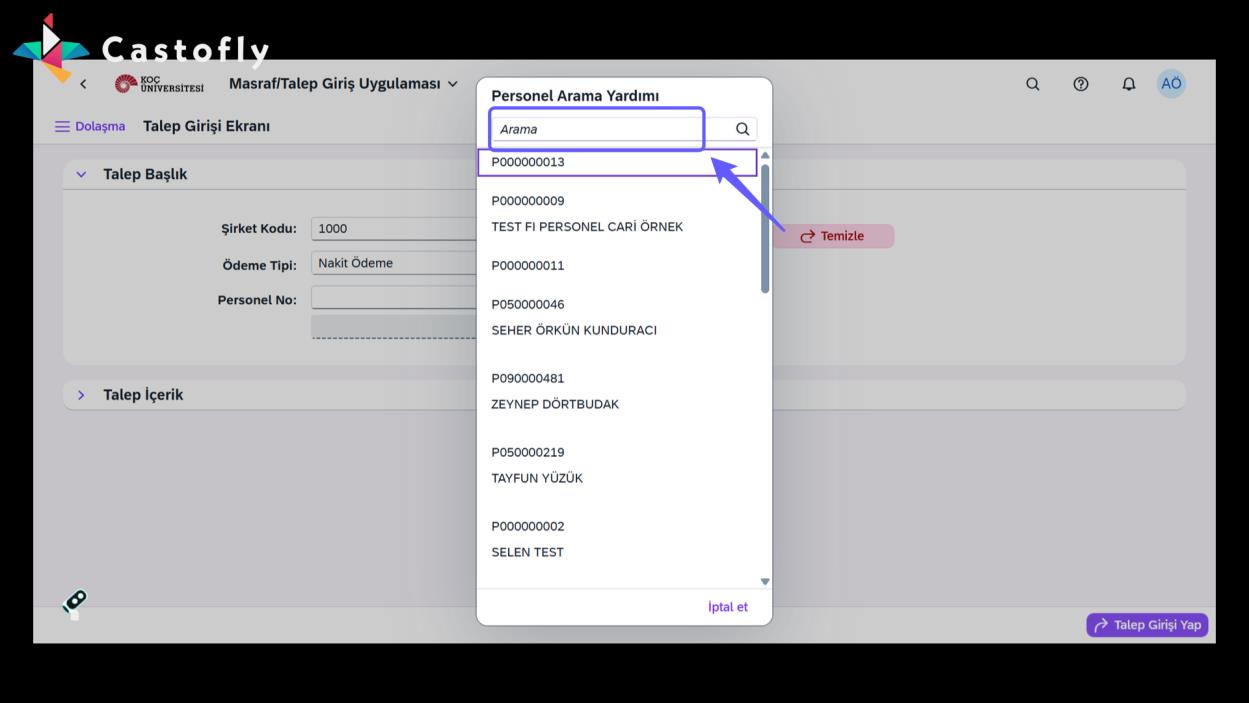
Select the personnel from the Personnel No menu. (You can create an expense request in your own name or on behalf of a colleague in your unit.)
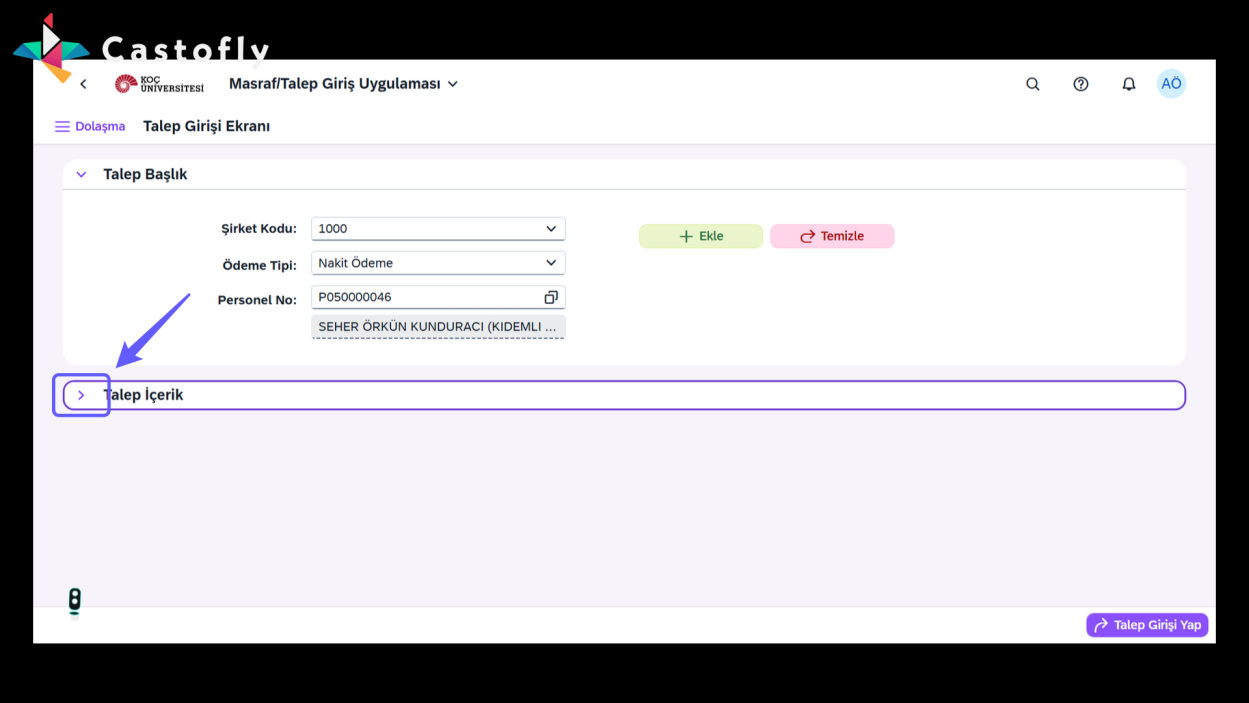
6. Open the Request Content
-
Click the arrow icon to view the request content.
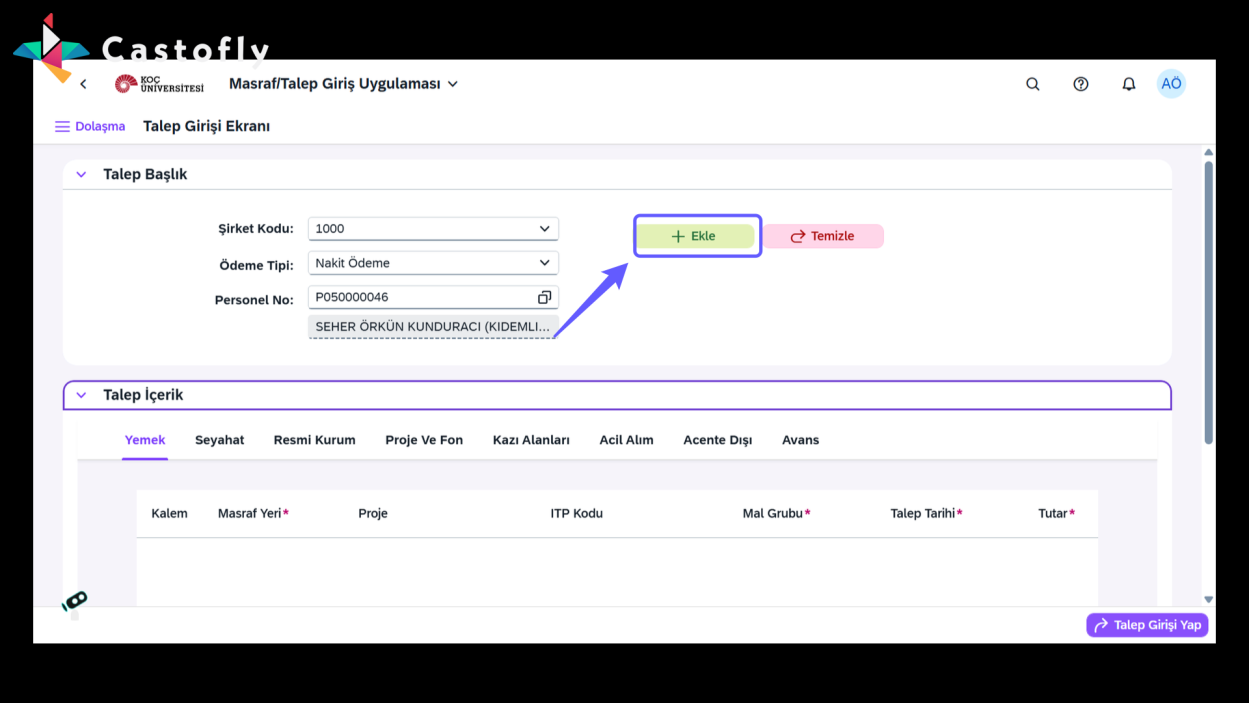
7. Add a New Request
-
Click the '+ Add' button to add a new request. (Select the relevant category based on your expense type and continue entering the request details — Meal, Travel, Emergency Purchase, etc.)
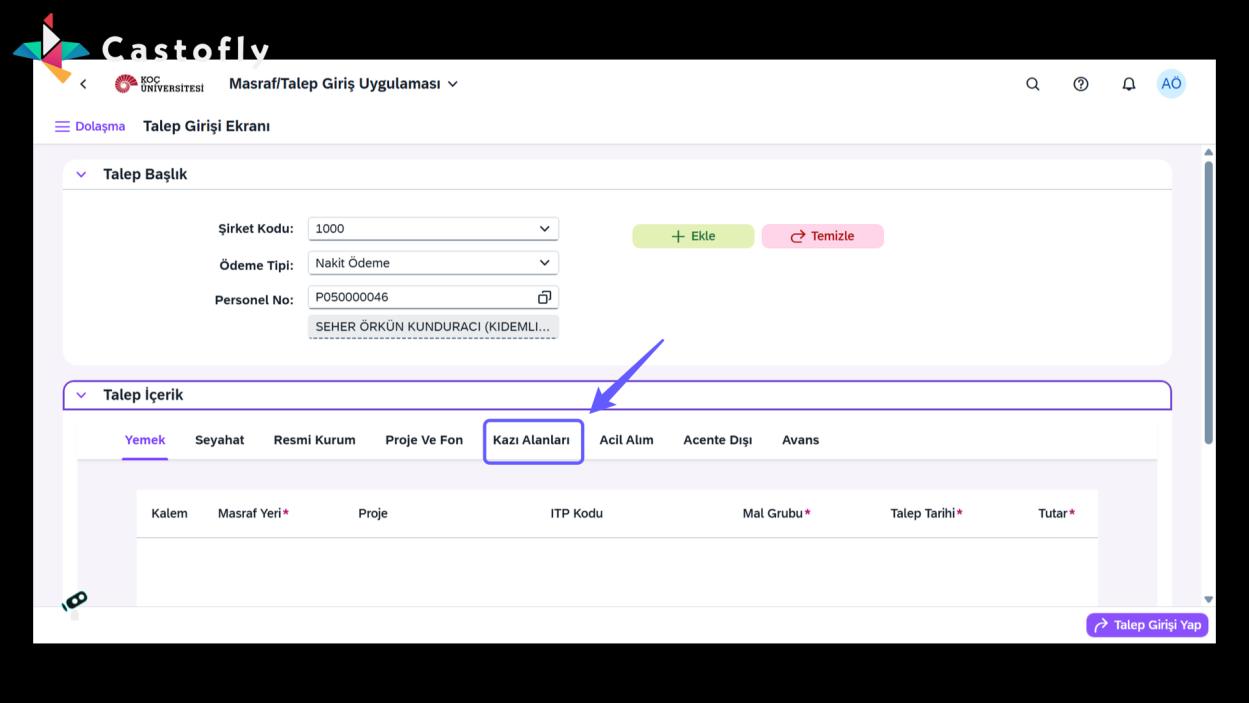
8. Excavation Site Expenses
-
Enter all expenses made for excavation sites by selecting a WBS element under the "Excavation Sites" category.
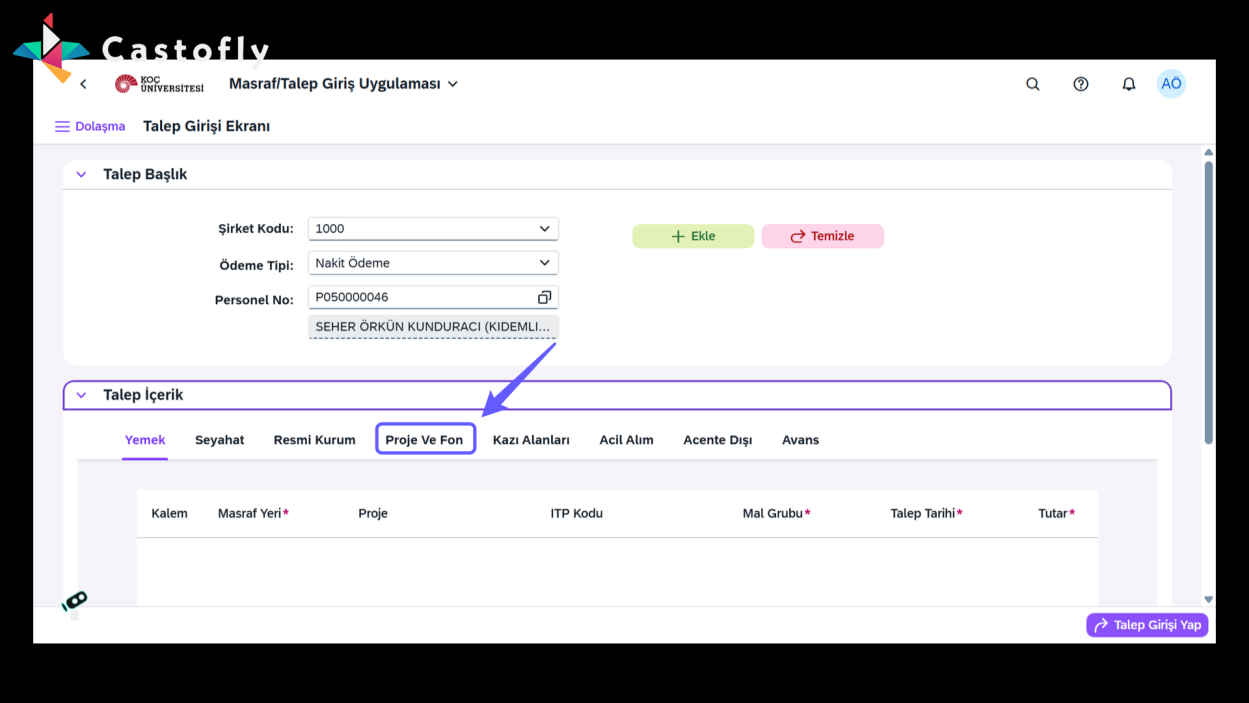
9. Project and Fund Expenses
-
Enter all your WBS-related expenses other than excavation site expenses under the "Project and Fund" category.
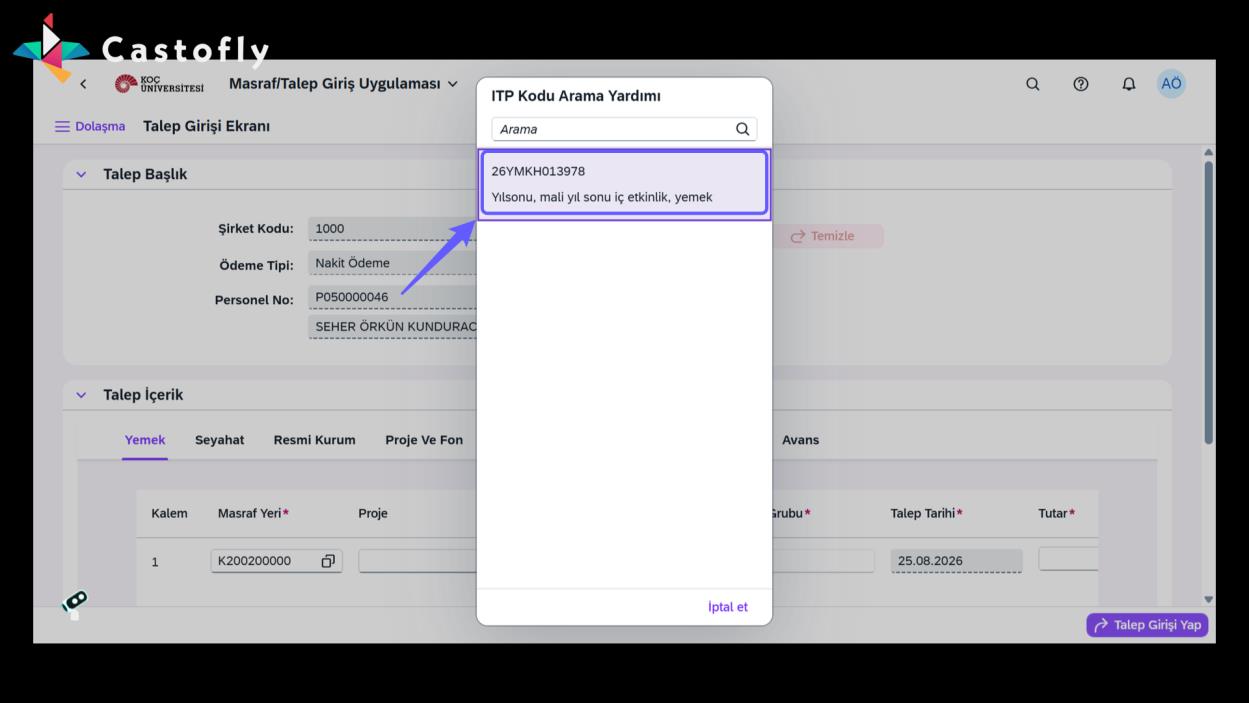
10. Filling In Request Details
-
Fill in the WBS Code, Request Date, Expense Amount, and other required information completely.
11. Adding Other Expenses
-
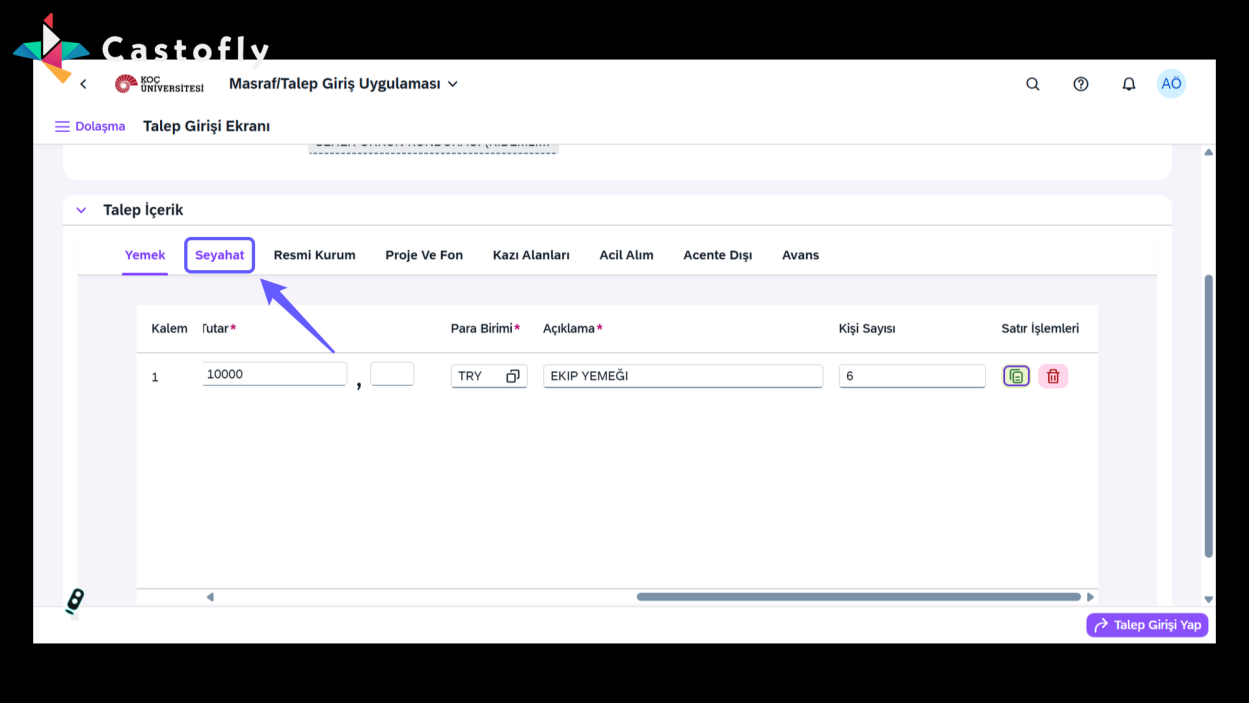
If you have expenses belonging to more than one category, you can continue entering them by switching to the other tabs.
12. Add New Request
-
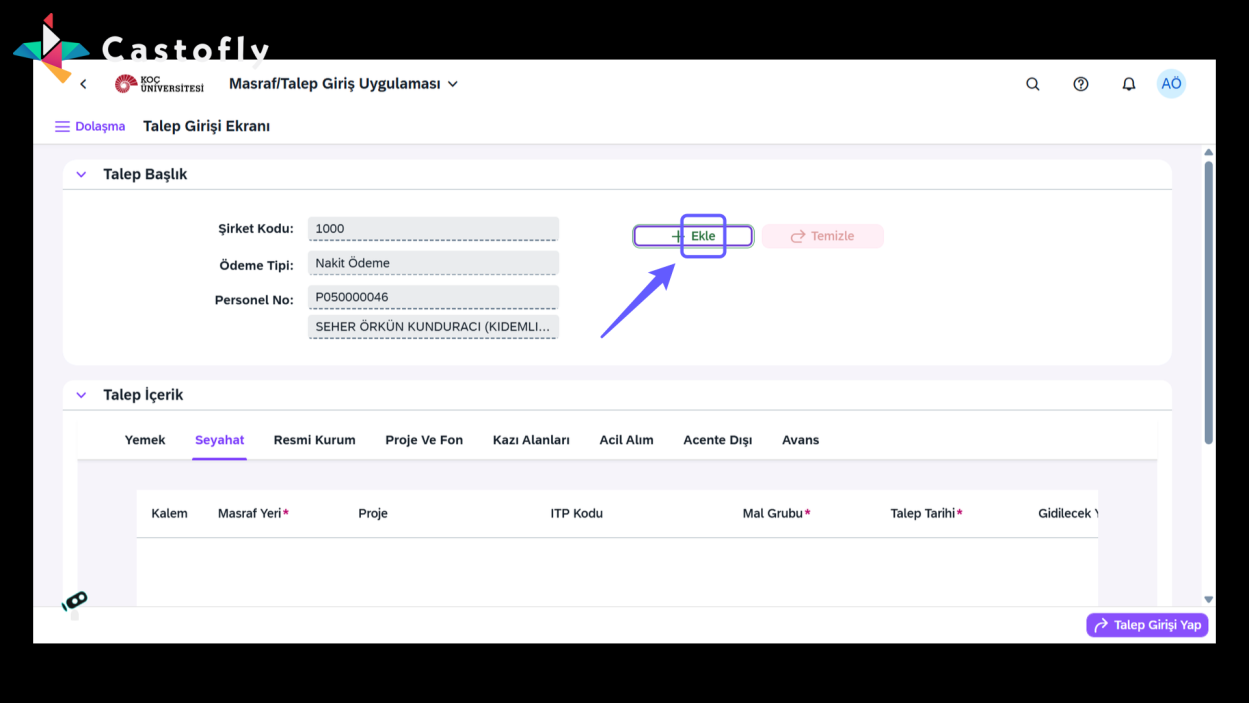
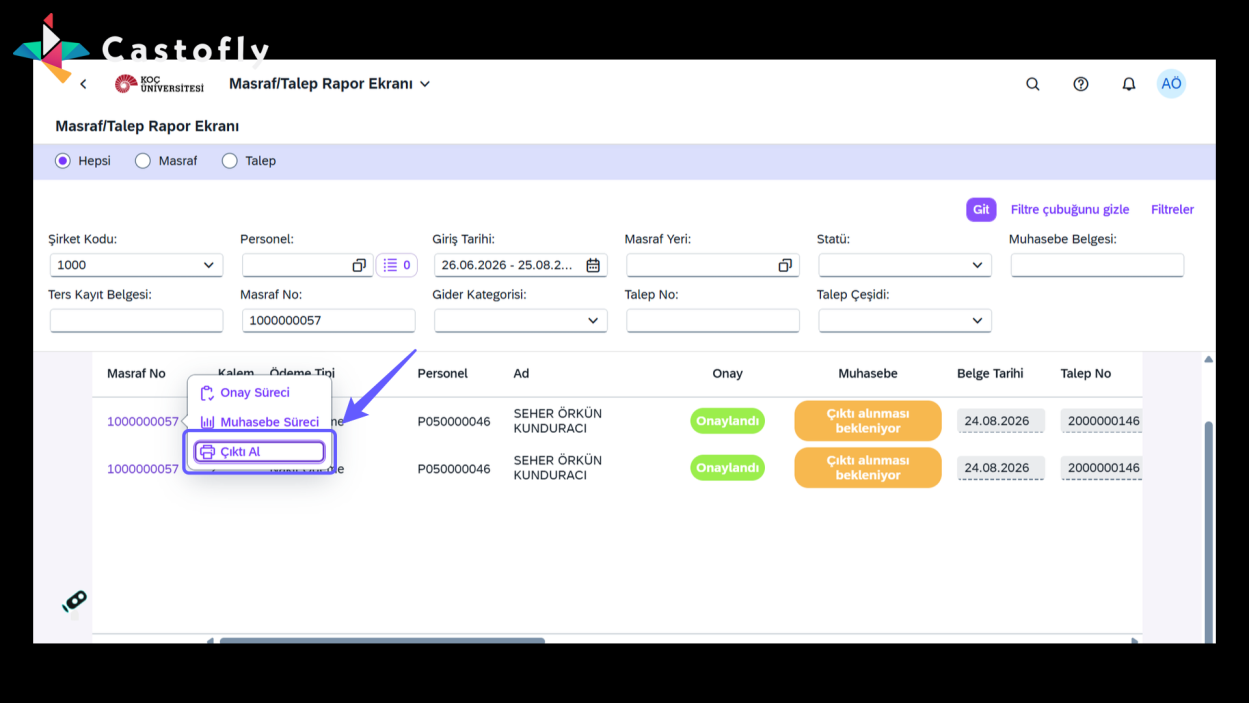
Click the 'Add' button to create the request.
13. Complete the Request Entry
-
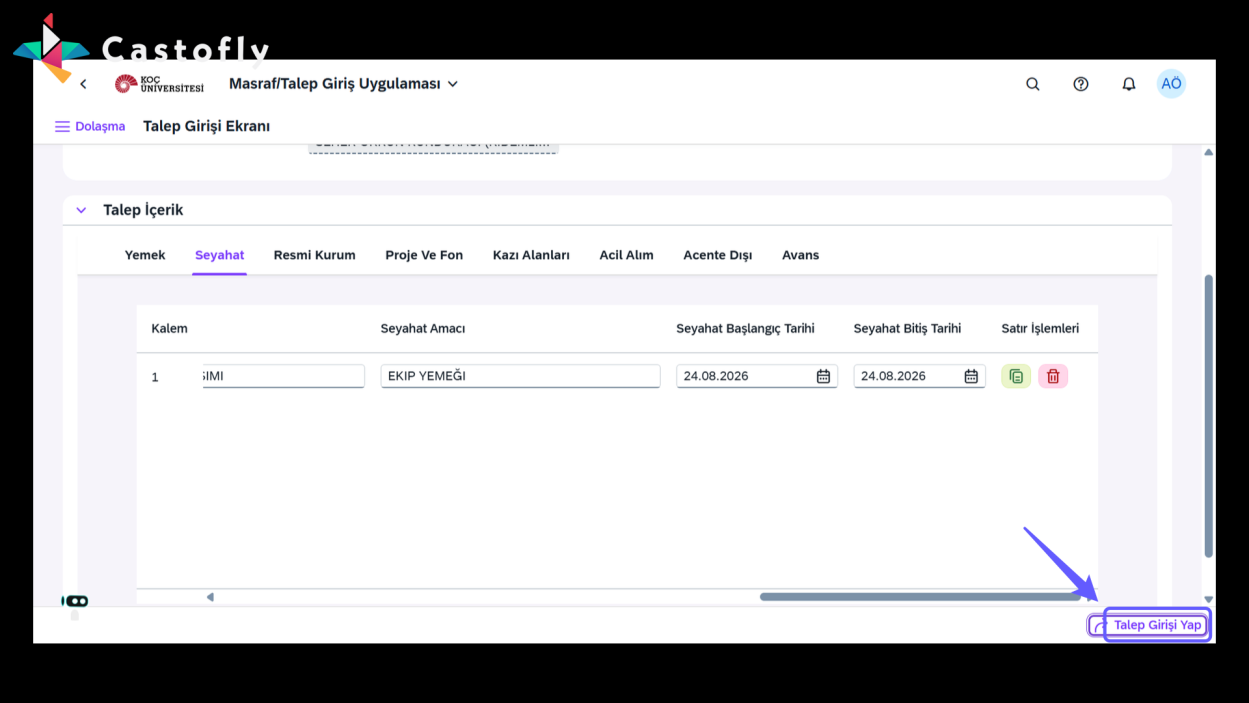
After filling in all the data completely, click "Submit Request" to create your Expense Request.
14. Request Entry Successful
-
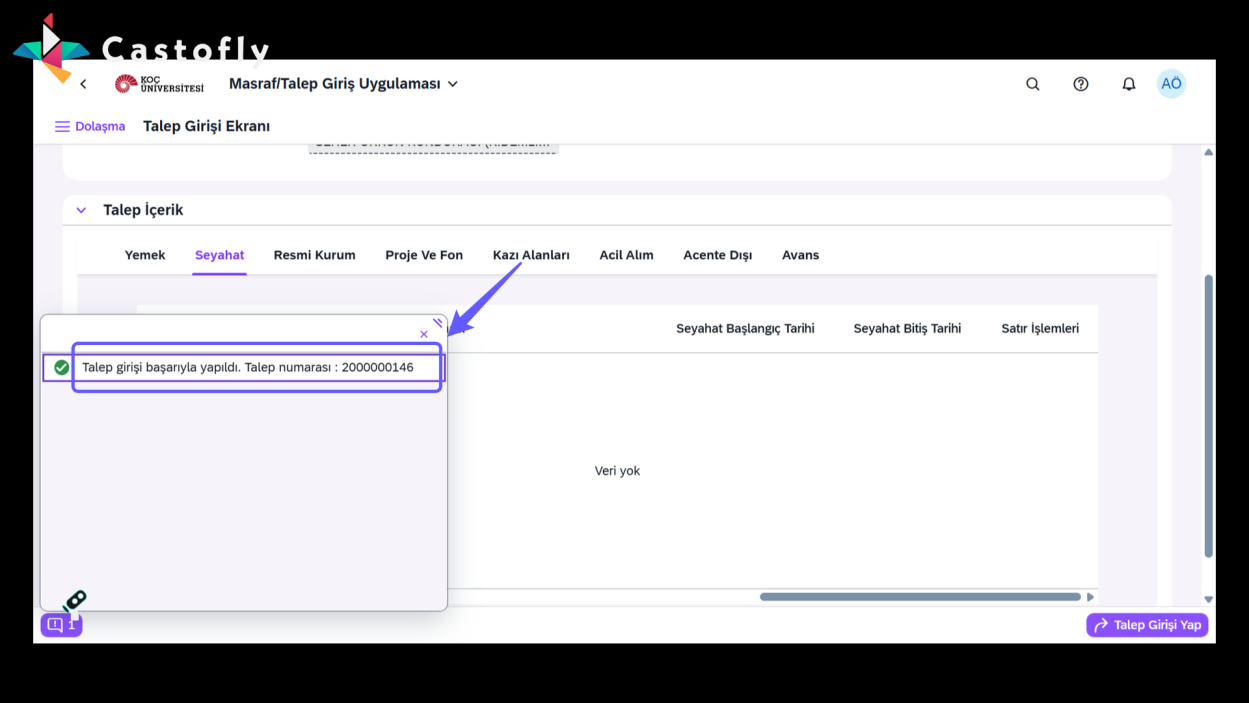
You can view your request number via the button in the bottom-left corner; if an error occurs, you can also view the error note there.
15. Converting the Request into an Expense
-
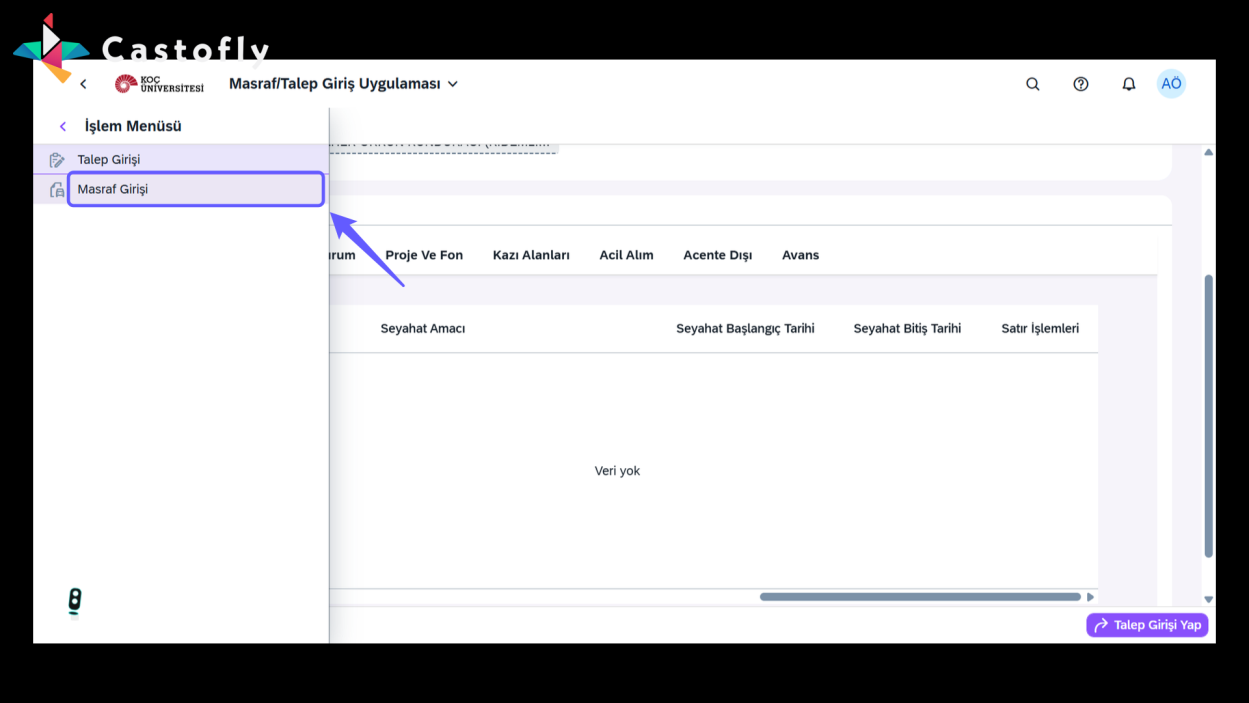
After your request is created, go to the Action Menu and follow the "Expense Entry" step.
16. Filling In Expense Header Data
-
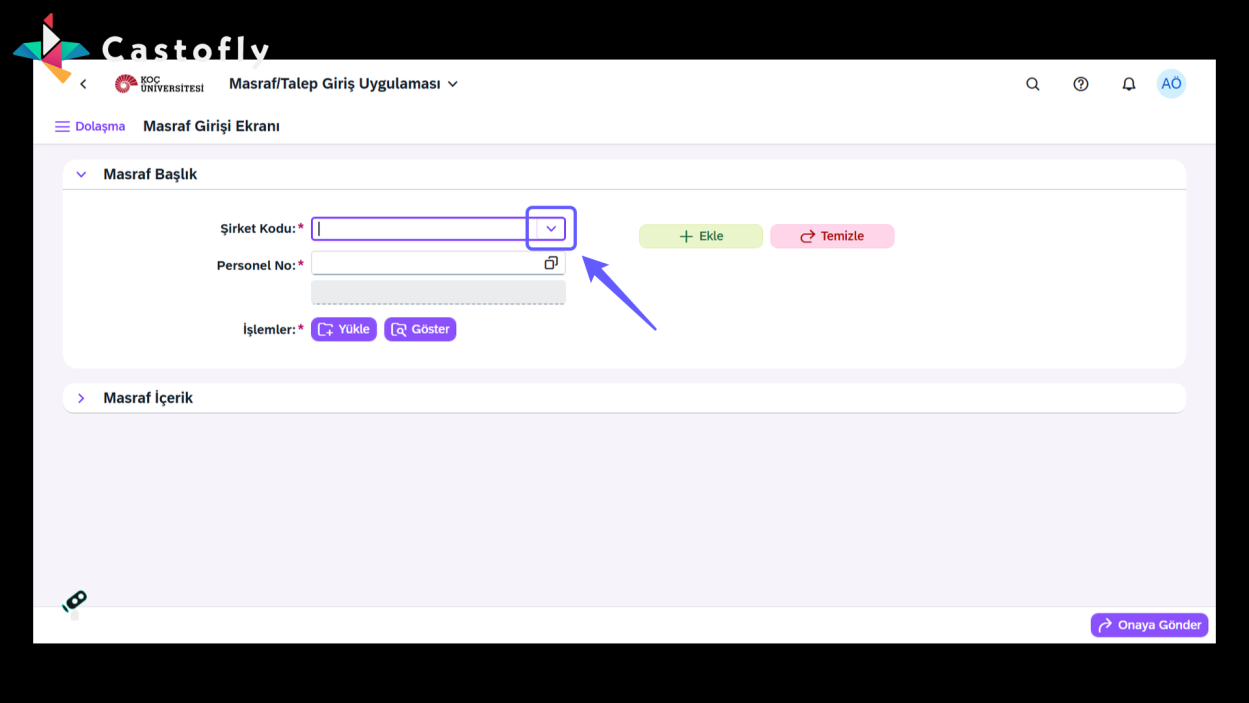
Fill in the Company Code and Personnel No fields.
17. Uploading Expense Documents
-
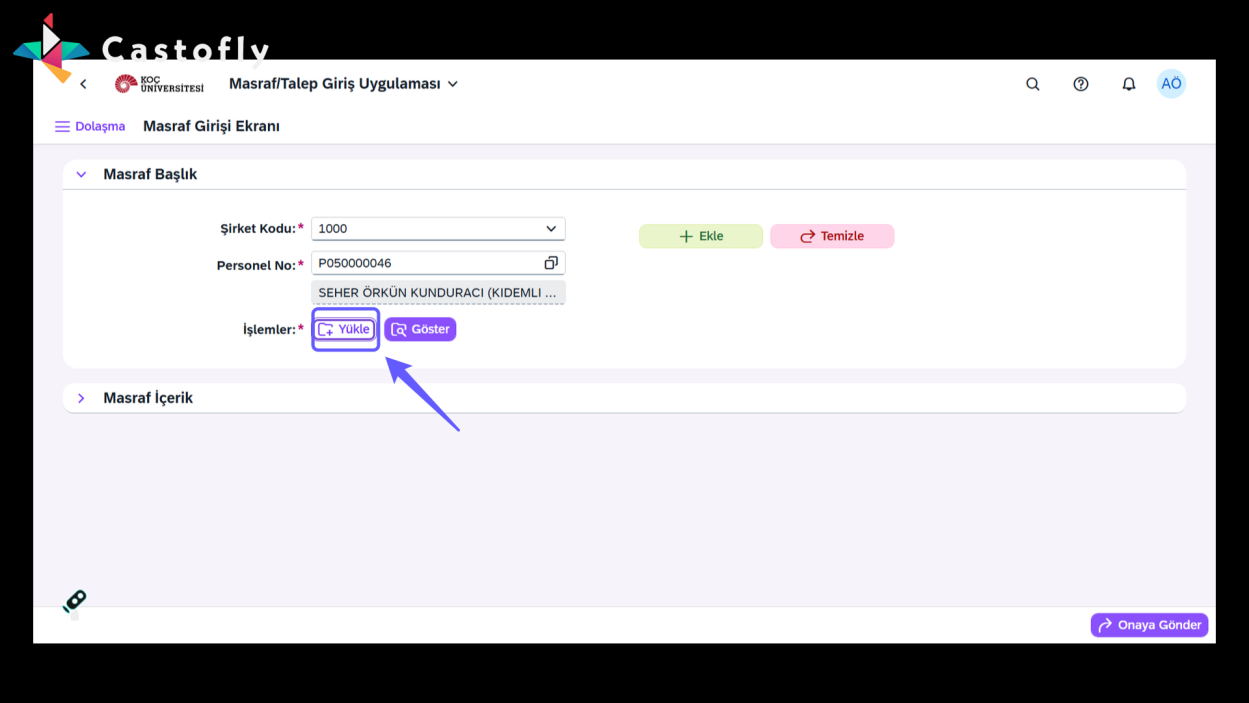
Add your supporting documents by clicking the "Upload" button.
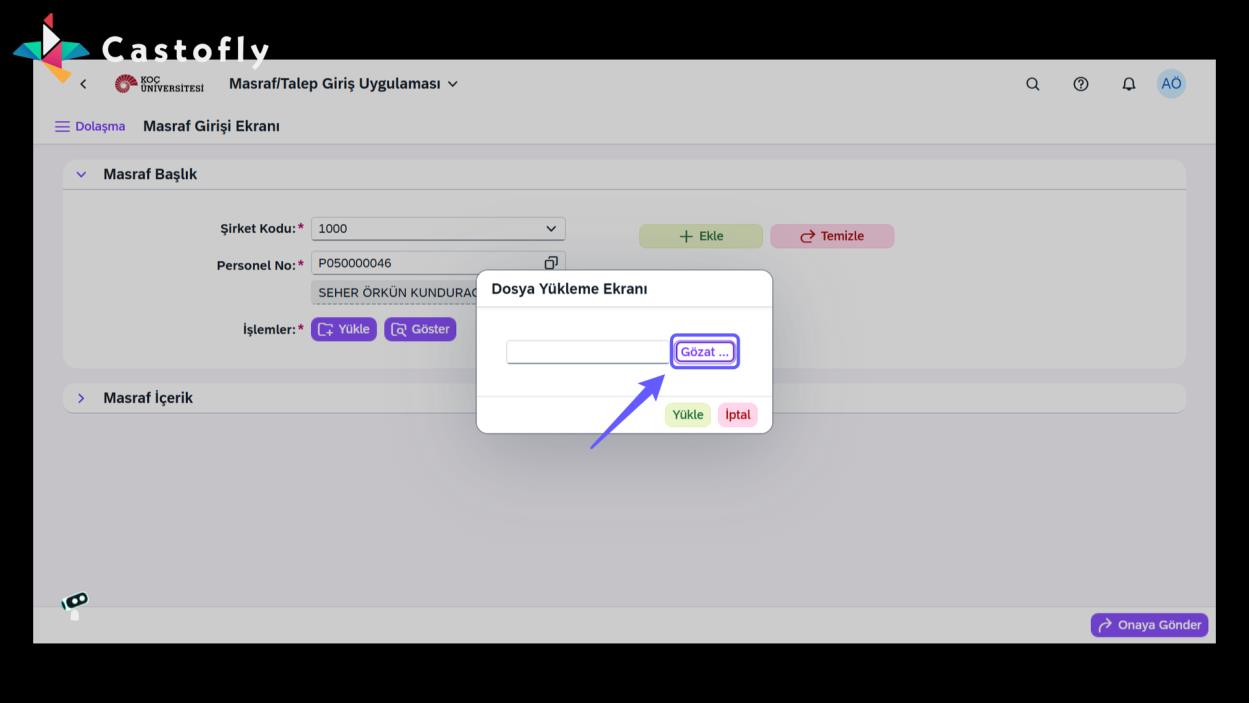
18. File Selection
-
Click the "Browse" button to select the file you want to upload.
19. File Upload
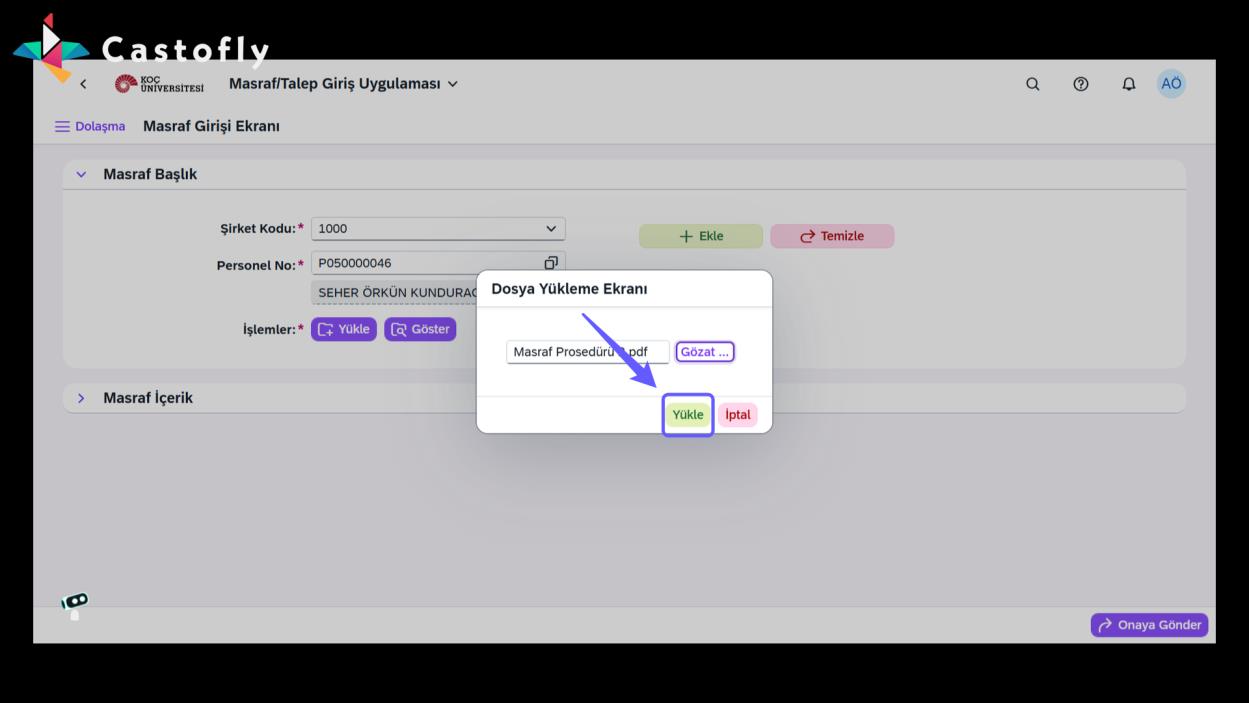
-
Click the 'Upload' button to upload the file.
20. Add a New Expense Line
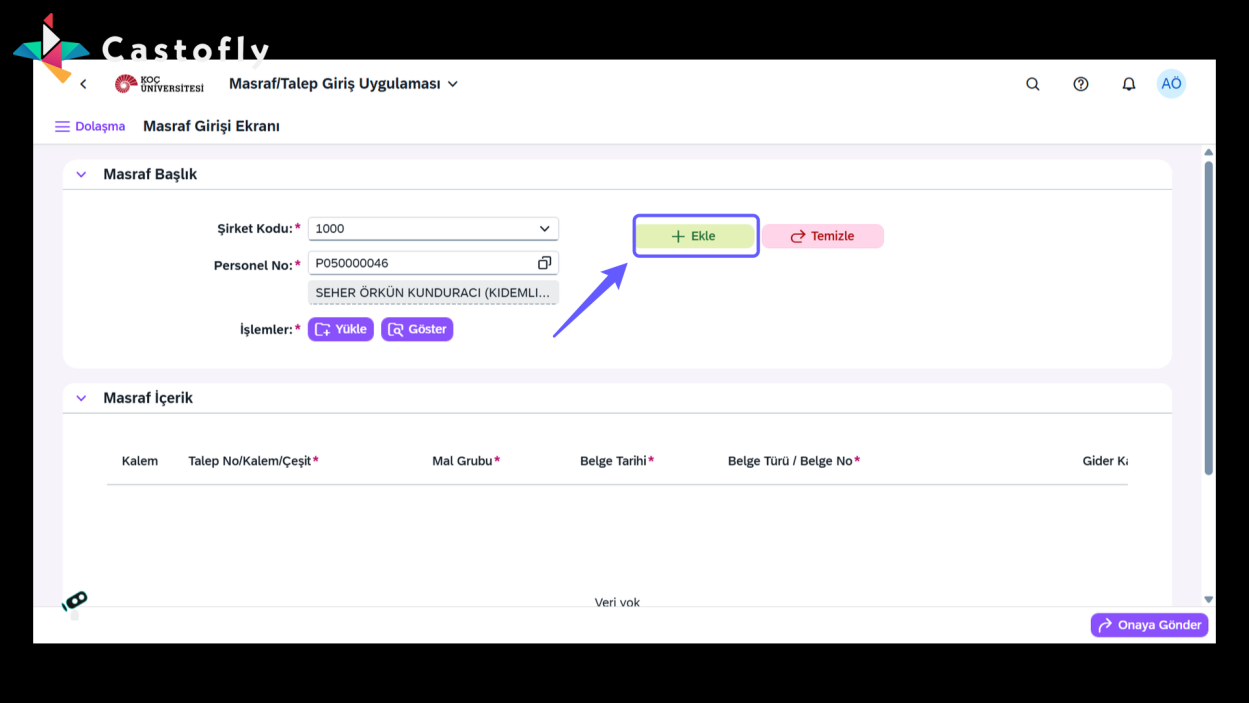
-
Click the "+ Add" button to add a new expense line.
21. Entering Expense Details
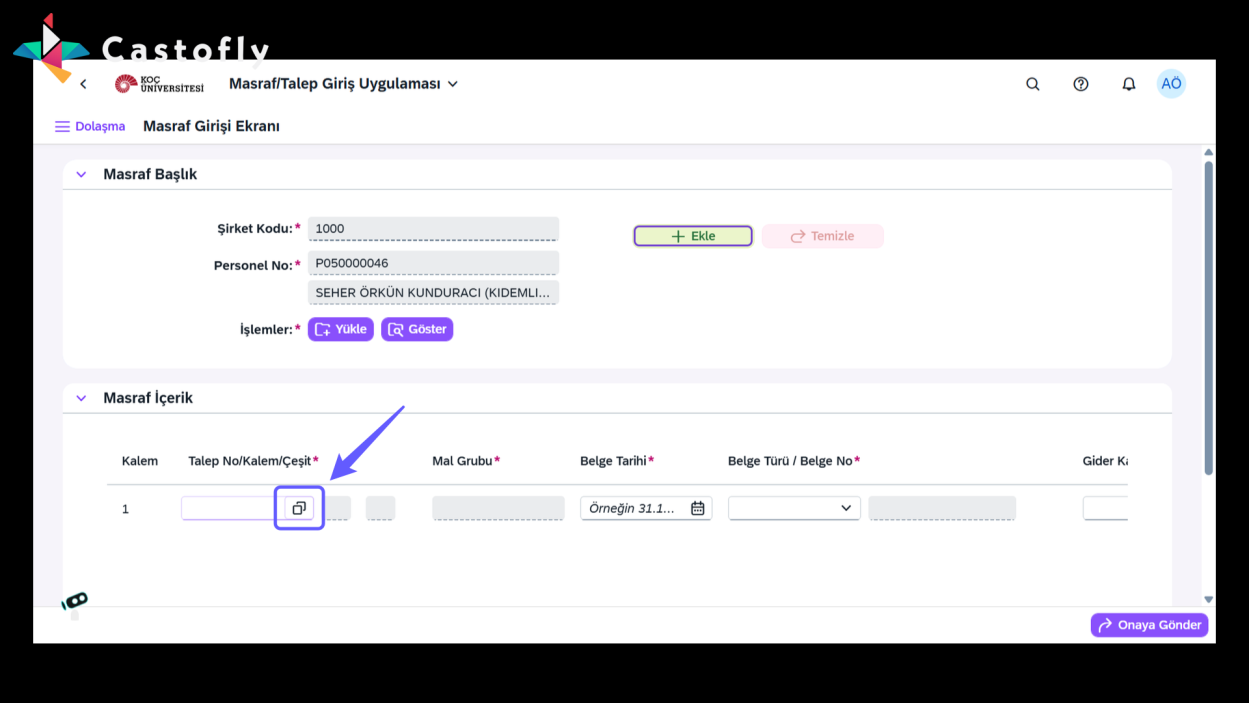
-
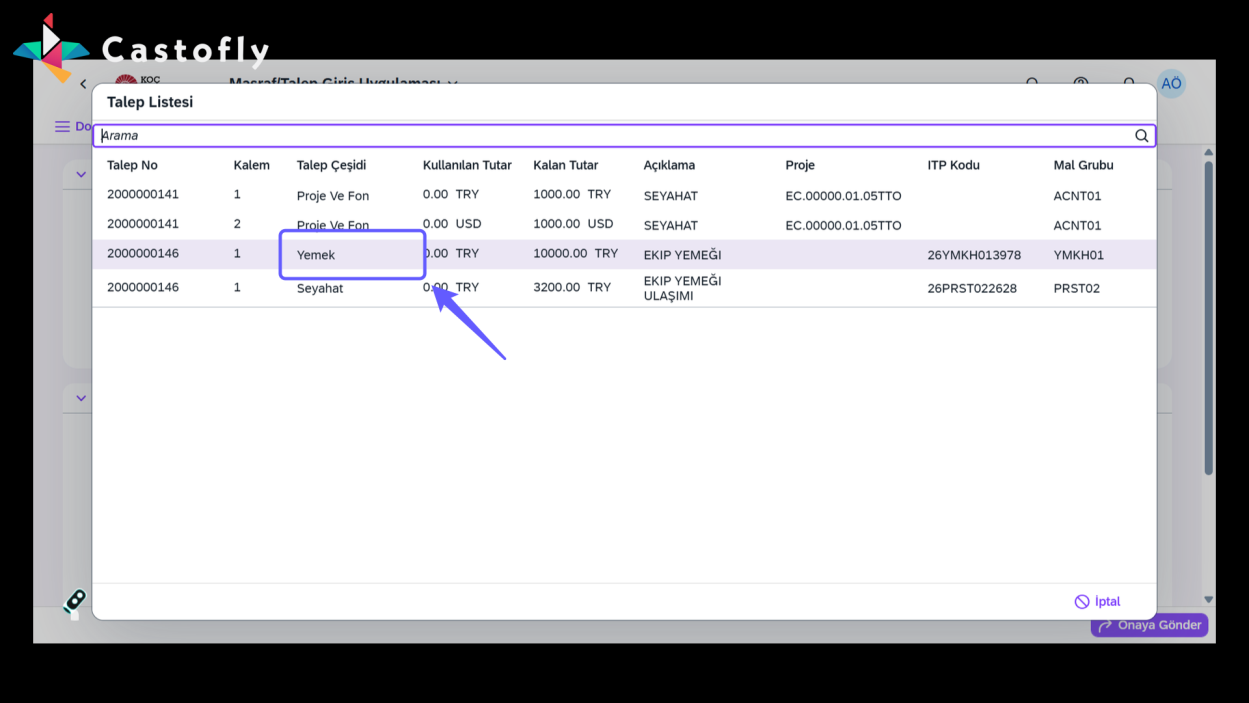
Select the expense requests you created from the Request No field.
-
From the Request No field, you can view all Expense Requests created for the relevant personnel. Continue by selecting the line you want to enter as an expense.
22. Enter the Document Date
-
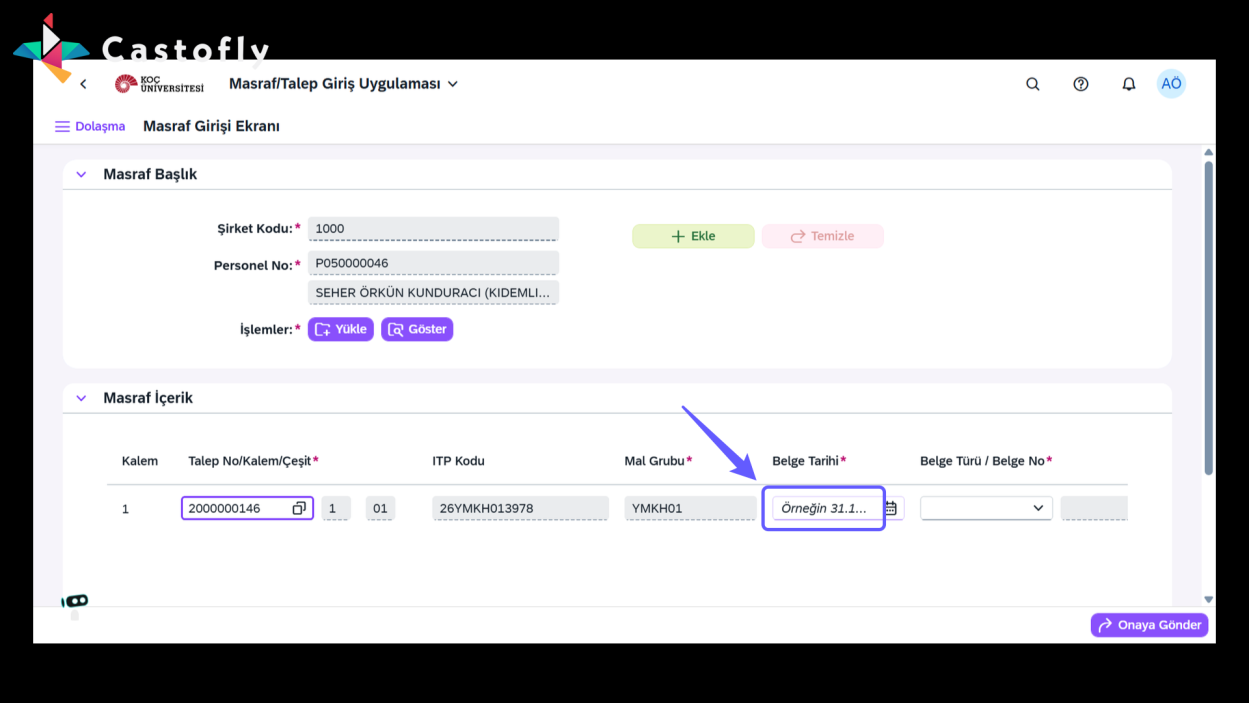
Enter the document date in the relevant field.
23. Select Document Type
-
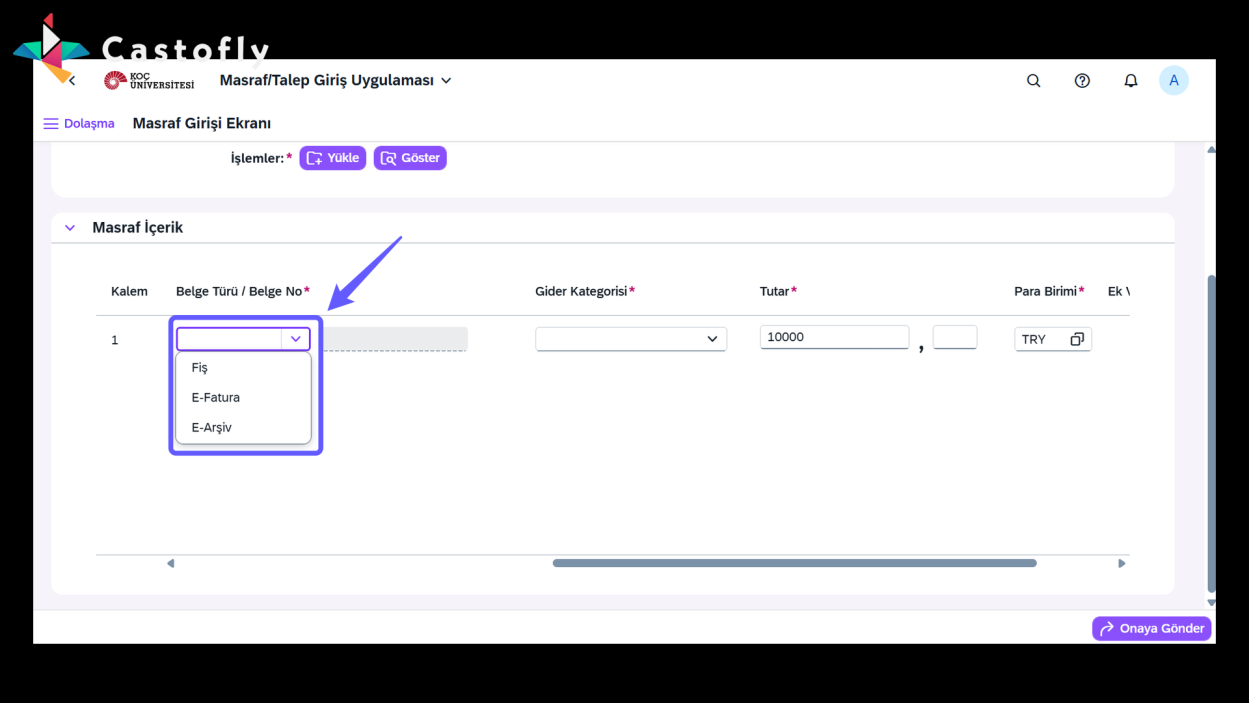
Select your document type and enter the document number completely in the field next to it.
24. Select Expense Category
-
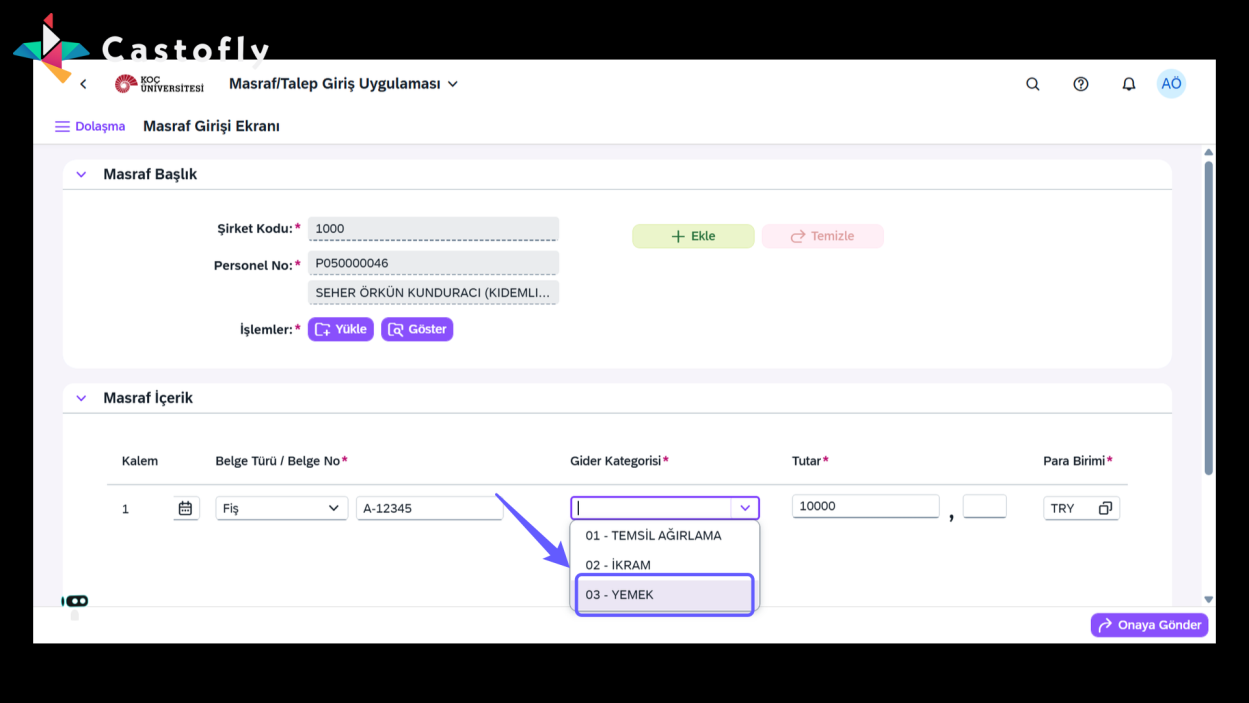
Click the drop-down menu in the Expense Category field and select the appropriate category.
25. Adding Content
-
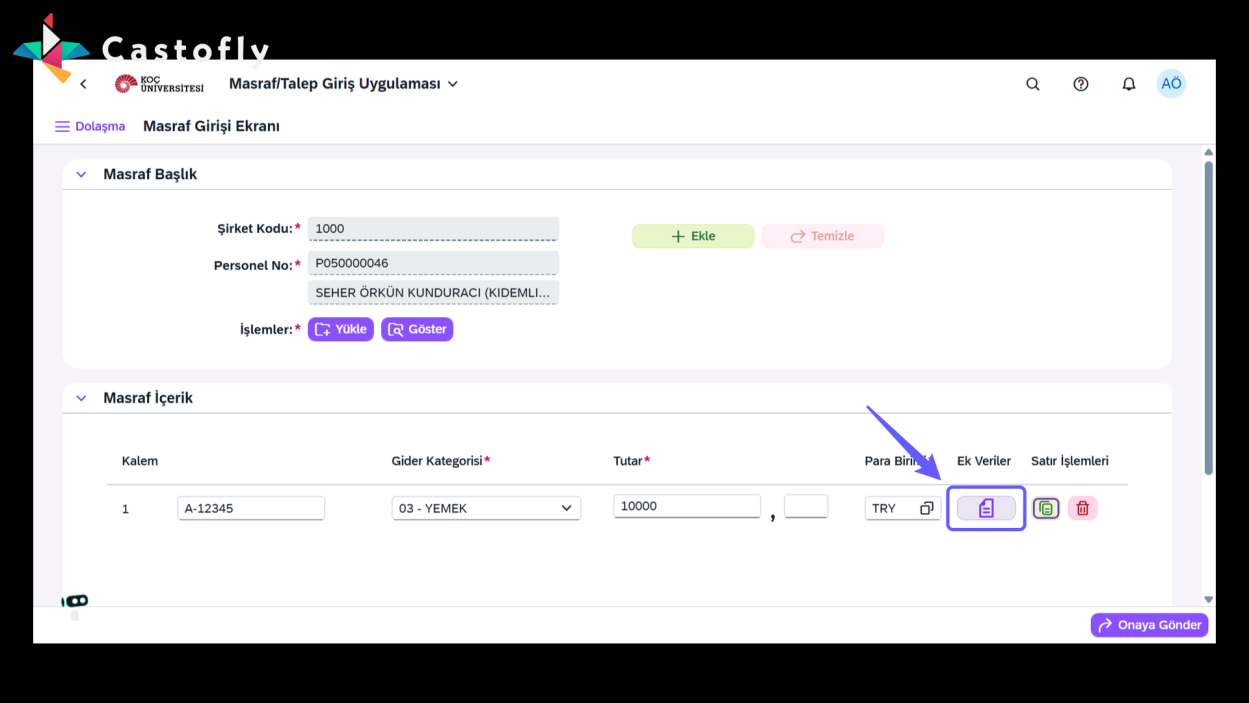
After entering the expense details, click the "Additional Data" button.
26. Fill in the Description Field
-
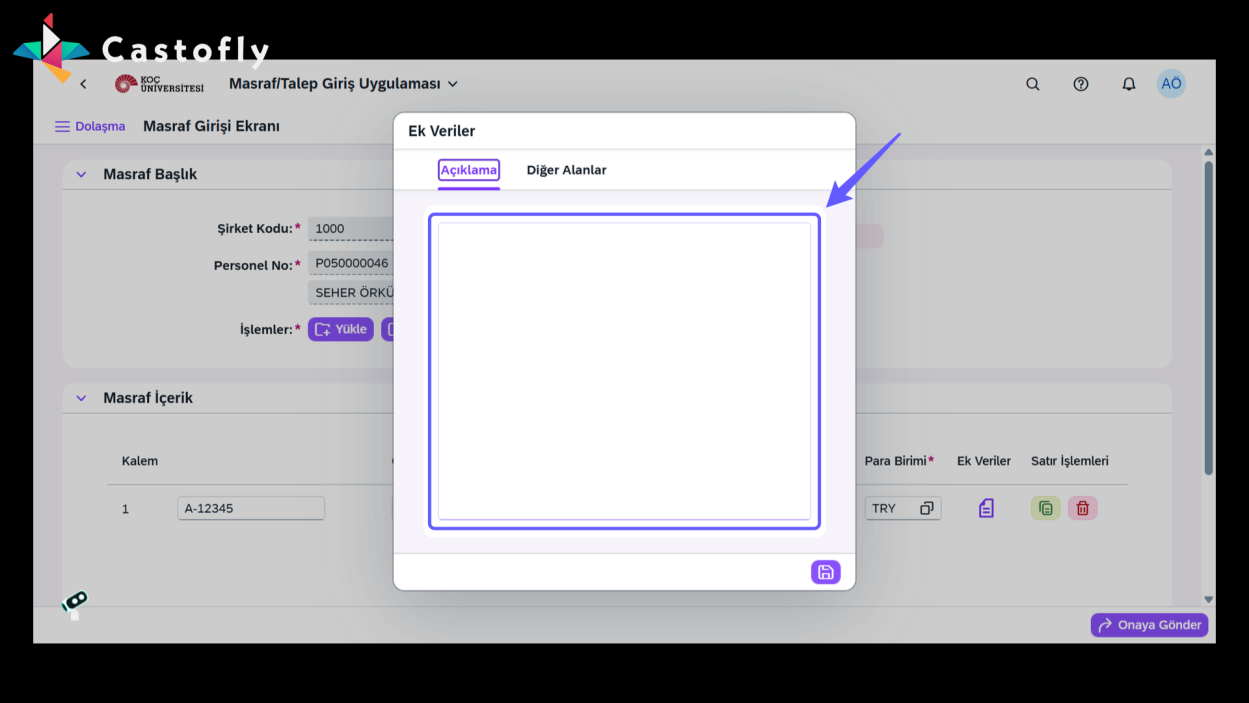
Enter the required information in the description field under the Additional Data tab.
27. Select Other Fields
-
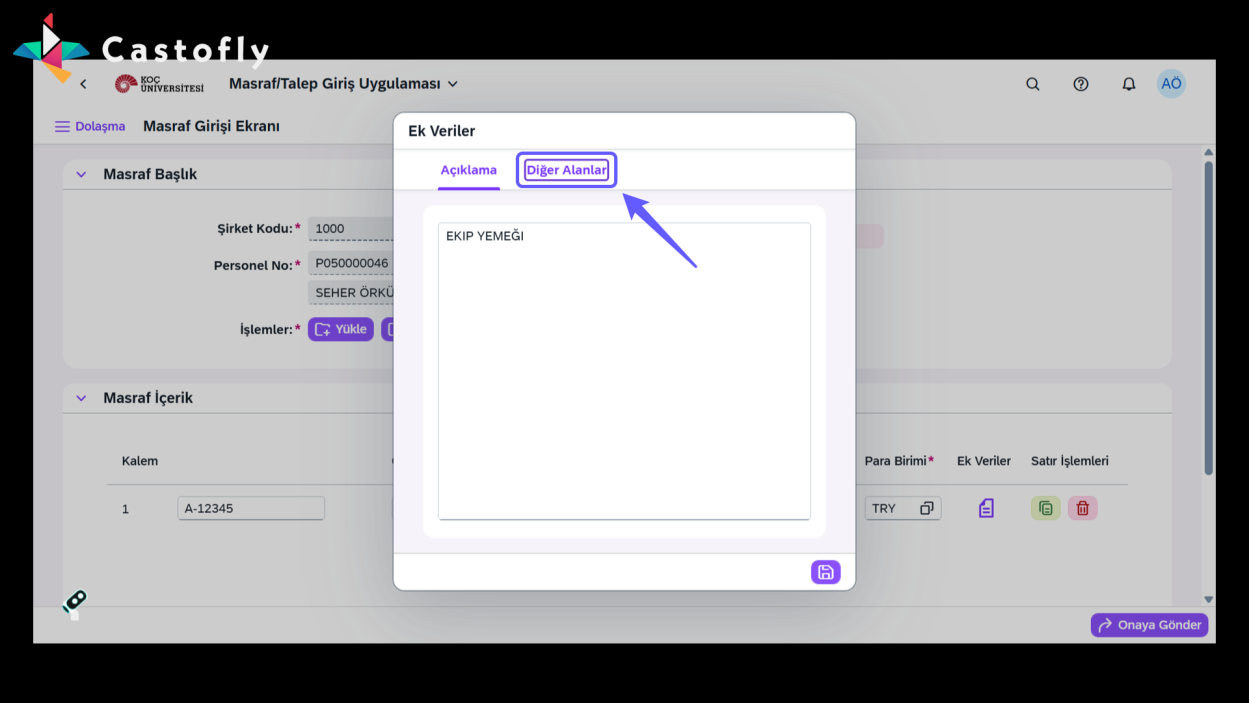
Click the "Other Fields" tab.
28. Select the Tax Indicator
-
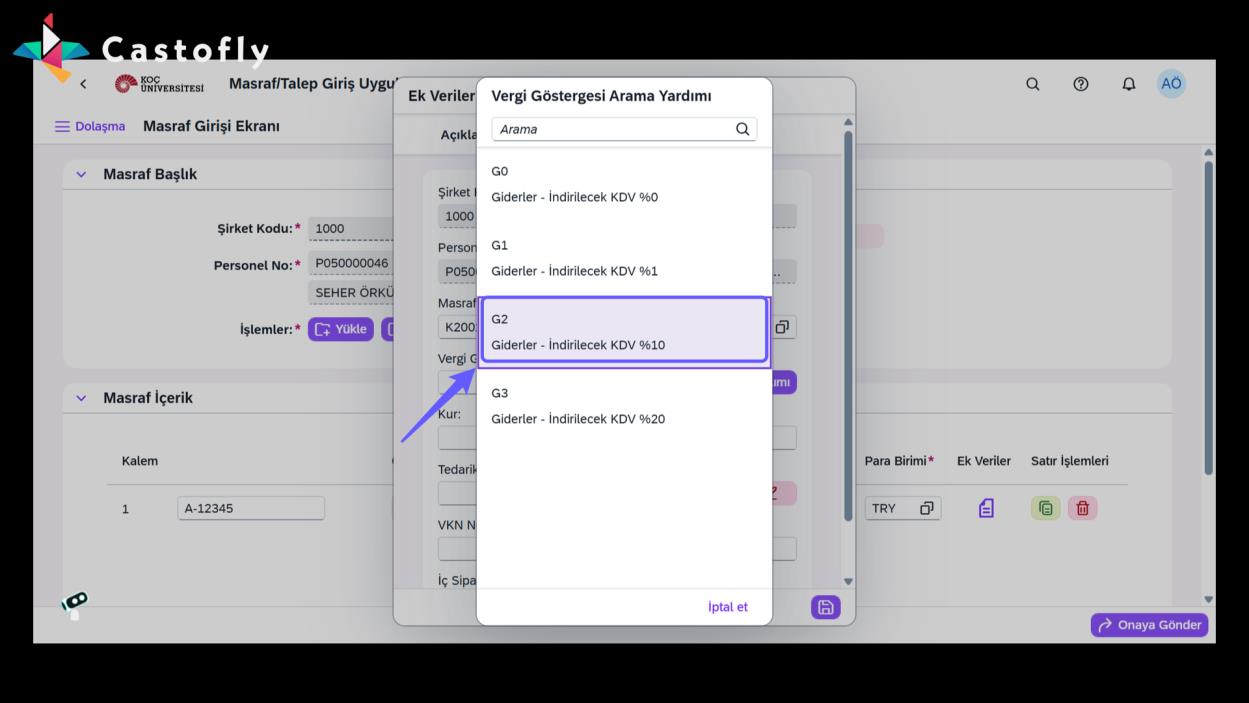
Select the VAT rate for your document from the Tax Indicator field. Then click Save and close the screen.
29. If Your Expense Document is an E-Invoice
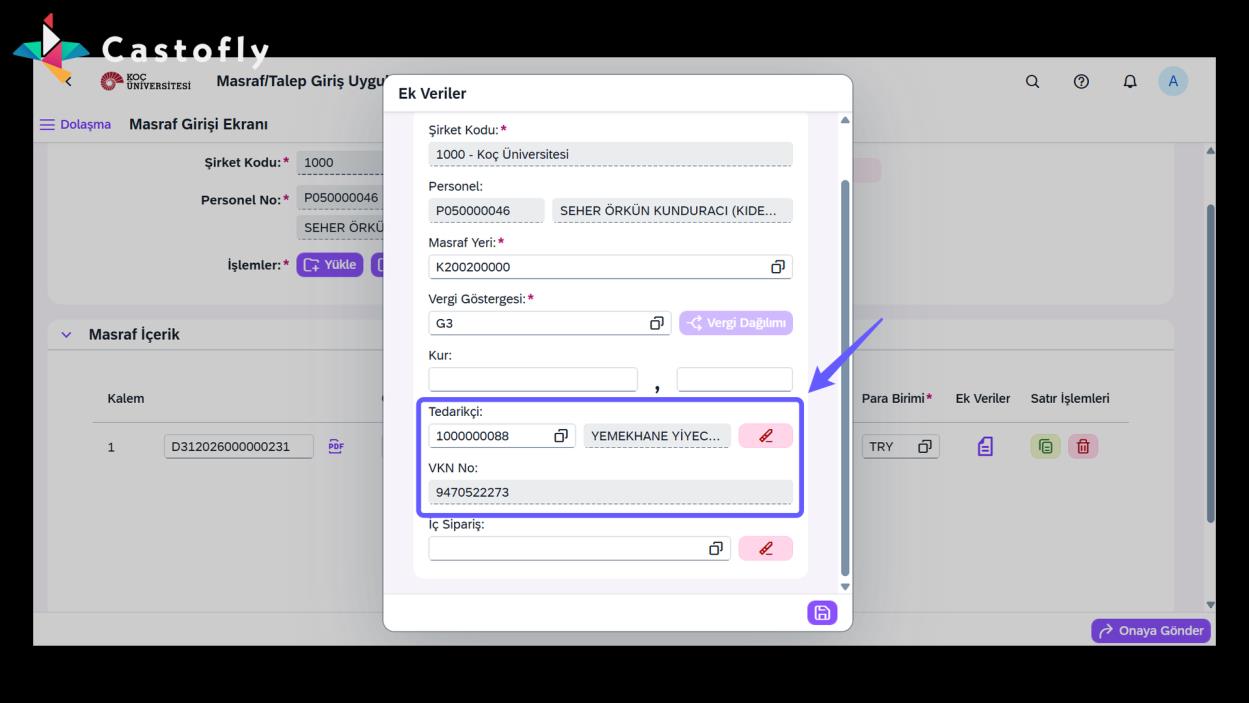
-
Select the vendor from the Supplier field under Additional Data. If you cannot find the vendor code, it is sufficient to fill in the Tax ID (VKN) field.
30. Add Expense
-
Click the 'Add' button to enter a new expense line and add any additional expenses.
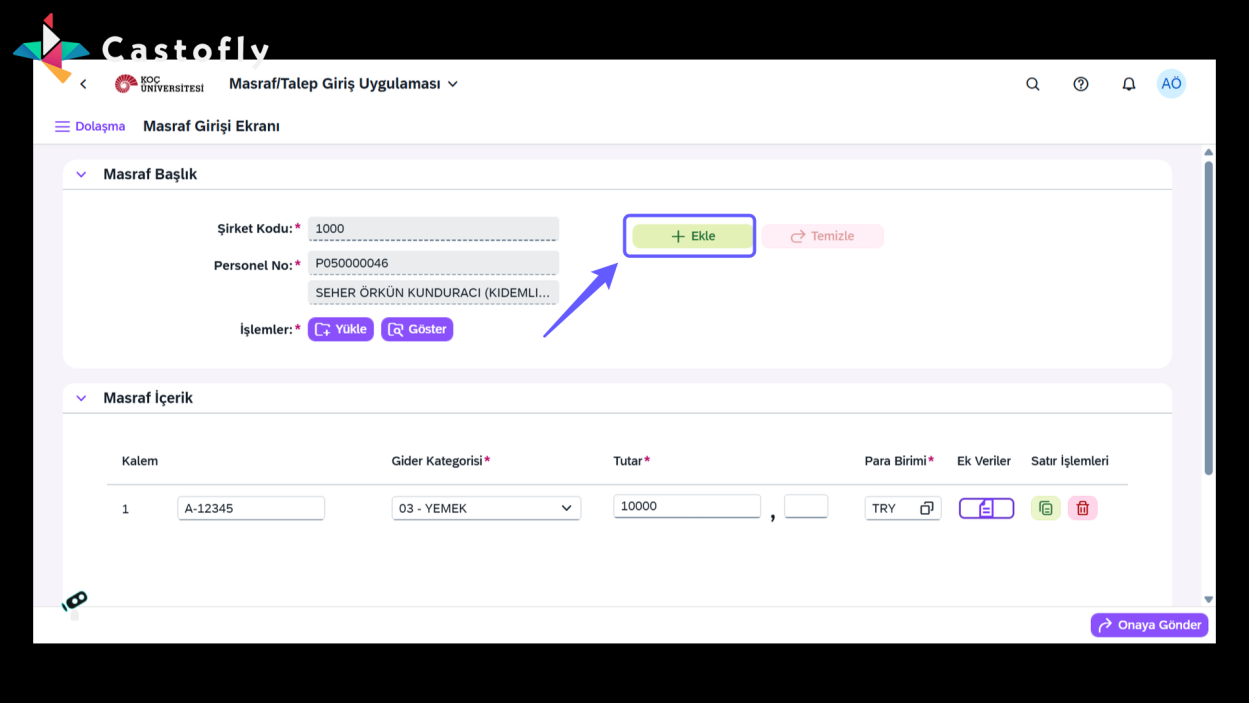
31. Submit for Approval
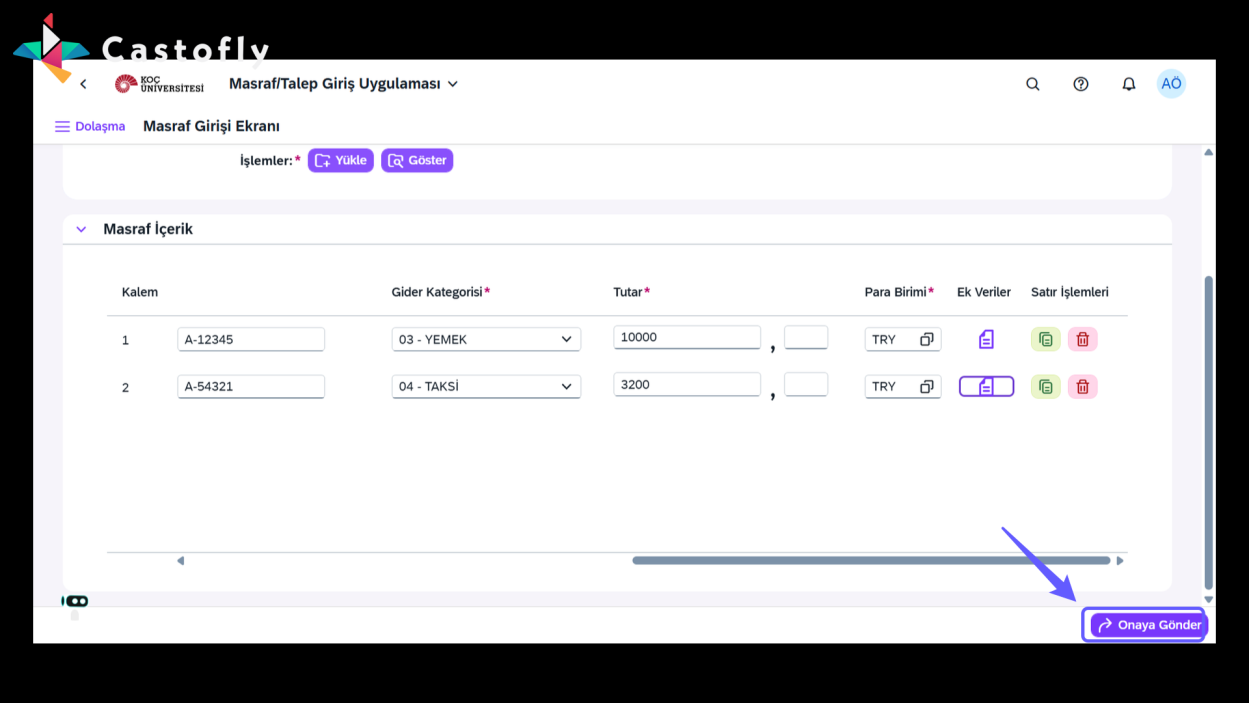
-
After entering all your expenses, click the "Submit for Approval" button in the bottom-right corner to create your Expense Document and send it for approval.
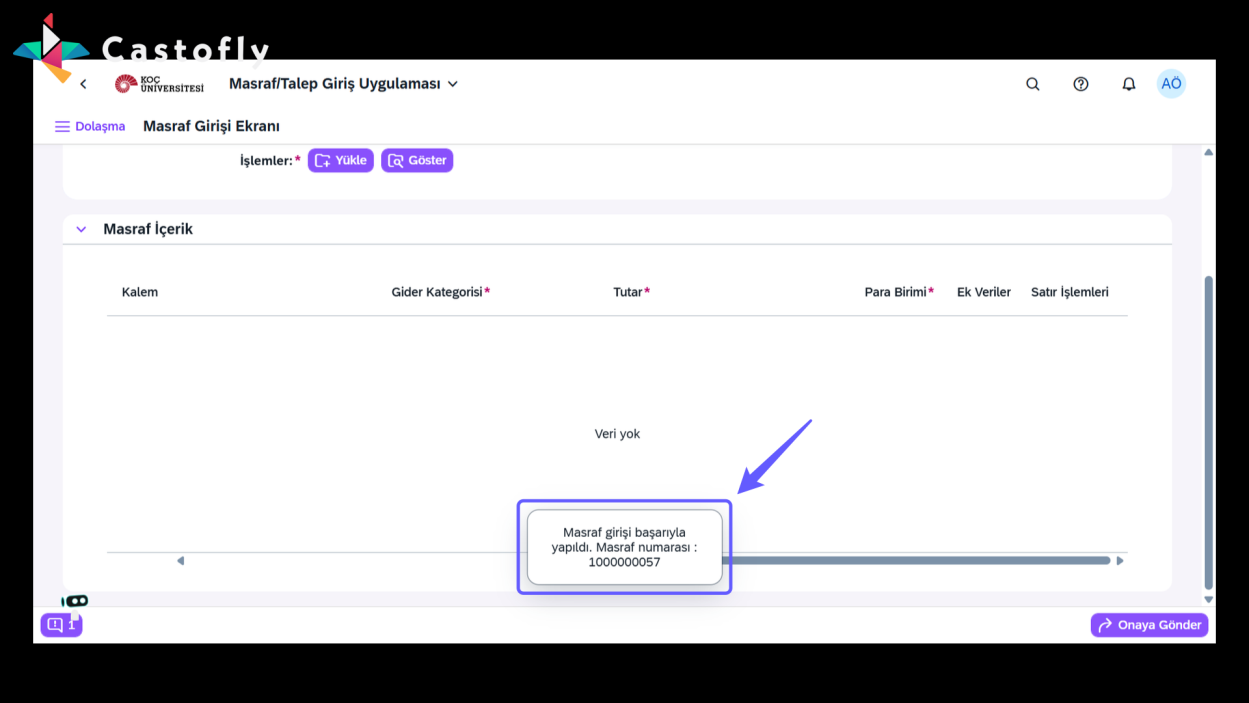
32. Finding Your Expense Number
-
You can see your expense number in the pop-up that appears on screen, and also via the button in the bottom-left corner.
33. Expense Request Report
-
You can view the approval status of your created expense documents by going to the "Expense Request Report" section on the home screen.
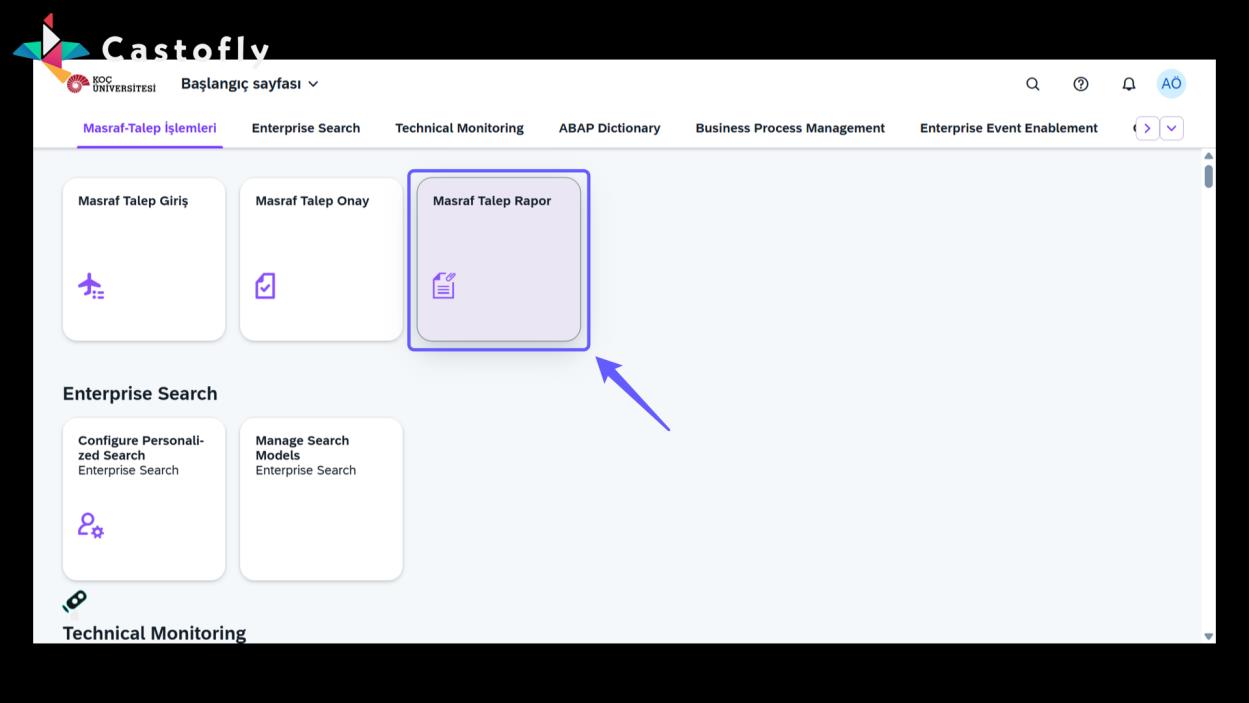
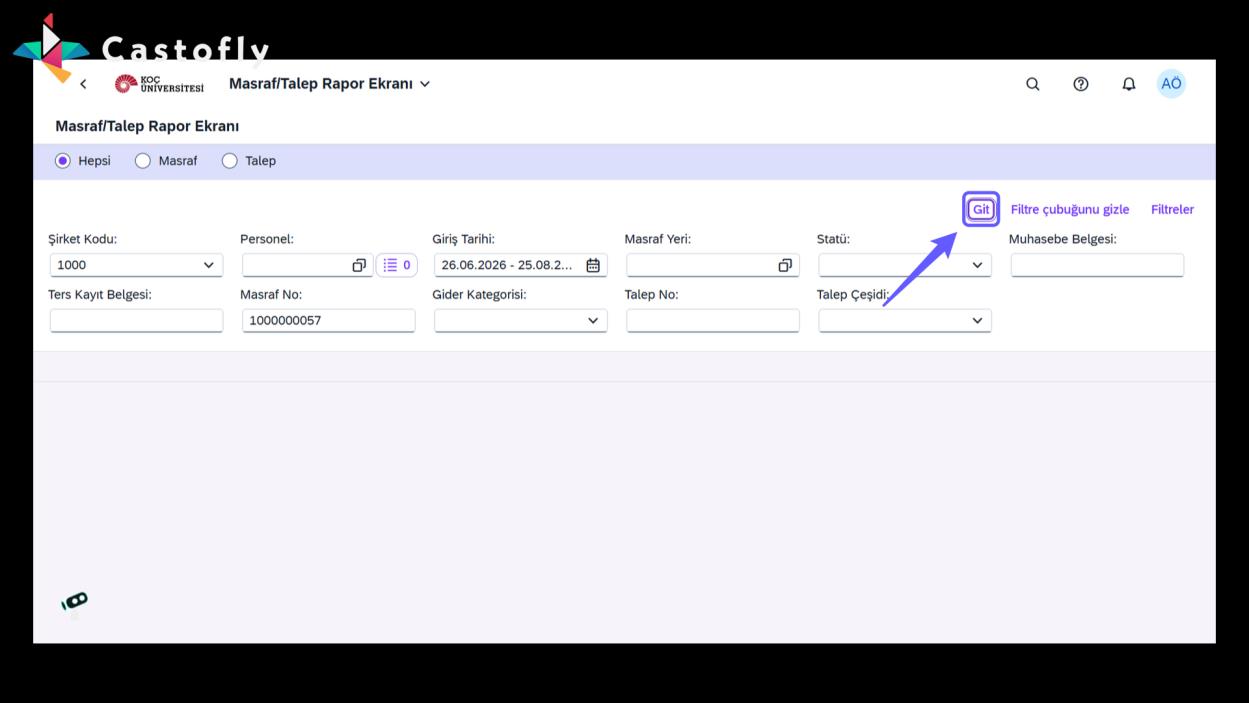
34. Listing Expense Documents
-
Enter details such as Company Code and Personnel No, then click the "Go" button.
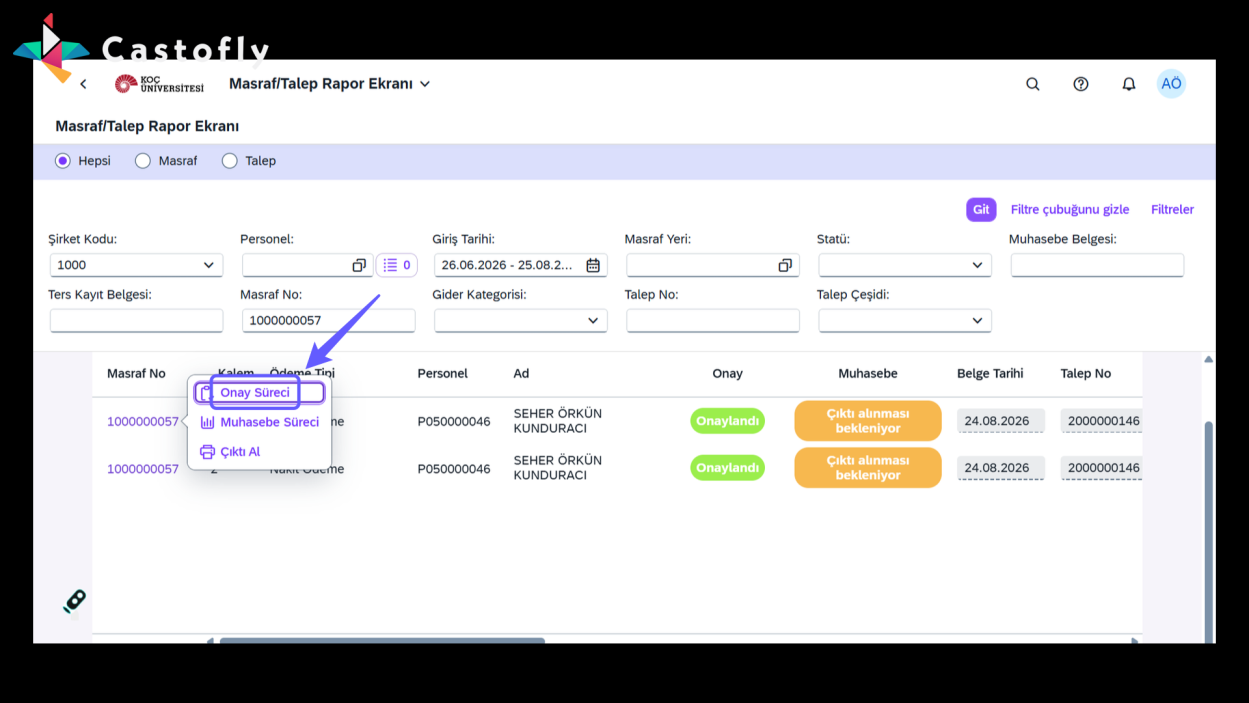
35. Viewing Document Status
-
Click the "Approval Process" button on your expense number to view its approver and approval time.
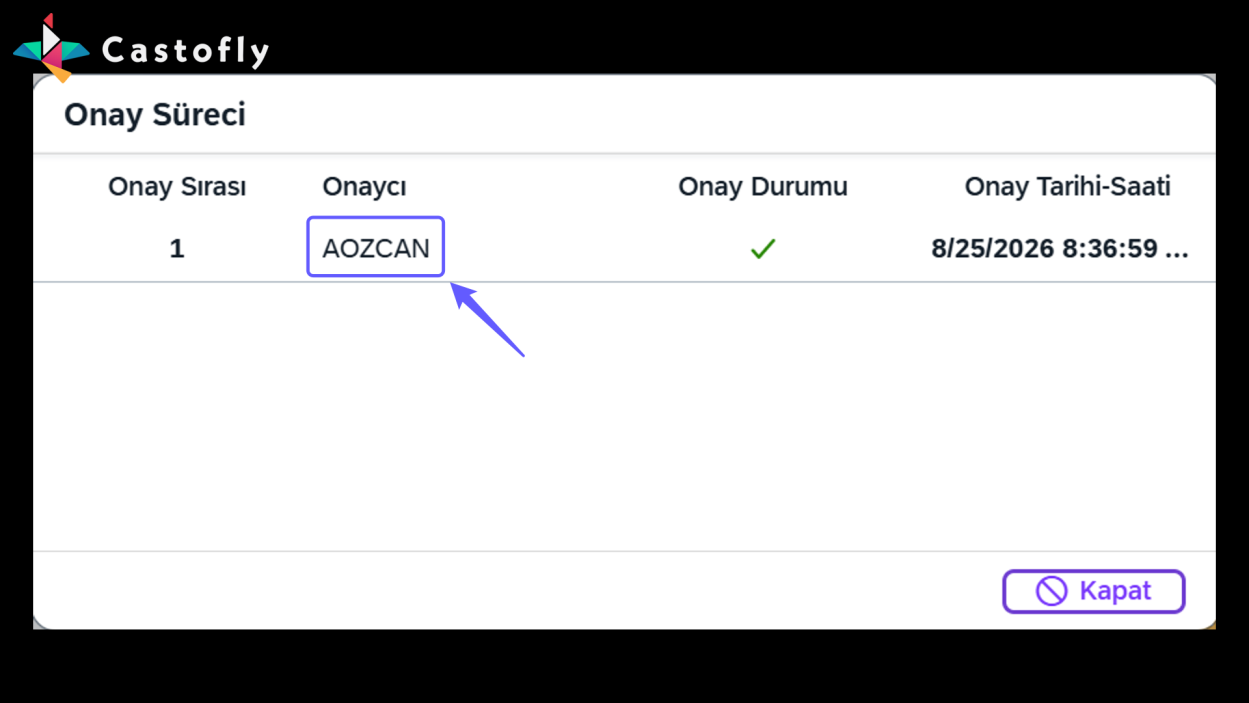
36. Viewing the Approval Process
-
The window shows the approval order, approver, approval status, and approval date/time.
37. Retrieving the Expense Printout
-
For approved expenses, click the "Print Output" option to print your expense form and forward it, together with your physical documents, to the Financial Affairs department.
Masraf Talep Kapsamı
Masraf taleplerinin ilgili prosedürlere uygun şekilde değerlendirilebilmesi için, talep oluşturulmadan önce harcamanın niteliğine uygun talep türü ve gider türünün seçilmesi gerekmektedir.
Prosedüre uygun olarak değerlendirilen ve gerekçelendirilmesi zorunlu olan alımların, talep / gider eşleşmelerine ilişkin genel liste Masraf Talep Kapsamı dokümanında yer almaktadır. Talep oluşturulmadan önce ilgili dokümanın incelenmesi ve harcamanın bu dokümanda belirtilen kurallara uygun olarak kategorize edilmesi önemle rica olunur.
1. Masraf Talep Girişi
-
İlk olarak harcamalarınızın girişi için "Masraf Talep Giriş" butonuna tıklayın.
2. Talep Girişi Yap
-
"Talep Girişi" seçeneğini seçerek devam edin.
3. Şirket Kodu Seçimi
-
İlgili şirket kodunuzu seçerek devam edin.
4. Ödeme Tipi Seçimi
-
Ödeme Tipi menüsünden seçiminizi yaparak devam edin.
5. Personel Seçimi
-
Personel No menüsünden personeli seçin. (Kendi adınıza veya kendi biriminizdeki ekip arkadaşlarınız adına masraf talebi oluşturabilirsiniz.)
6. Talep İçeriğini Aç
-
Talep içeriğini görüntülemek için ok yönündeki simgeye tıklayın.
7. Yeni Talep Ekle
-
Yeni bir talep eklemek için '+ Ekle' butonuna tıklayın. (Yapmış olduğunuz harcama kategorisine göre ilgili kategorilerden birini seçin ve talep detaylarını girmeye devam edin. Örnek: Yemek, Seyahat, Acil Alım vb.)
8. Kazı Alanları Harcamaları
-
Kazı alanları için yapılan tüm harcamaları "Kazı Alanları" kategorisinden PYP seçerek girin.
9. Proje ve Fon Harcamaları
-
Kazı alanı harcamaları hariç kalan tüm PYP'li harcamalarınızı "Proje ve Fon" kategorisinden girin.
10. Talep Detaylarının Doldurulması
-
ITP Kodu, Talep Tarihi, Harcama Tutarı gibi bilgileri eksiksiz bir şekilde doldurun.
11. Diğer Harcamaların Eklenmesi
-
Harcamalarınız içerisinde birden fazla kategoriye ait harcama varsa, diğer sekmelere geçerek giriş yapmaya devam edebilirsiniz.
12. Yeni Talep Ekleme
-
Talep oluşturmak için 'Ekle' butonuna bas.
13. Talep Girişini Tamamla
-
Tüm verileri eksiksiz doldurduktan sonra "Talep Girişi Yap" butonuna tıklayarak masraf talebinizi oluşturabilirsiniz.
14. Talep Girişi Başarılı
-
Sol alt köşede bulunan buton üzerinden talep numaranızı ve bir hata alınması durumunda hata notunu da görüntüleyebilirsiniz.
15. Talebin Masrafa Dönüştürülmesi
-
Talebiniz oluştuktan sonra İşlem Menüsü'ne girerek "Masraf Girişi" adımını takip edin.
16. Masraf Başlık Verilerinin Doldurulması
-
Şirket Kodu ve Personel No verilerini doldurun.
17. Masraf Dosyası Yükleme
-
Masraflarınıza dair belgelerinizi "Yükle" butonuna tıklayarak ekleyin.
18. Dosya Seçimi
-
"Gözat" düğmesine tıklayarak yüklemek istediğiniz dosyayı seçin.
19. Dosya Yükleme
-
Dosyayı yüklemek için 'Yükle' butonuna tıklayın.
20. Yeni Masraf Kalemi Ekle
-
Yeni bir masraf kalemi eklemek için "+ Ekle" butonuna tıkla.
21. Masraf Detaylarının Girilmesi
-
Talep No bölümünden oluşturduğunuz masraf taleplerinizi seçin.
-
Talep No. Bölümünden ilgili personel için oluşturulmuş tüm masraf taleplerini görüntüleyebilirsiniz. Masraf girişini yapmak istediğiniz kalemi seçerek devam edebilirsiniz.
22. Belge Tarihini Girin
-
Belge tarihini ilgili alana girin.
23. Belge Türü Seçimi
-
Belgenizin türünü seçin ve belge numaranızı yanındaki alana eksiksiz şekilde yazın.
24. Gider Kategorisini Seç
-
Gider Kategorisi alanında, kategori seçmek için aşağı açılır menüyü tıklayın ve uygun kategoriyi belirleyin.
25. İçerik Ekleme
-
Harcama detaylarını girdikten sonra "Ek Veriler" butonuna tıklayın.
26. Açıklama Alanını Doldurun
-
Ek veriler sekmesinde açıklama alanına gerekli bilgileri girin.
27. Diğer Alanlar Seçimi
-
"Diğer Alanlar" sekmesine tıklayın.
28. Vergi Gösterge Seçimi
-
Vergi Göstergesi alanından belgenize ait KDV oranını seçin. Ardından kaydet butonuna basarak ekrandan çıkın.
29. Harcama Belgenizin E-Fatura Olması Durumunda
-
Ek veriler alanındaki Tedarikçi bölümünden cariyi seçin. Cari kodunu bulamamanız halinde VKN bölümünü doldurmanız yeterlidir.
30. Masraf Ekle
-
Yeni bir masraf girişi yapmak için 'Ekle' butonuna tıklayarak diğer harcamalarınızı da girebilirsiniz.
31. Onaya Gönderme
-
Tüm harcamaların girişini yaptıktan sonra, sağ alt köşede bulunan "Onaya Gönder" butonuna basarak masraf belgenizi oluşturup onaya gönderebilirsiniz.
32. Masraf Numarasını Öğrenme
-
Oluşan masraf numaranızı ekrana çıkan pop-up üzerinden ve sol alt köşedeki butona tıklayarak görebilirsiniz.
33. Masraf Talep Raporu
-
Oluşan masraf belgelerinizin onay durumunu ana ekrandaki "Masraf Talep Rapor" bölümüne girerek görüntüleyebilirsiniz.
34. Masraf Belgelerinin Listelenmesi
-
Şirket Kodu, Personel No gibi detayları girin ve "Git" butonuna tıklayın.
35. Belge Durumunu Görme
-
Masraf numaranızın üzerinden "Onay Süreci" butonuna tıklayarak masrafınızın onaycısını ve onaylama zamanını görüntüleyebilirsiniz.
36. Onay Sürecini Görüntüleme
-
Açılan pencerede onay sırasını, onaycıyı, onay durumunu ve onay tarih-saatini görüntüleyebilirsiniz.
37. Masraf Çıktısının Alınması
-
Onaylanmış masraflarınız için "Çıktı Al" seçeneğine tıklayarak masraf formunuzun dökümünü alın ve fiziki belgelerinizi bu form ile birlikte Mali İşler'e iletin.