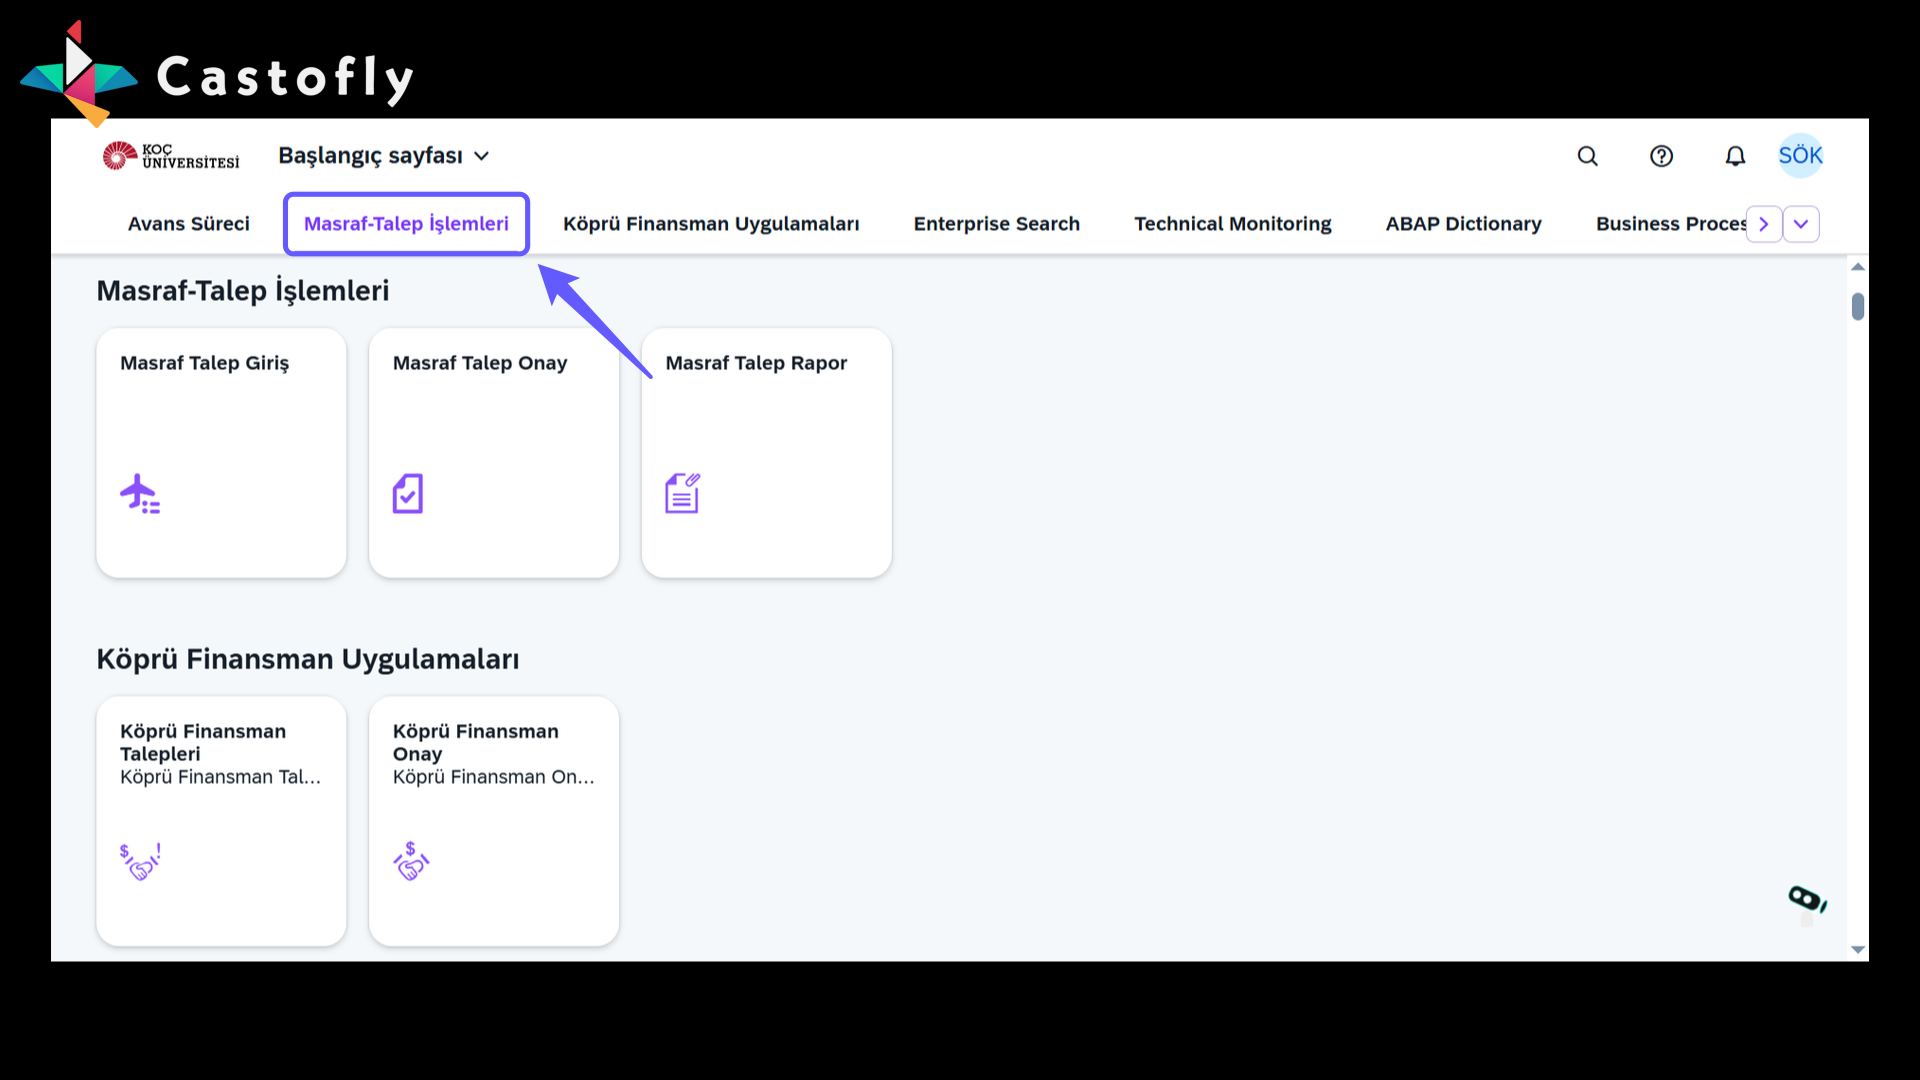
1. Expense Request Operations
-
Click the 'Expense-Request Operations' option from the menu. Access this section to view the detailed steps.
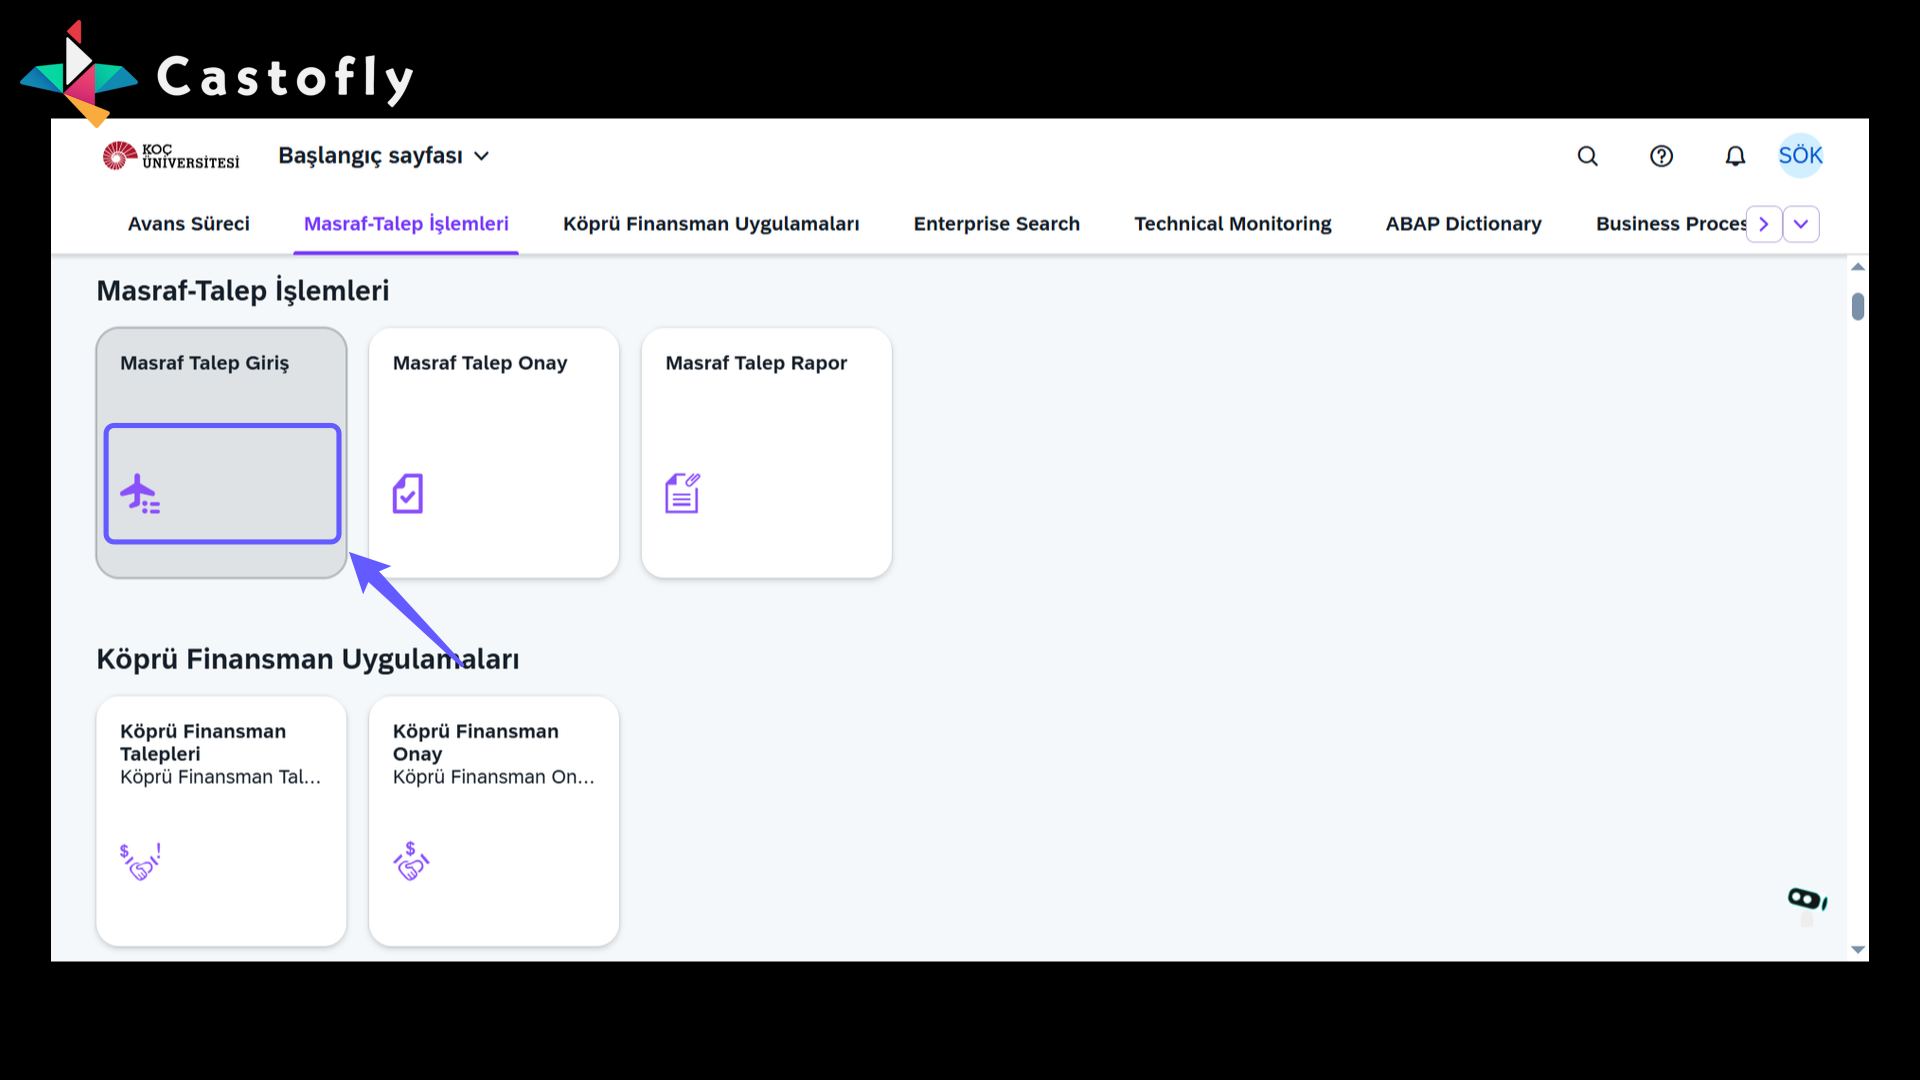
2. Enter Expense Request
-
Click the icon to start an expense request entry and fill in the required information.
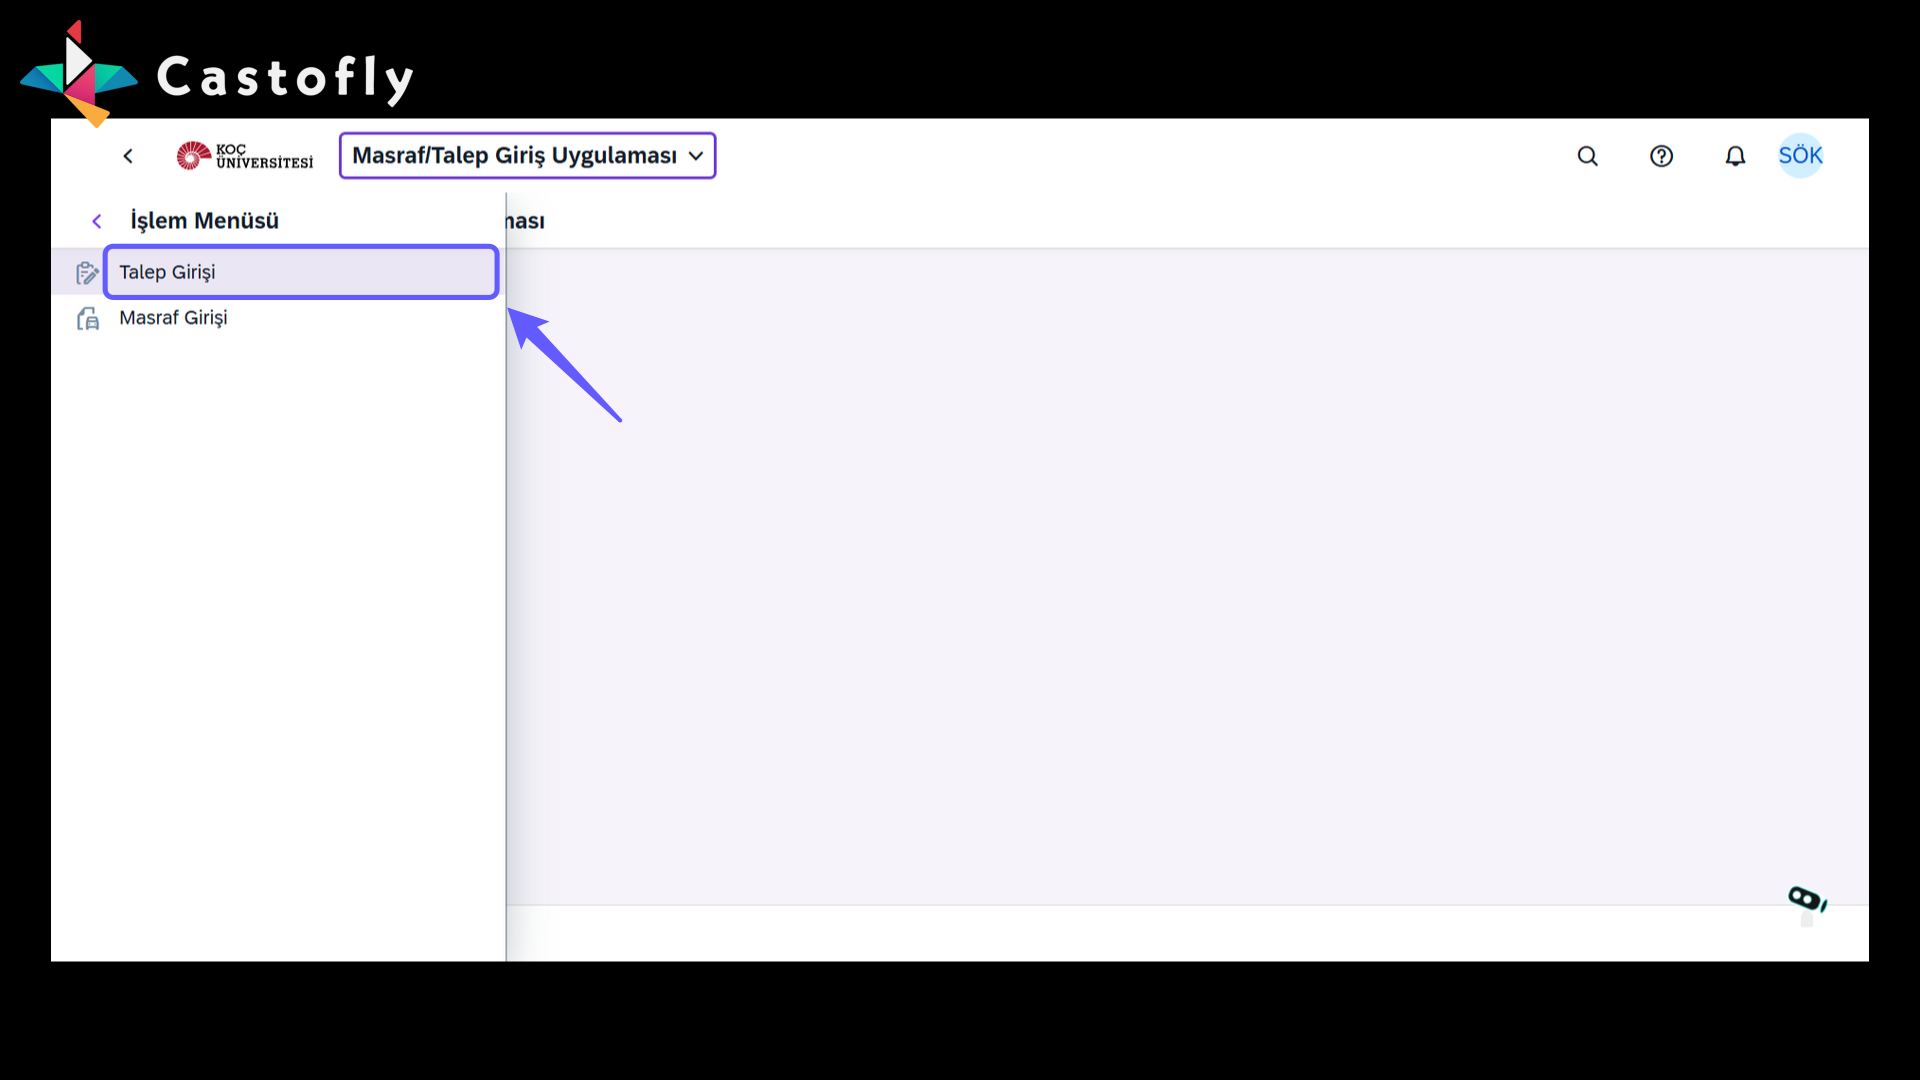
3. Access the Request Entry Menu
-
Click the Request Entry button to create a new request. Carefully review the options in the action menu and select the one that suits your needs.
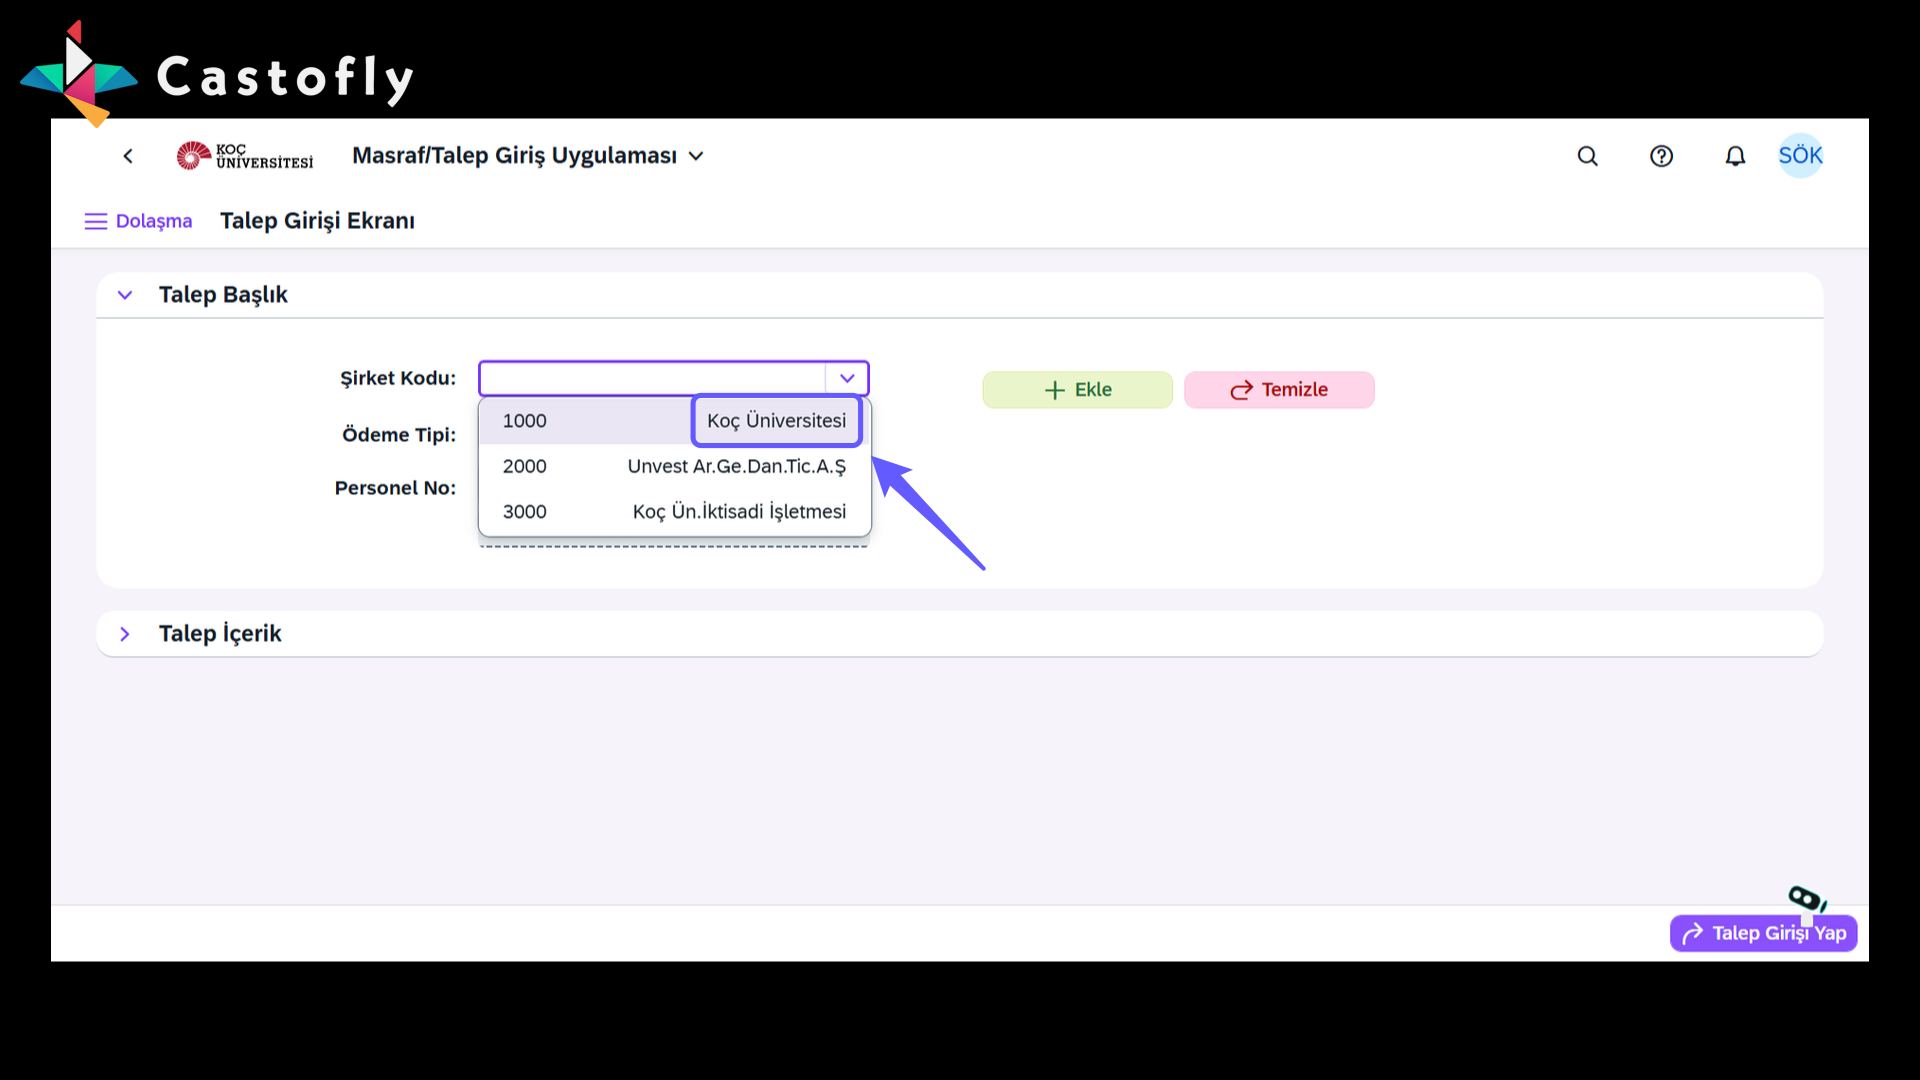
4. Select Company Code
-
Click the dropdown in the Company Code field and select the appropriate option.
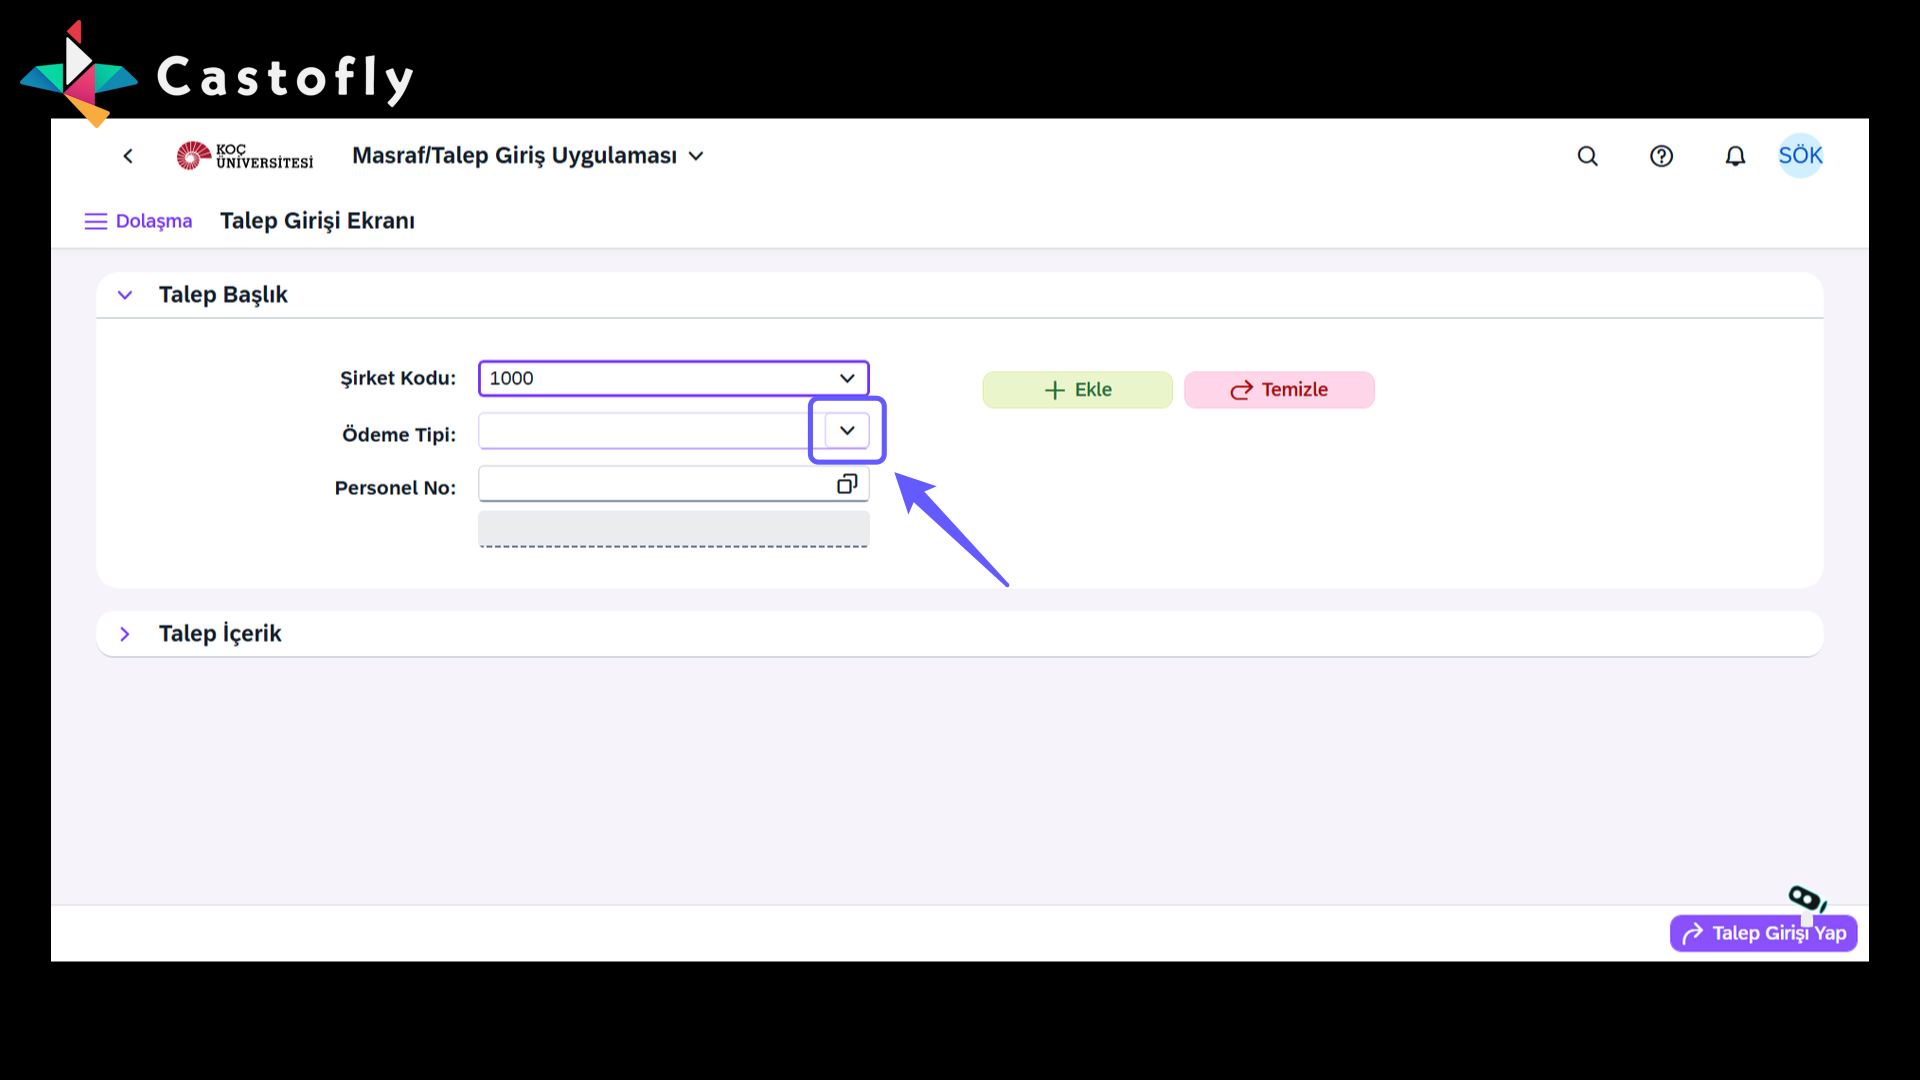
5. Select Payment Type
-
Click the down-arrow icon to open the payment type options. Choose the payment type you want from the list.
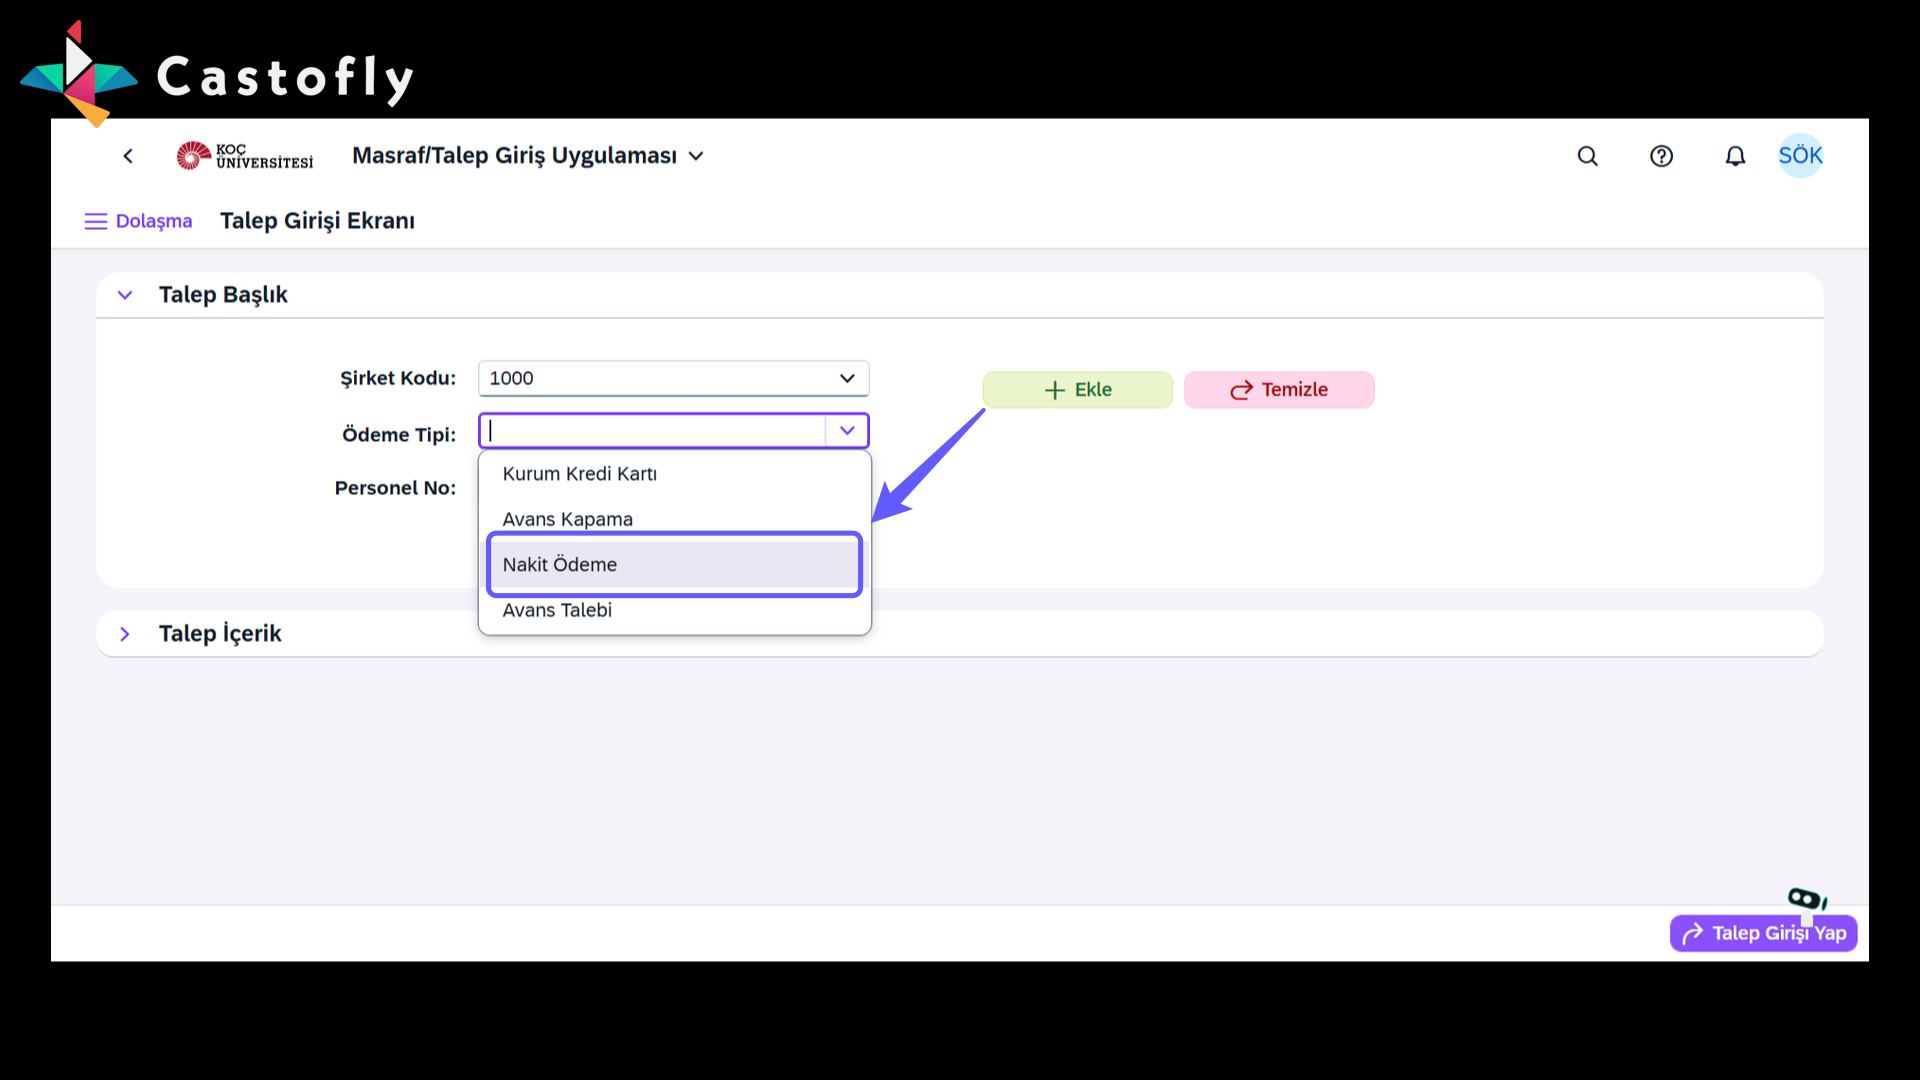
6. Select Cash Payment
-
Select the expense option from the Payment Type menu.
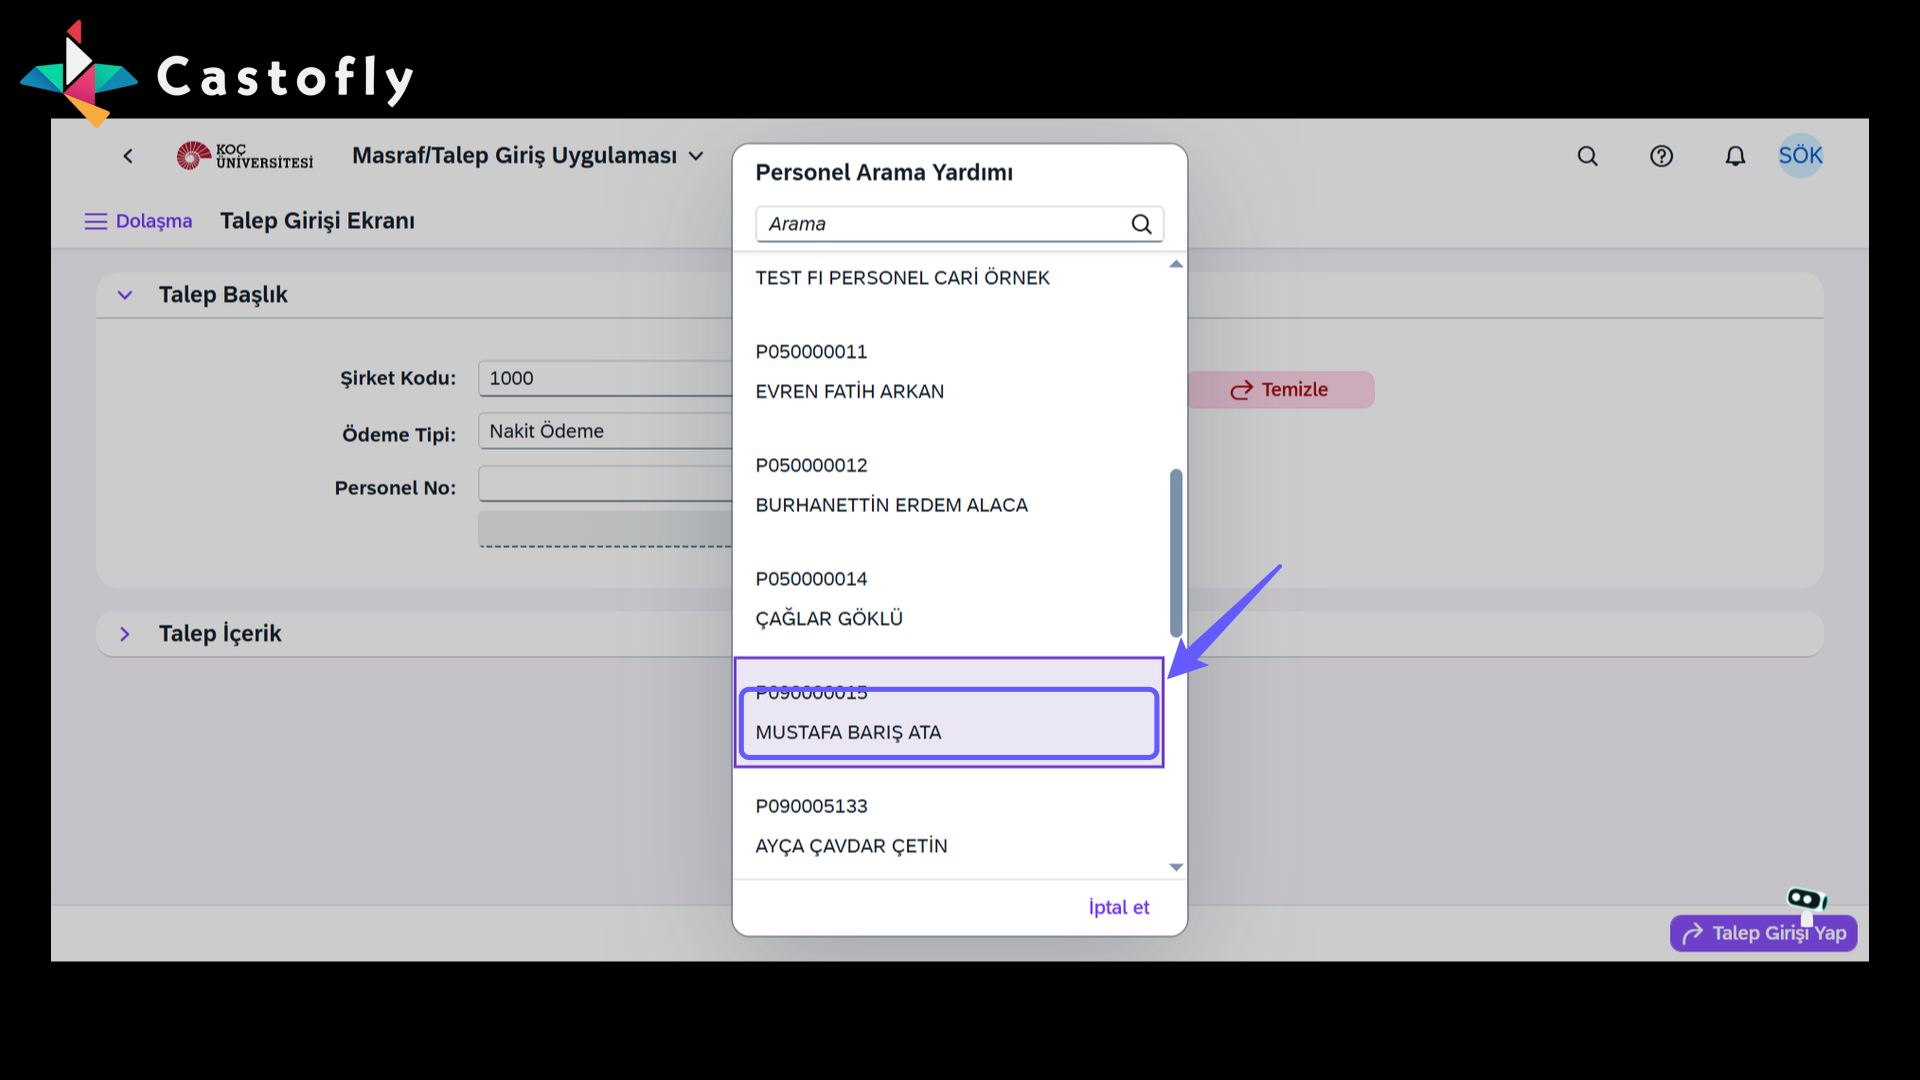
7. Select Personnel
-
Select your personnel and proceed with the transaction.
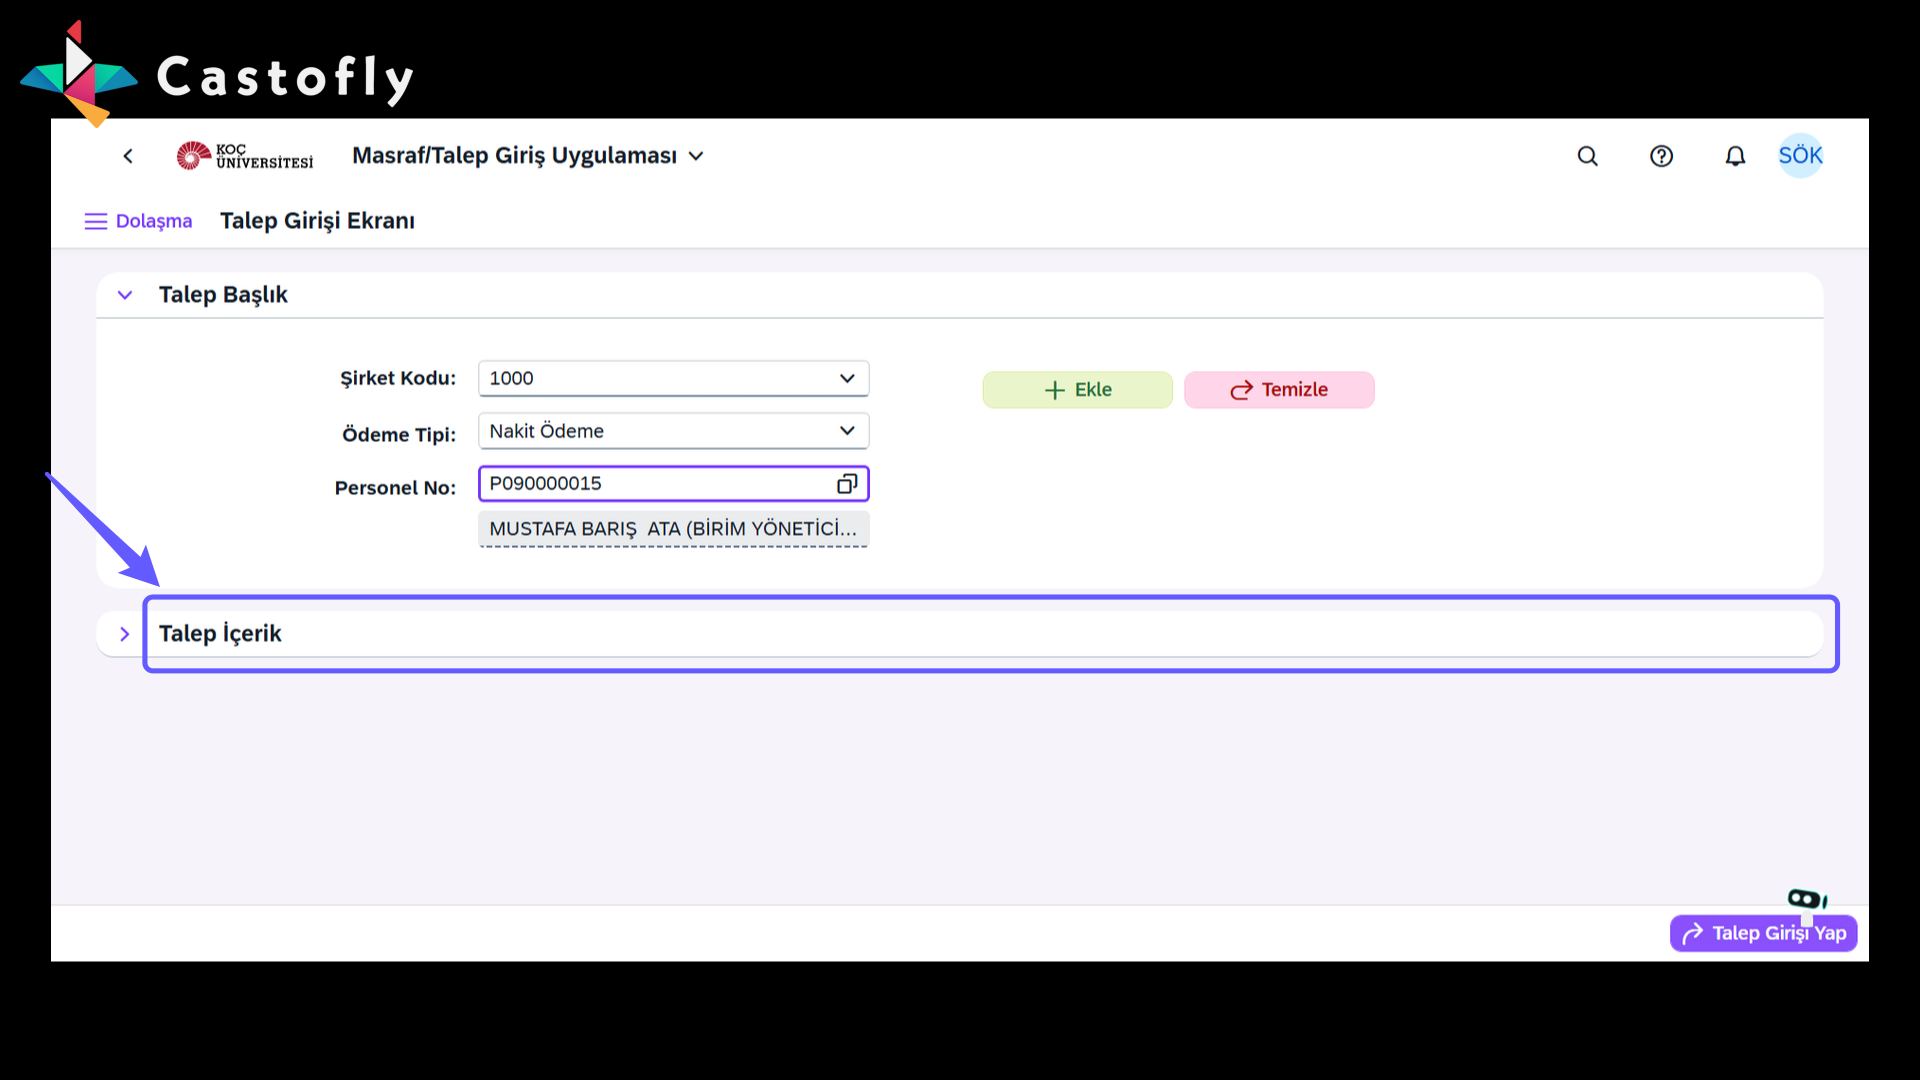
8. Fill in the Request Content
-
Enter the relevant information into the request content and verify its accuracy. Provide the requested details completely and correctly, then save.
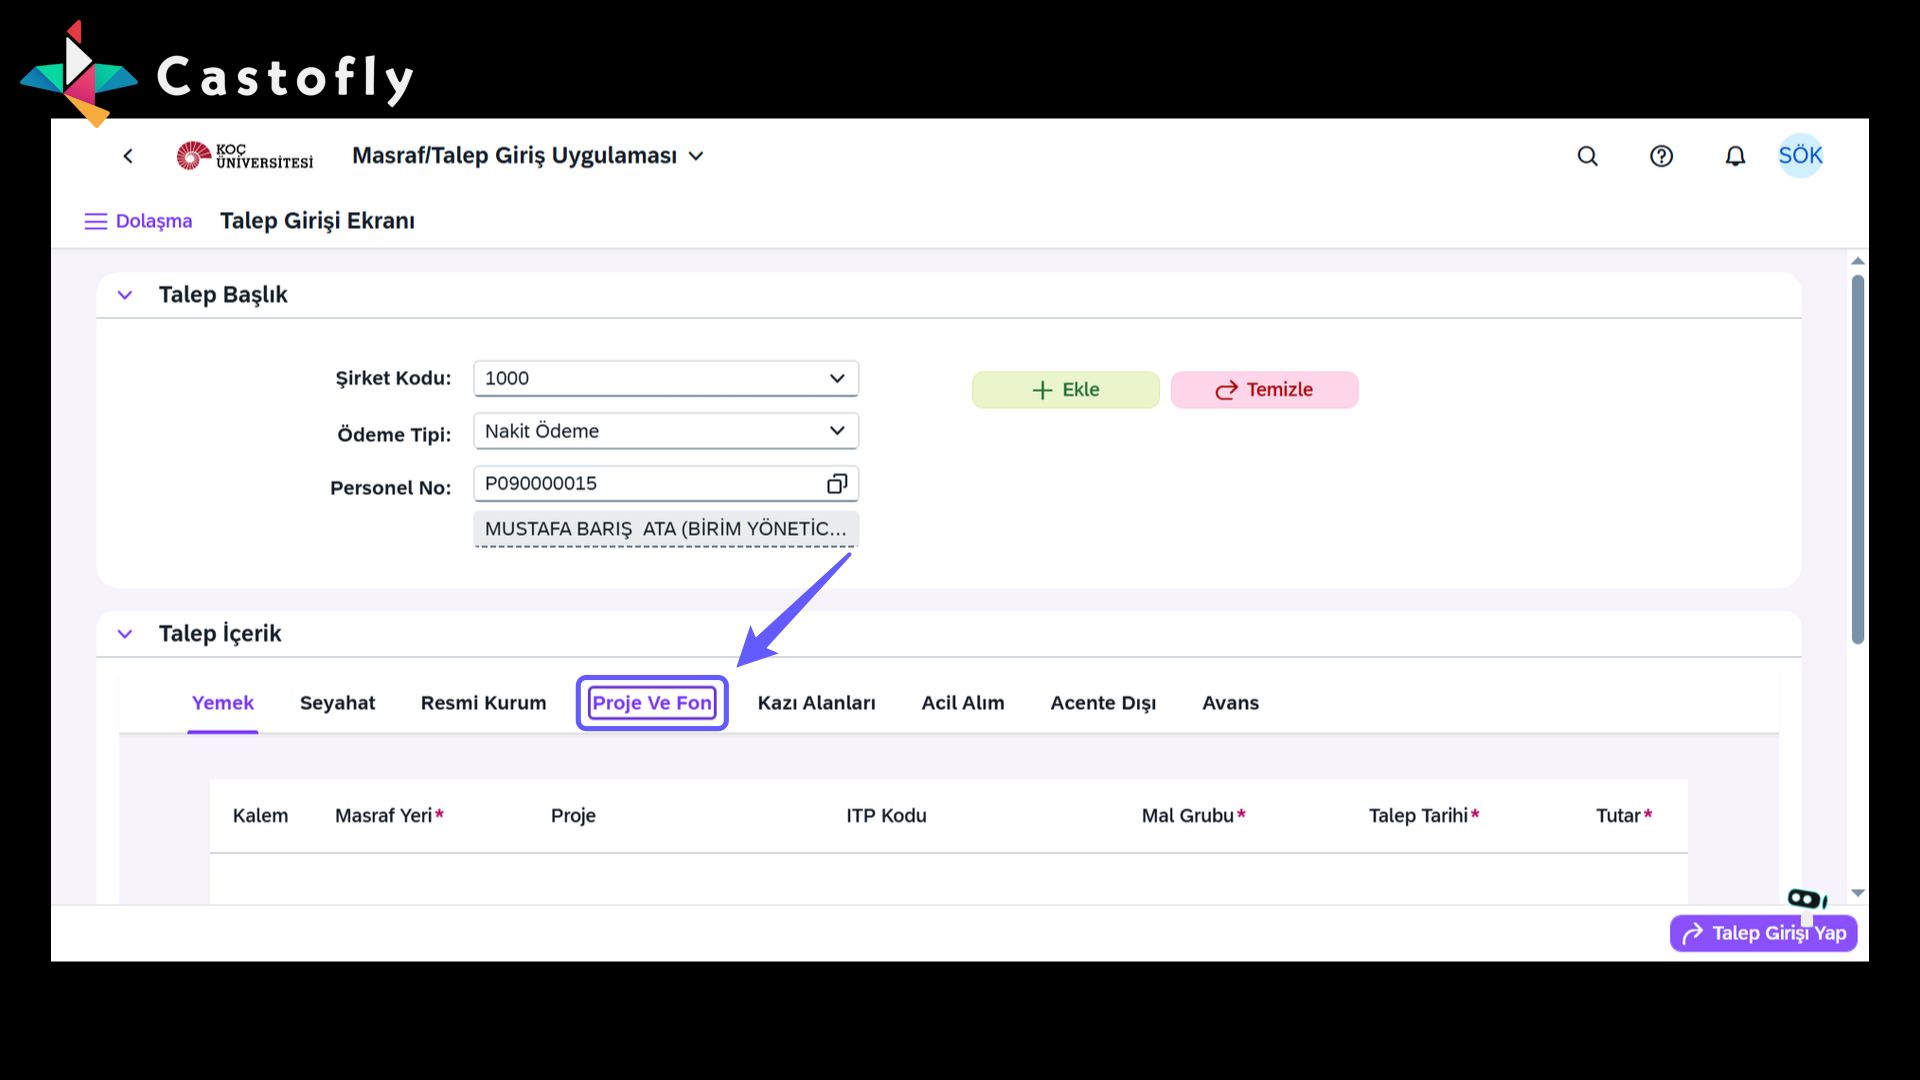
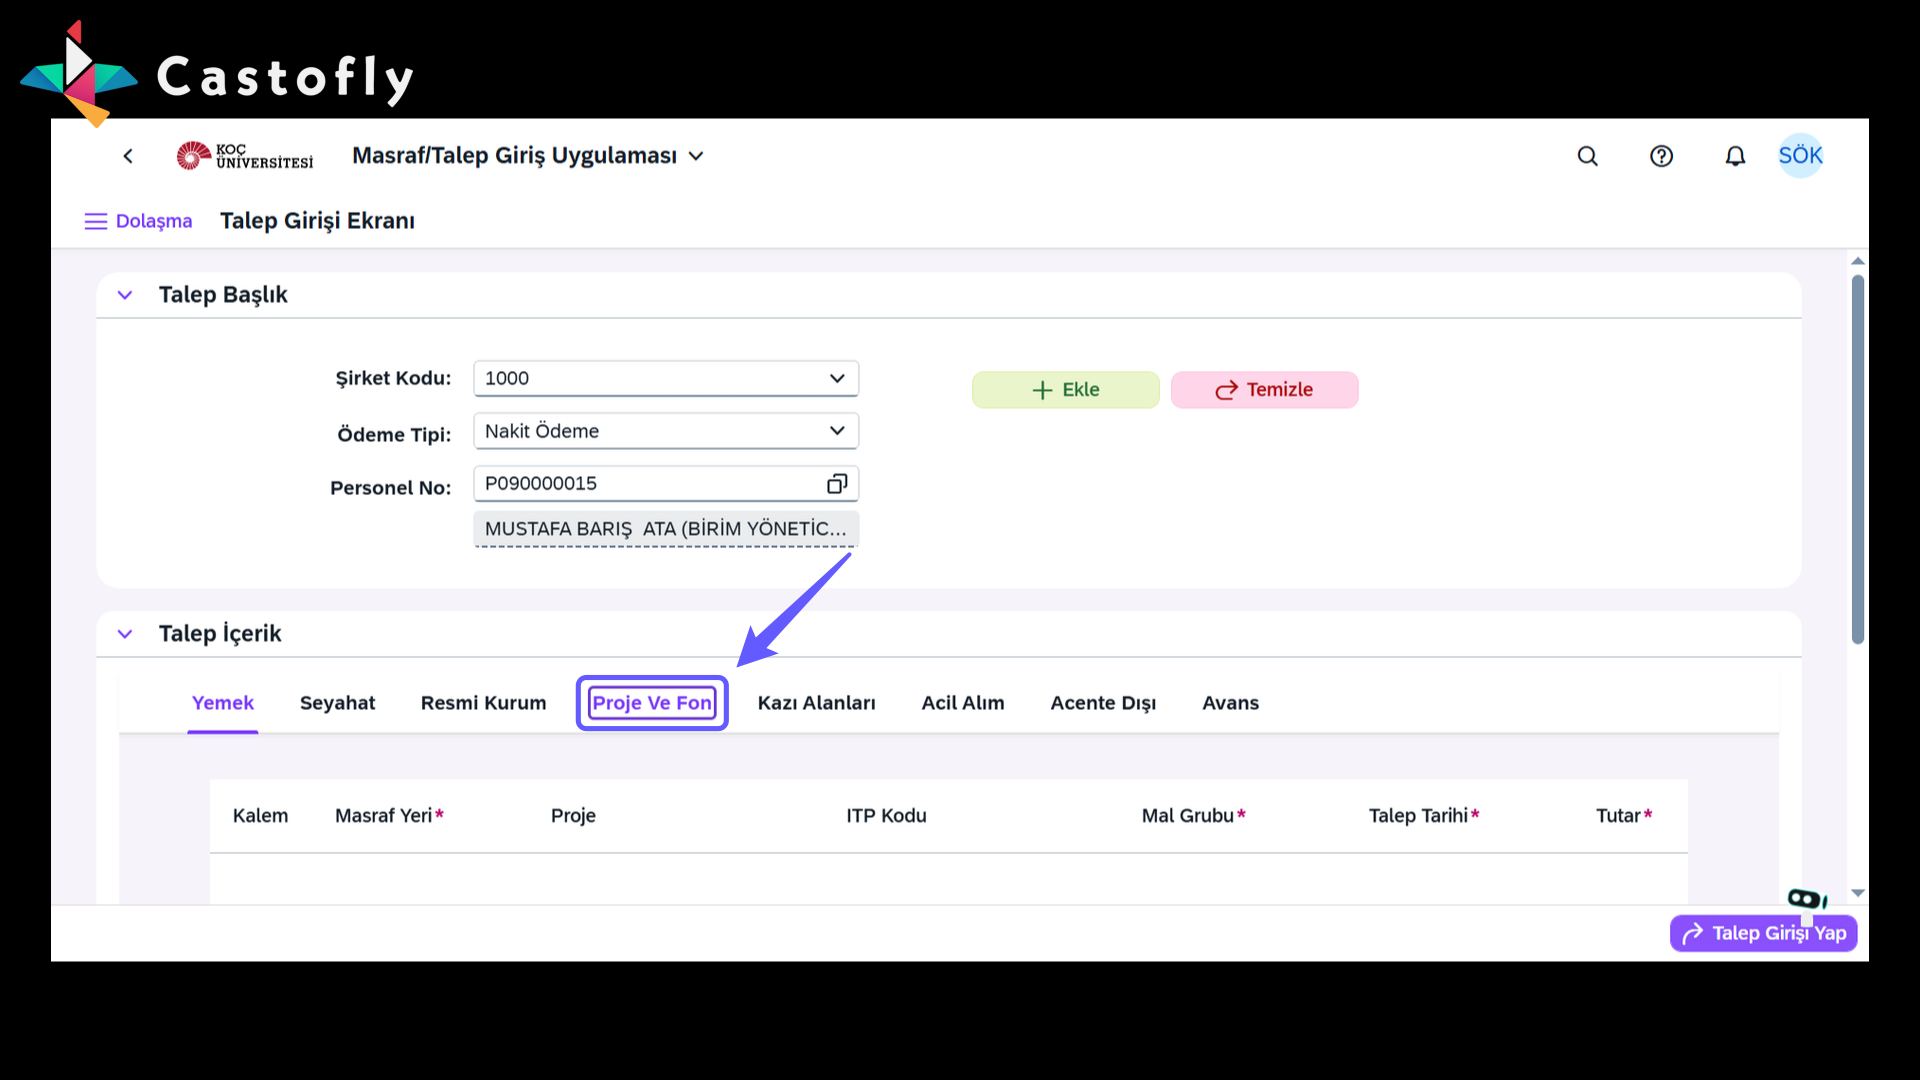
9. Select Project and Fund
-
Click the Project and Fund tab and select the project or fund you need. This step ensures your expense record is created correctly.
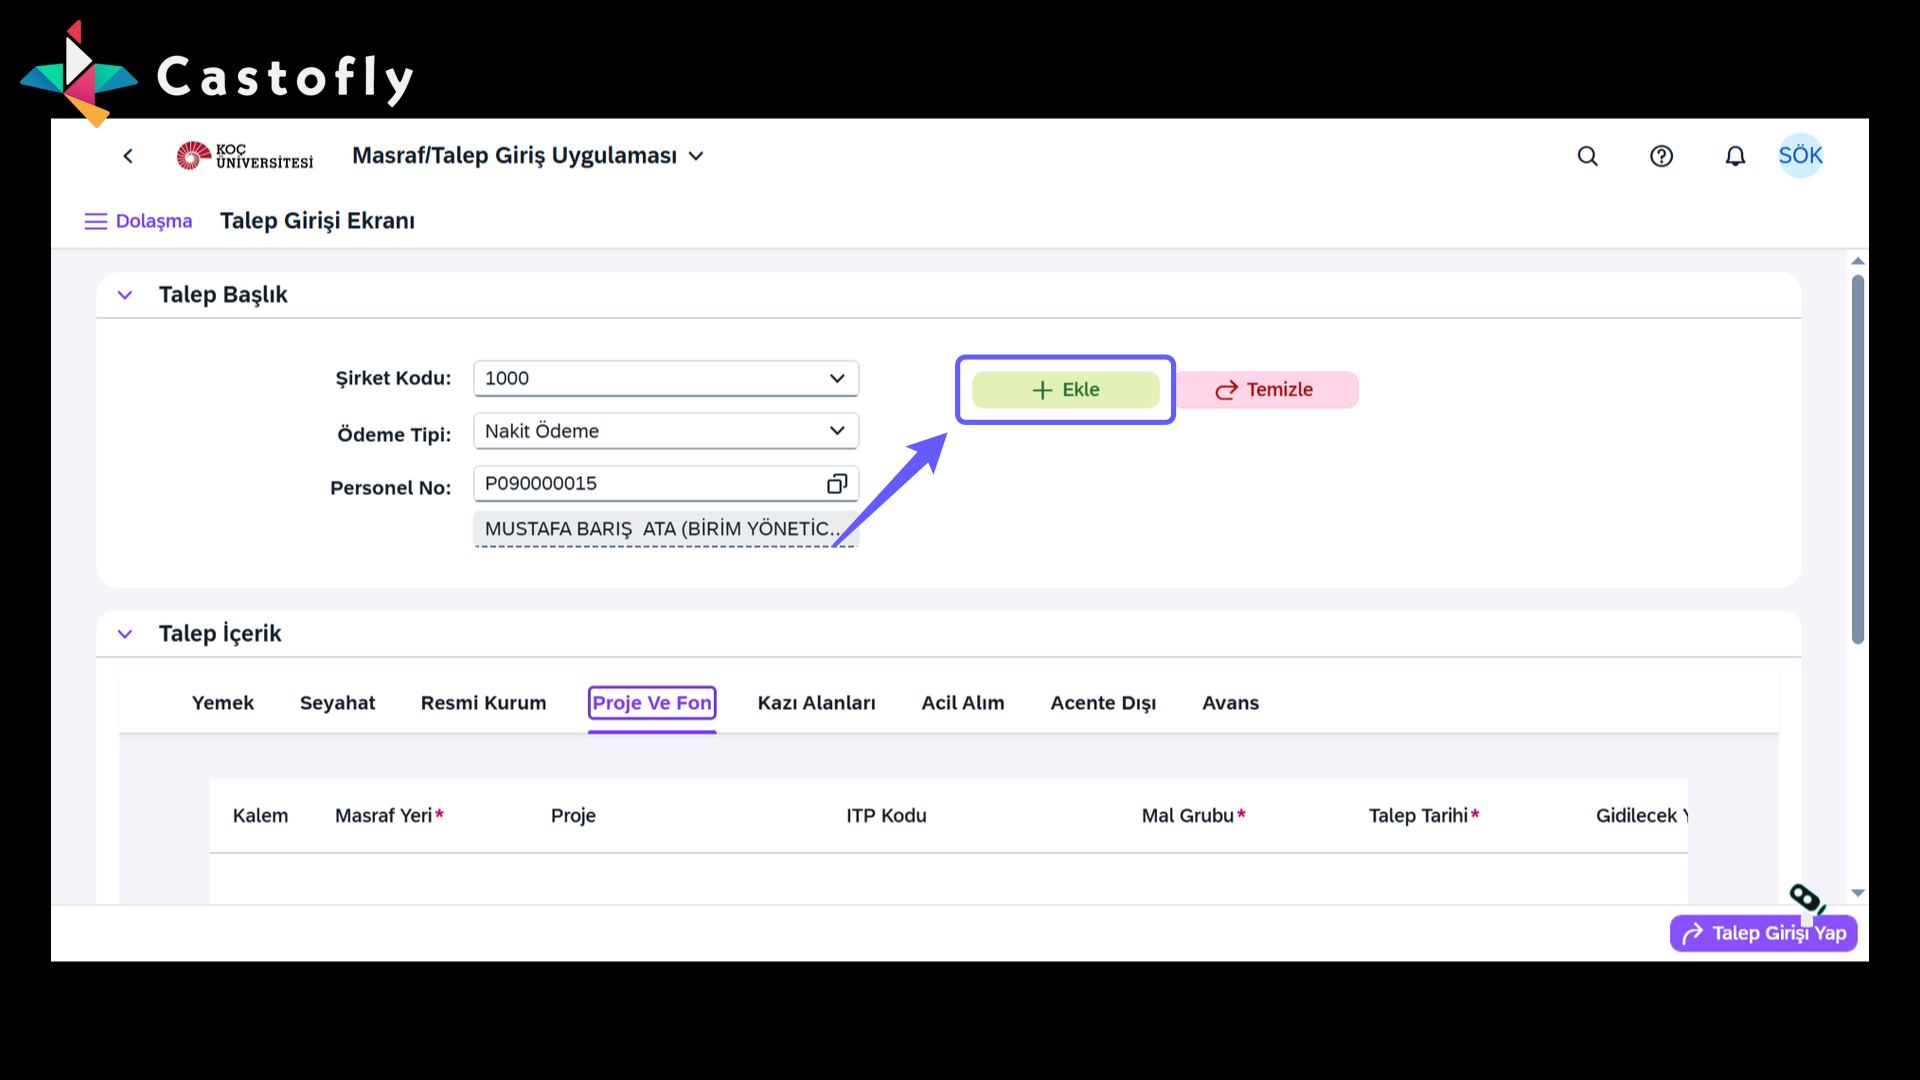
10. Add Request
-
Click the 'Add' button to add a new request.
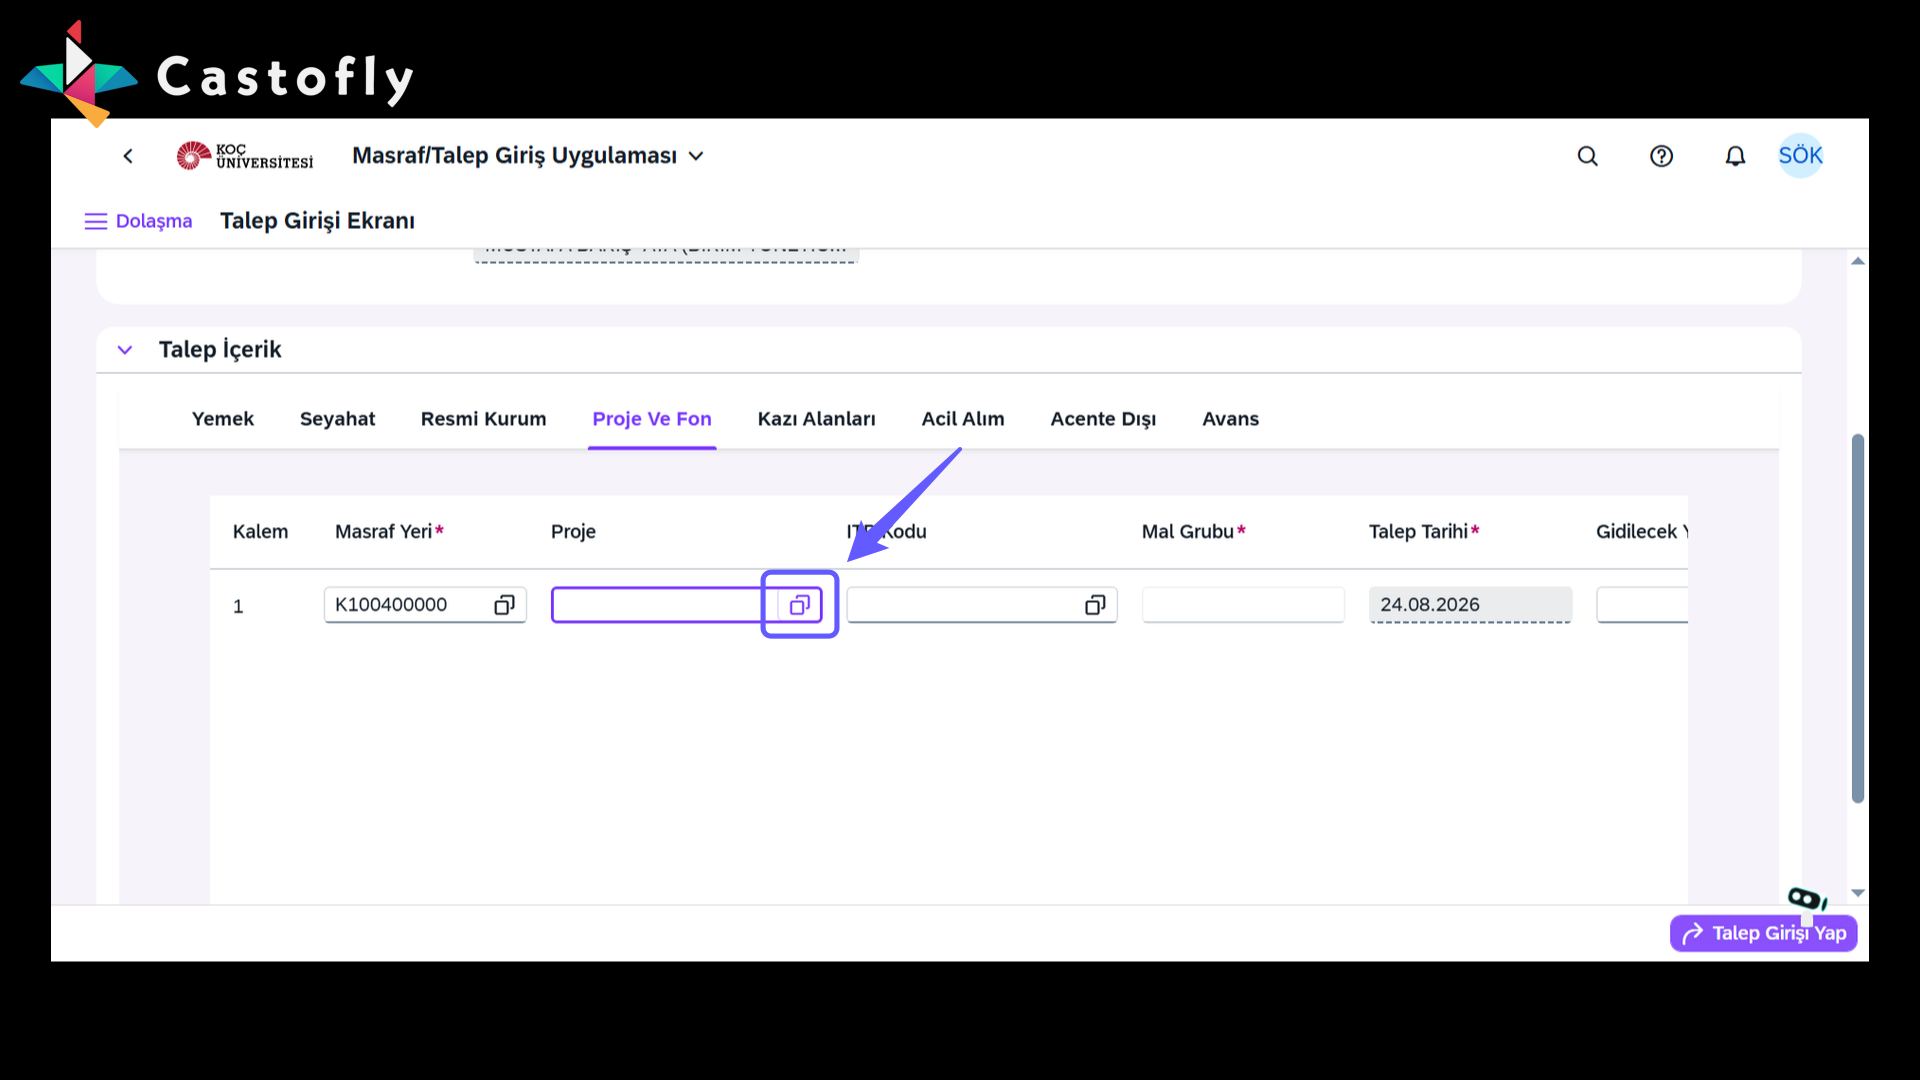
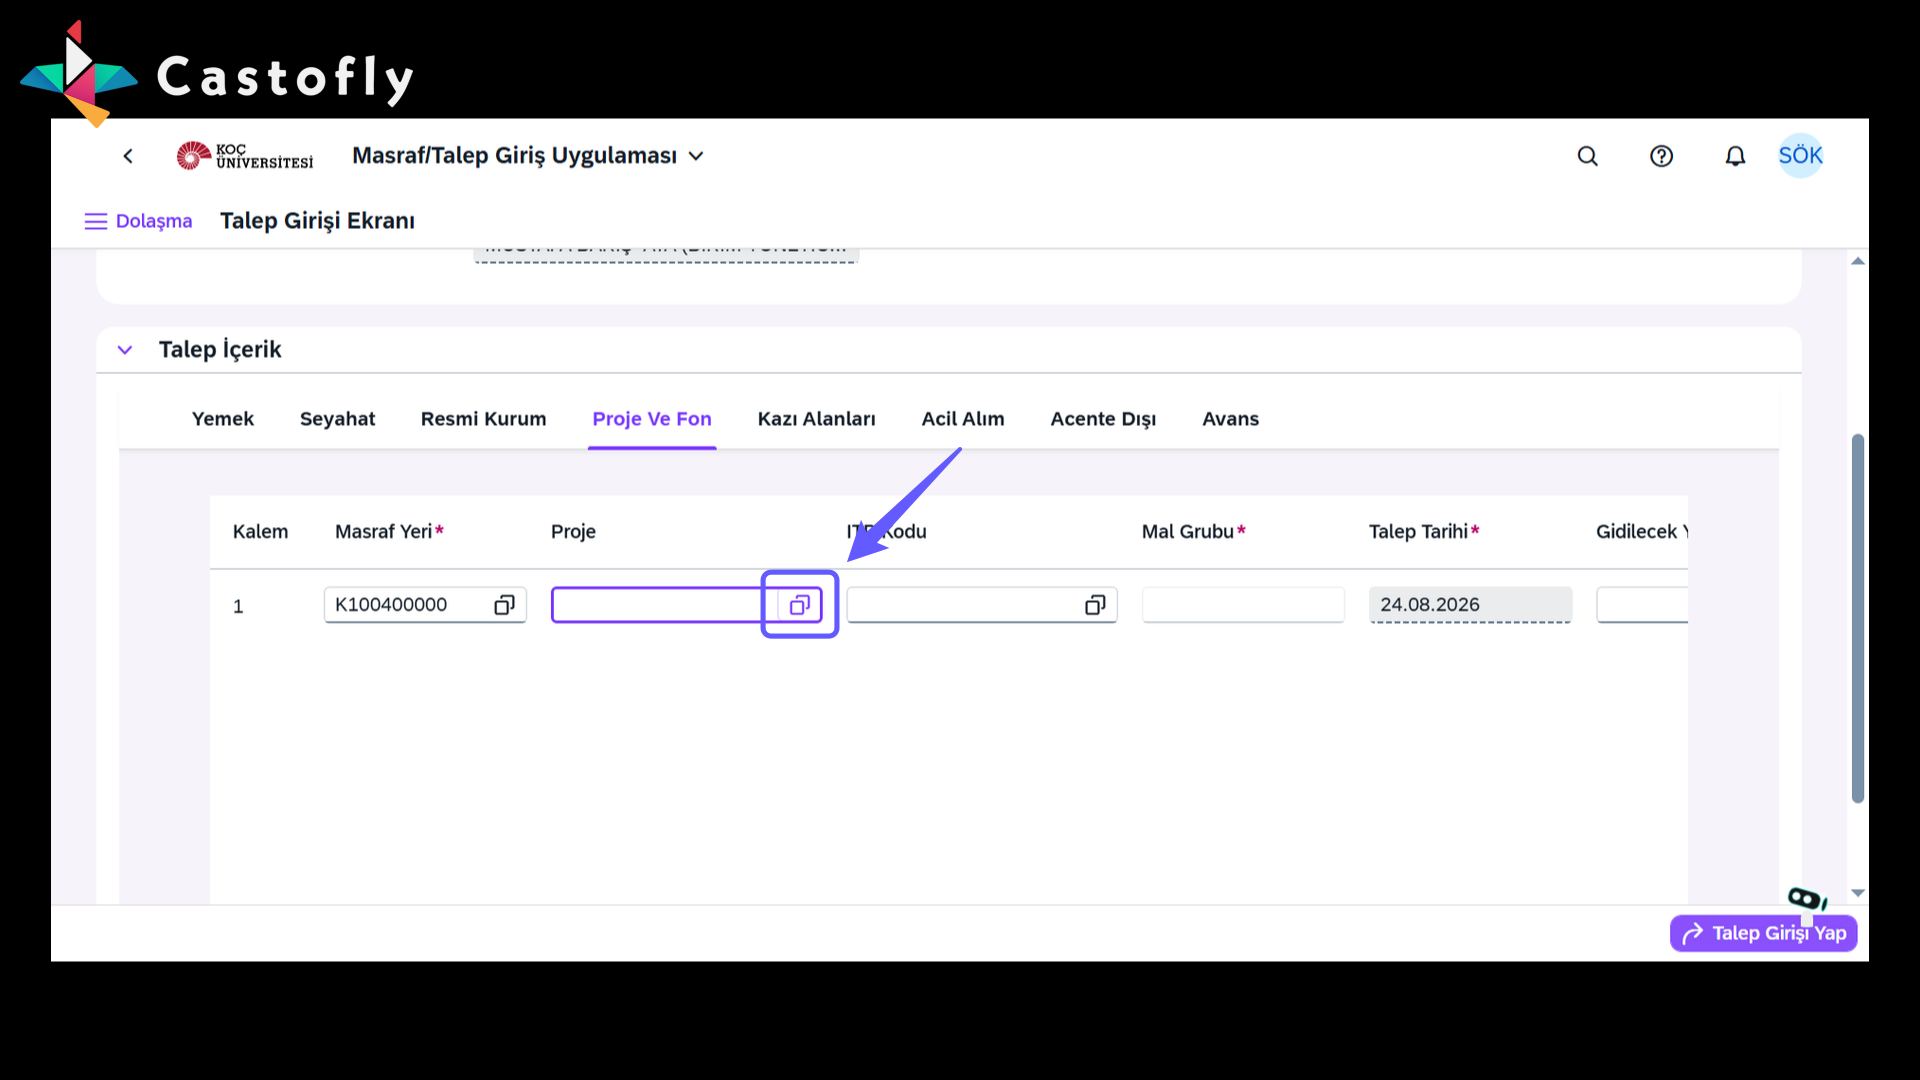
11. Select Project
-
Click the icon to select the relevant project.
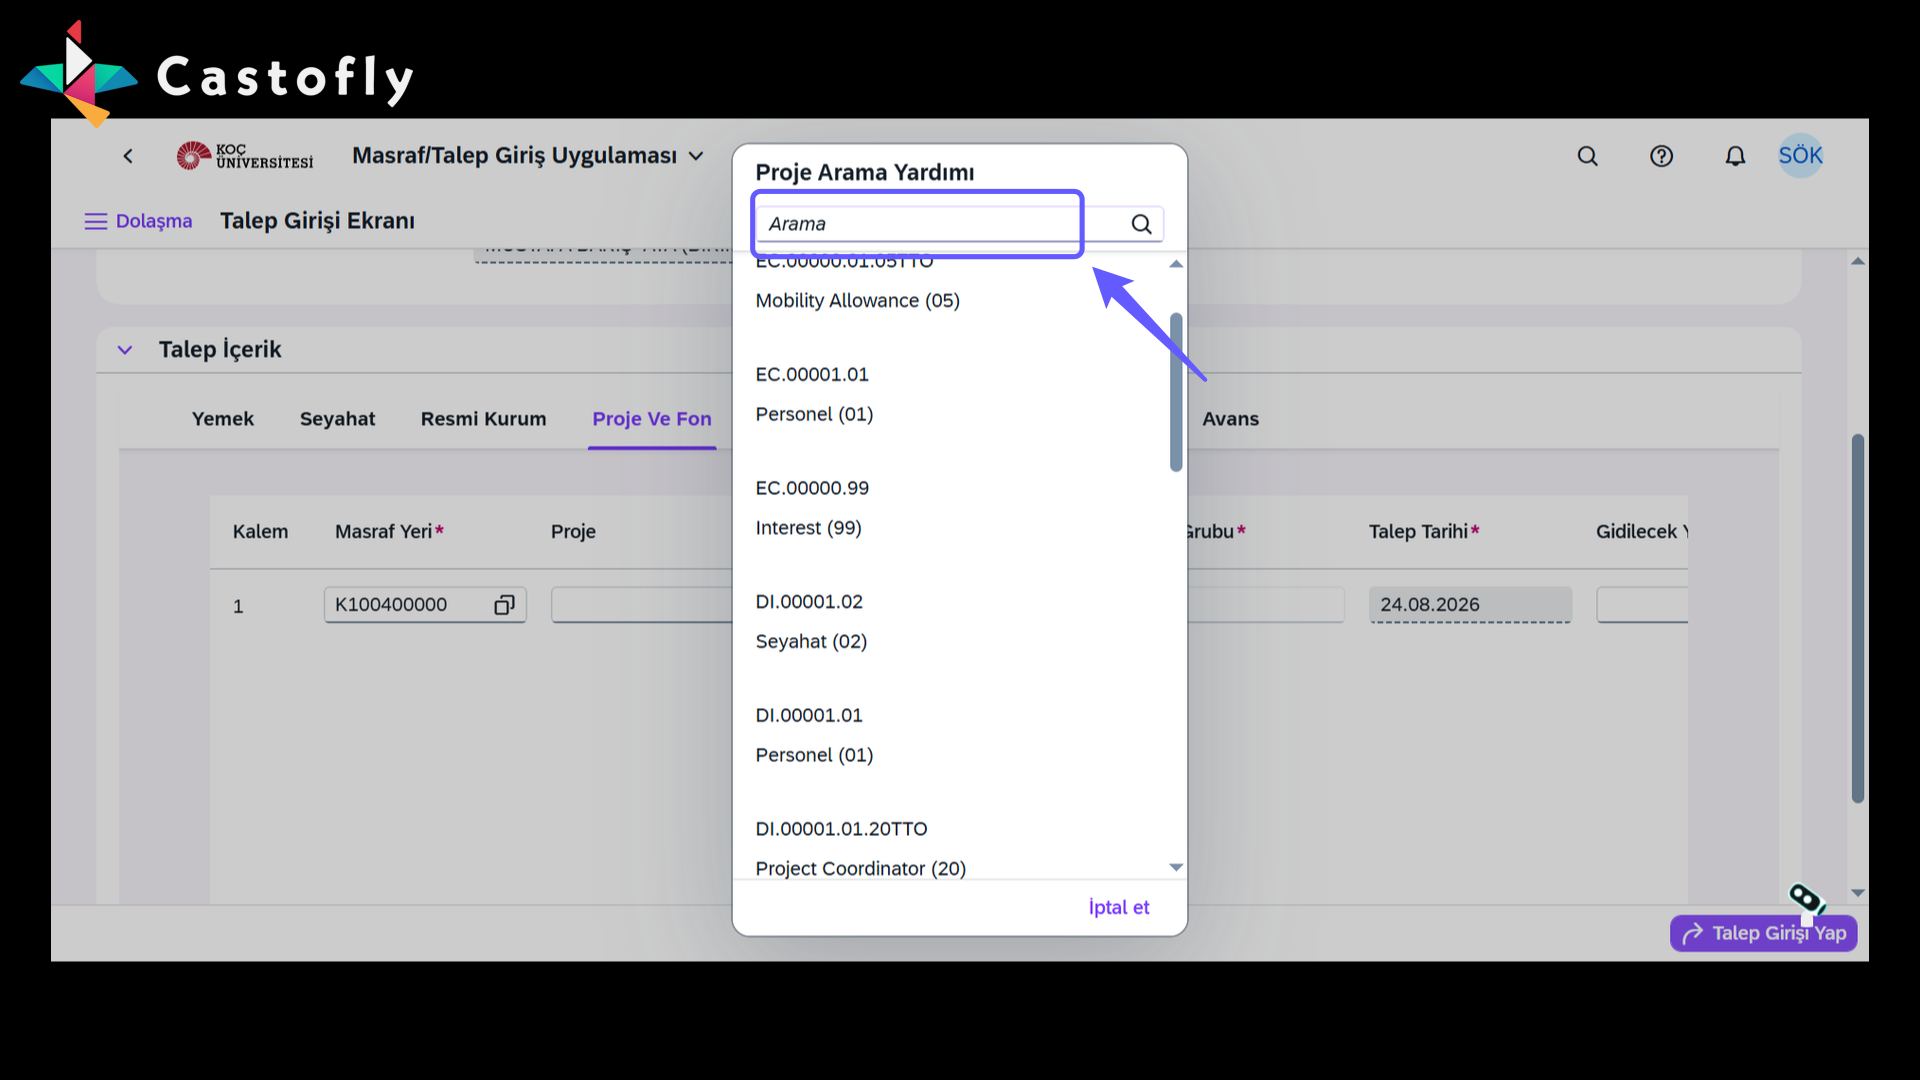
12. Select Project Code
-
Open the list and select the appropriate project code.
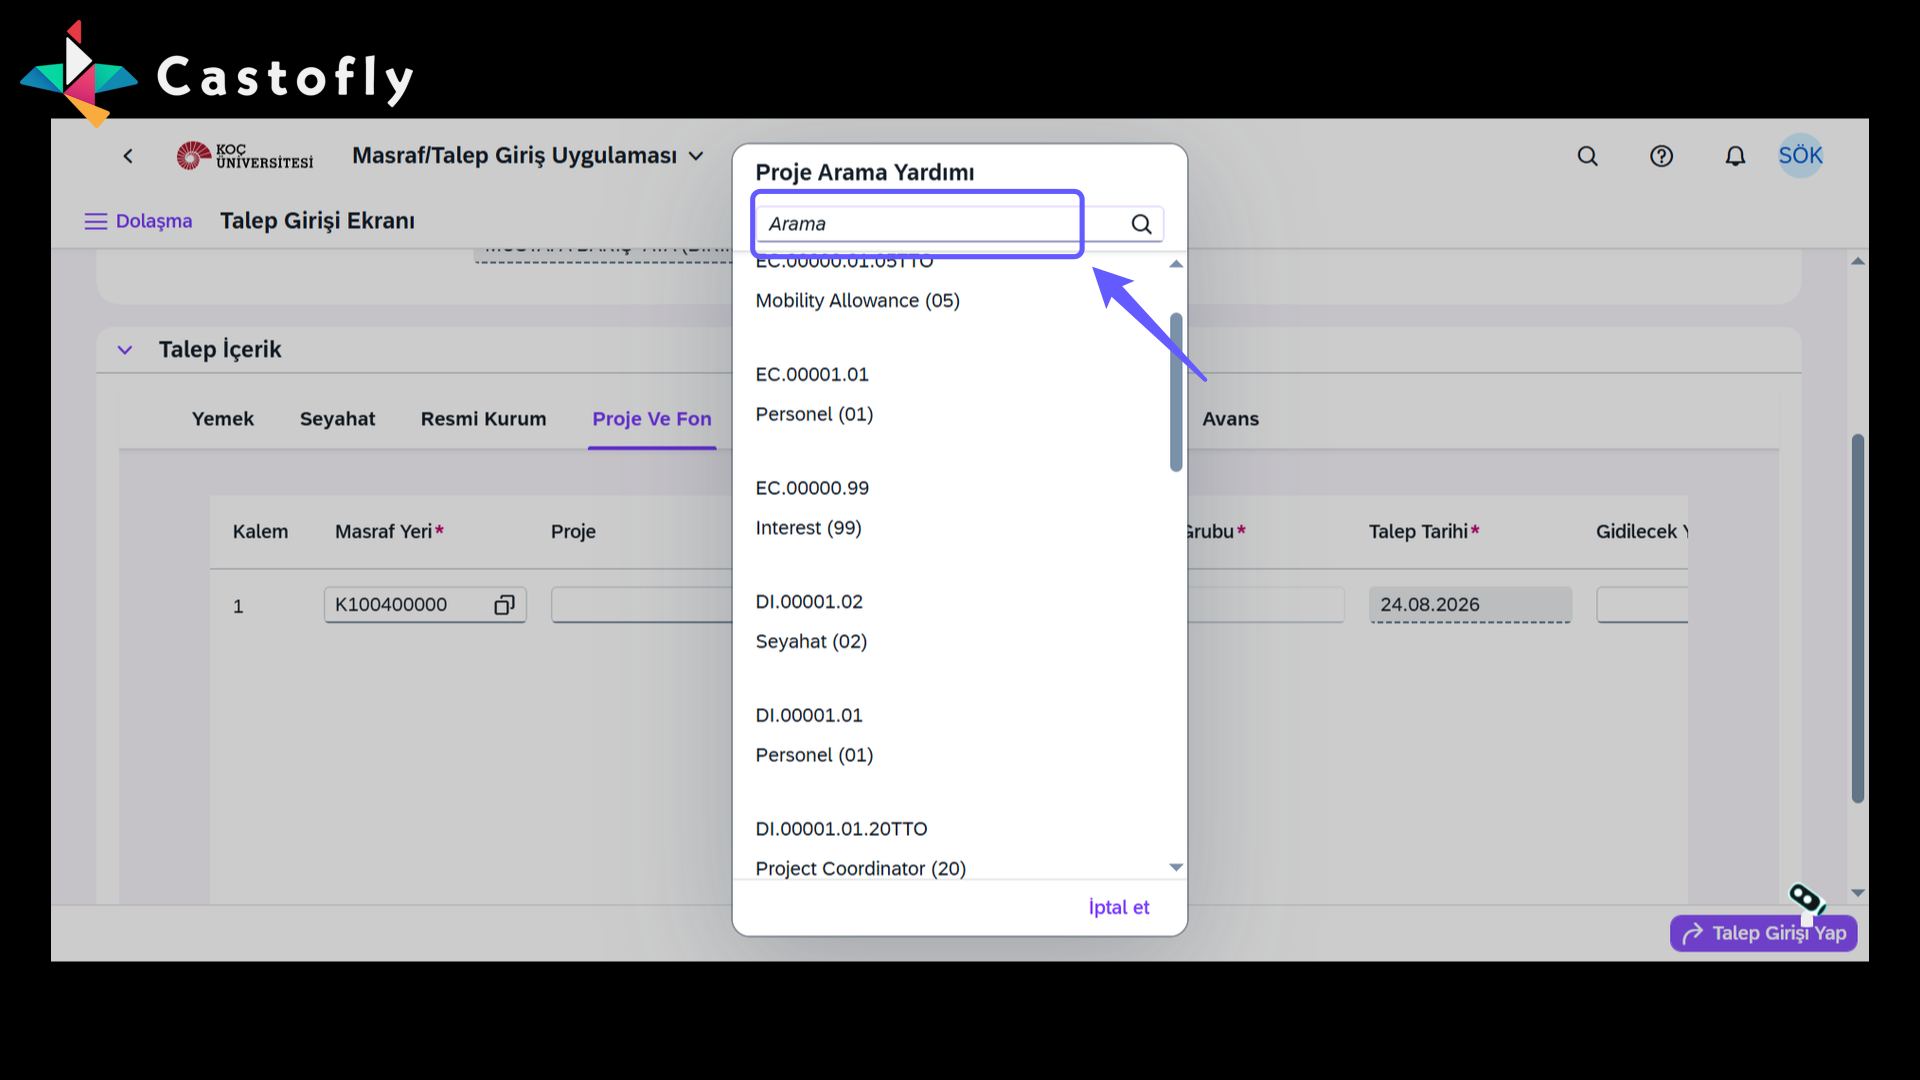
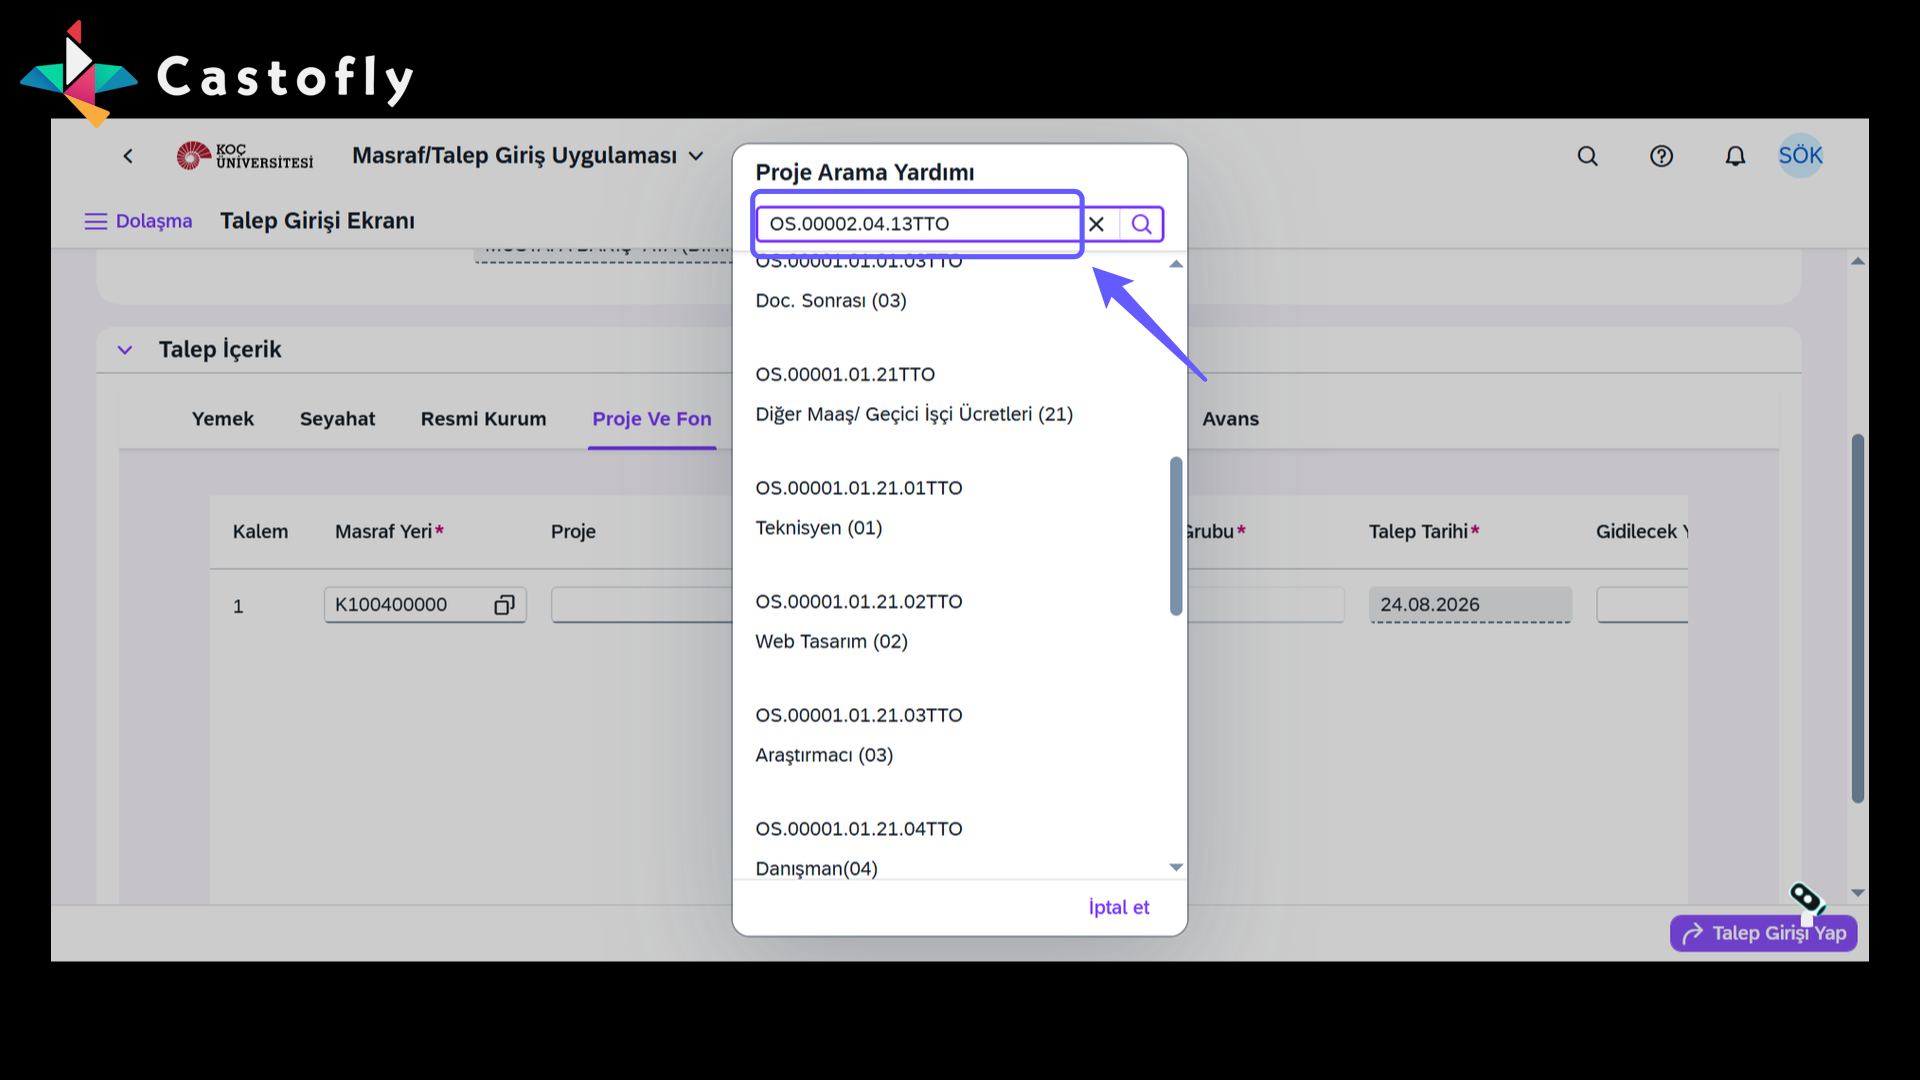
13. Make a Project Selection
-
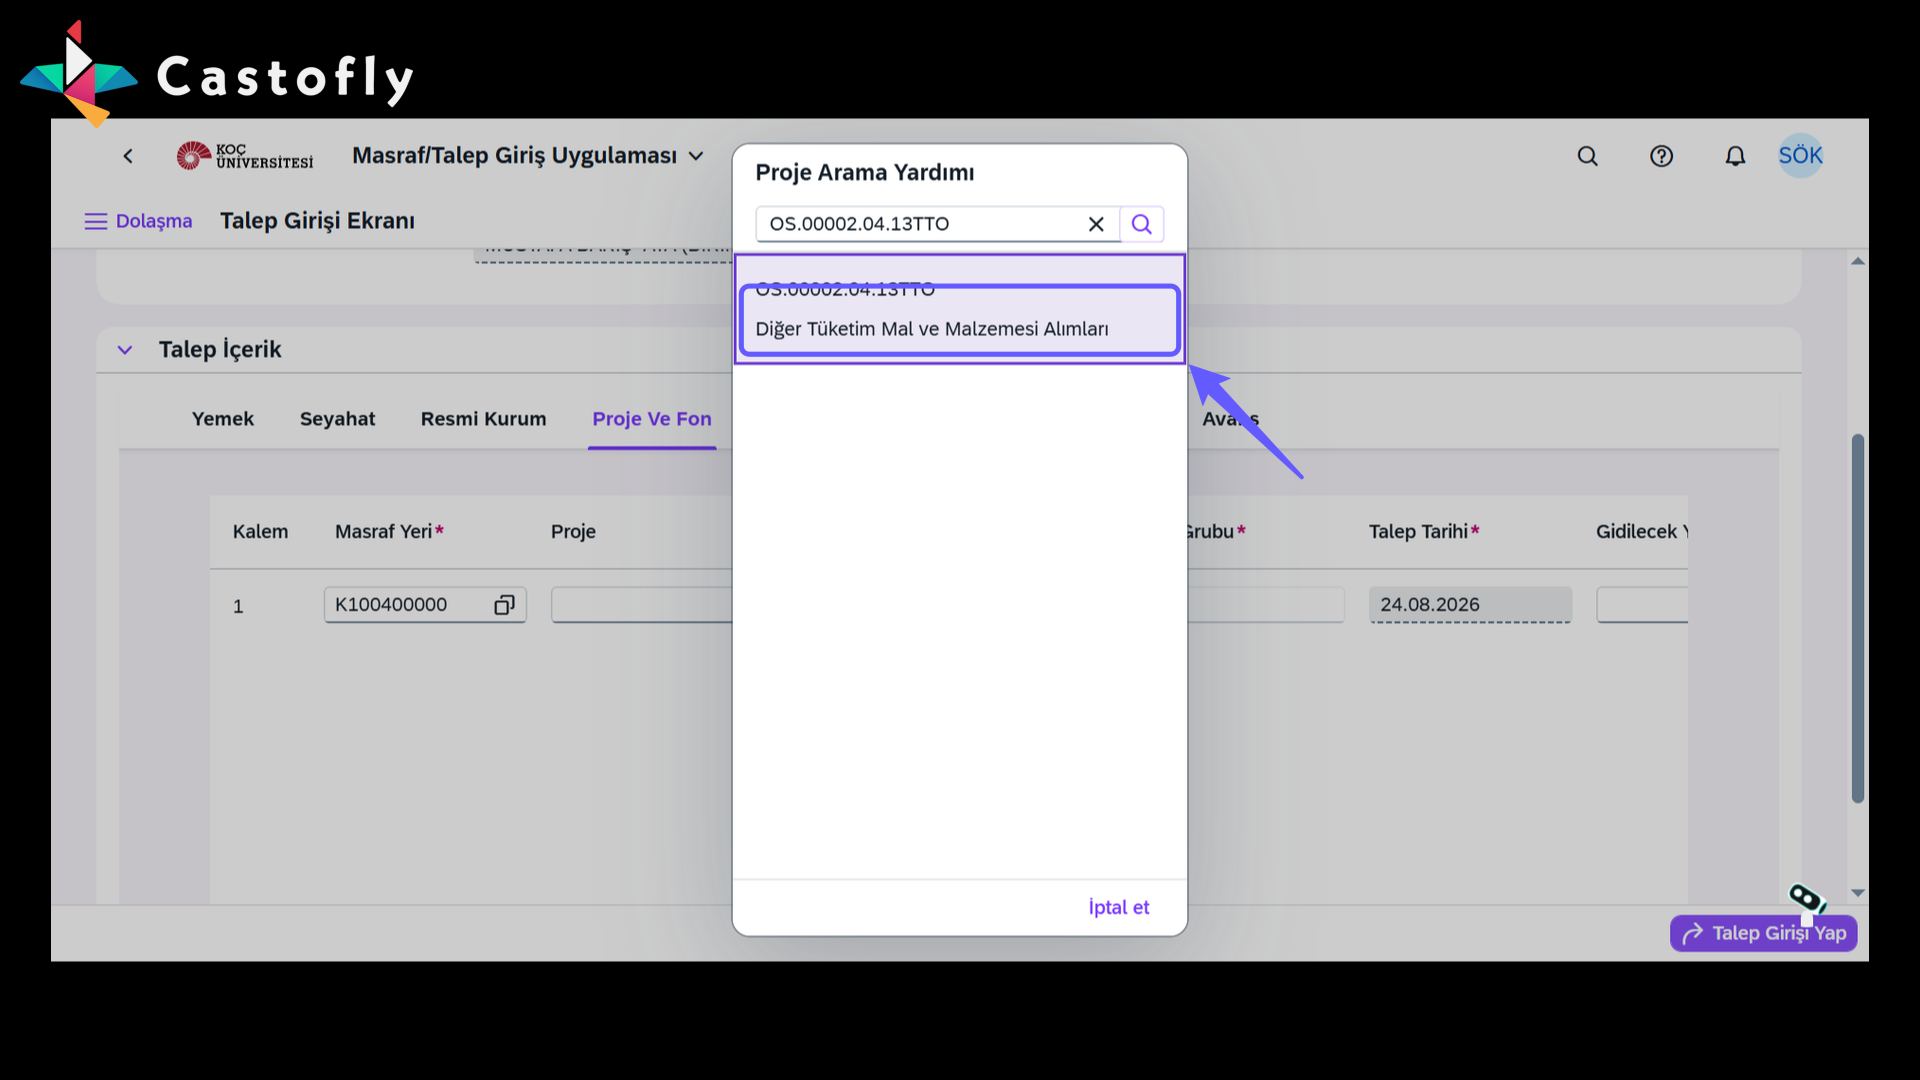
Choose a project number from the list. Type the project code you want to search for in the box and verify it by clicking the magnifying-glass icon, then proceed with your selection.
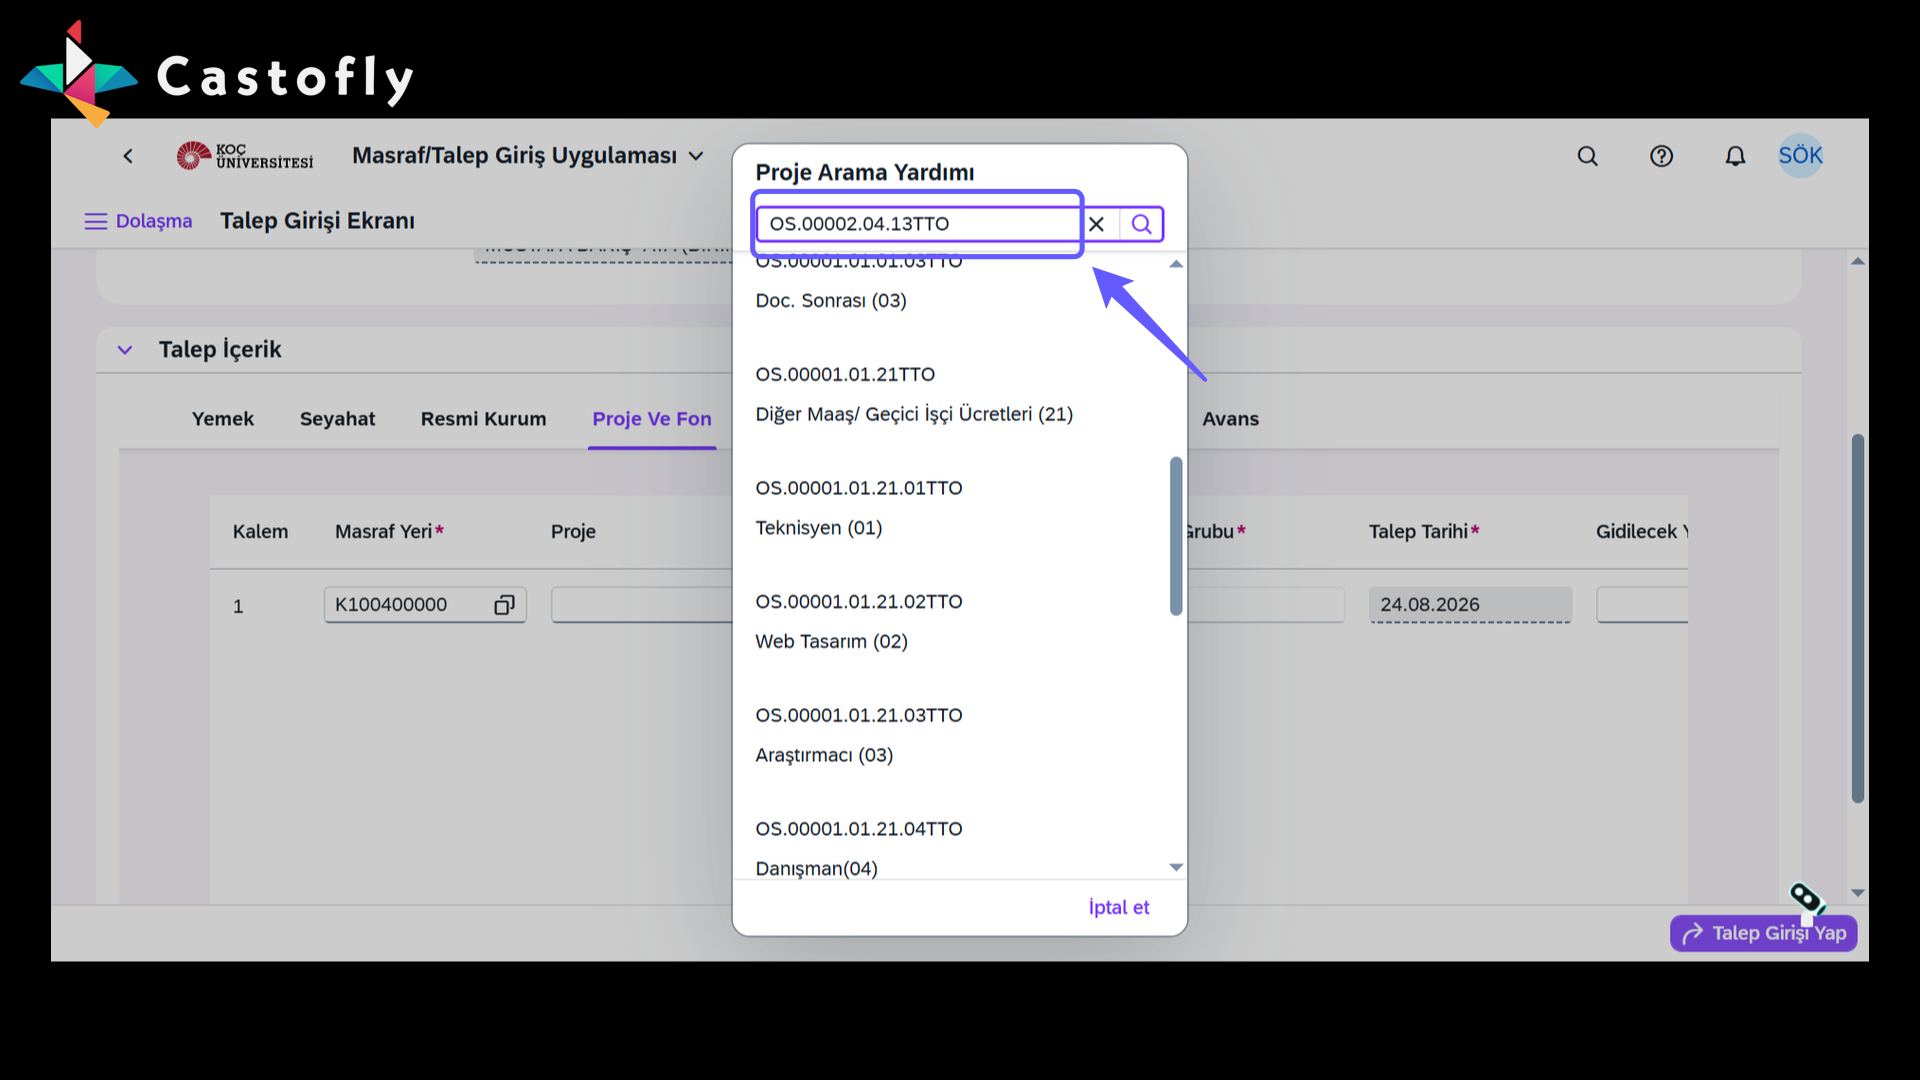
14. Project Selection
-
Click a project to select it and confirm.
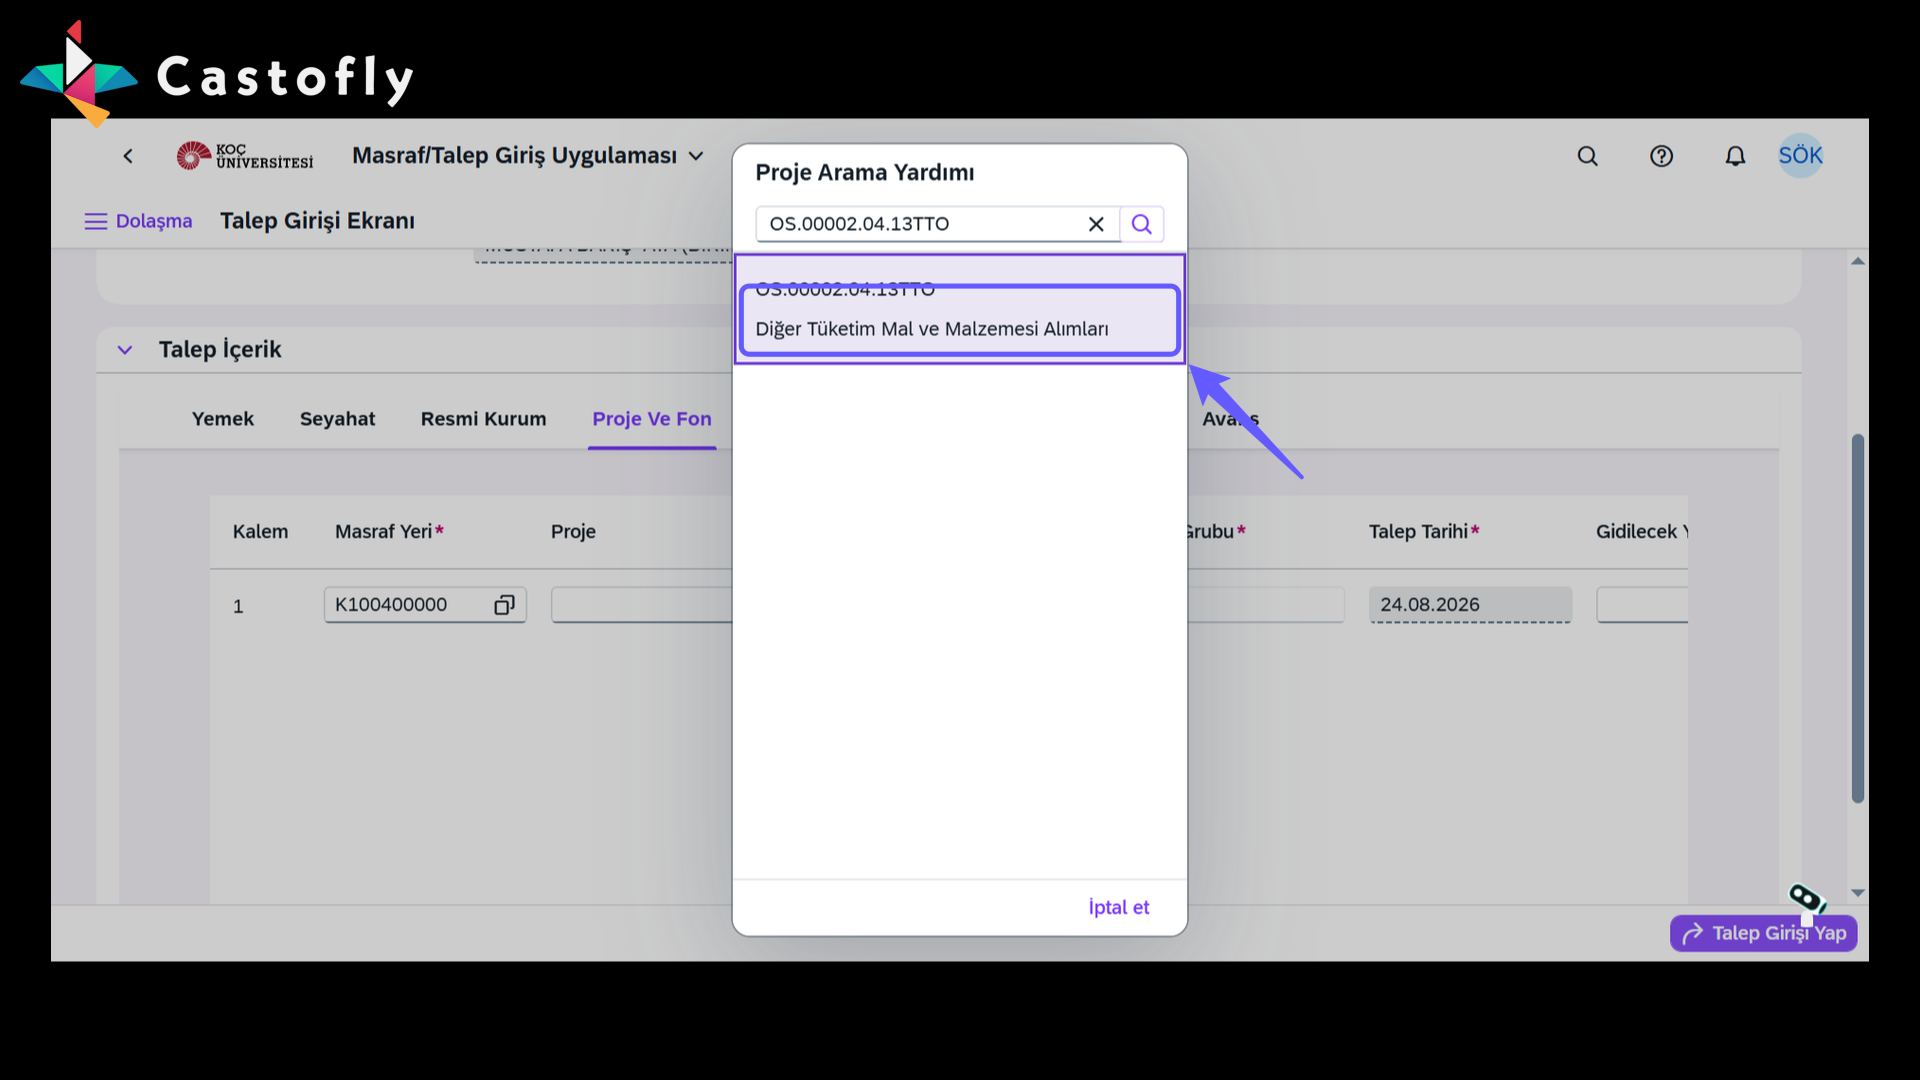
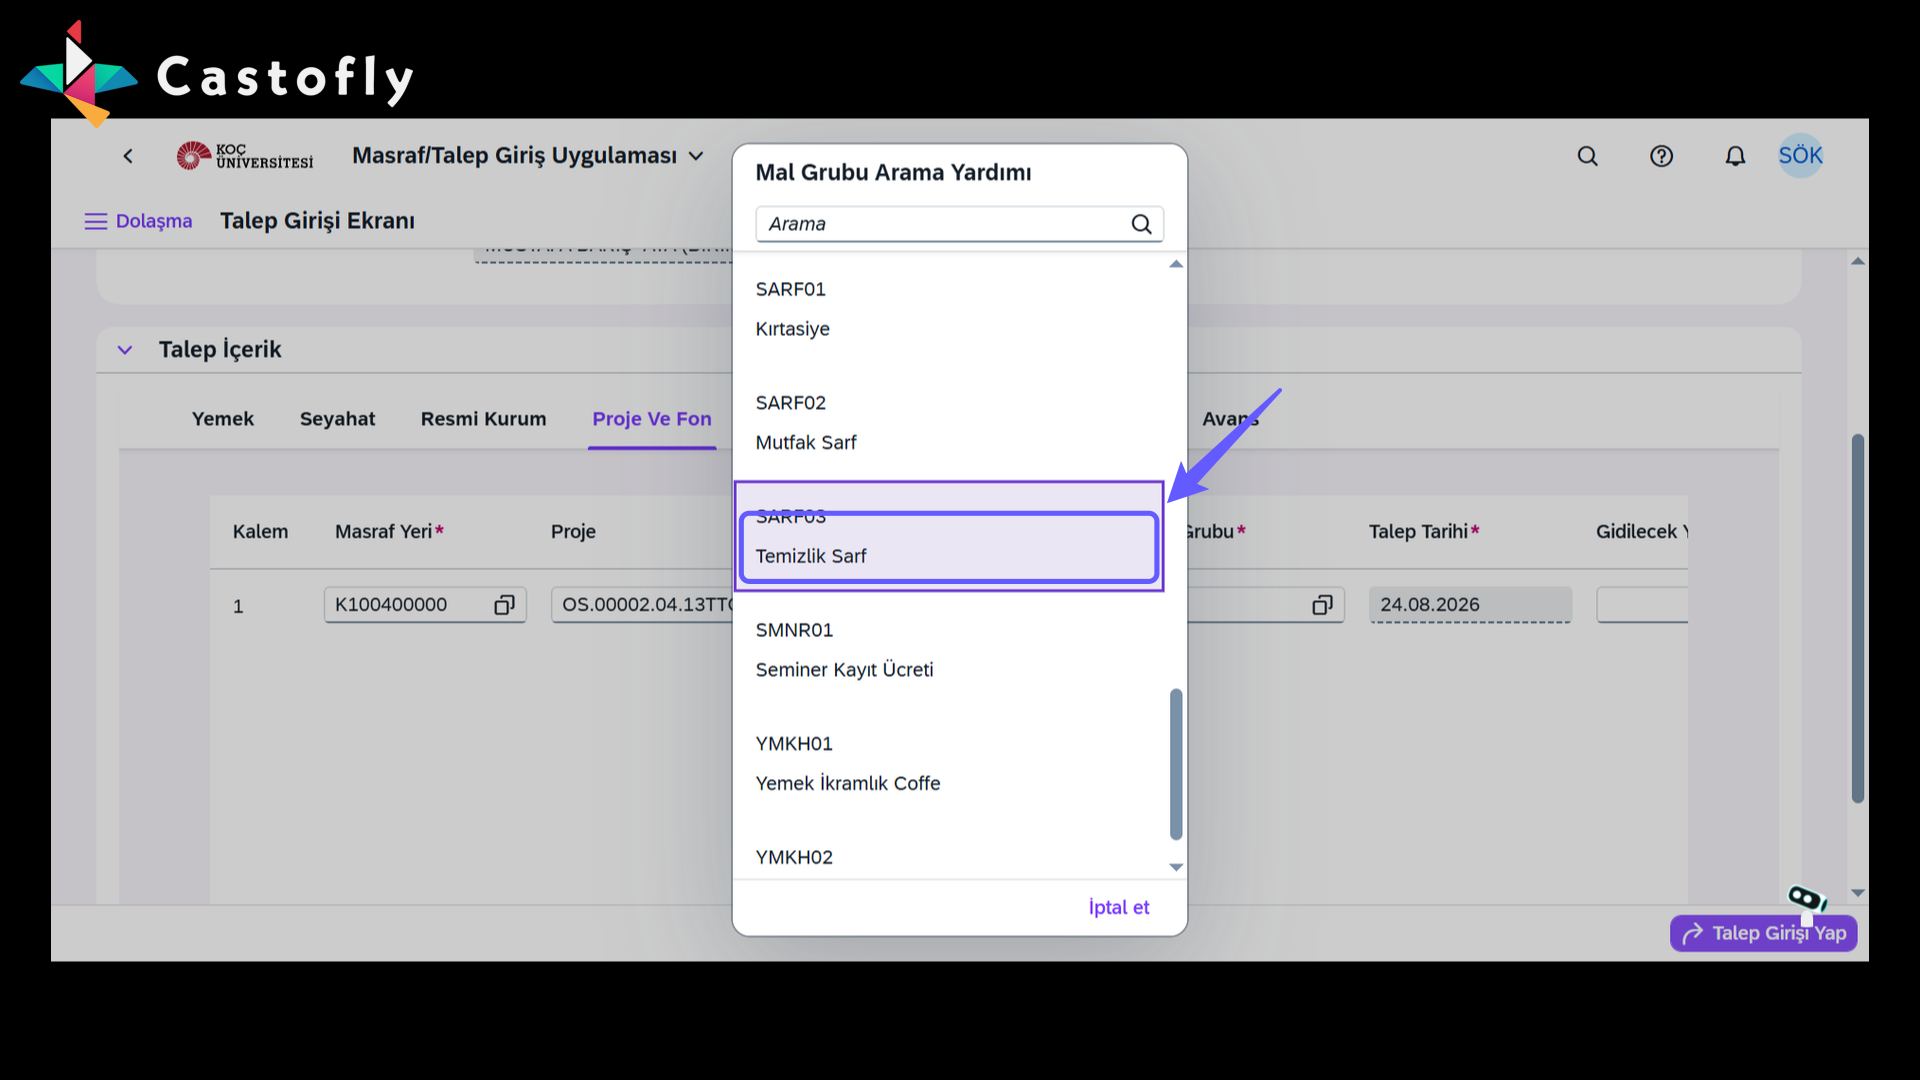
15. Select Material Group
-
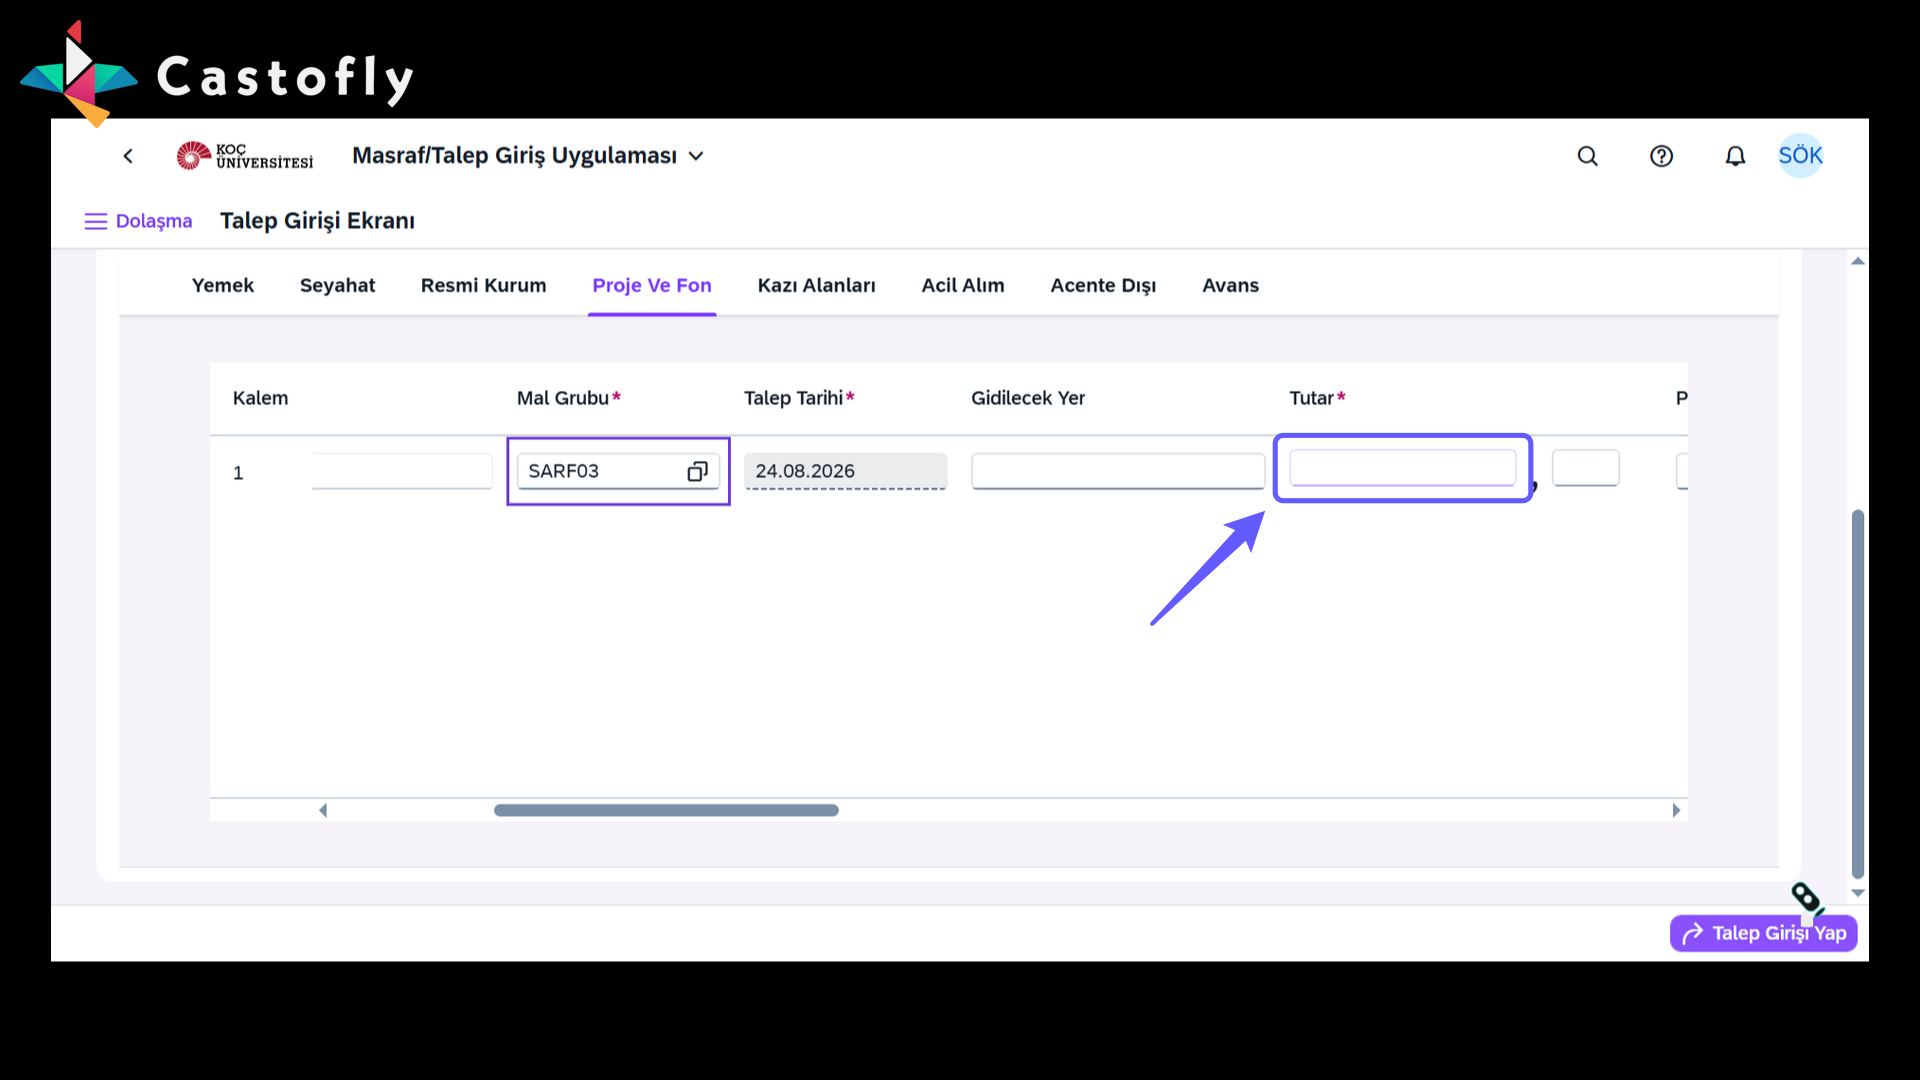
Click the file icon to determine the expense category for the request.
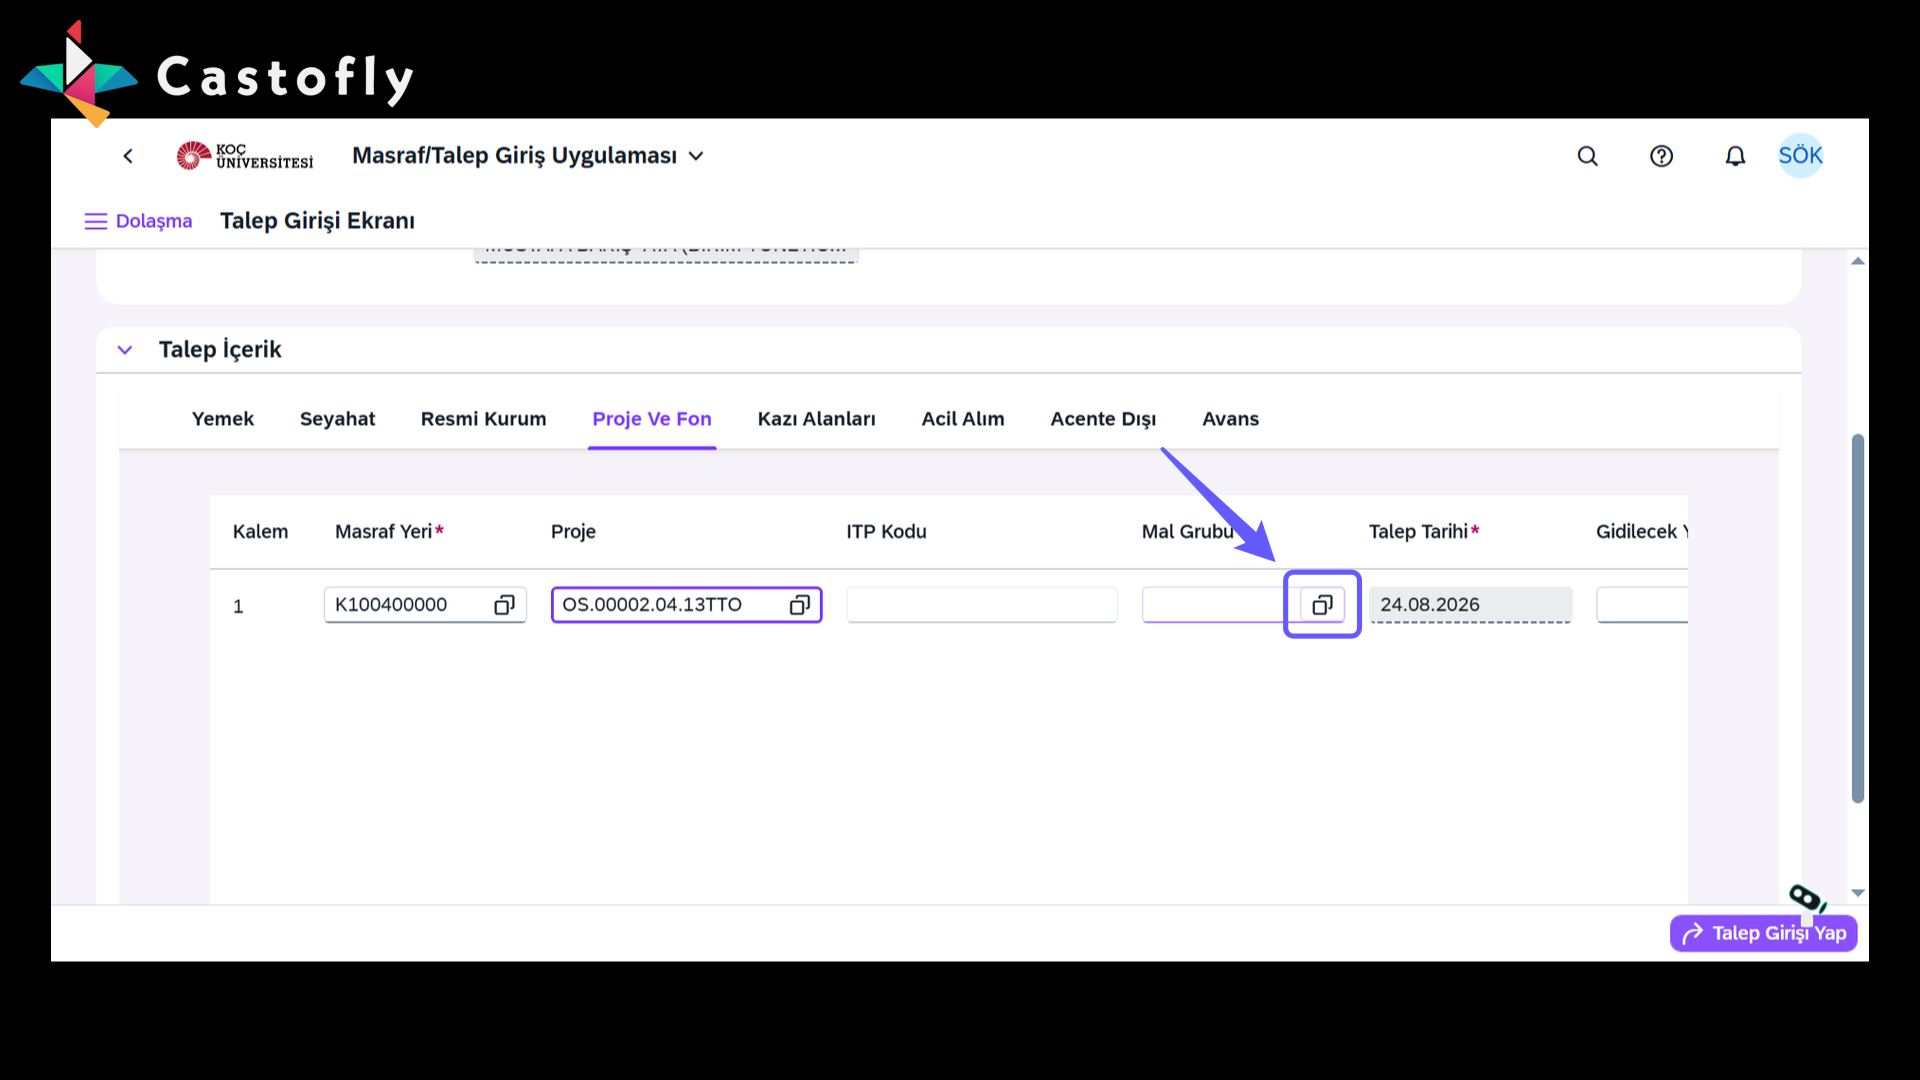
16. Select Cleaning Supplies
-
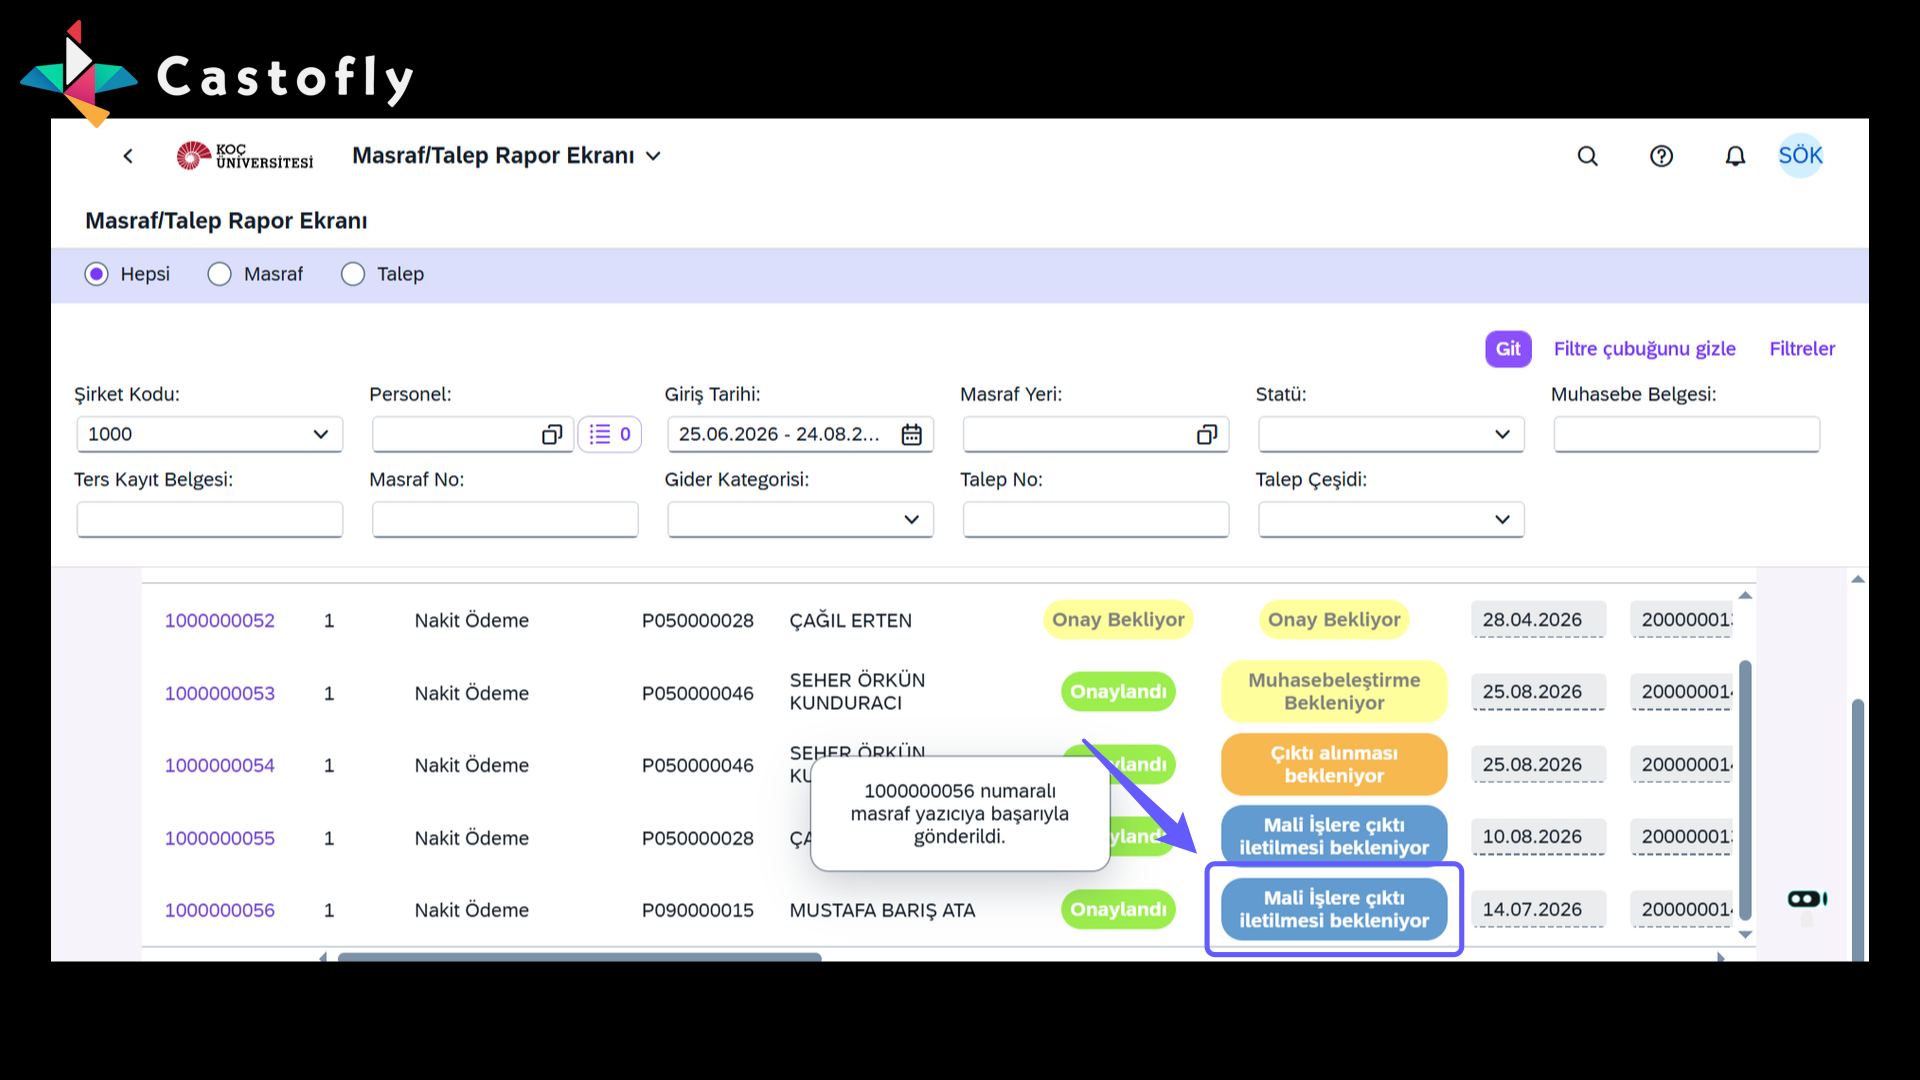
Determine the material group by selecting the request category. This step is required to complete the expense entry.
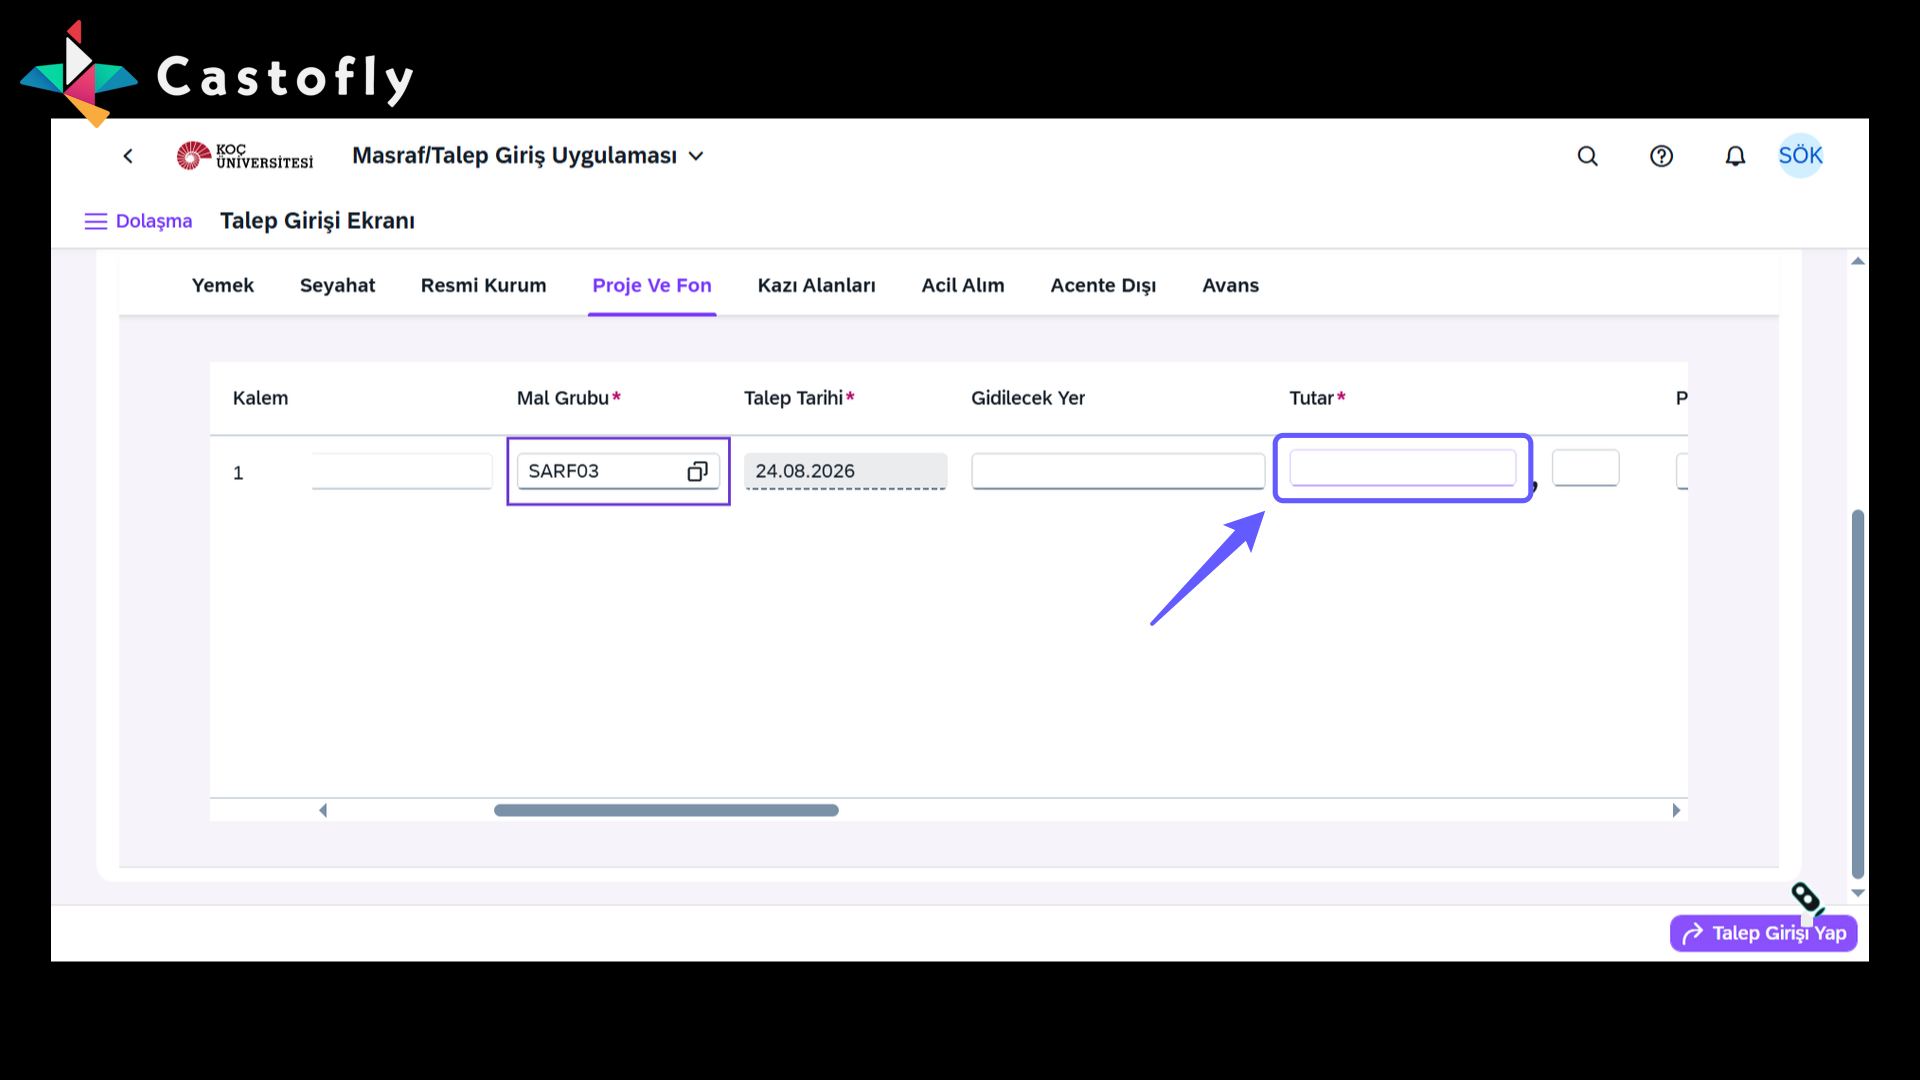
17. Enter Amount
-
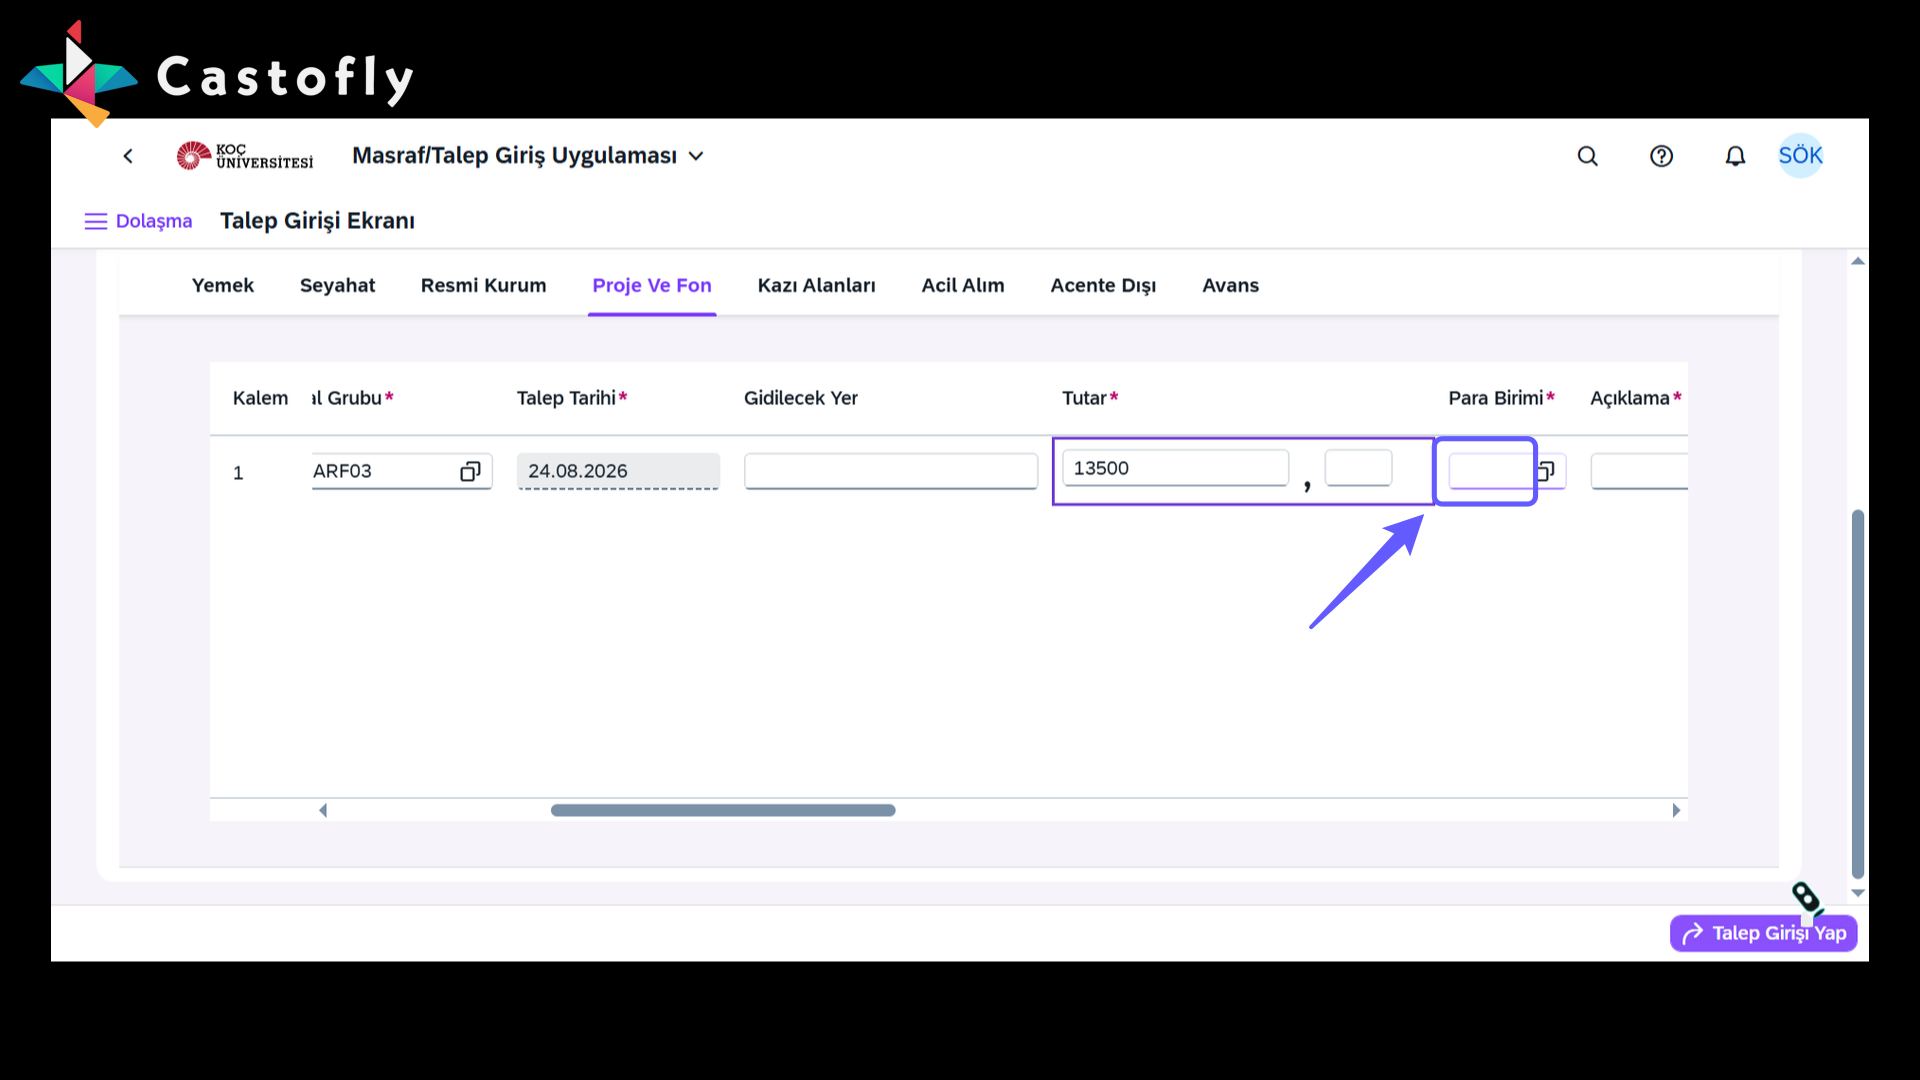
Enter the requested amount in this field. Make sure the information is accurate and complete.
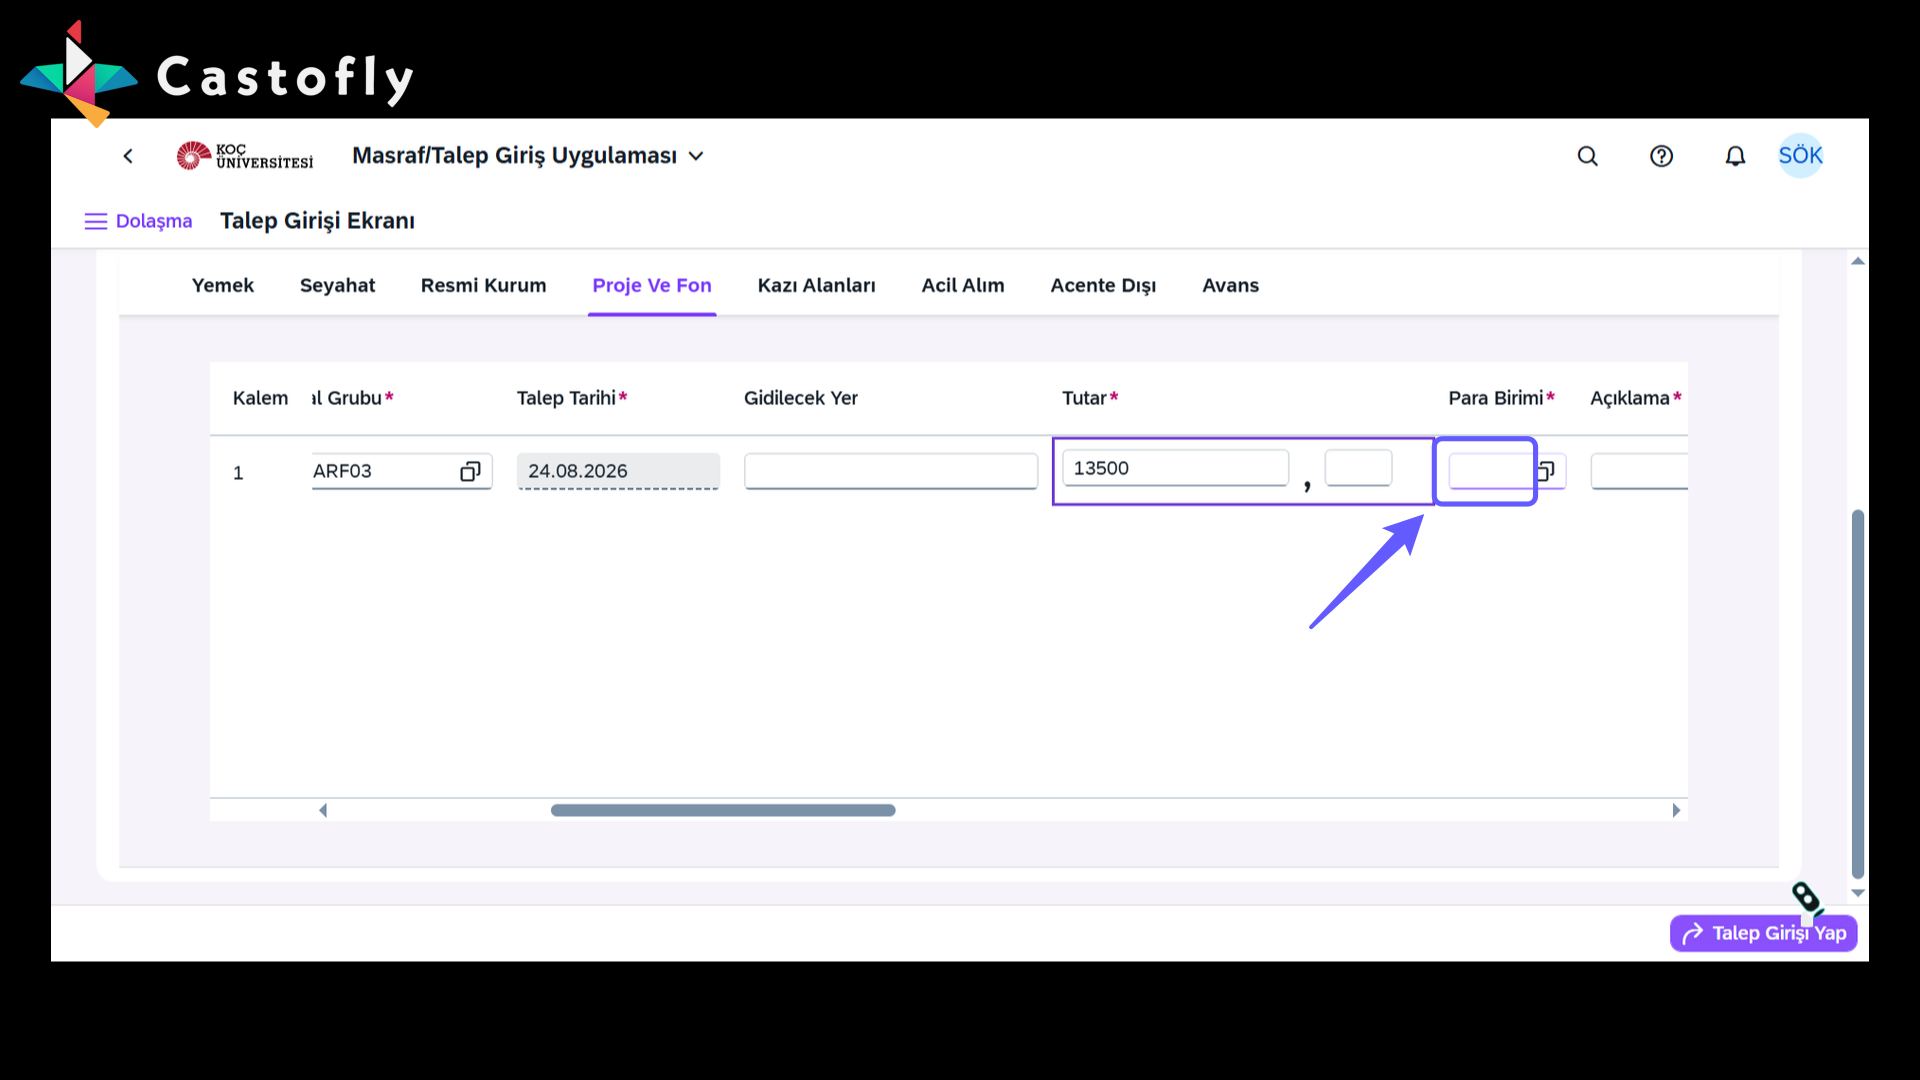
18. Select Currency
-
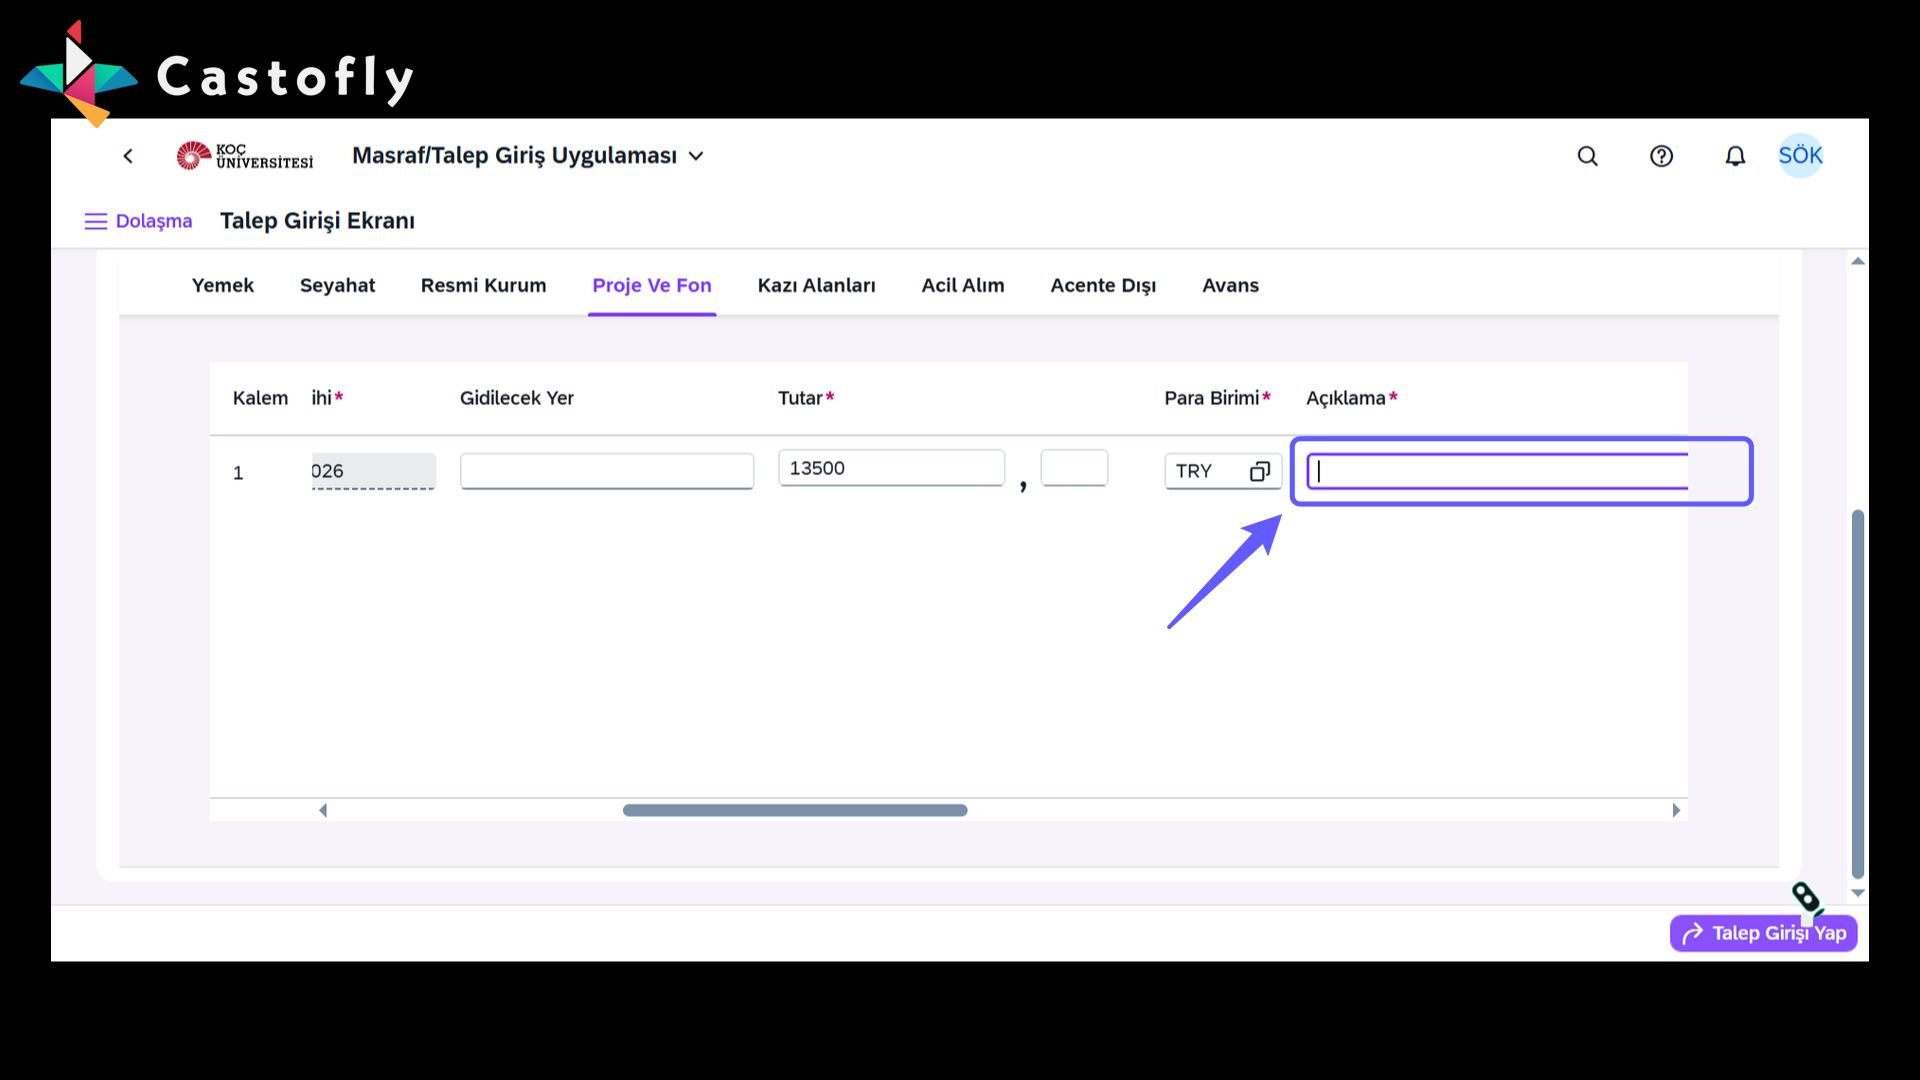
Click the currency selection field and choose the currency you want.
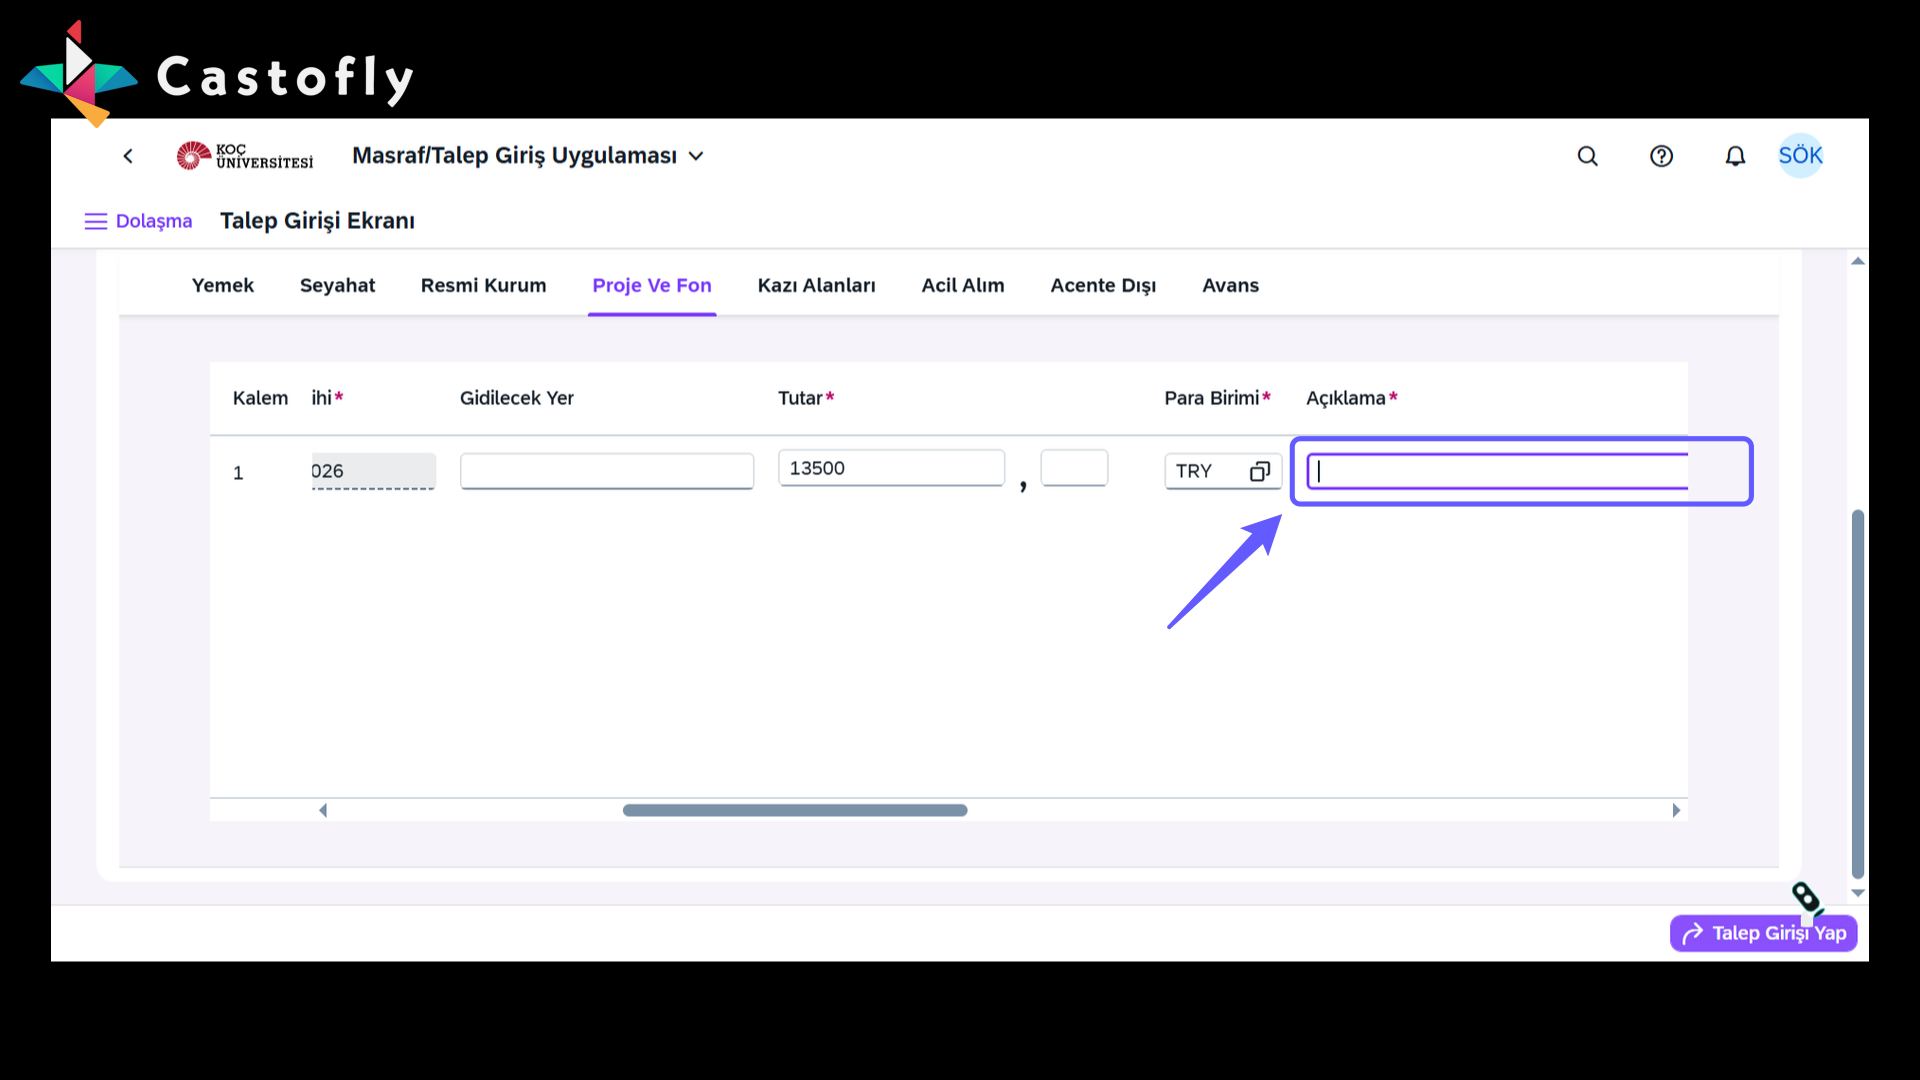
19. Fill in the Description Field
-
Enter details related to the project in the description field.
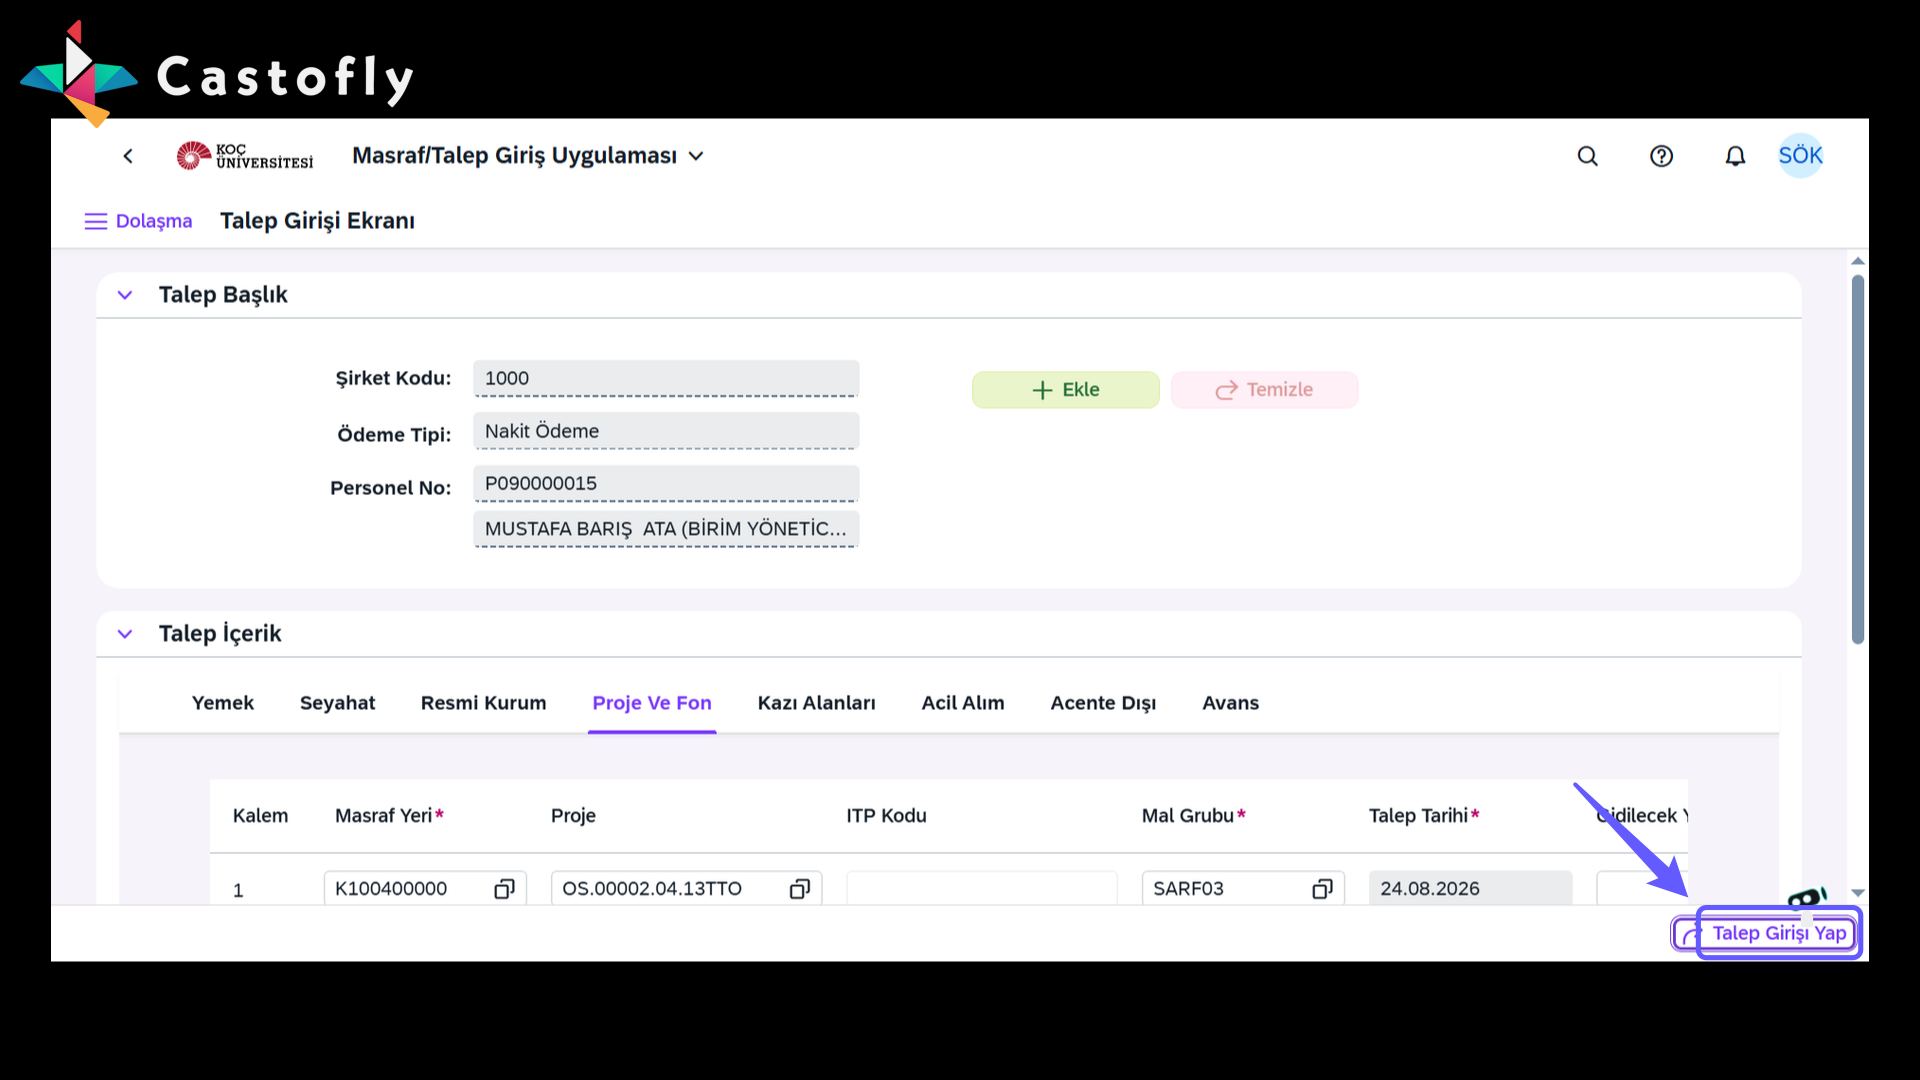
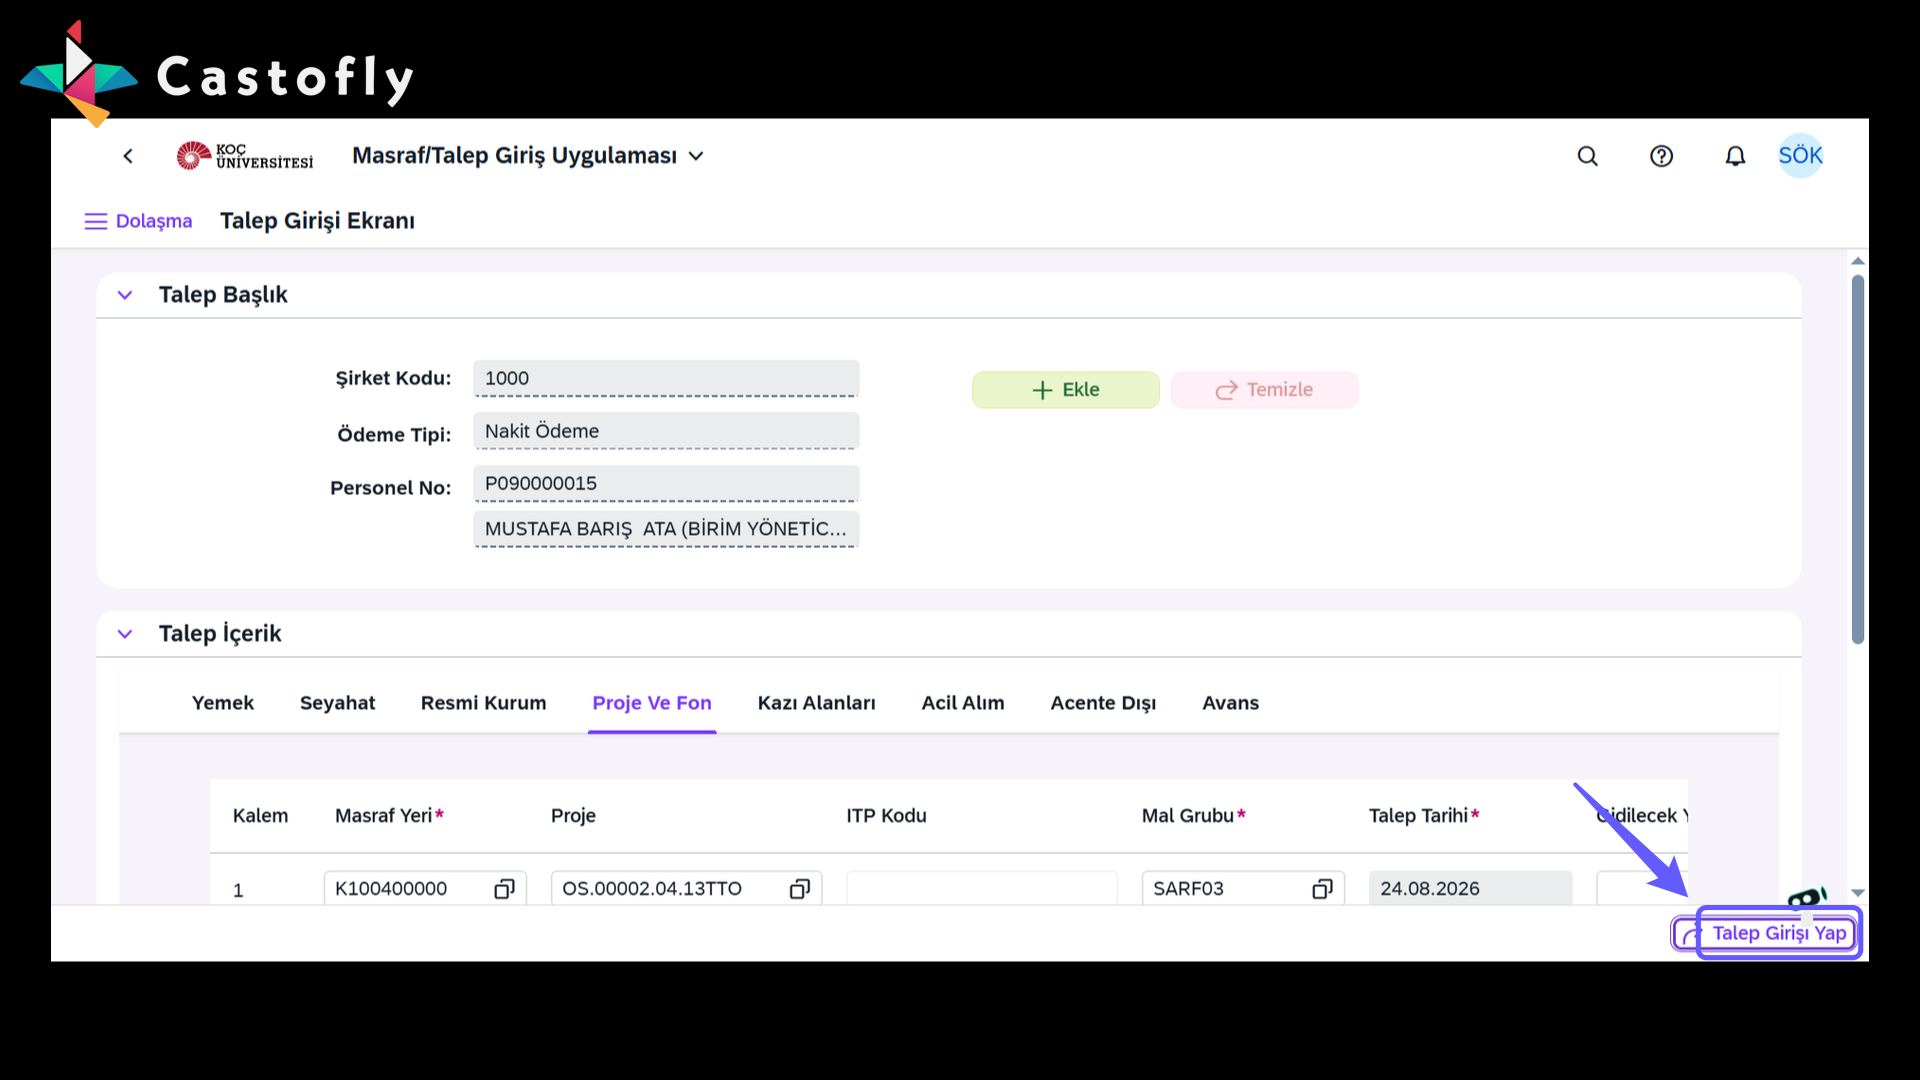
20. Submit Request Entry
-
Click here to start the request entry process. Check the required information and confirm the final step to complete the process.
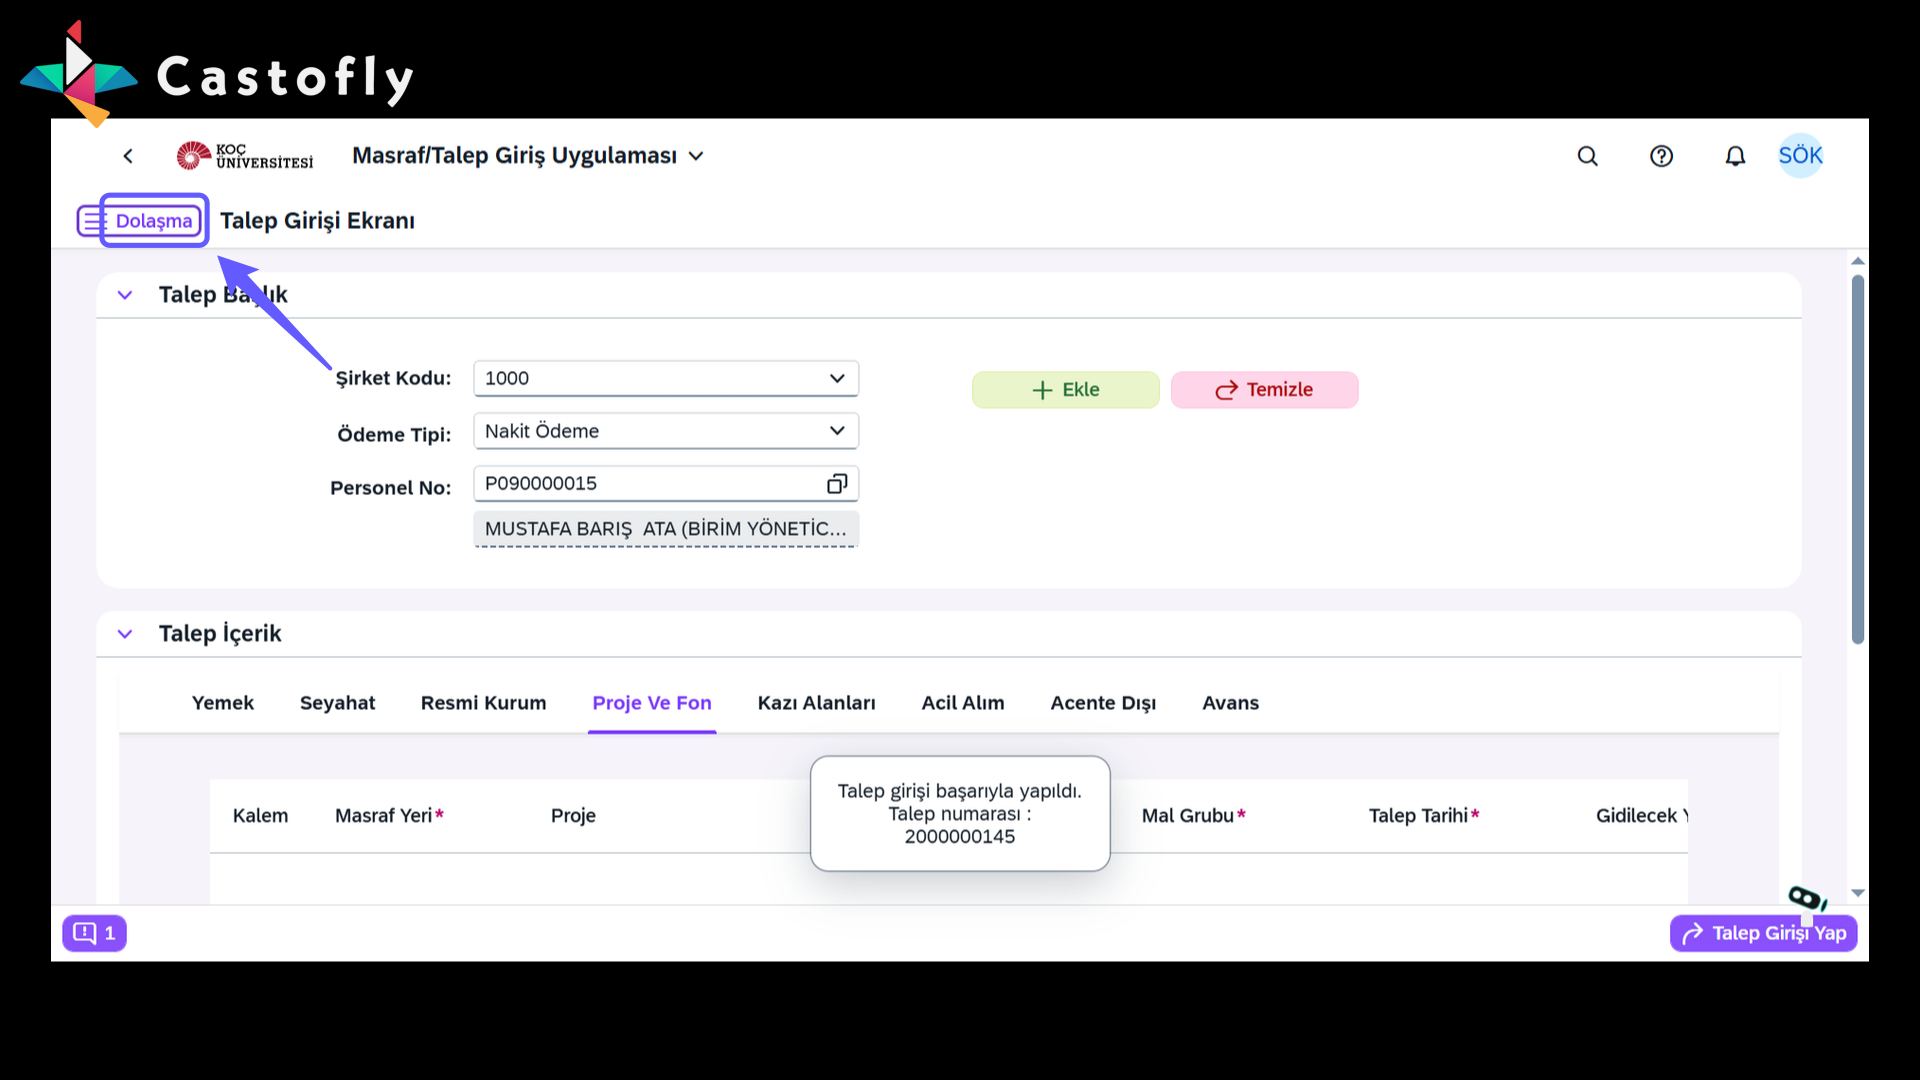
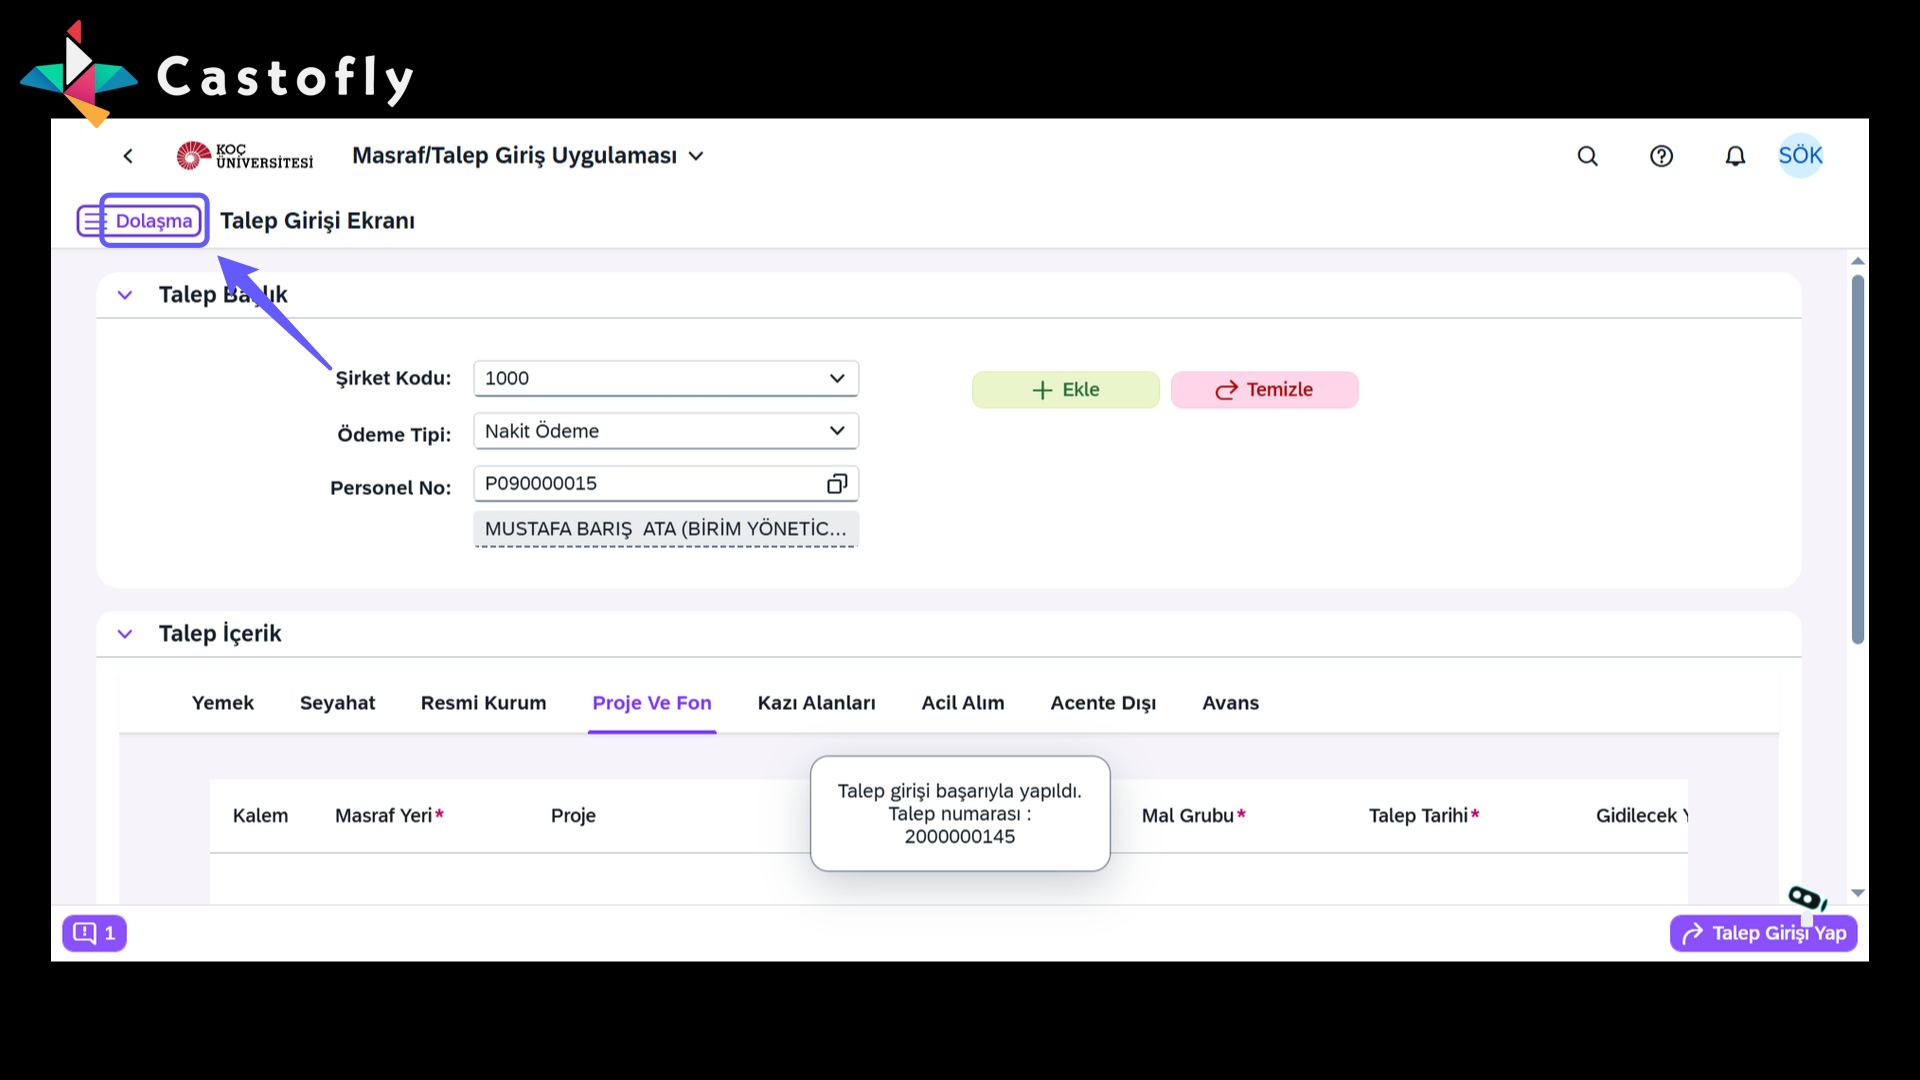
21. Access the Menu
-
After successfully creating the request entry, return to the menu area to convert the request into an expense.
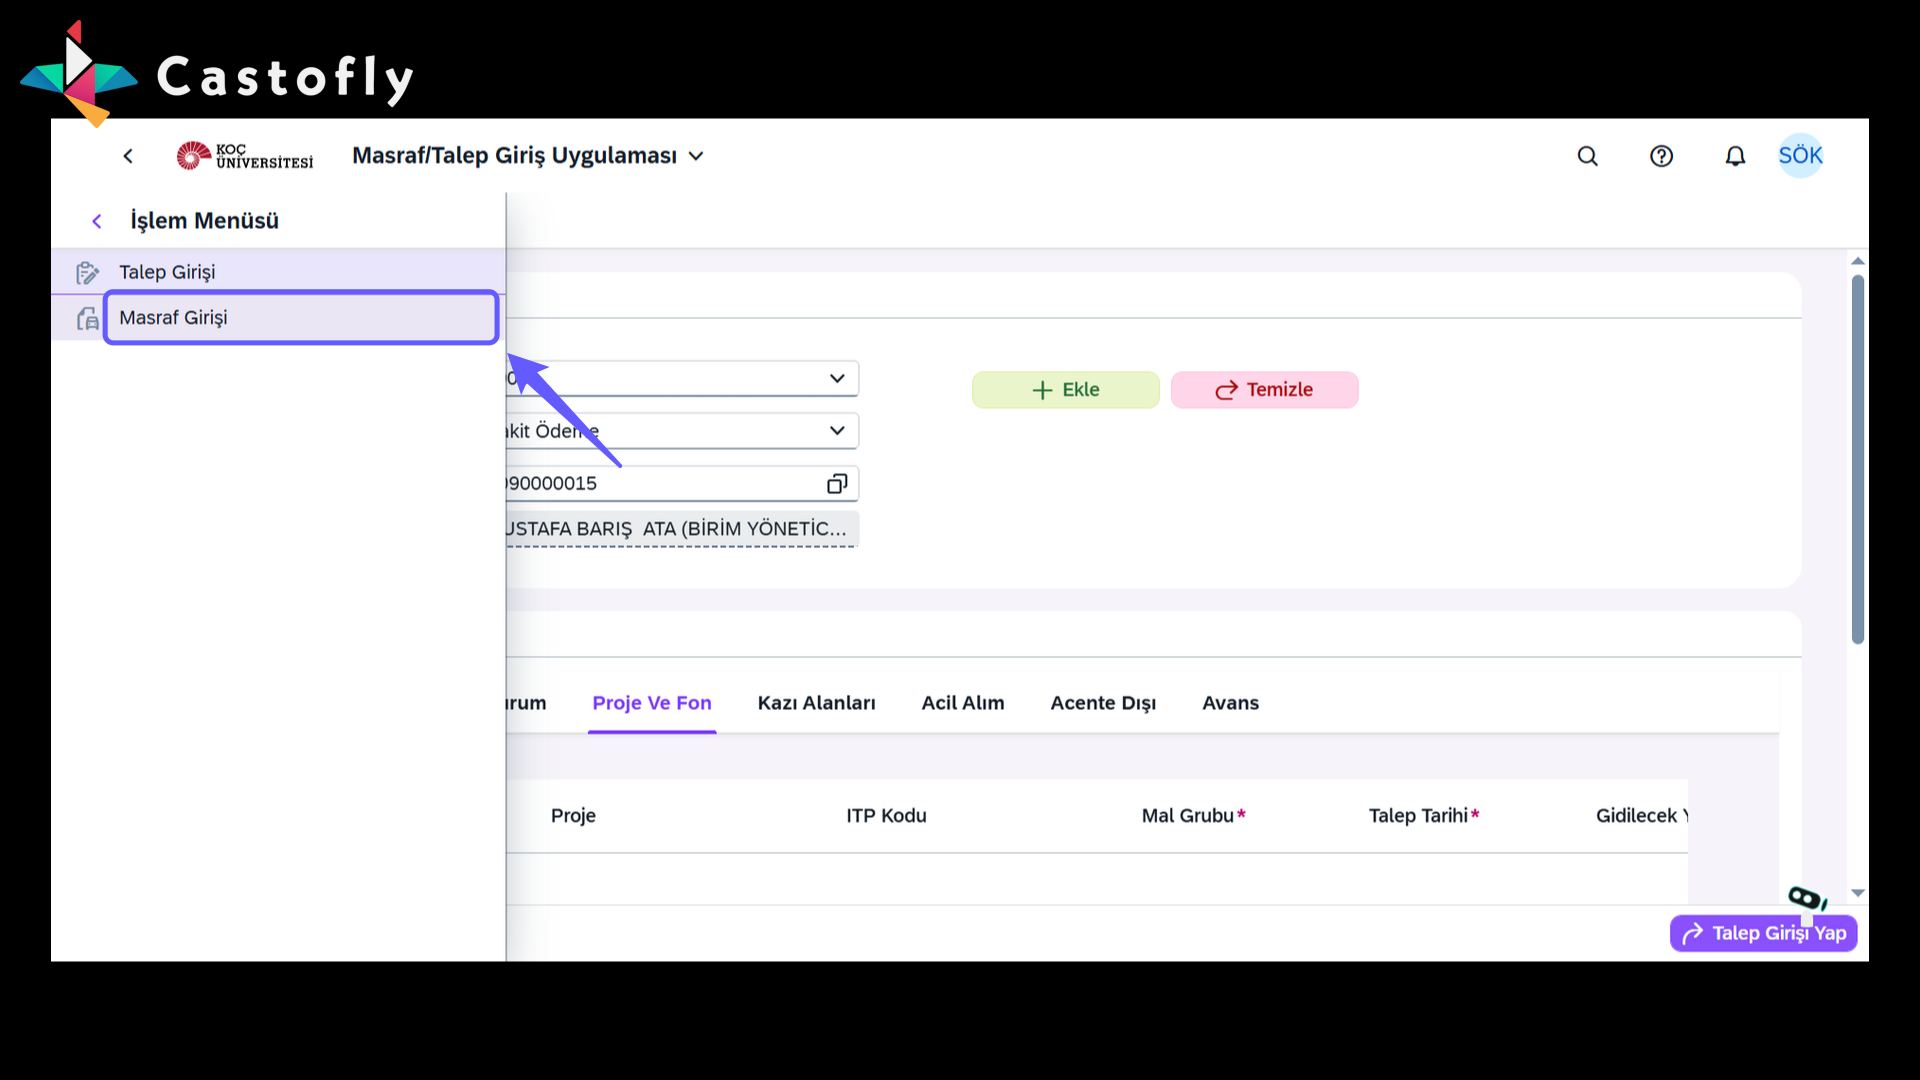
22. Expense Entry
-
Click the expense entry option.
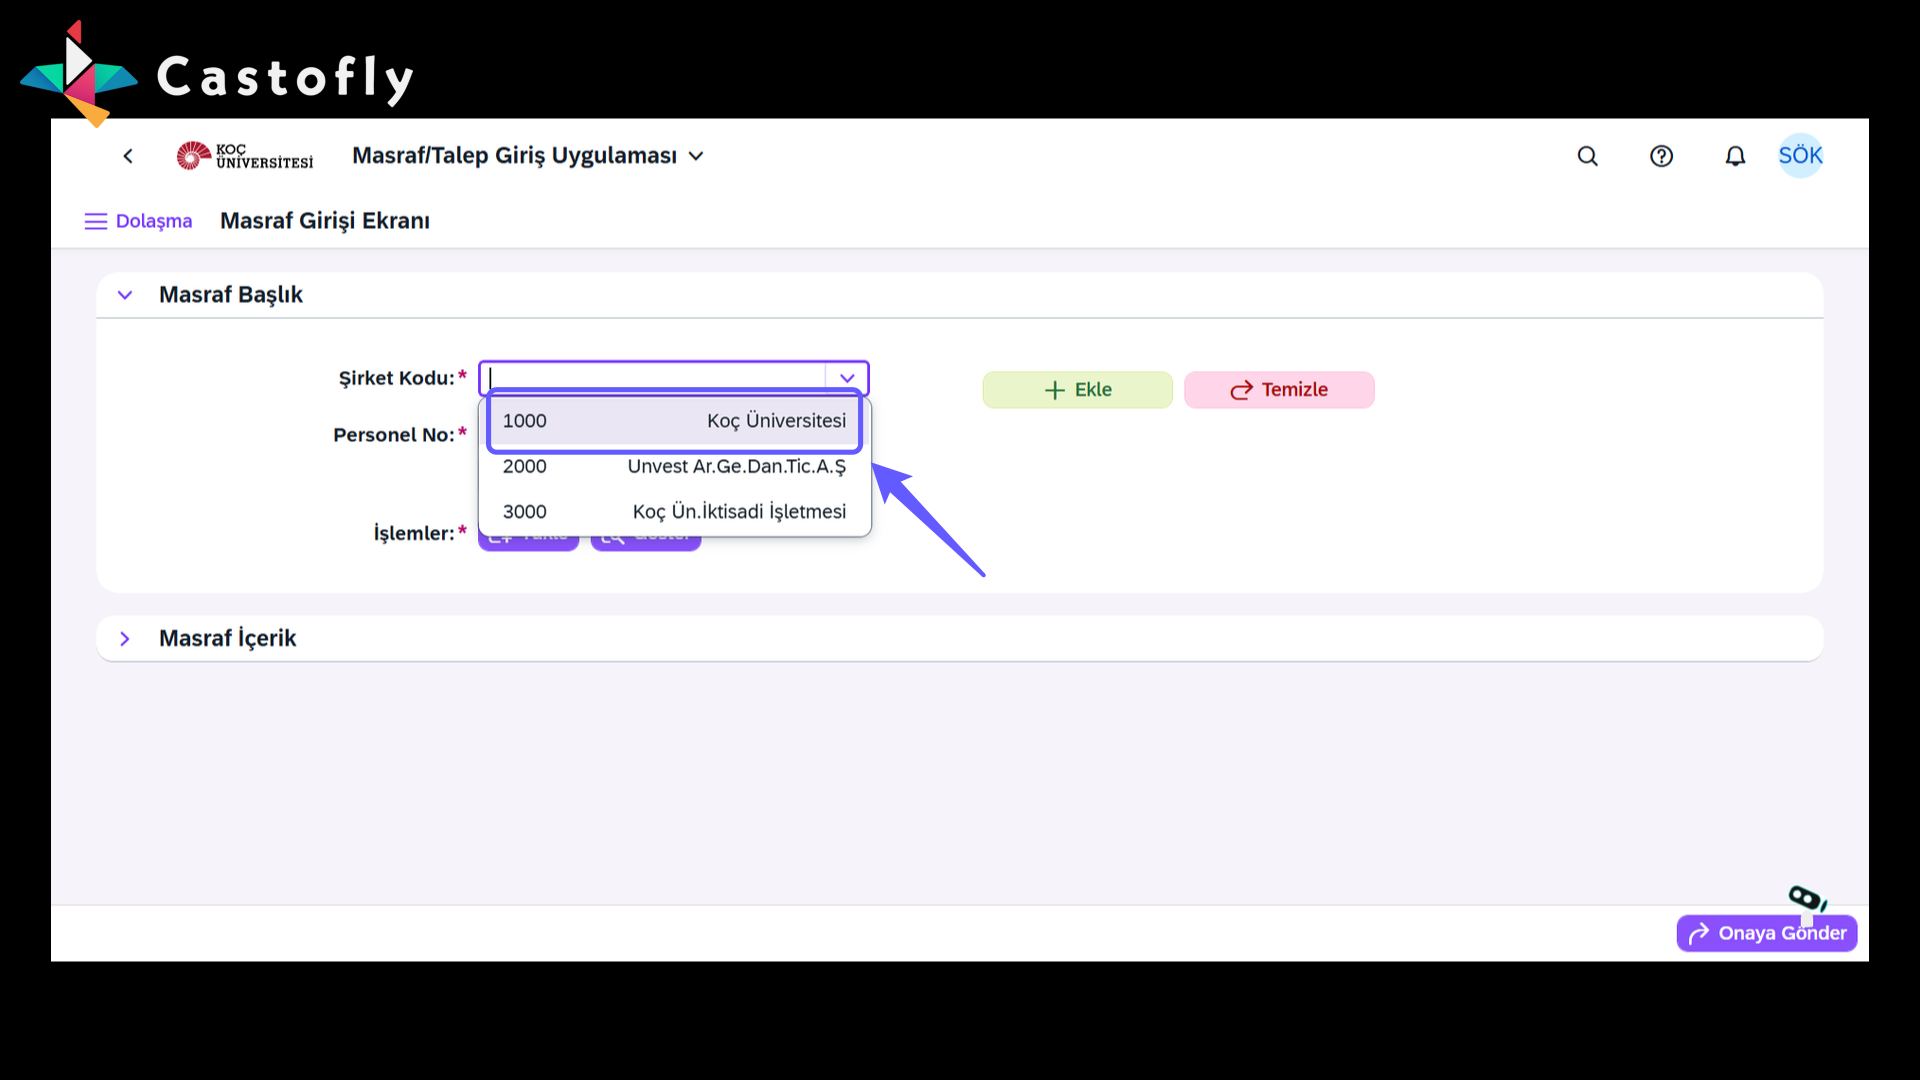
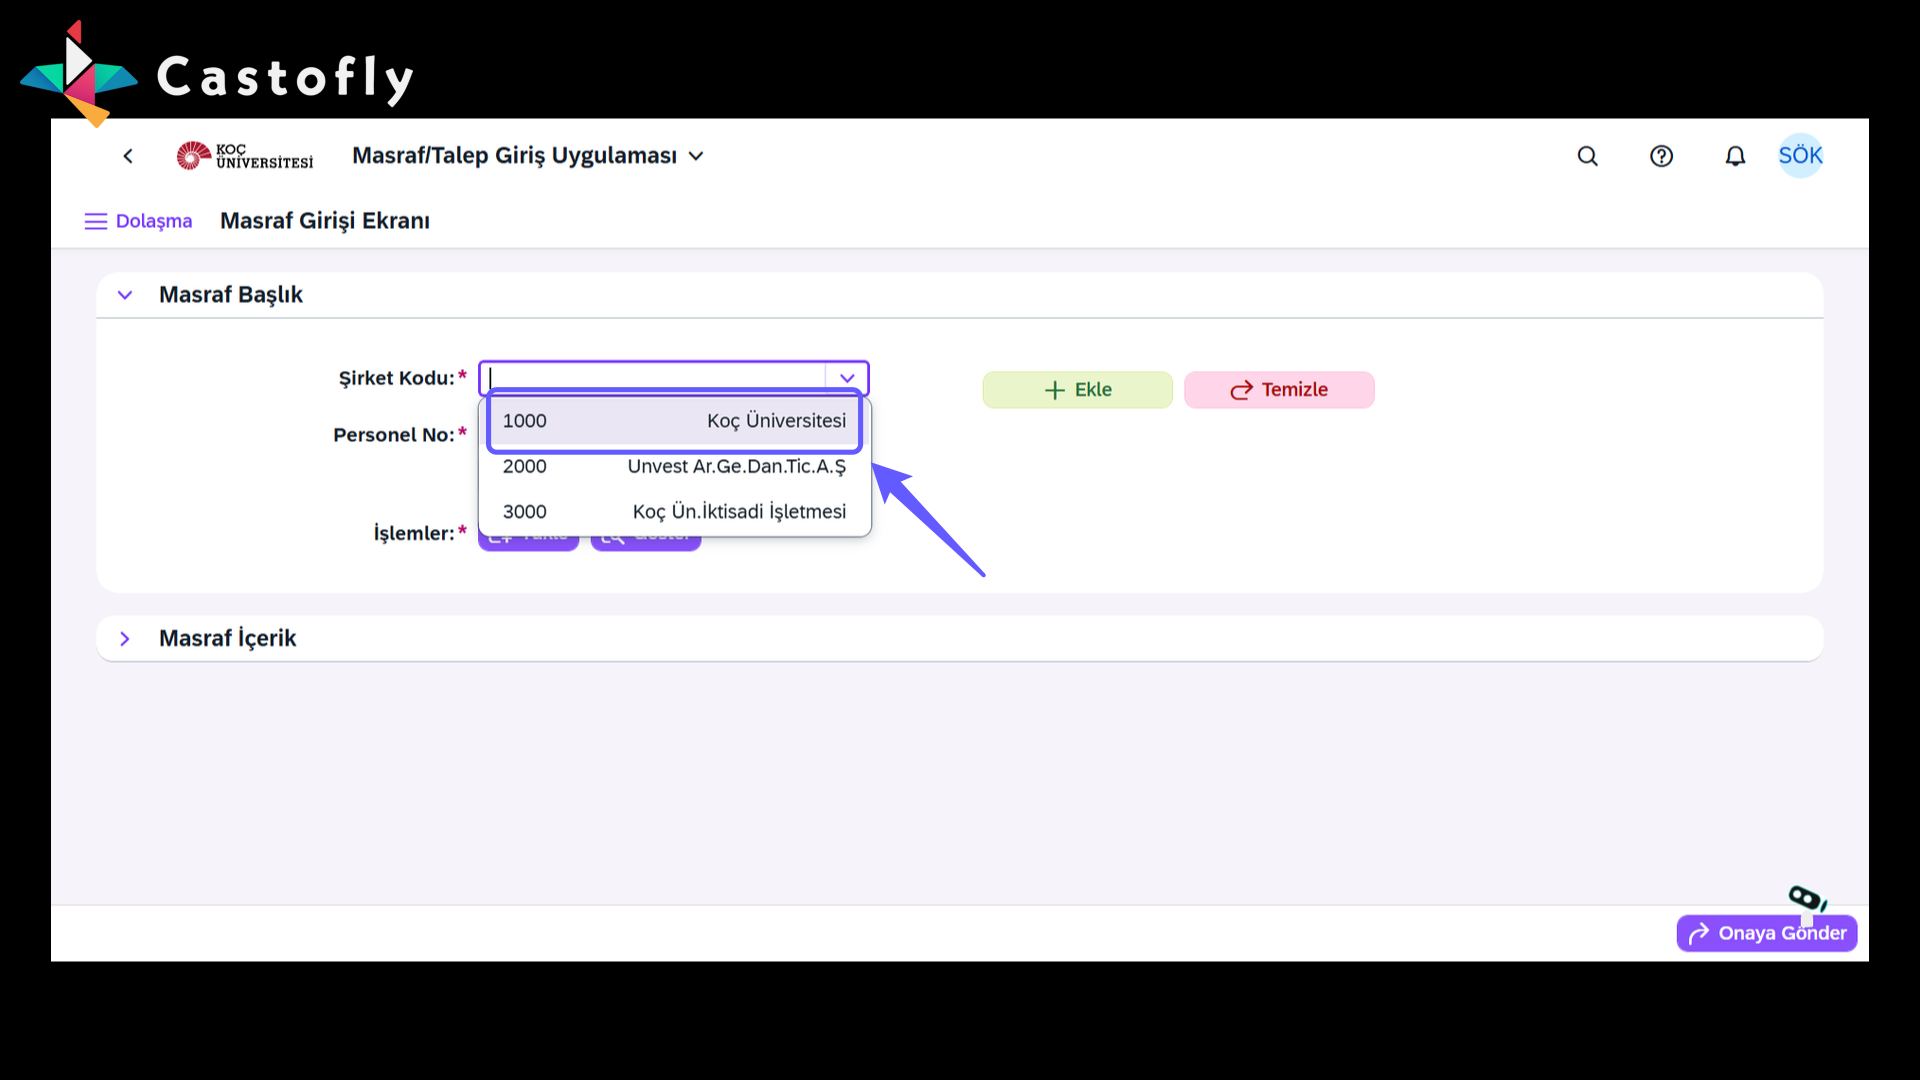
23. Select Company Code
-
Click the dropdown in the Company Code field again and re-select the correct option.
24. Select Personnel
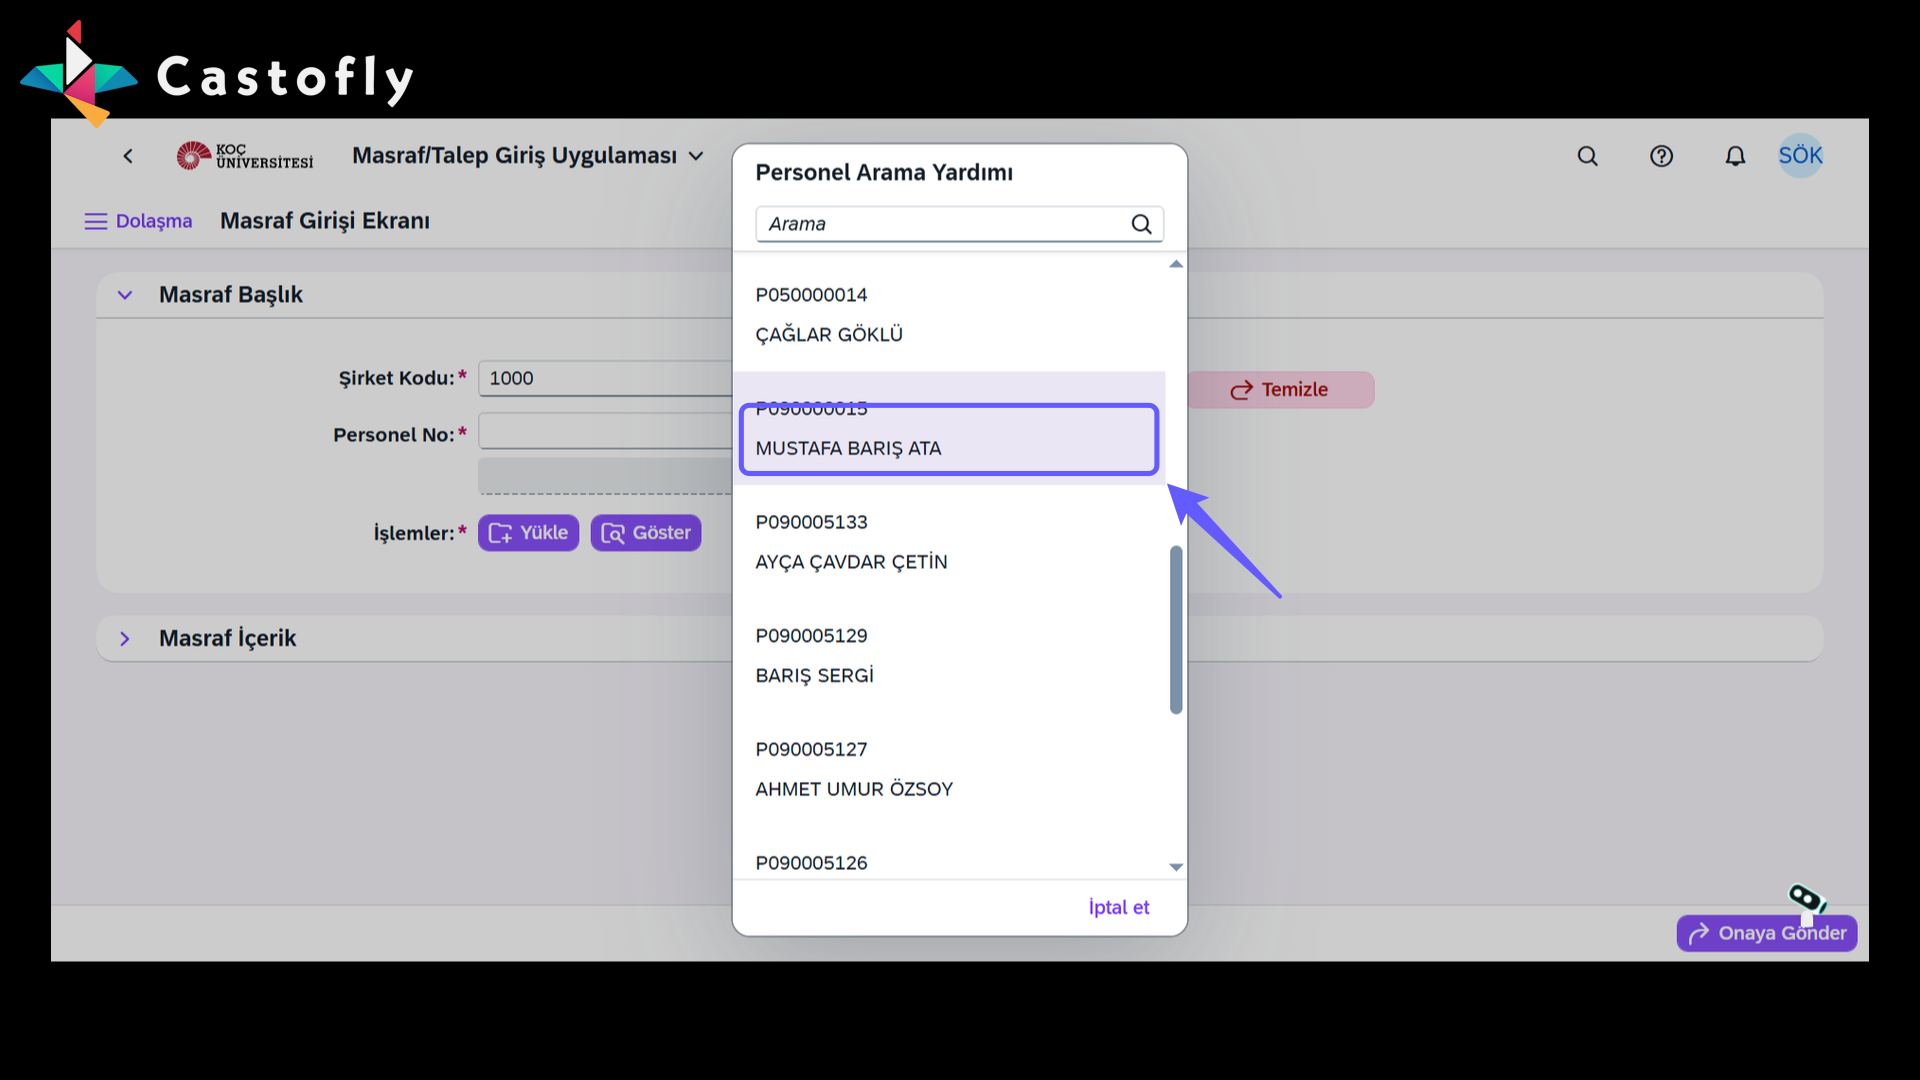
-
Re-select the request owner so the request can be converted into an expense.
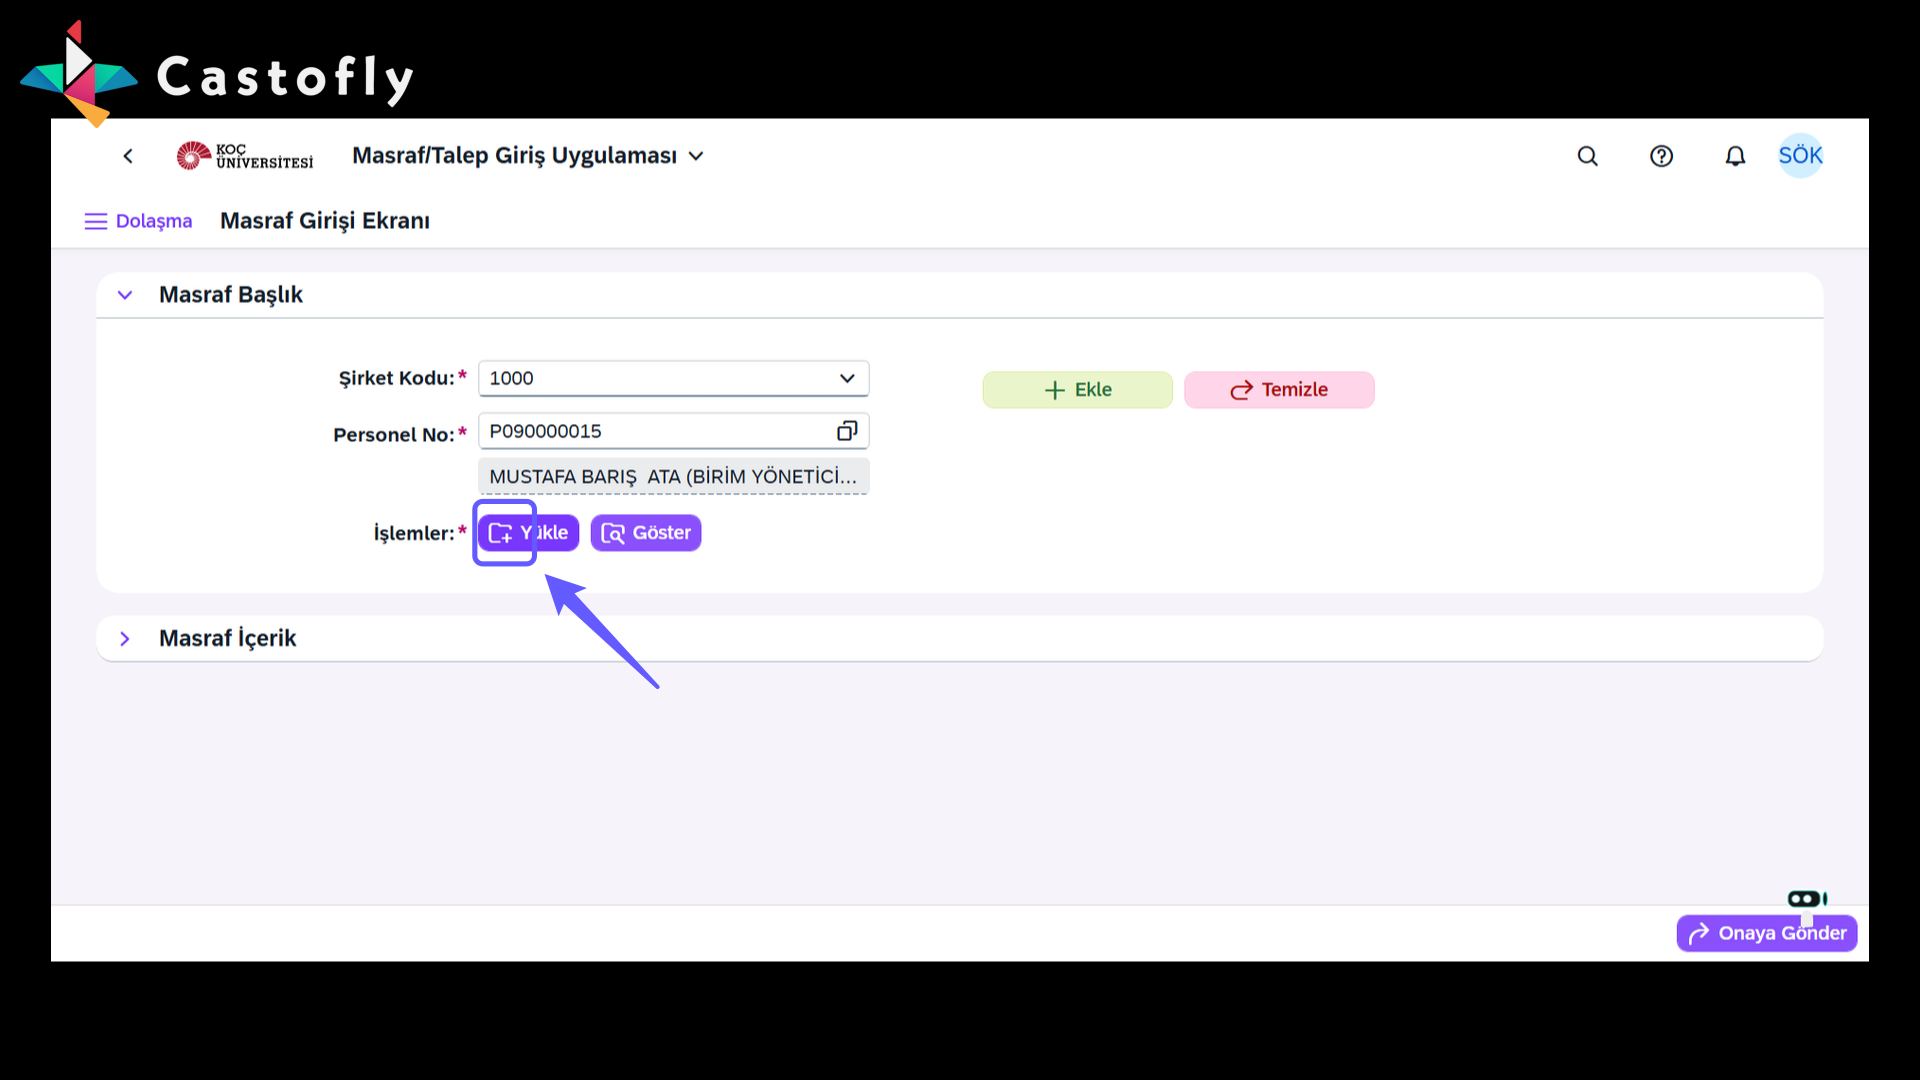
25. File Upload
-
Click the 'Browse' button to select the file you want to upload, then click 'Upload' to transfer the file into the system.
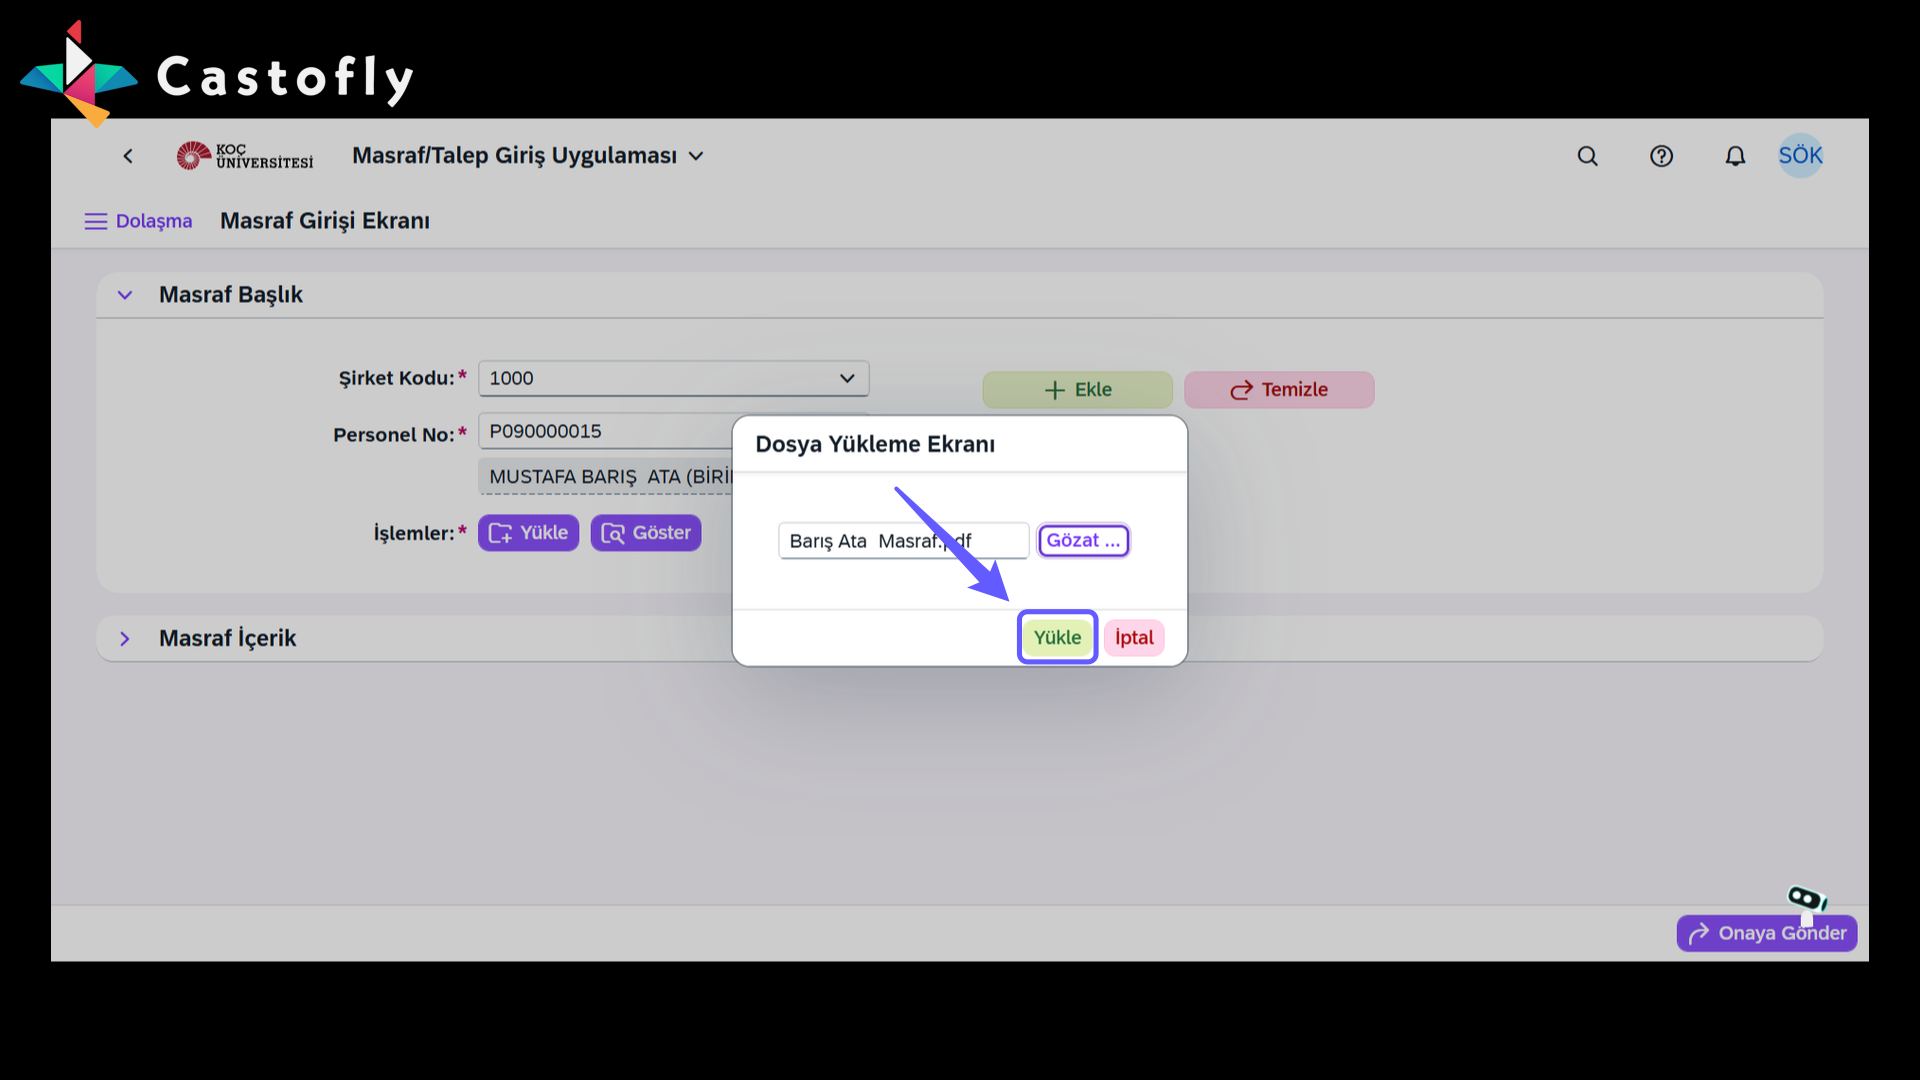
26. Upload the File
-
Click the 'Upload' button to upload the selected file. Once complete, click 'Show' to view your uploaded files.
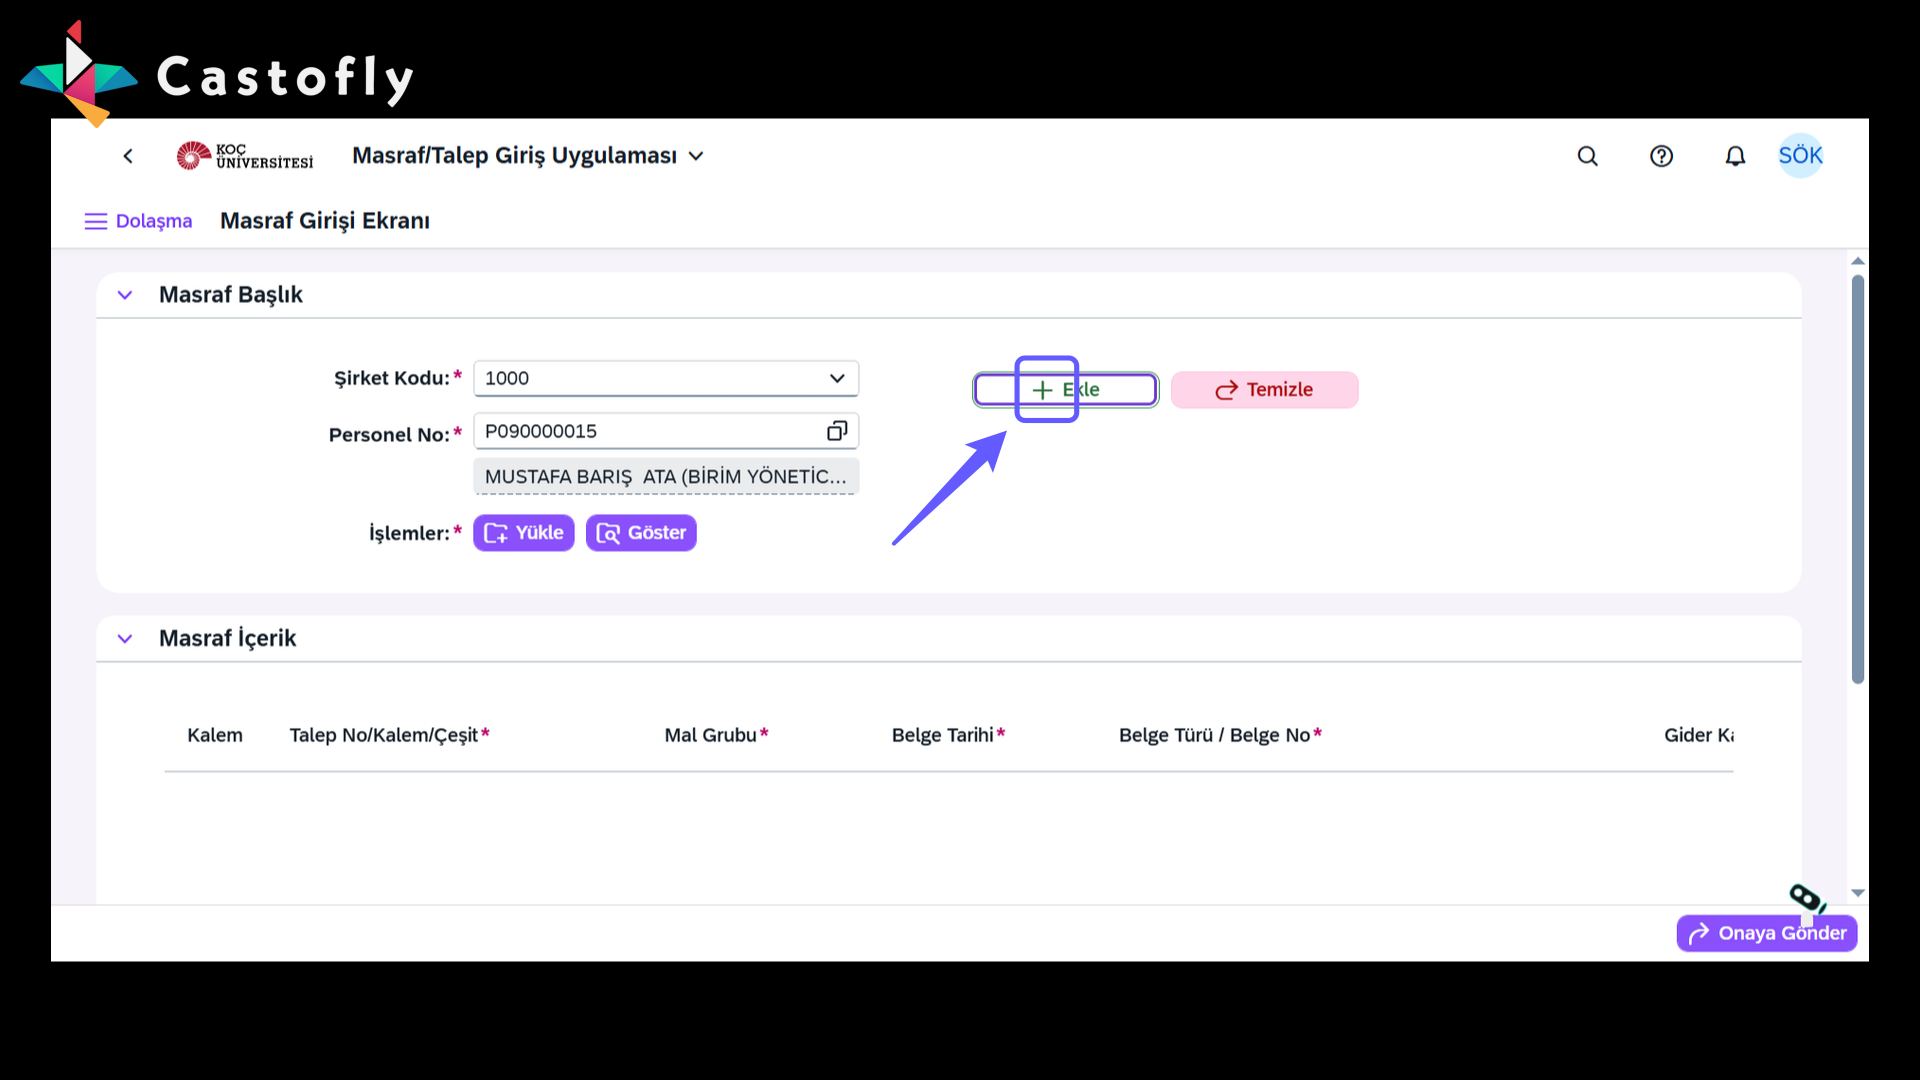
27. Add Expense Entry
-
Enter the details of the requested expense in the expense content section. Click 'Add' whenever you want to add a new expense entry.
28. Add Request Information
-
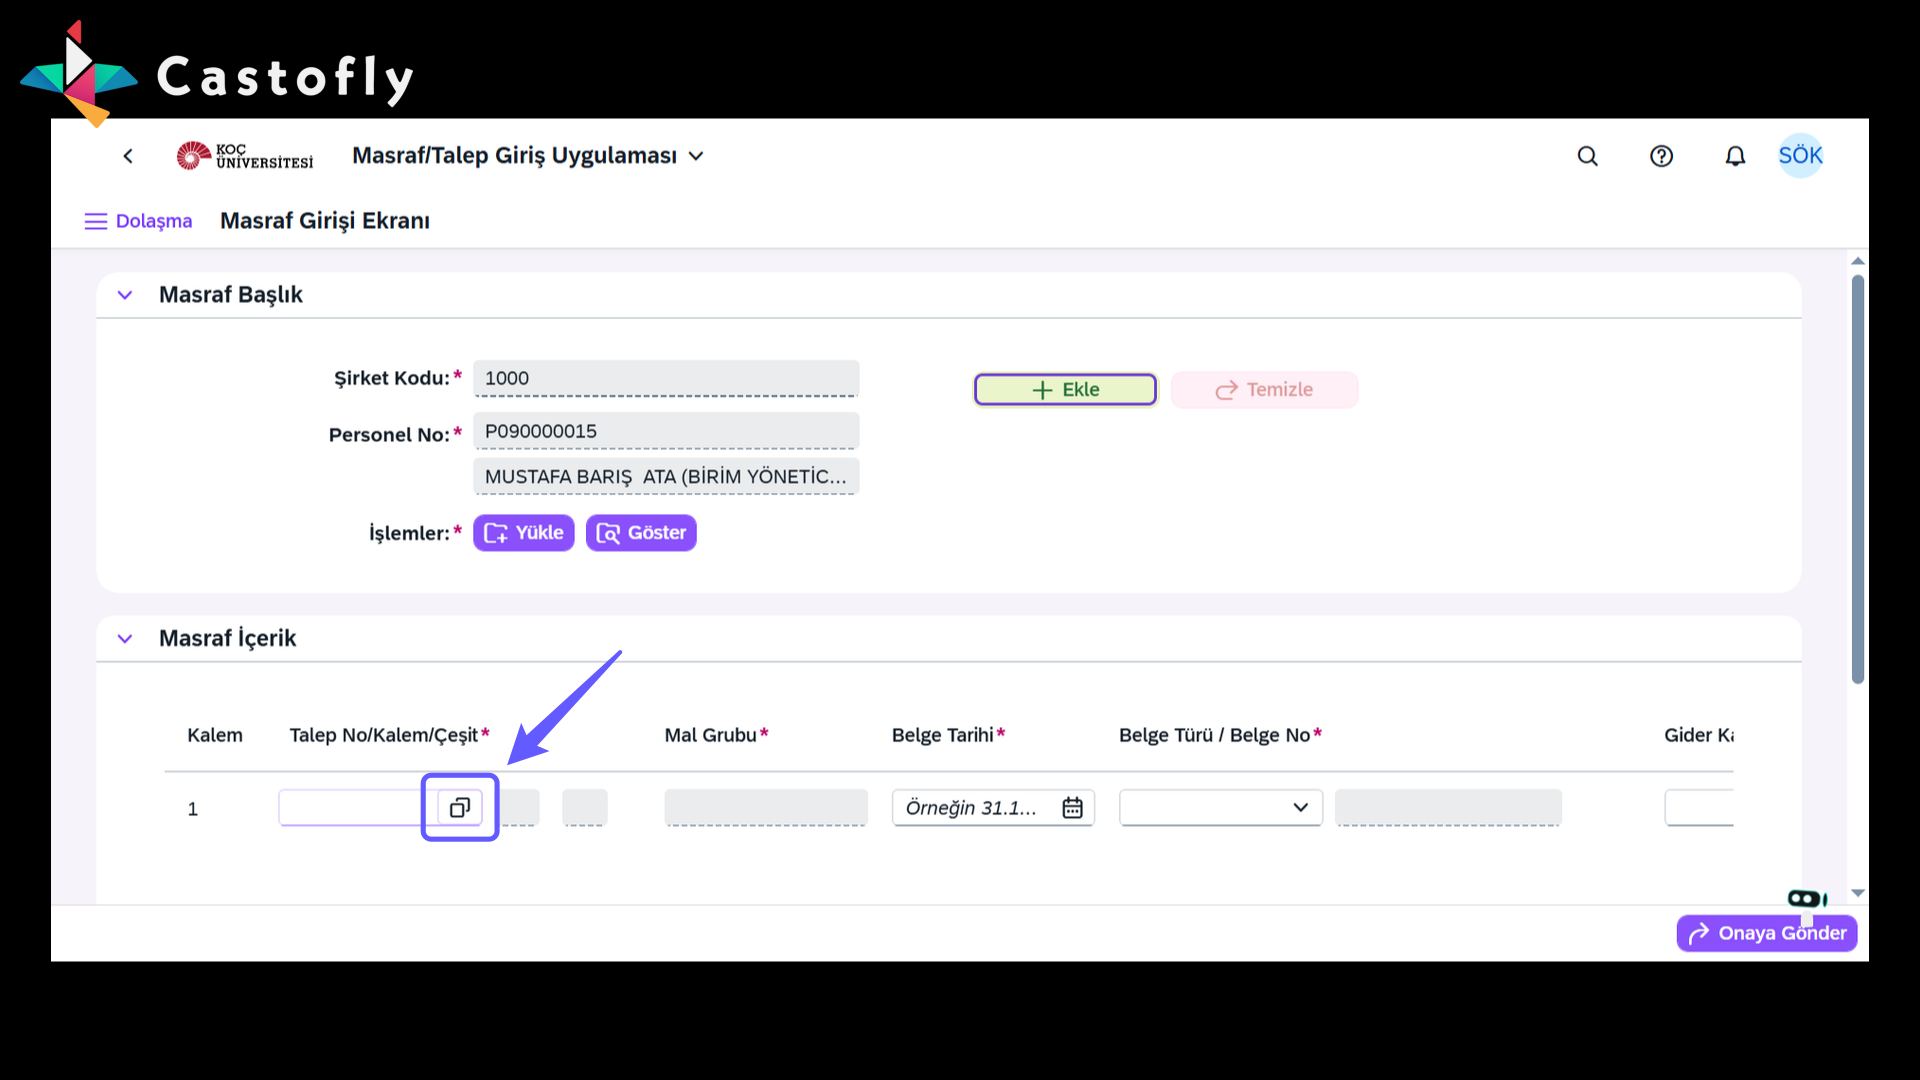
Click the box to select the request number and enter the required information.
29. Select Document Date
-
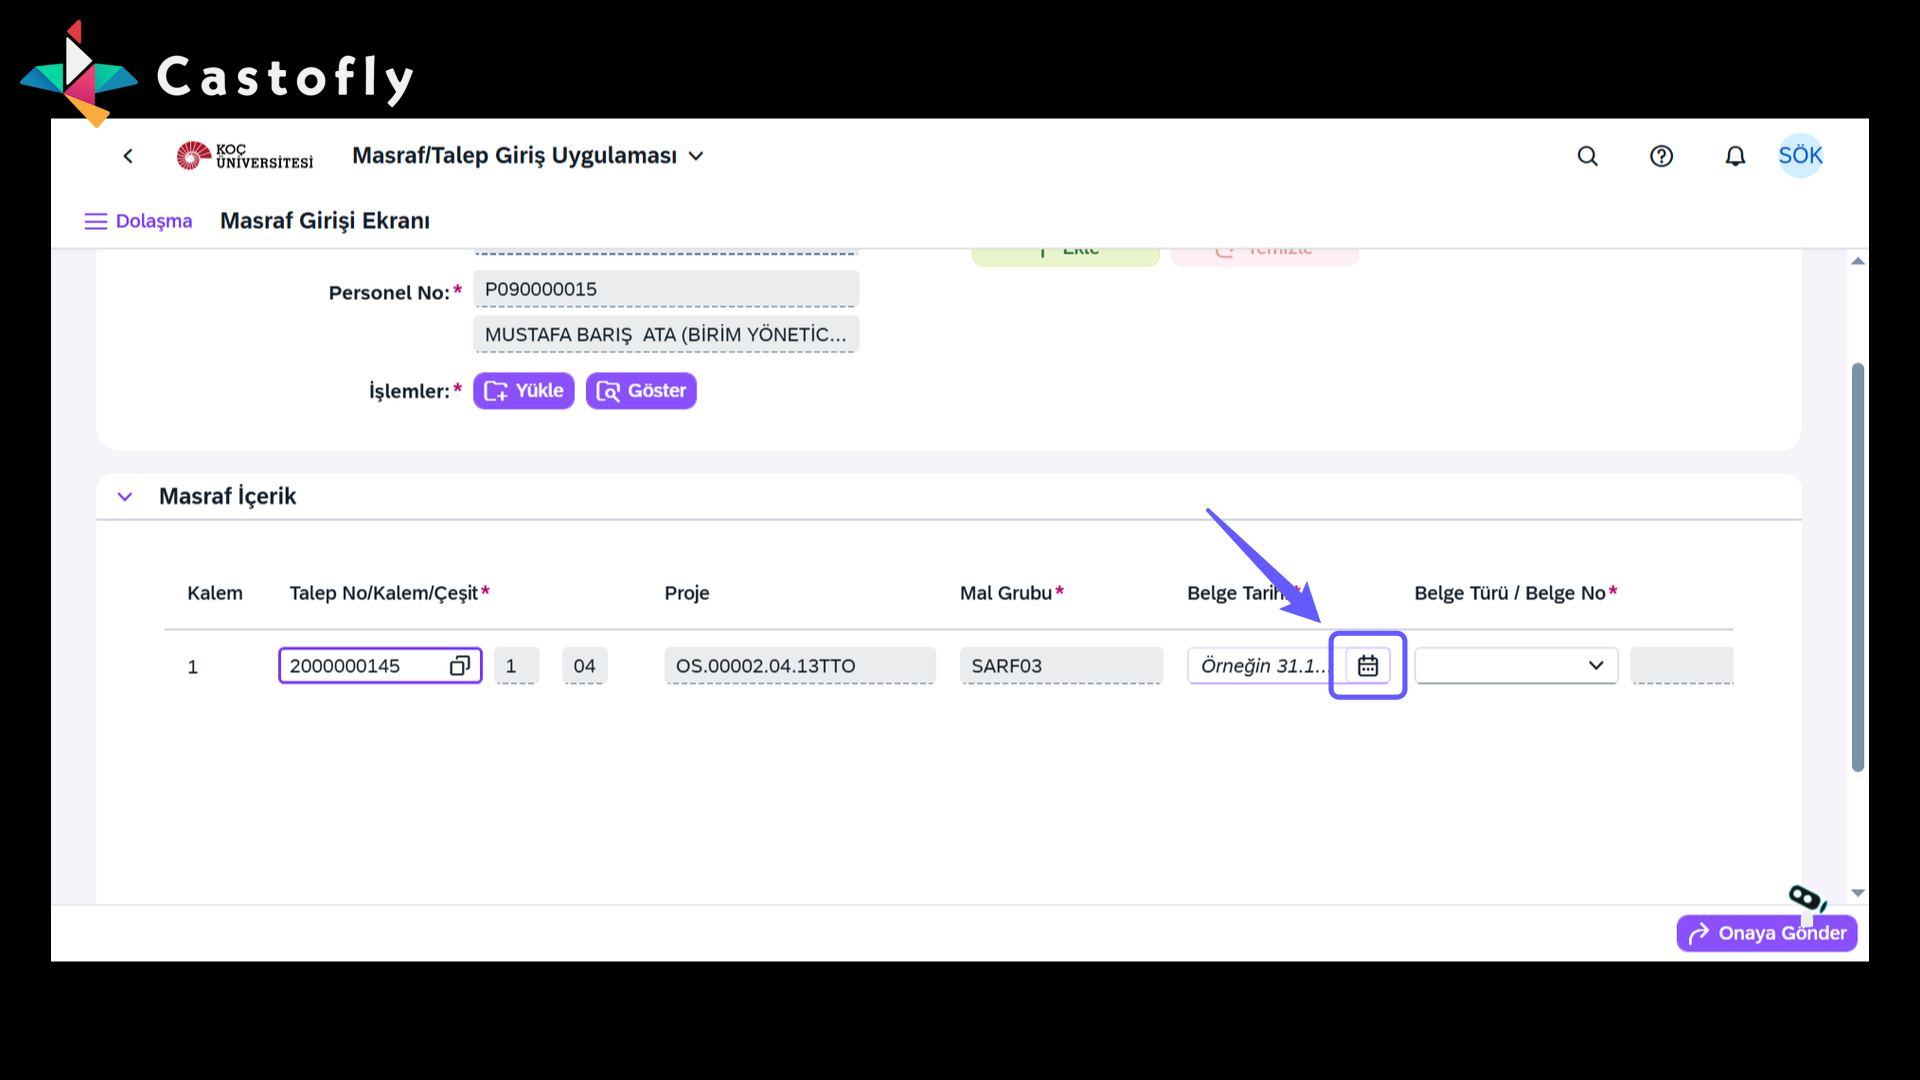
Click the date icon to select the document date. Before selecting the date, make sure the correct document has been uploaded.
30. Select Document Type
-
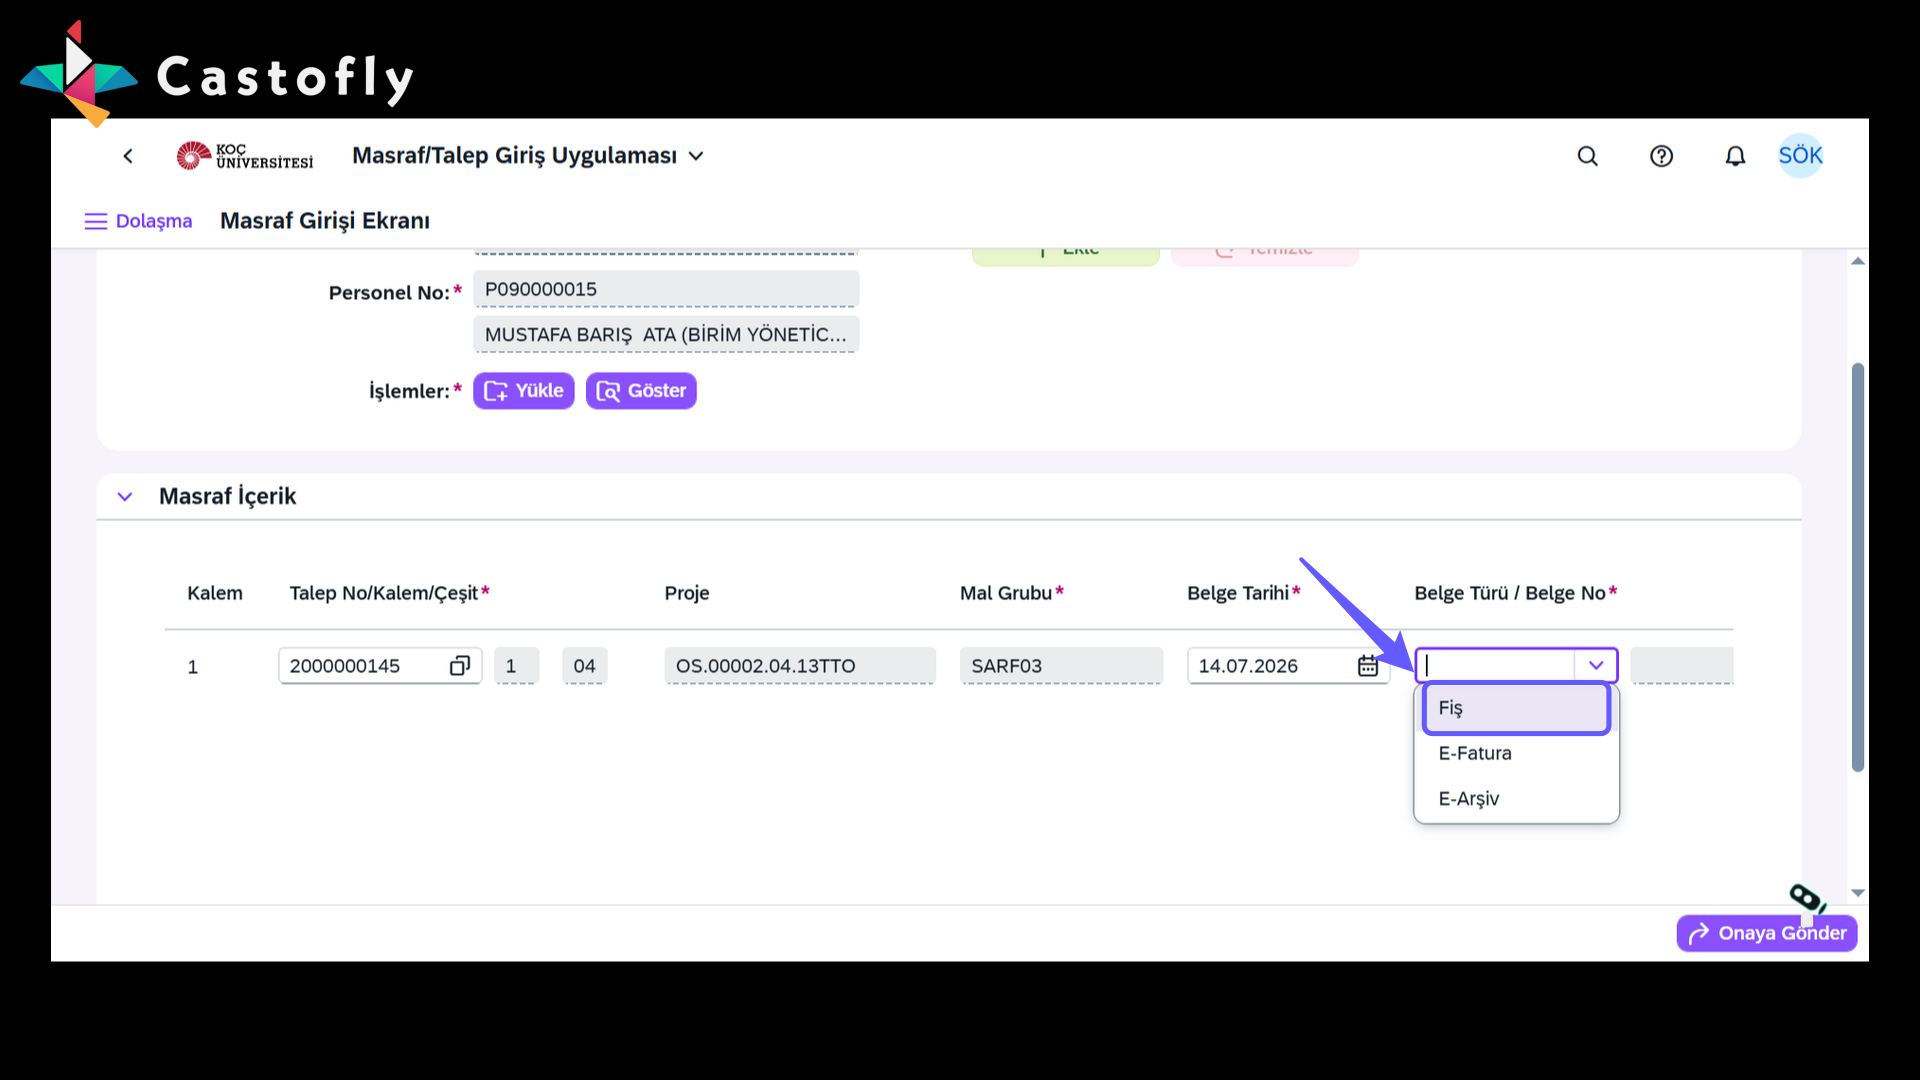
Click the Document Type menu and select the type of your document.
31. Enter Document Number
-
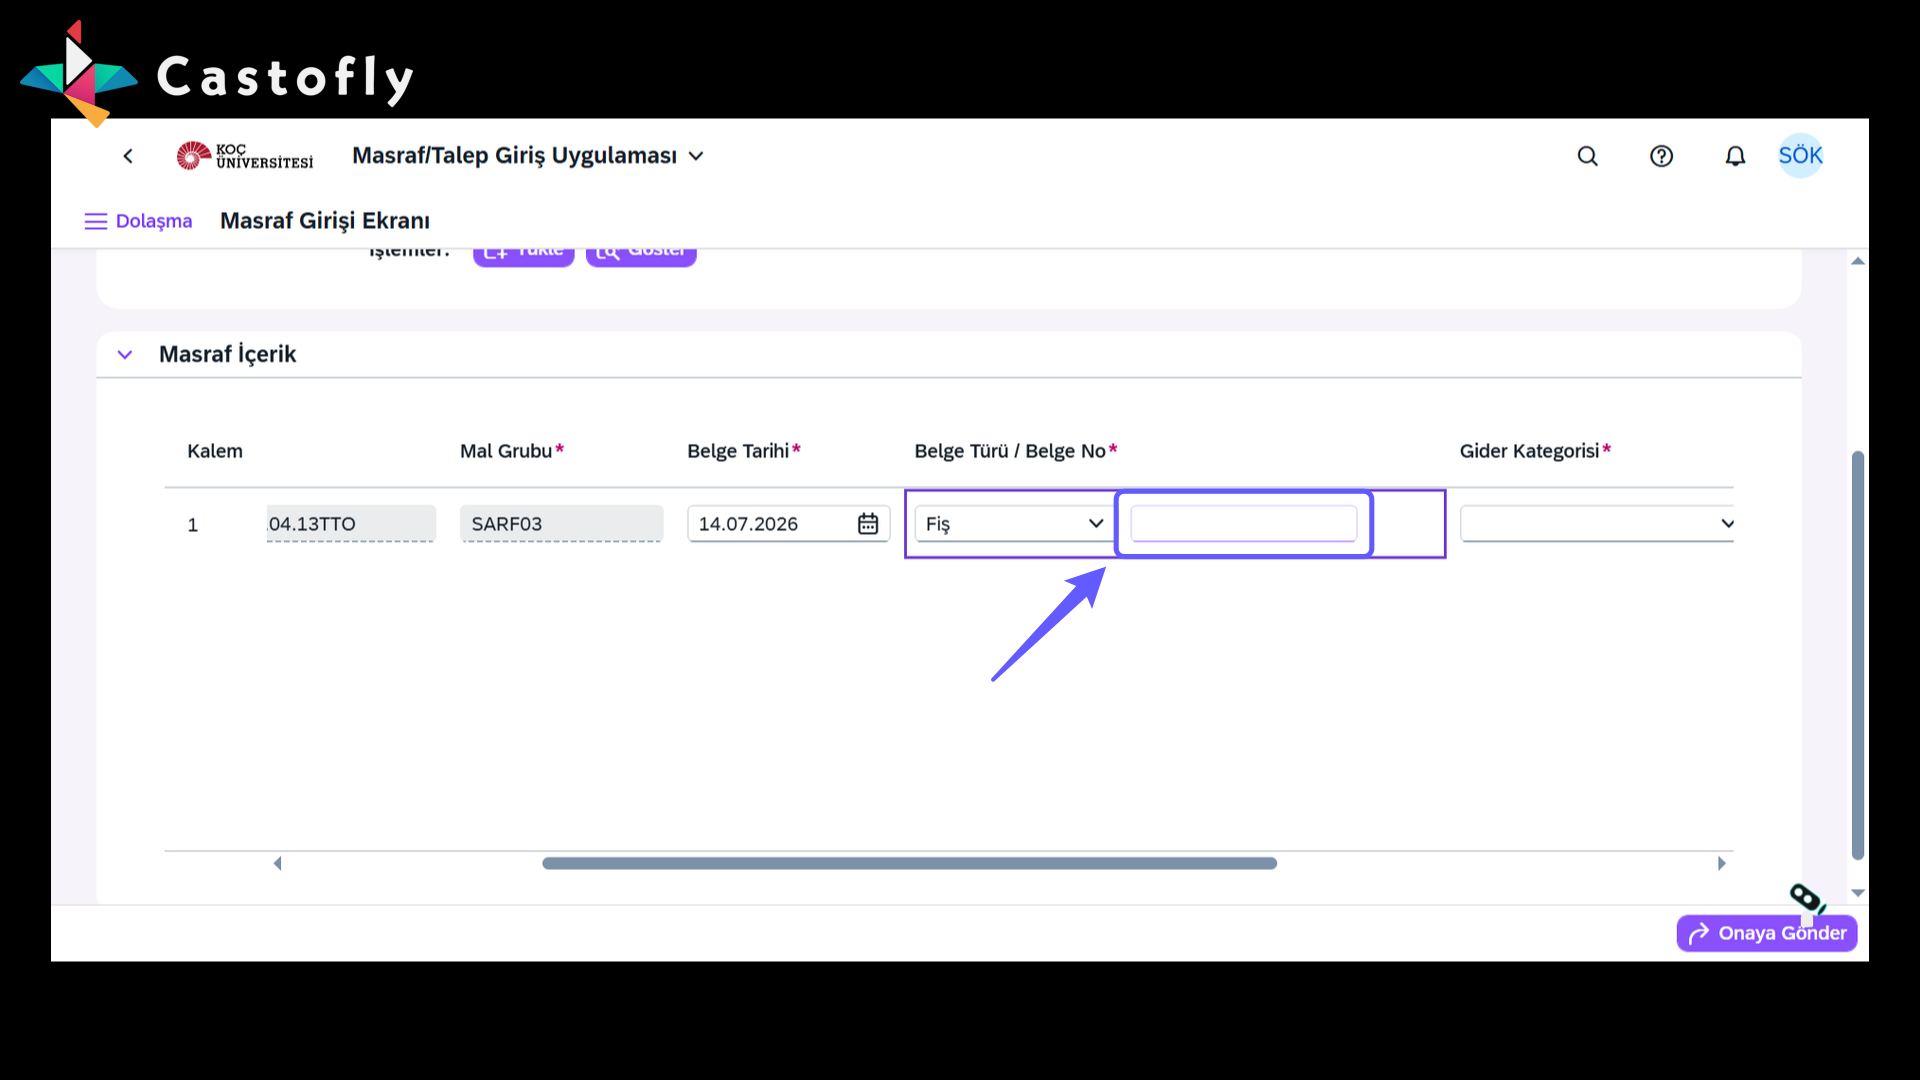
Enter the document number in this field and perform the necessary check.
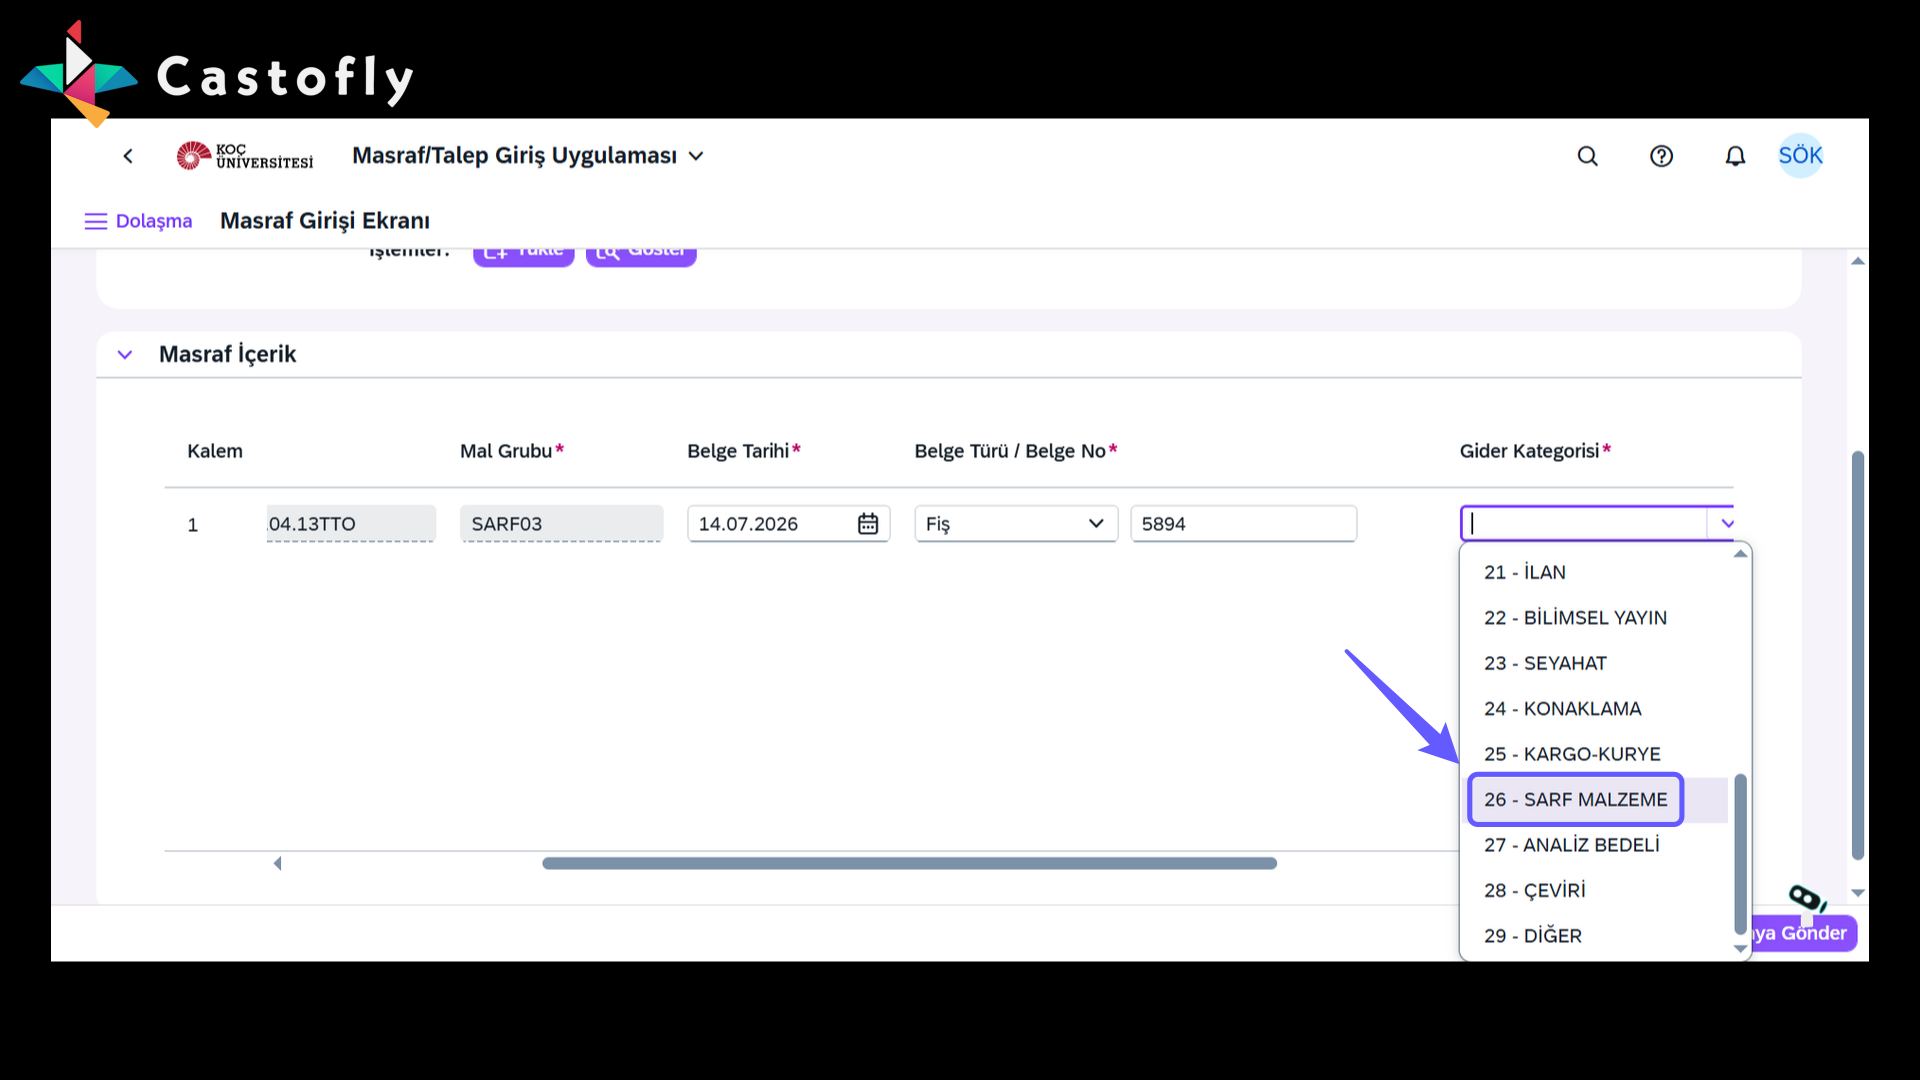
32. Select Expense Category
-
Click the down-arrow icon to open the expense category list and select the appropriate option.
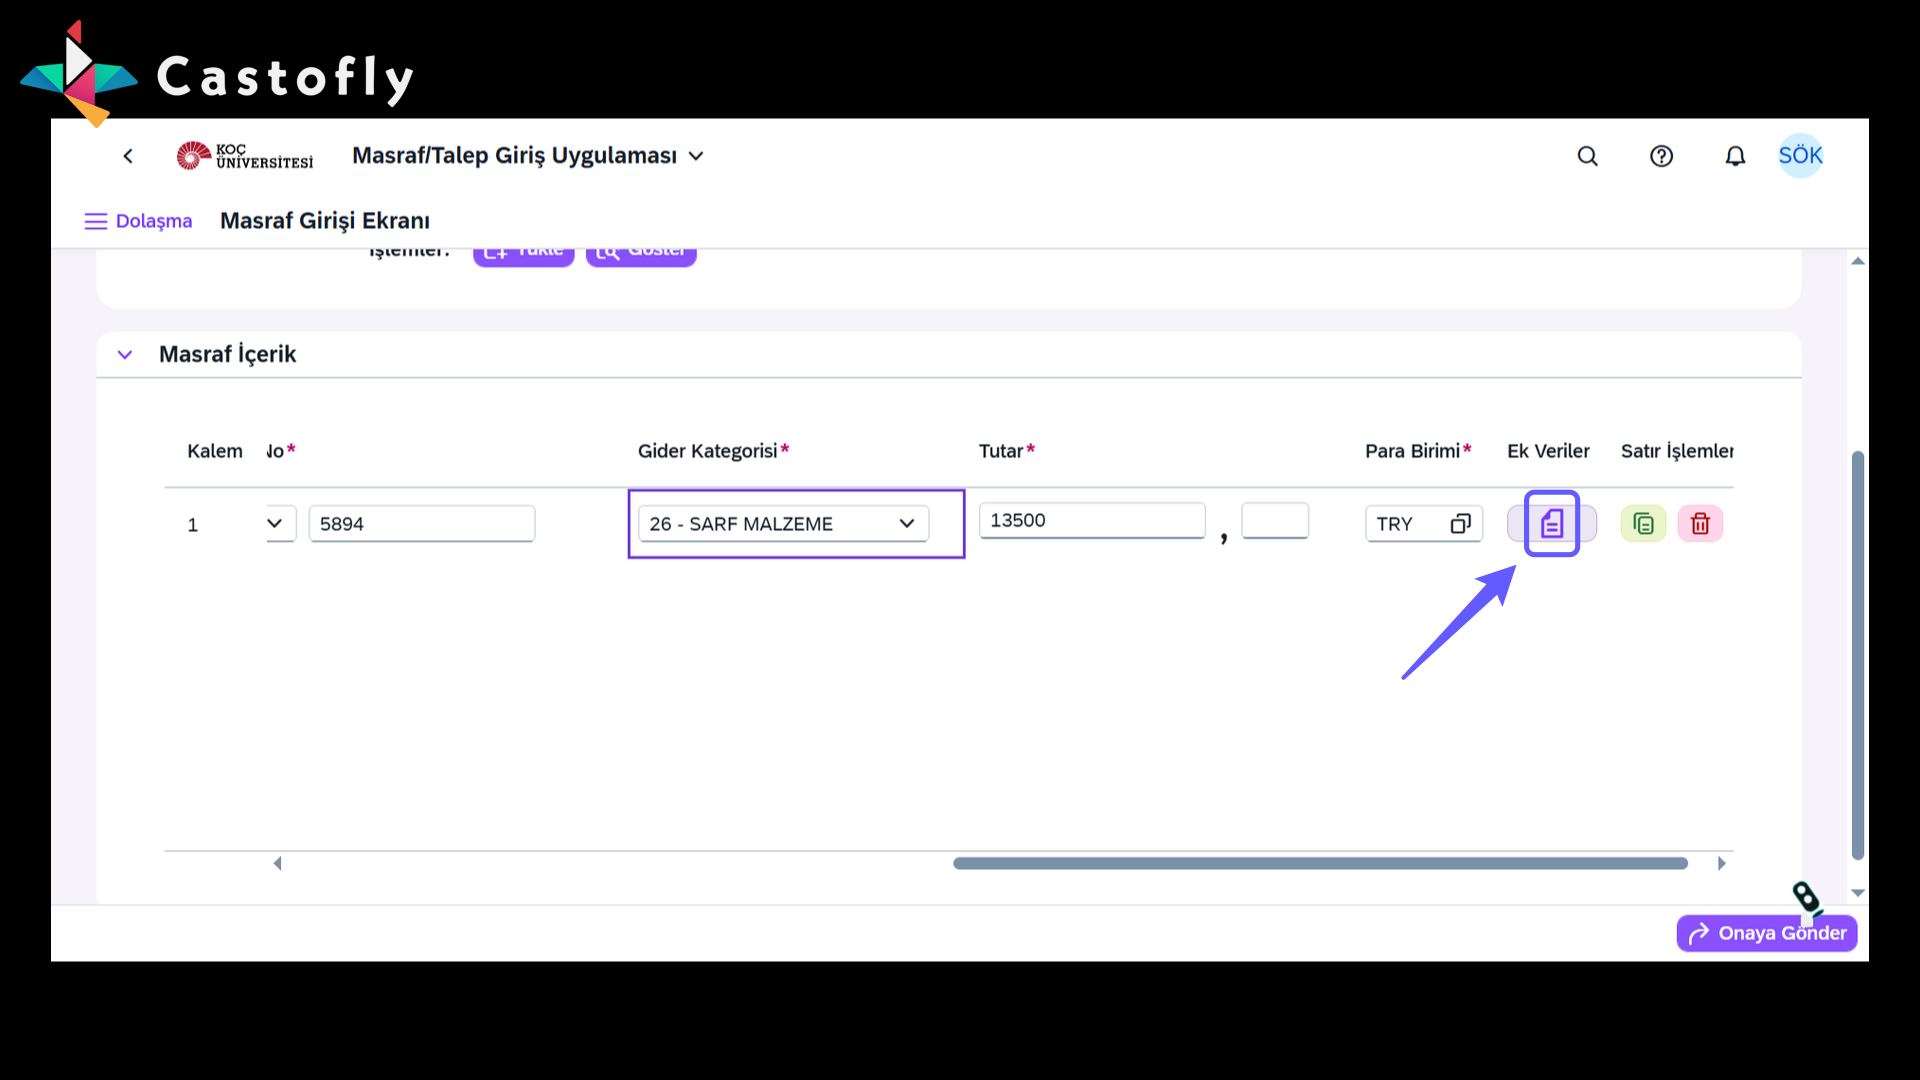
33. Edit Additional Data
-
Click the additional data icon to enter or update the required information.
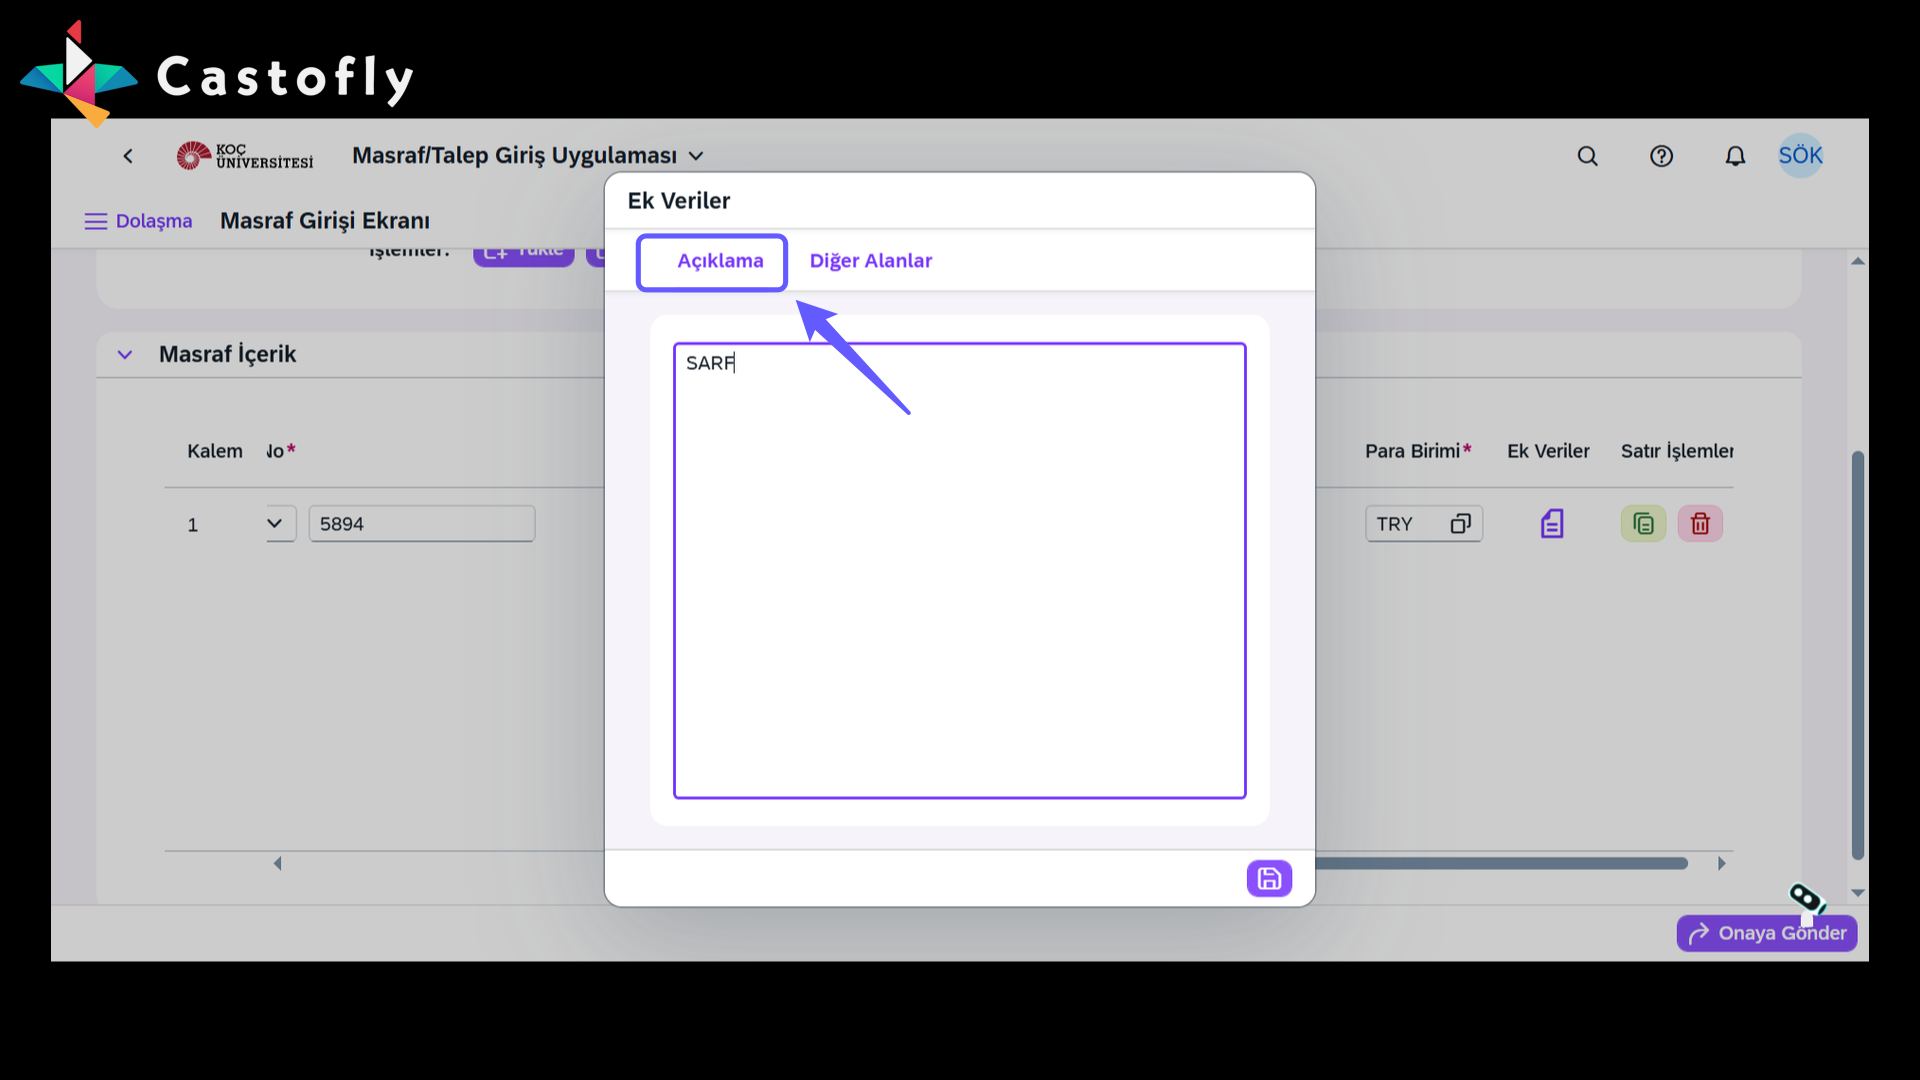
34. Using the Description Field
-
Enter the expense details in the description box. This field must be filled in.
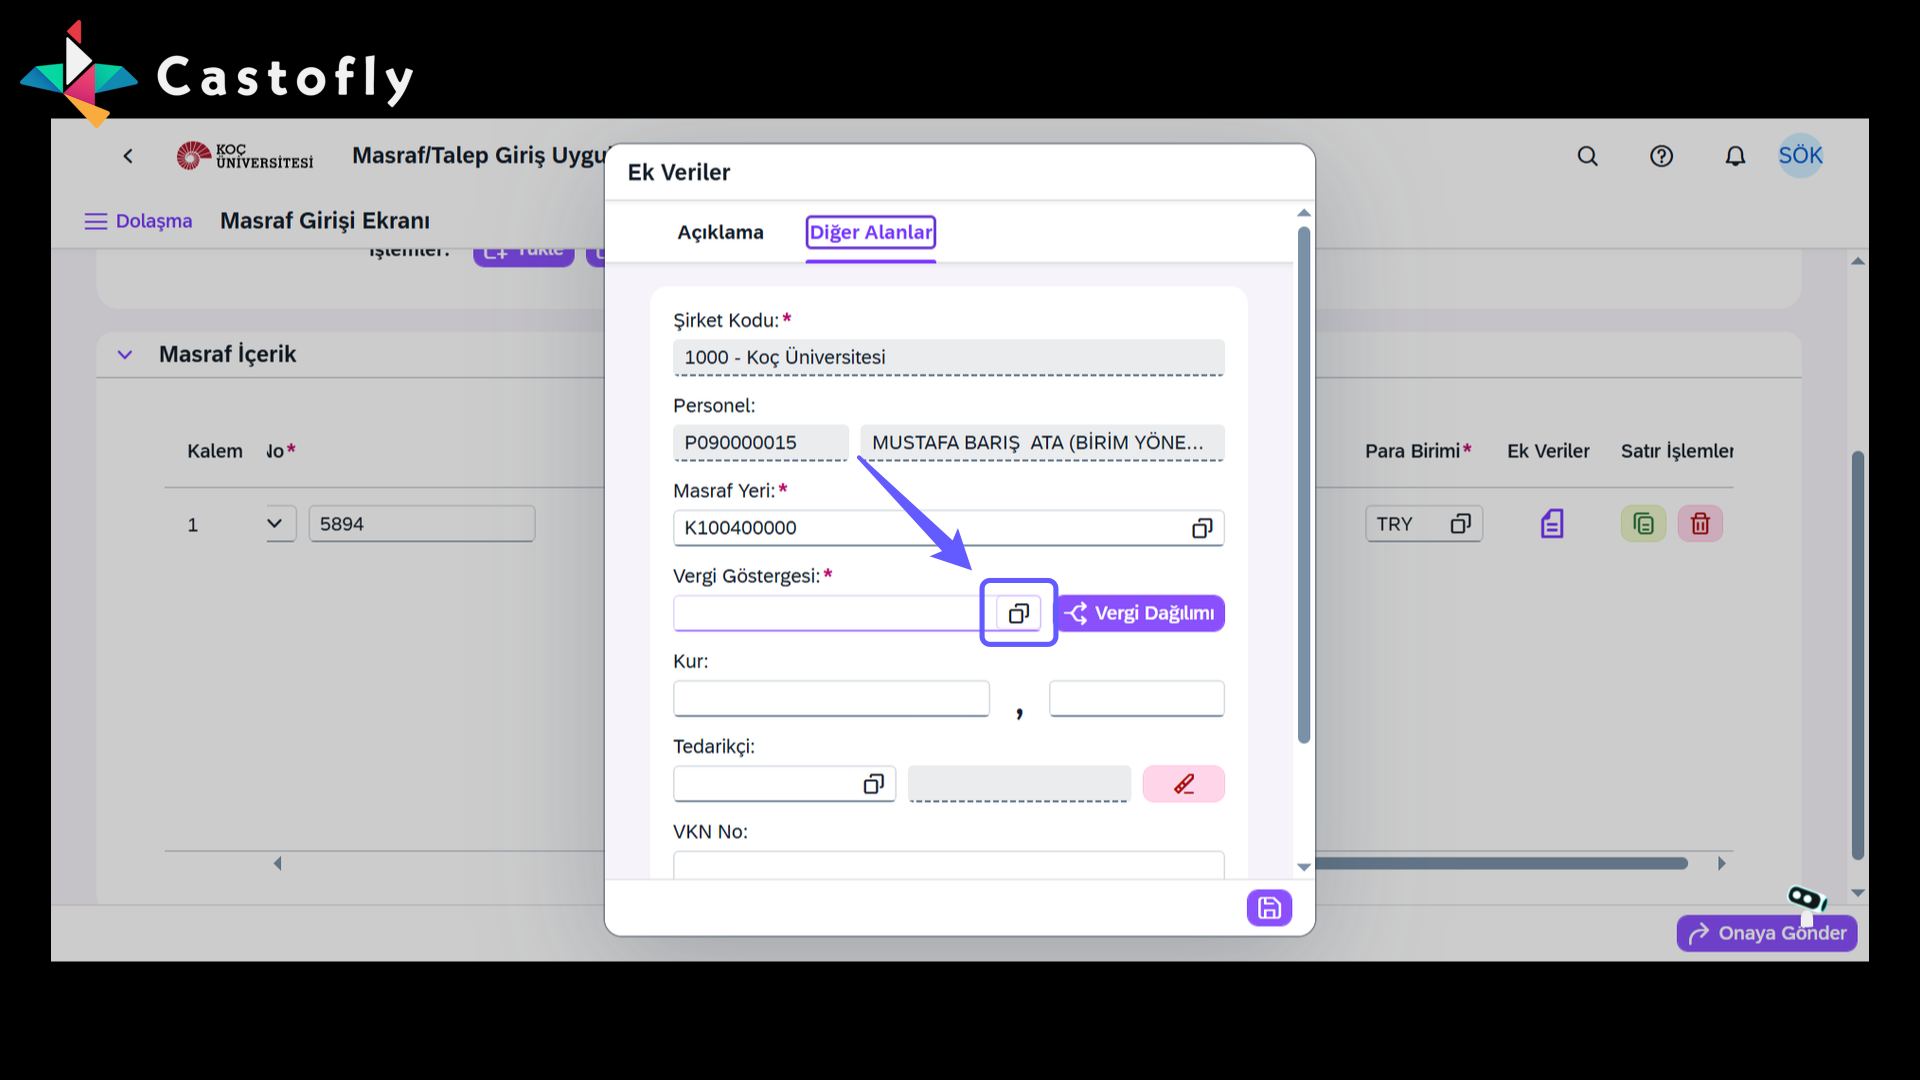
35. Fill in Other Fields
-
Enter the required information in the tax indicator field. This field must not be left blank.
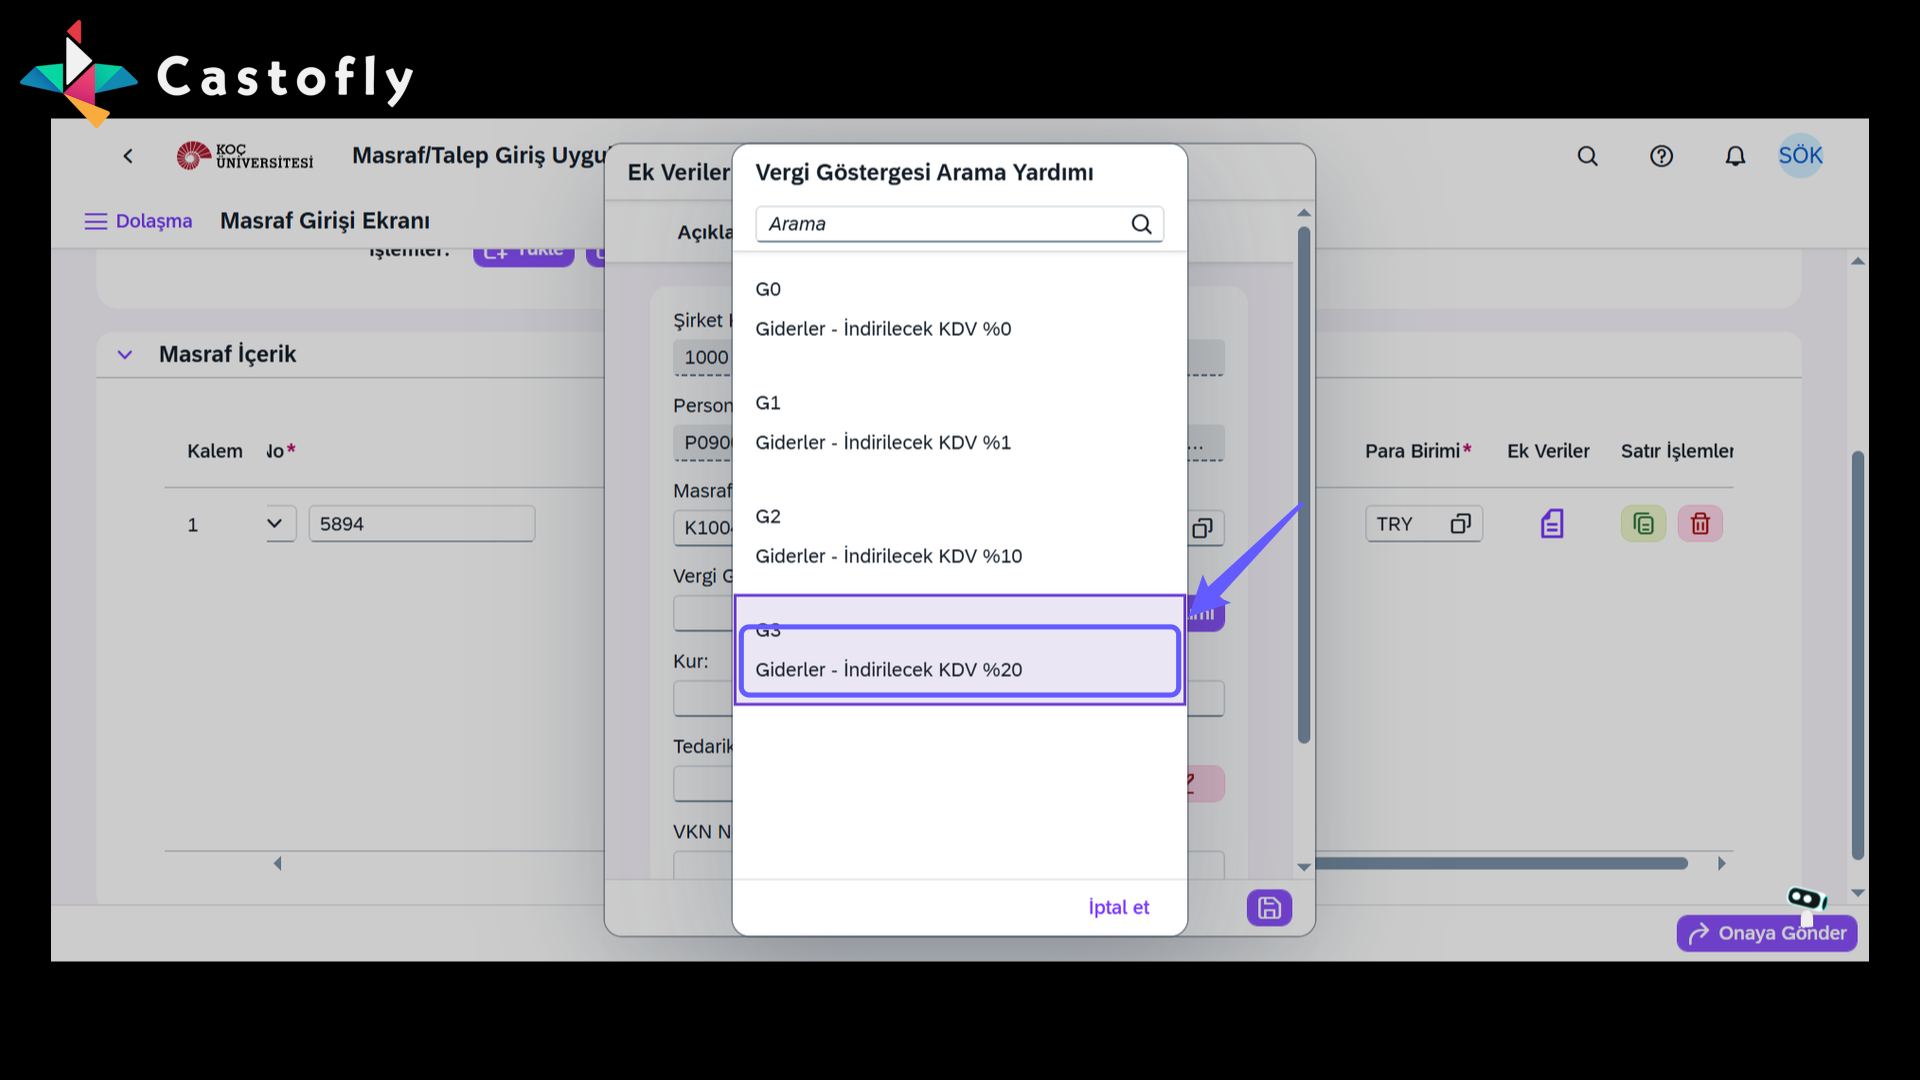
36. Select Tax
-
Click one of the options G0, G1, G2, or G3 to select your VAT indicator.
37. Save the Data
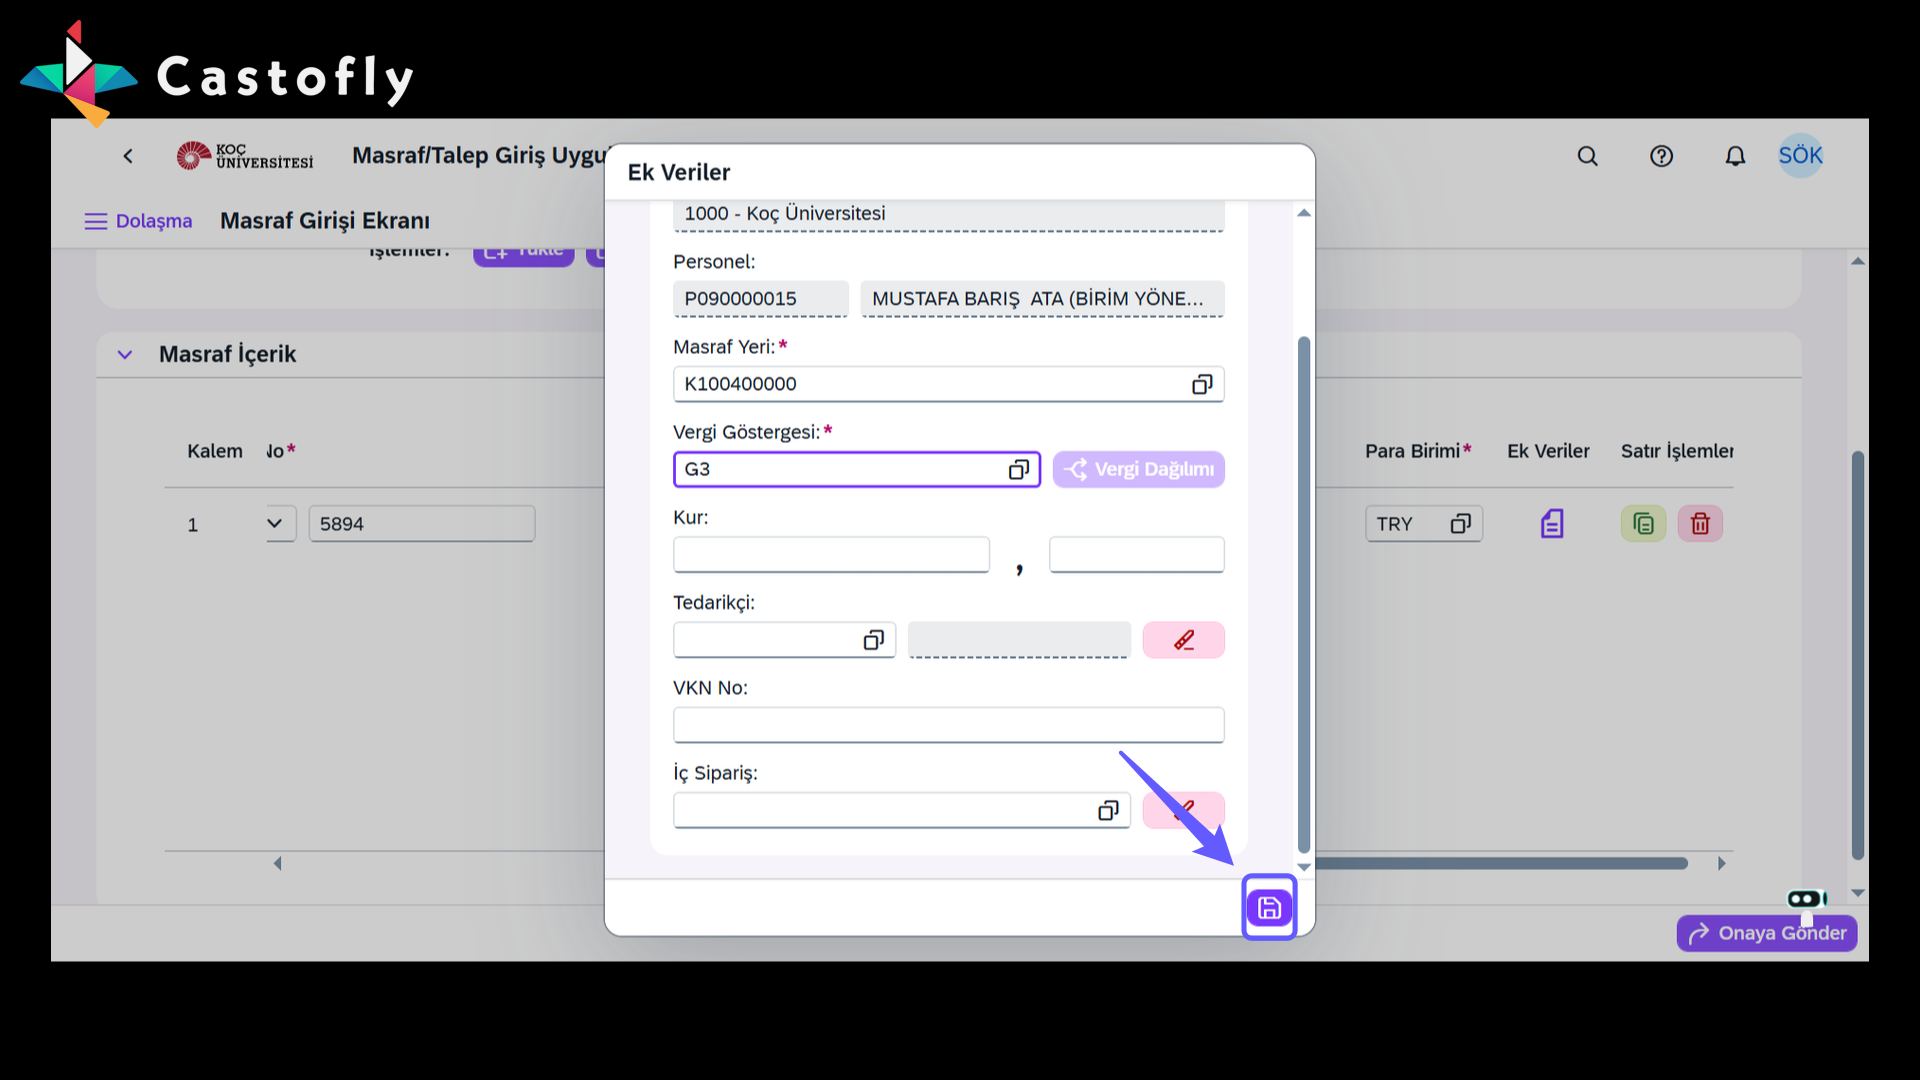
-
For invoices issued in the name of Koç University, fill in the supplier information completely and accurately. Once confirmed, click the save (floppy disk) icon in the bottom-right corner to save.
38. Submit for Approval
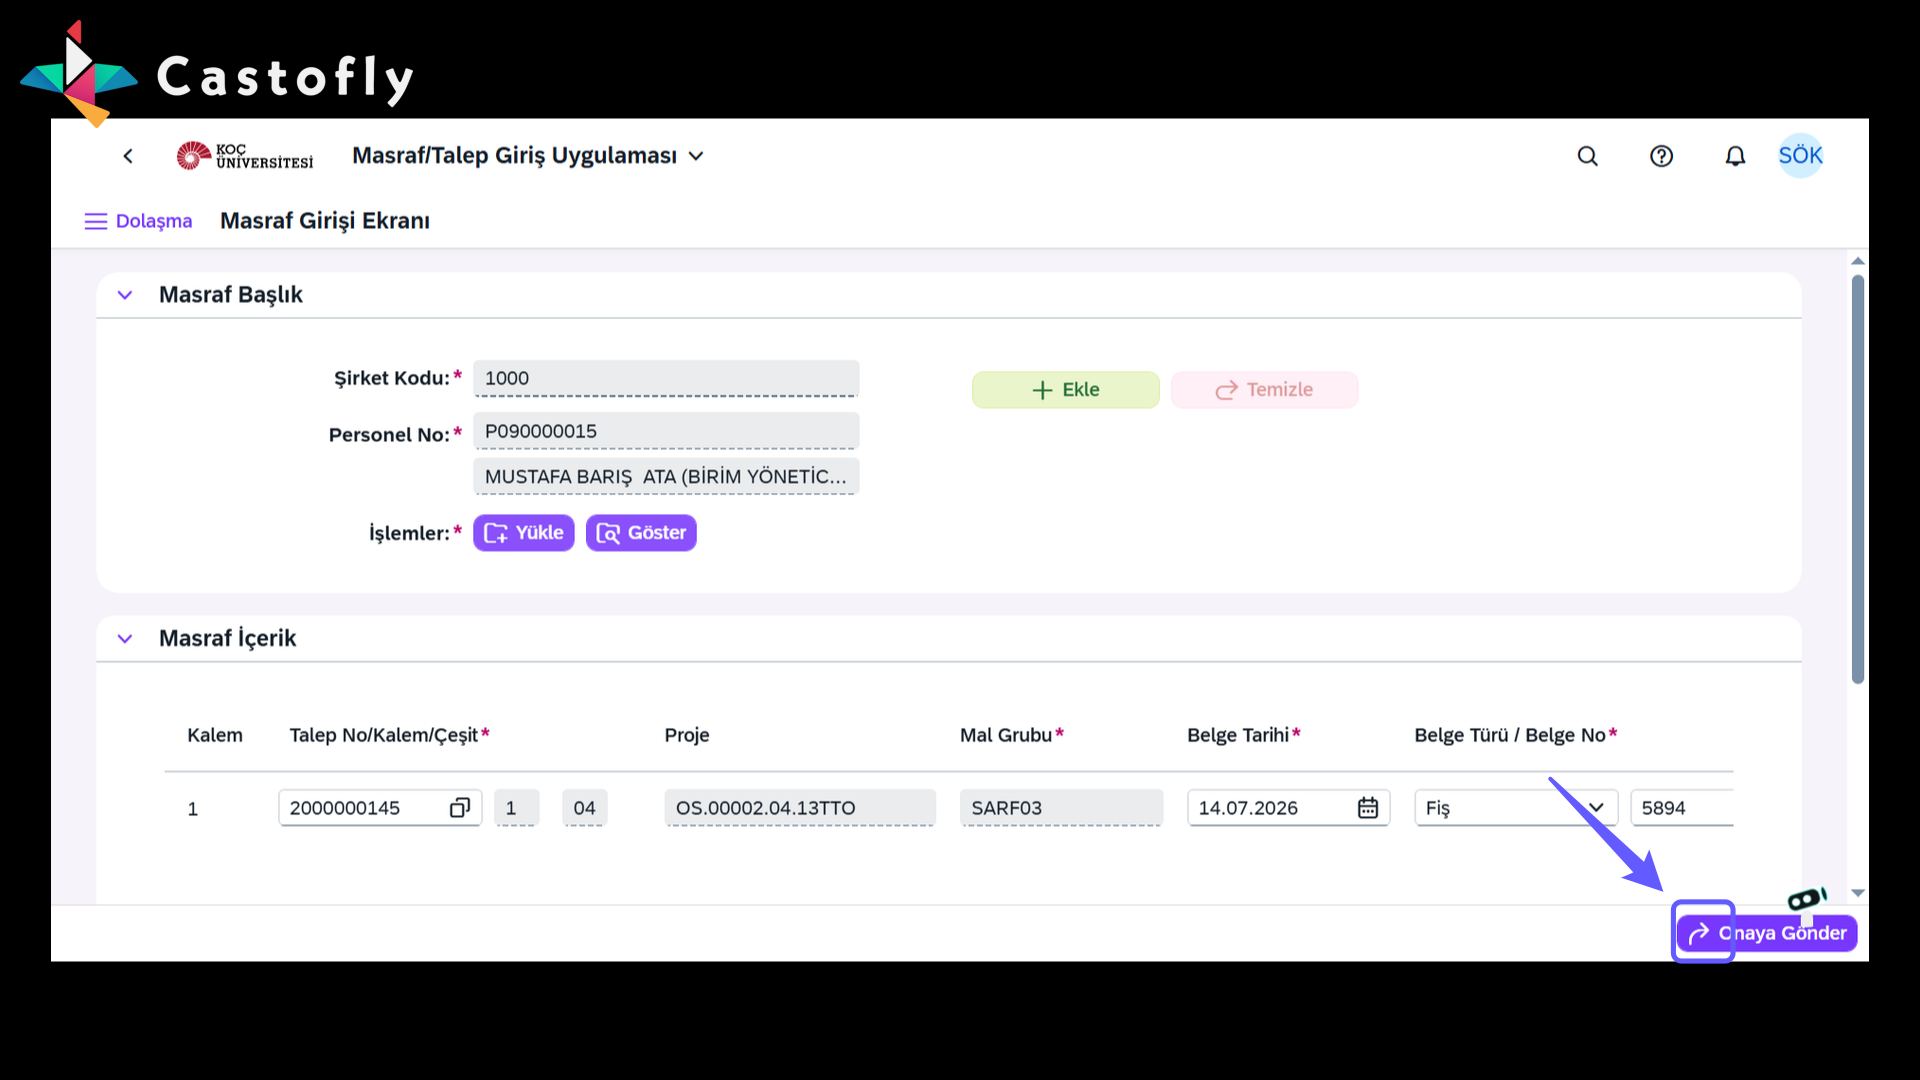
-
Make sure all required information is complete and correct, then click 'Submit for Approval' to complete the process. Verify that it was submitted successfully.
39. Expense Entry
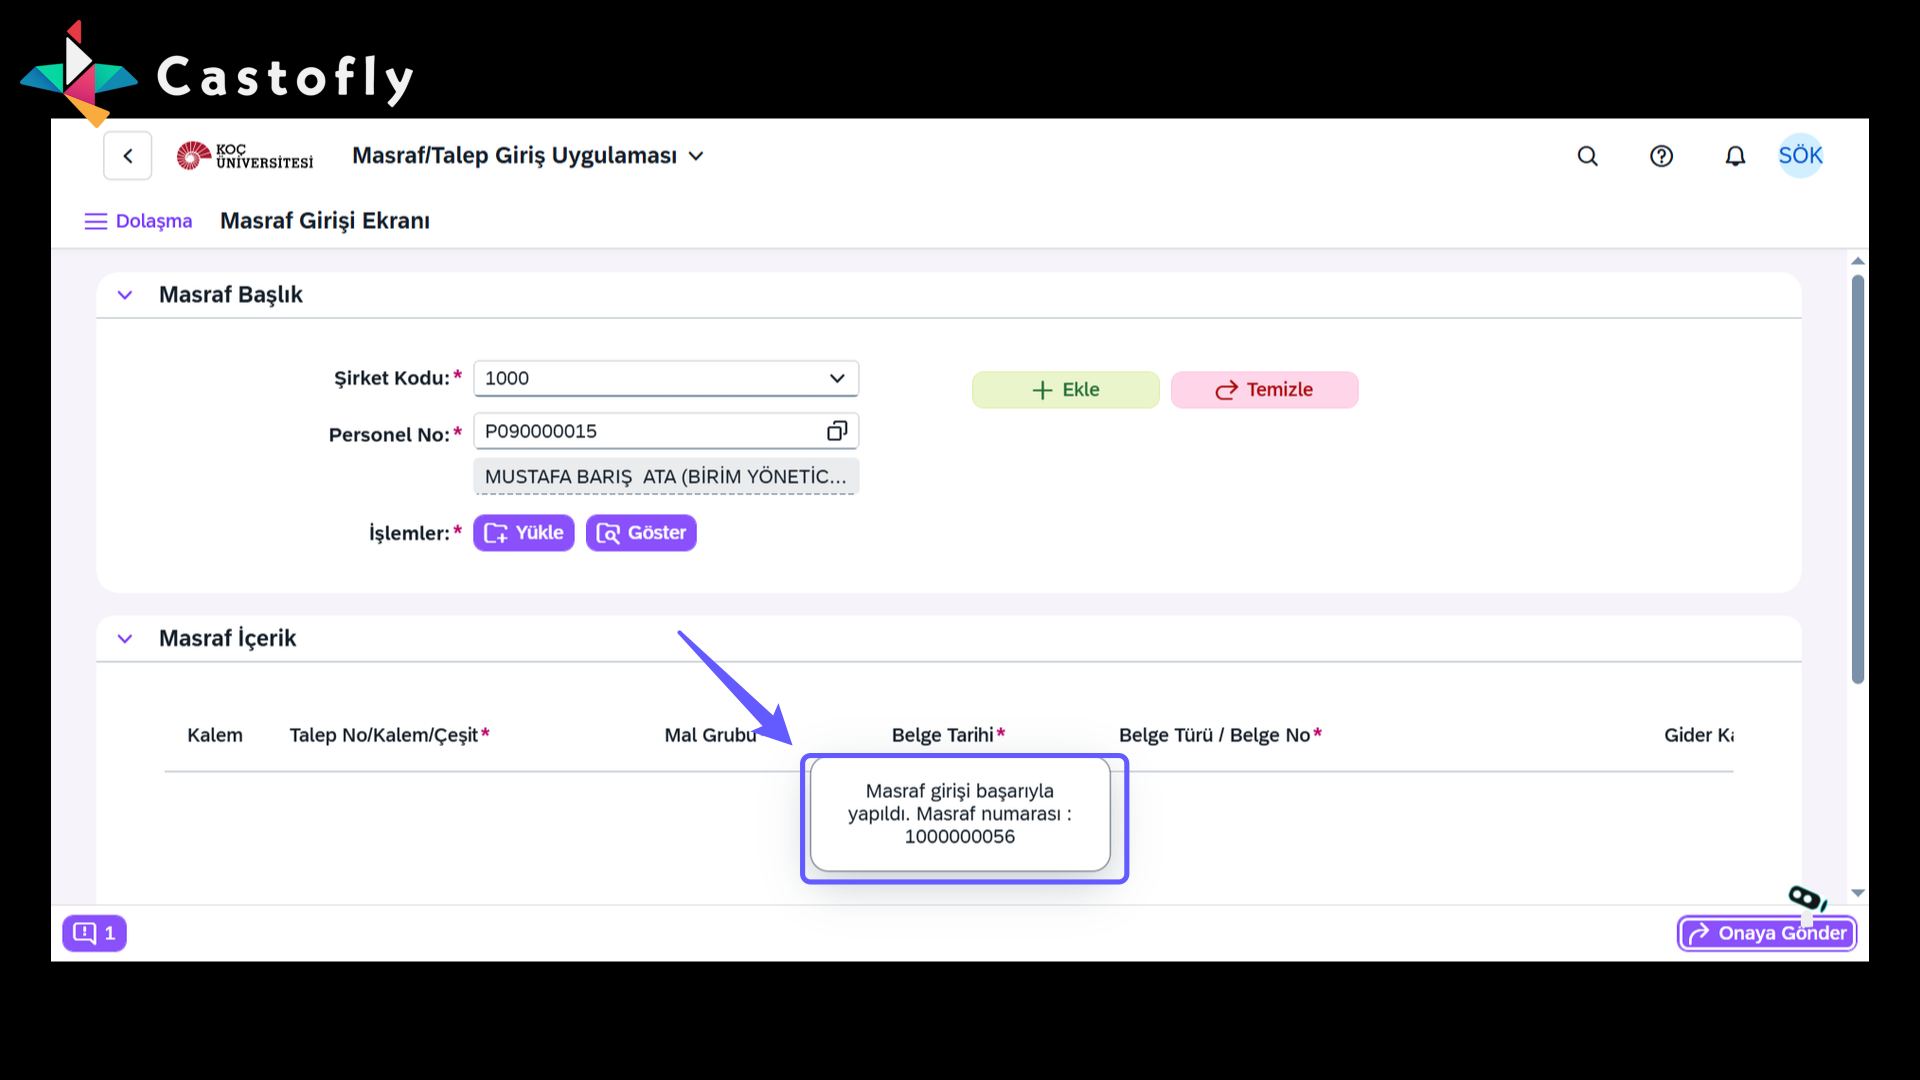
-
Be sure to check that your submission was delivered successfully.
40. Expense Request Approval
-
The expense request has been submitted for approval to the relevant project's principal investigator. Please notify the relevant person for approval.
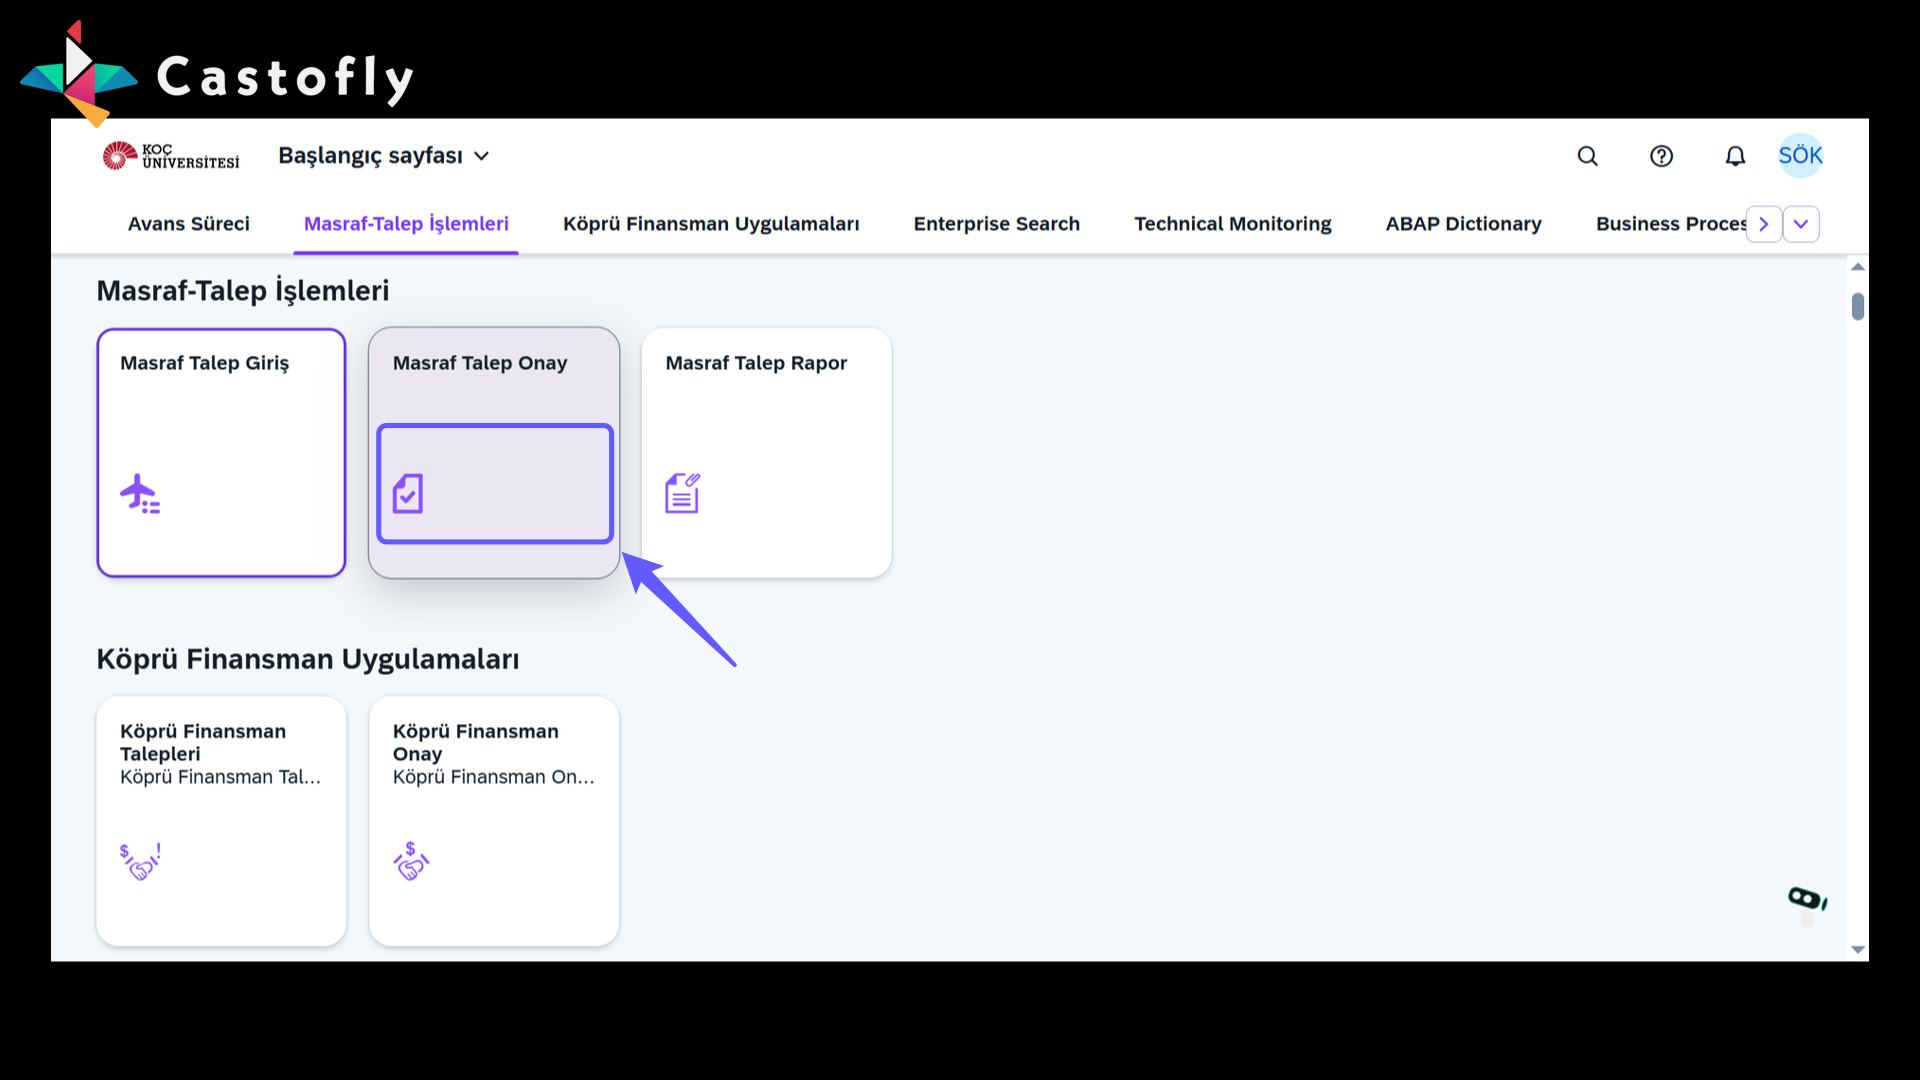
41. Complete the Expense Approval
-
Have your principal investigator click 'Approve' to complete the expense approval. Make sure the principal investigator and other relevant people in the approval hierarchy have been informed.
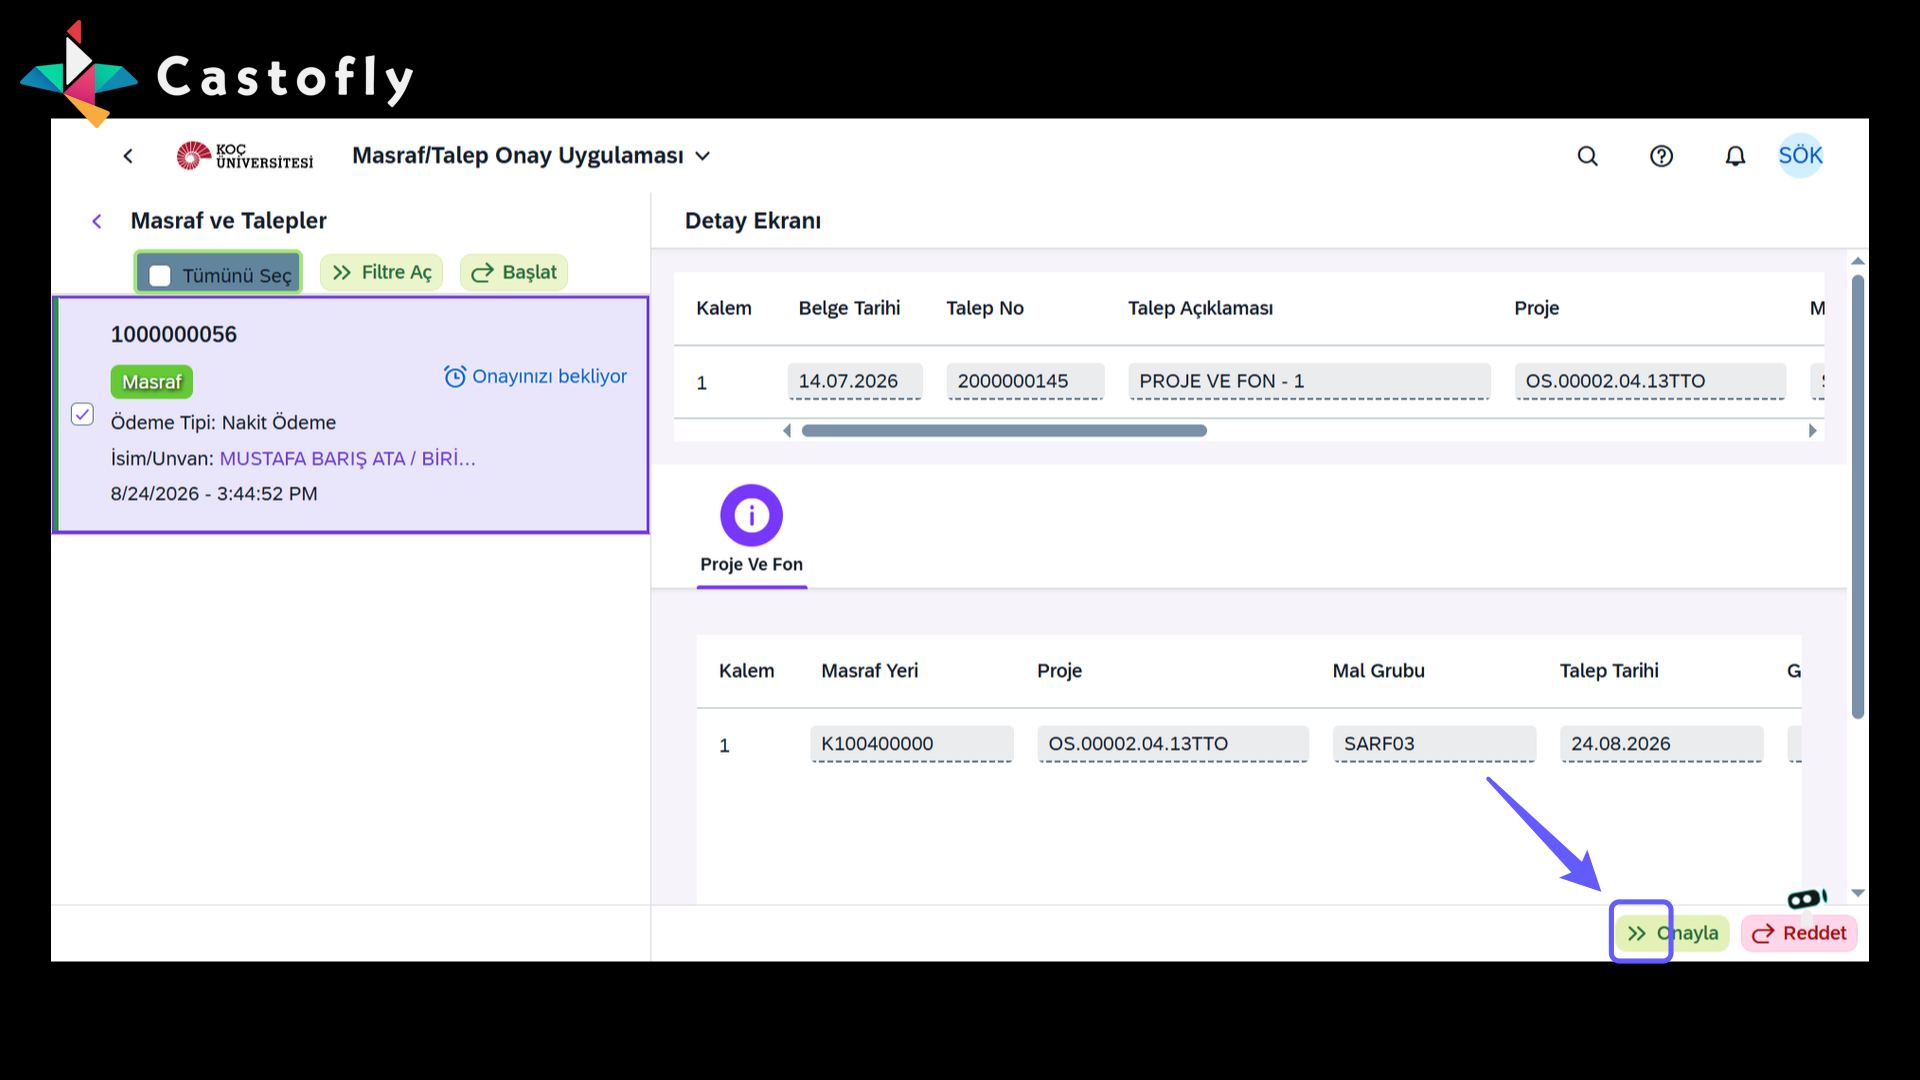
42. Open the Expense Request Report
-
Click this button to review all your requests and the approval hierarchy. Review the details of your expense requests and easily access the contact information for any pending approvals.
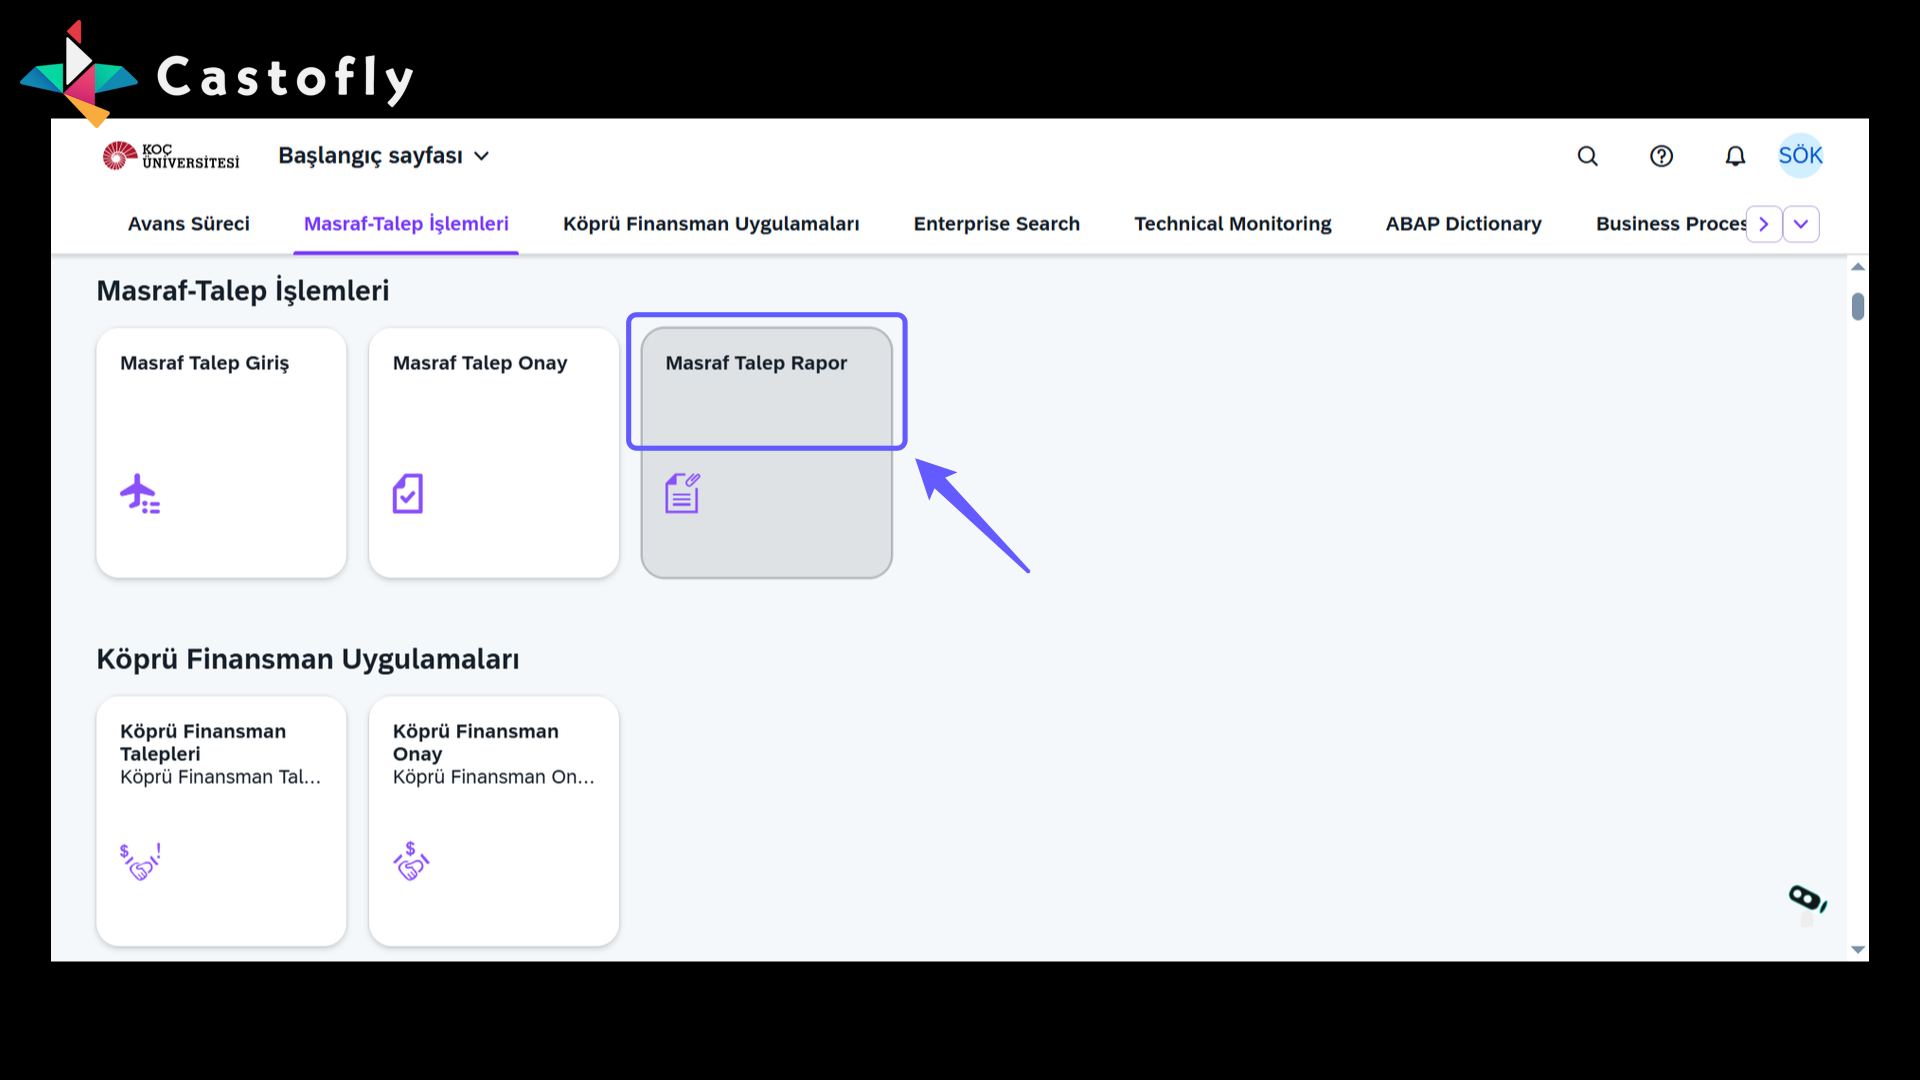
43. Select Company
-
Select the appropriate company code from the dropdown menu.
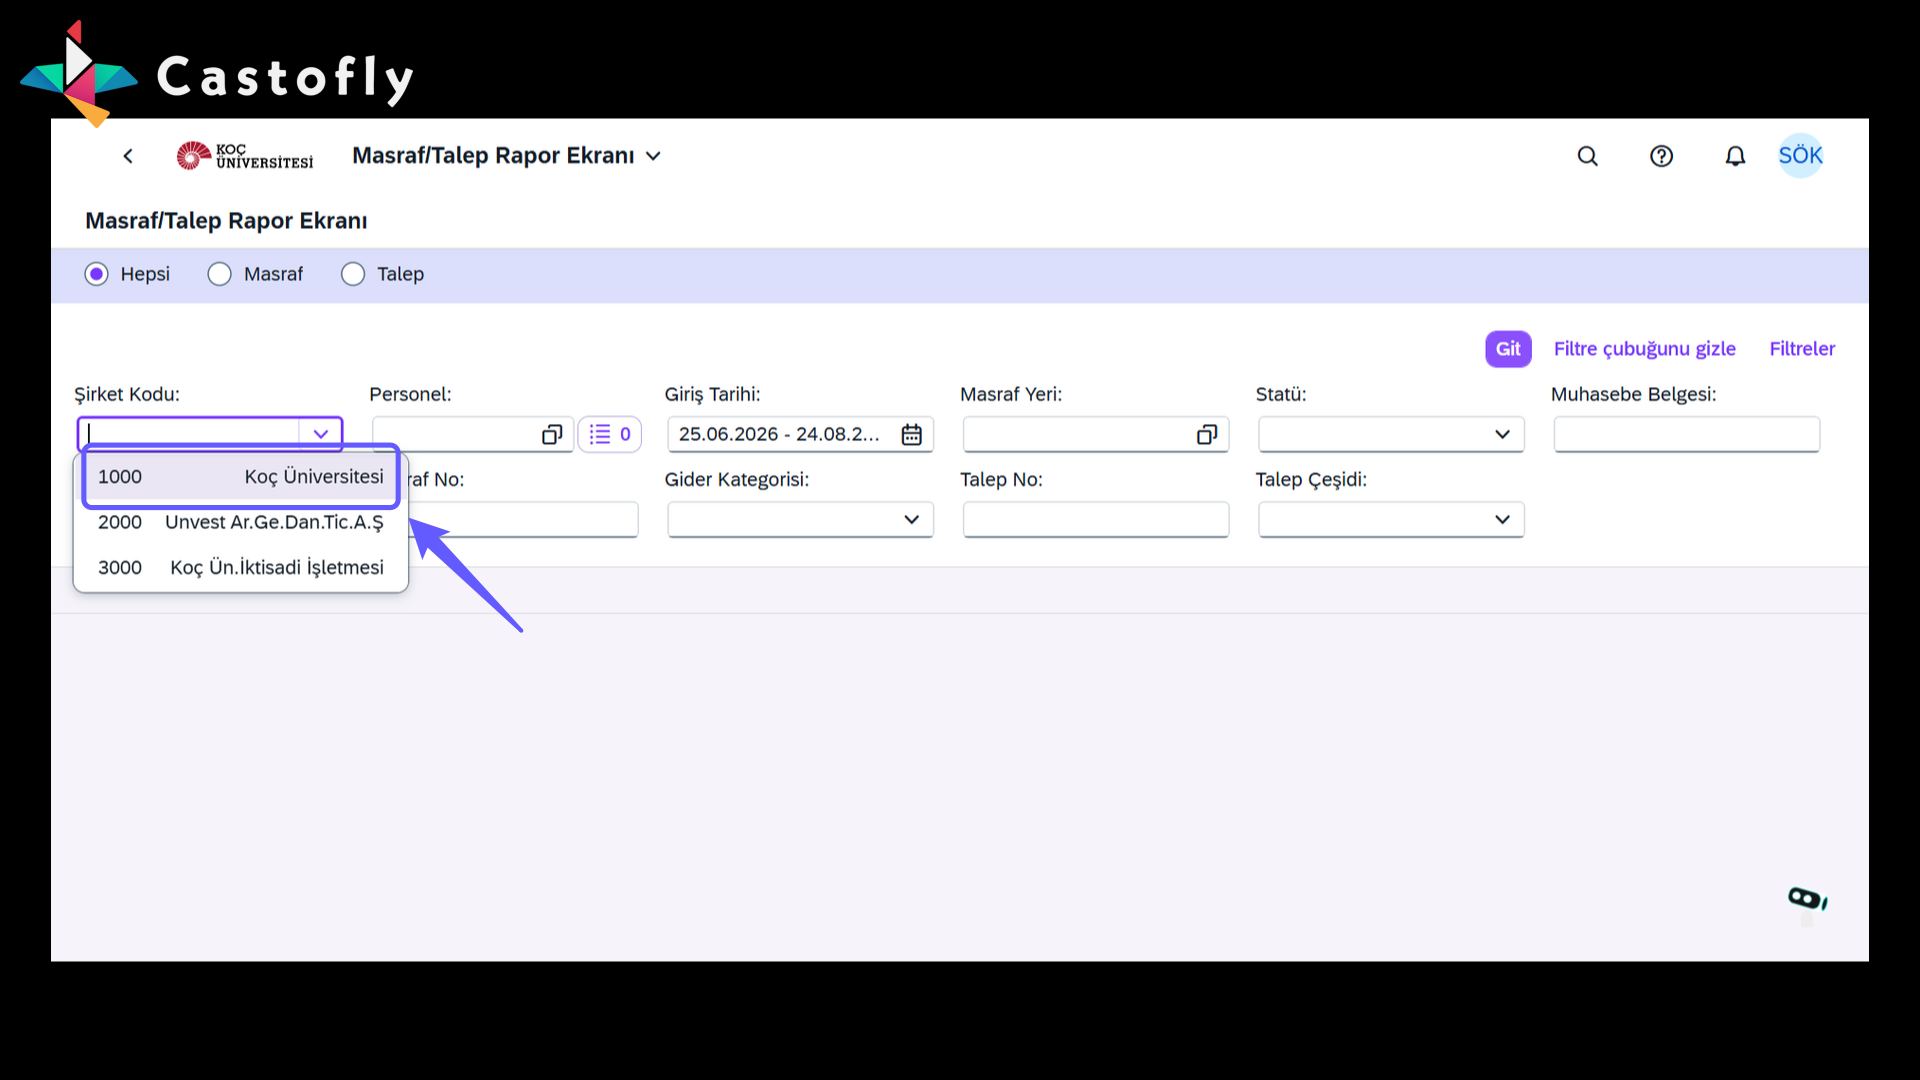
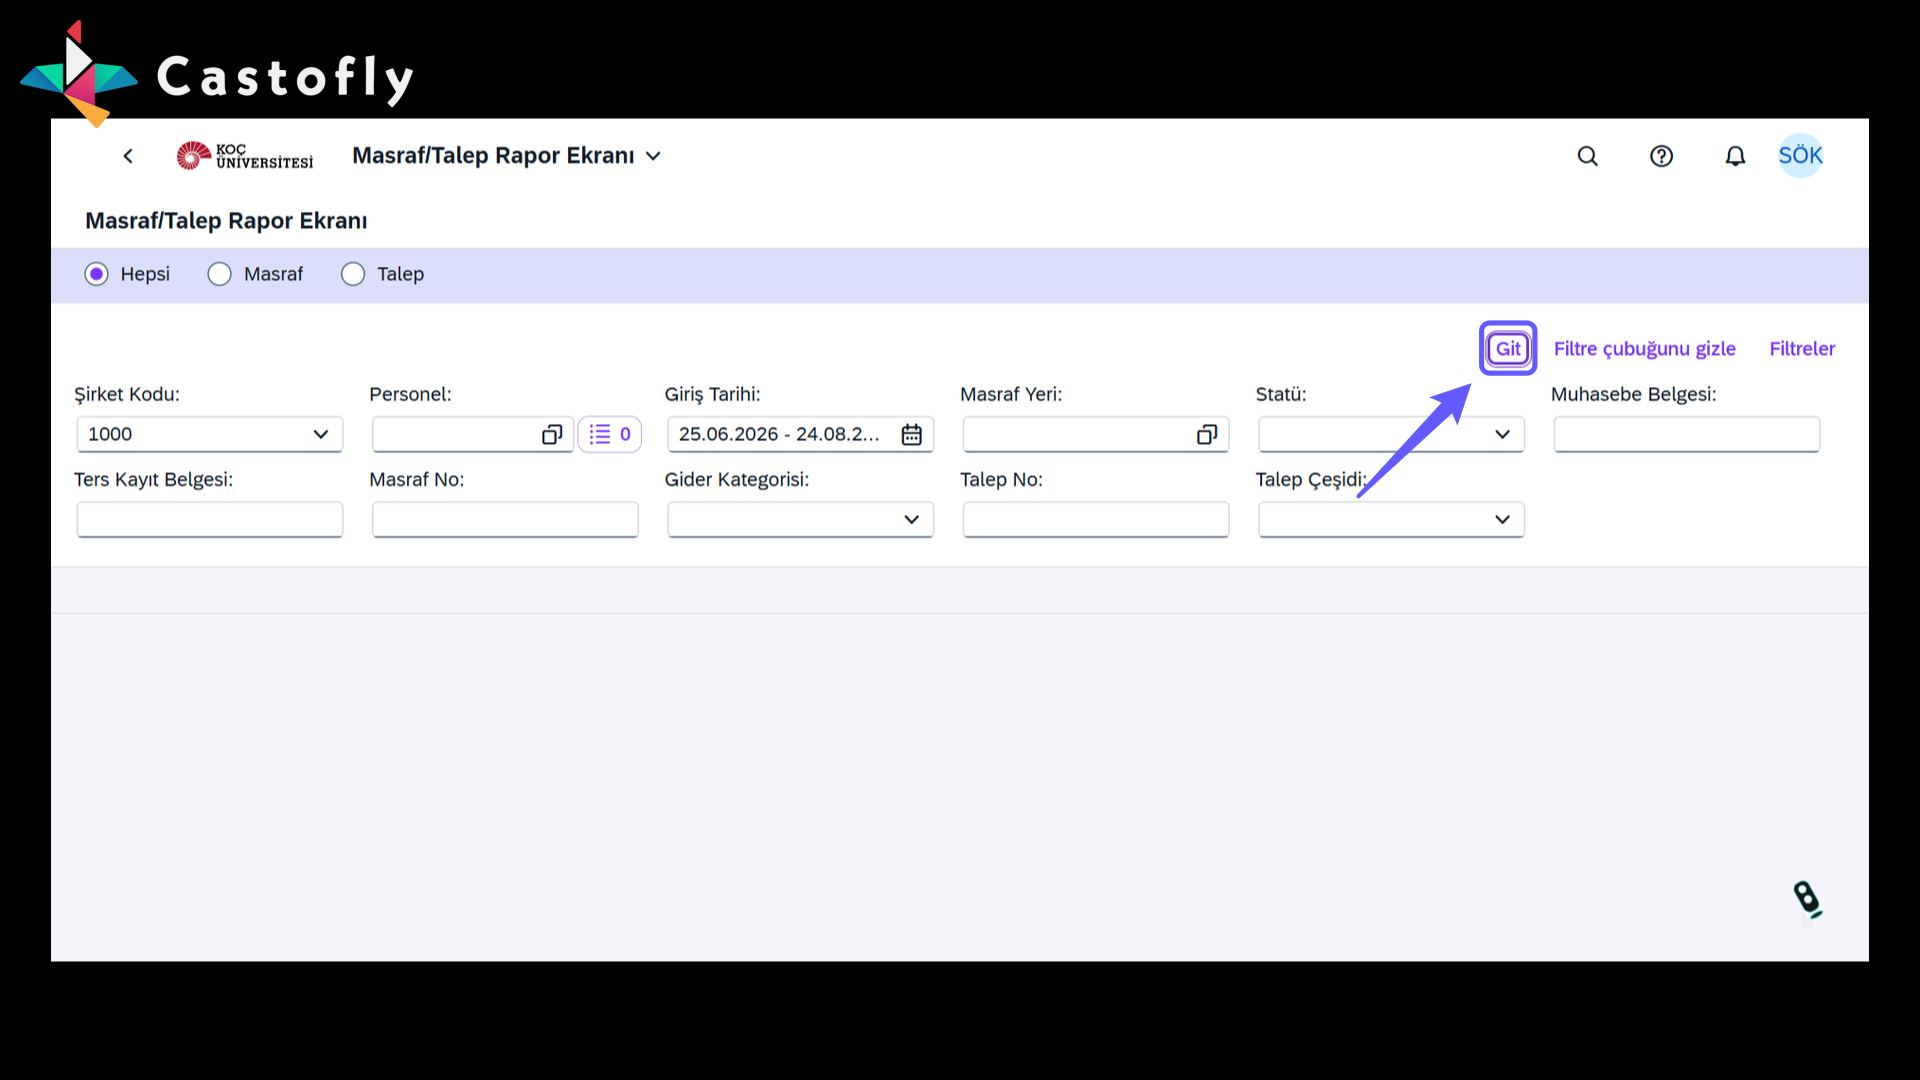
44. Click the Go Button
-
Click Go to run the search. It displays results matching the criteria you set with the filters, or the current list if no filters were selected.
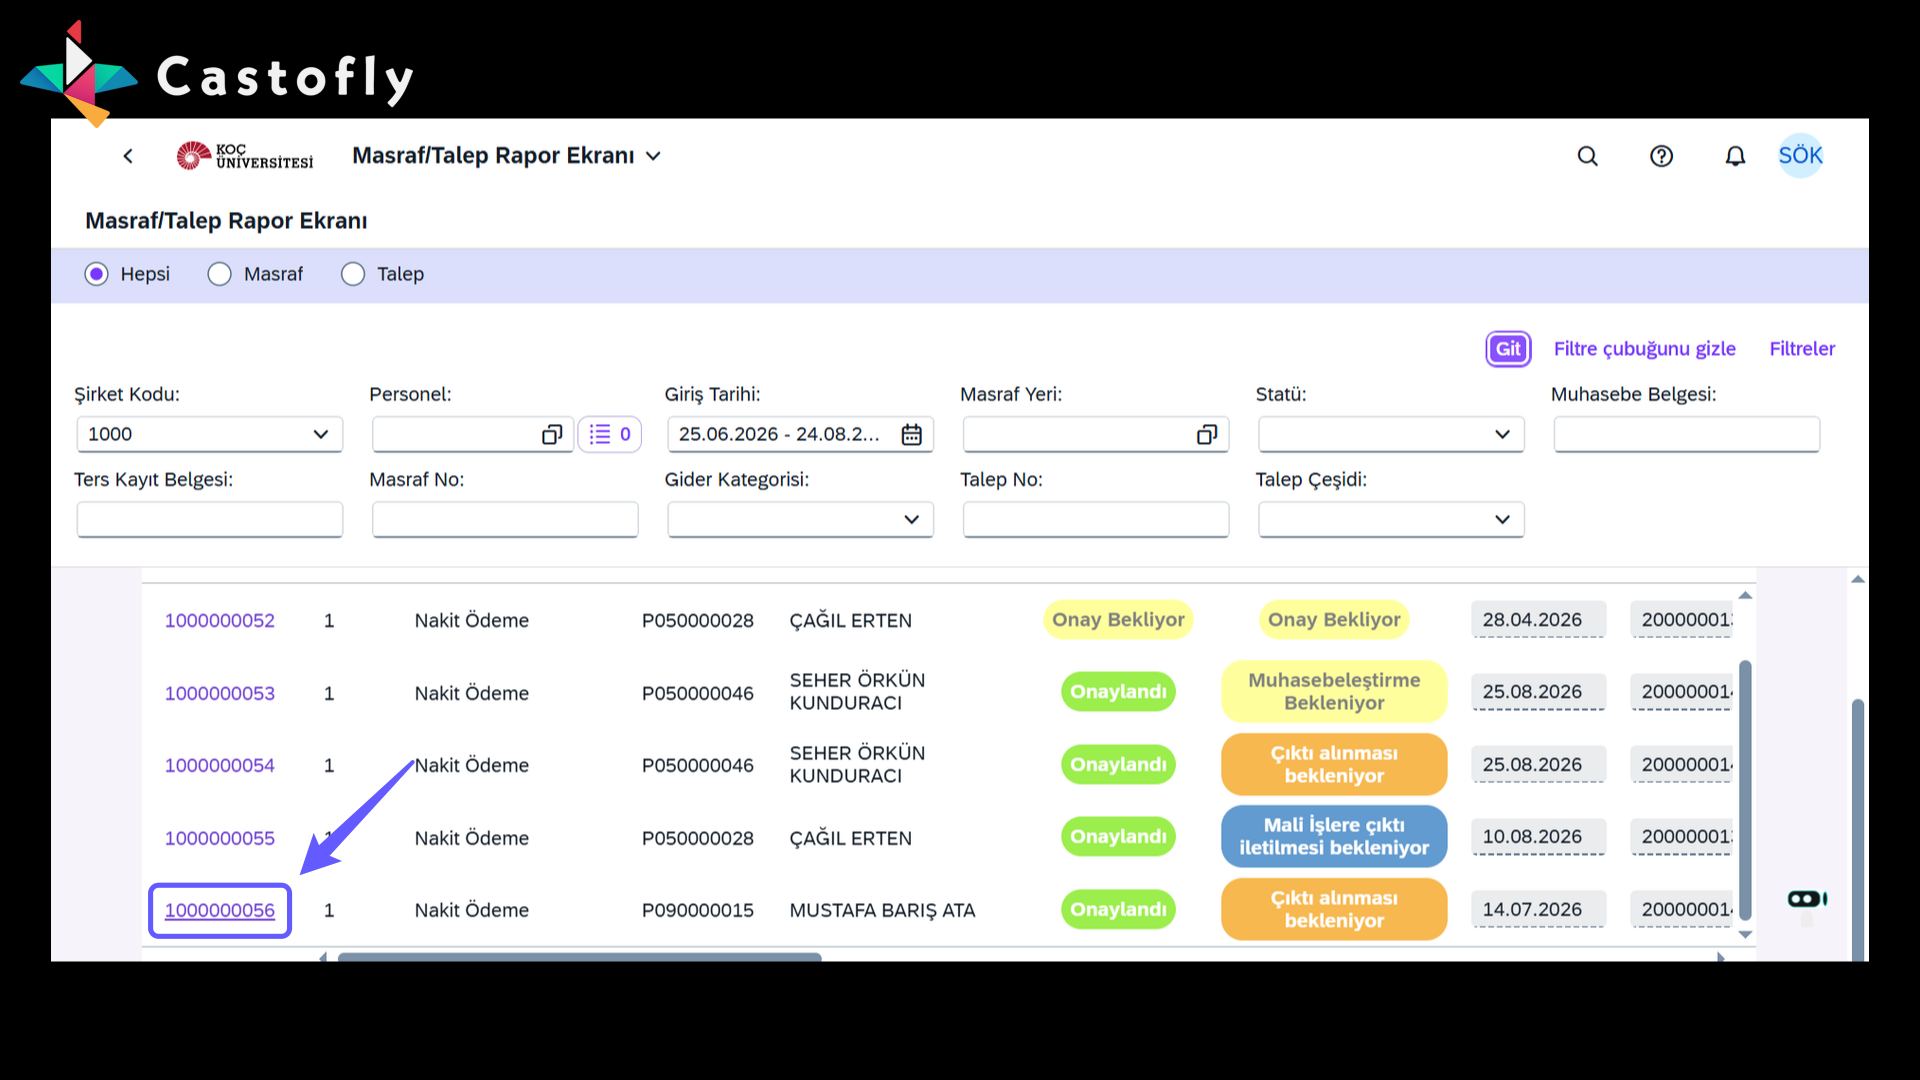
45. New Expense Item
-
Check the approval status of the expense number and the accounting process, and review the details carefully. Contact the relevant departments when needed.
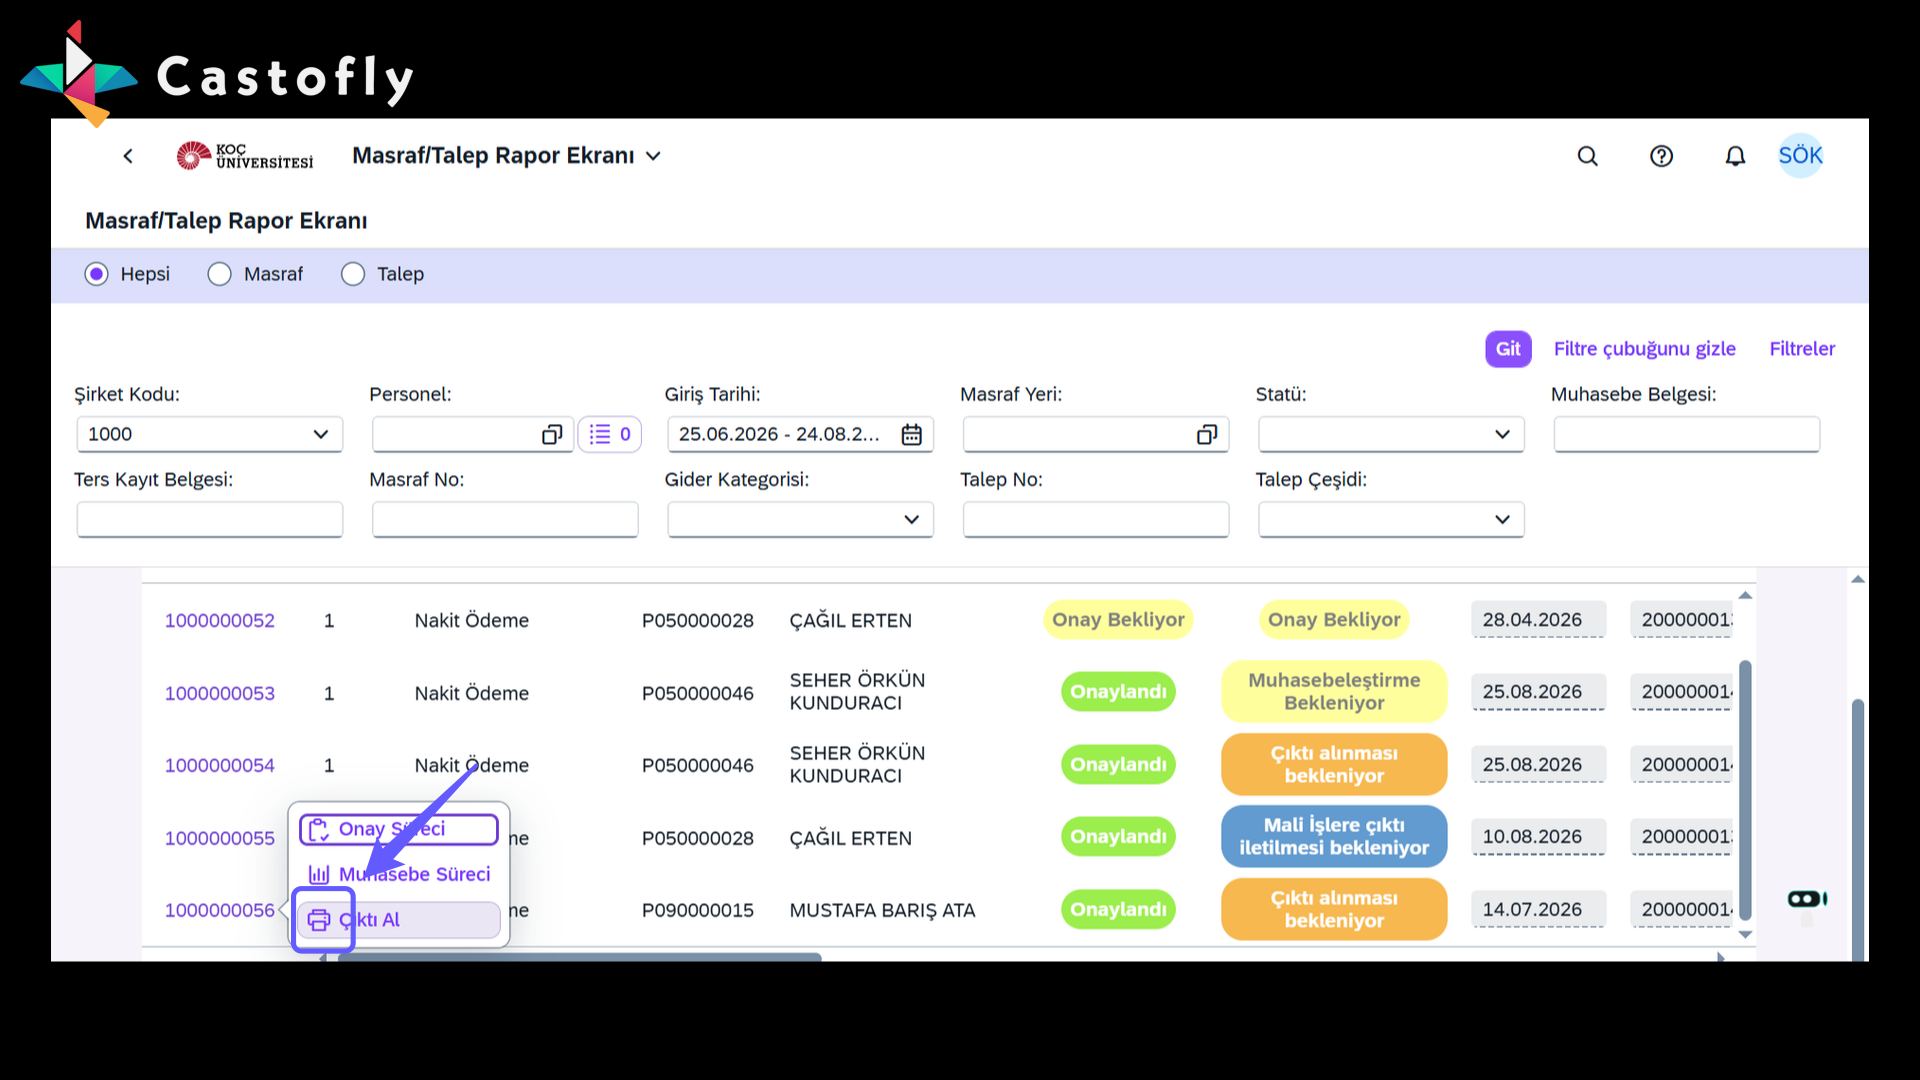
46. Print and Process Options
-
Click the expense number to check the approval status and accounting process. Contact the relevant departments when necessary. For expenses whose approval is complete, remember to select the print option.
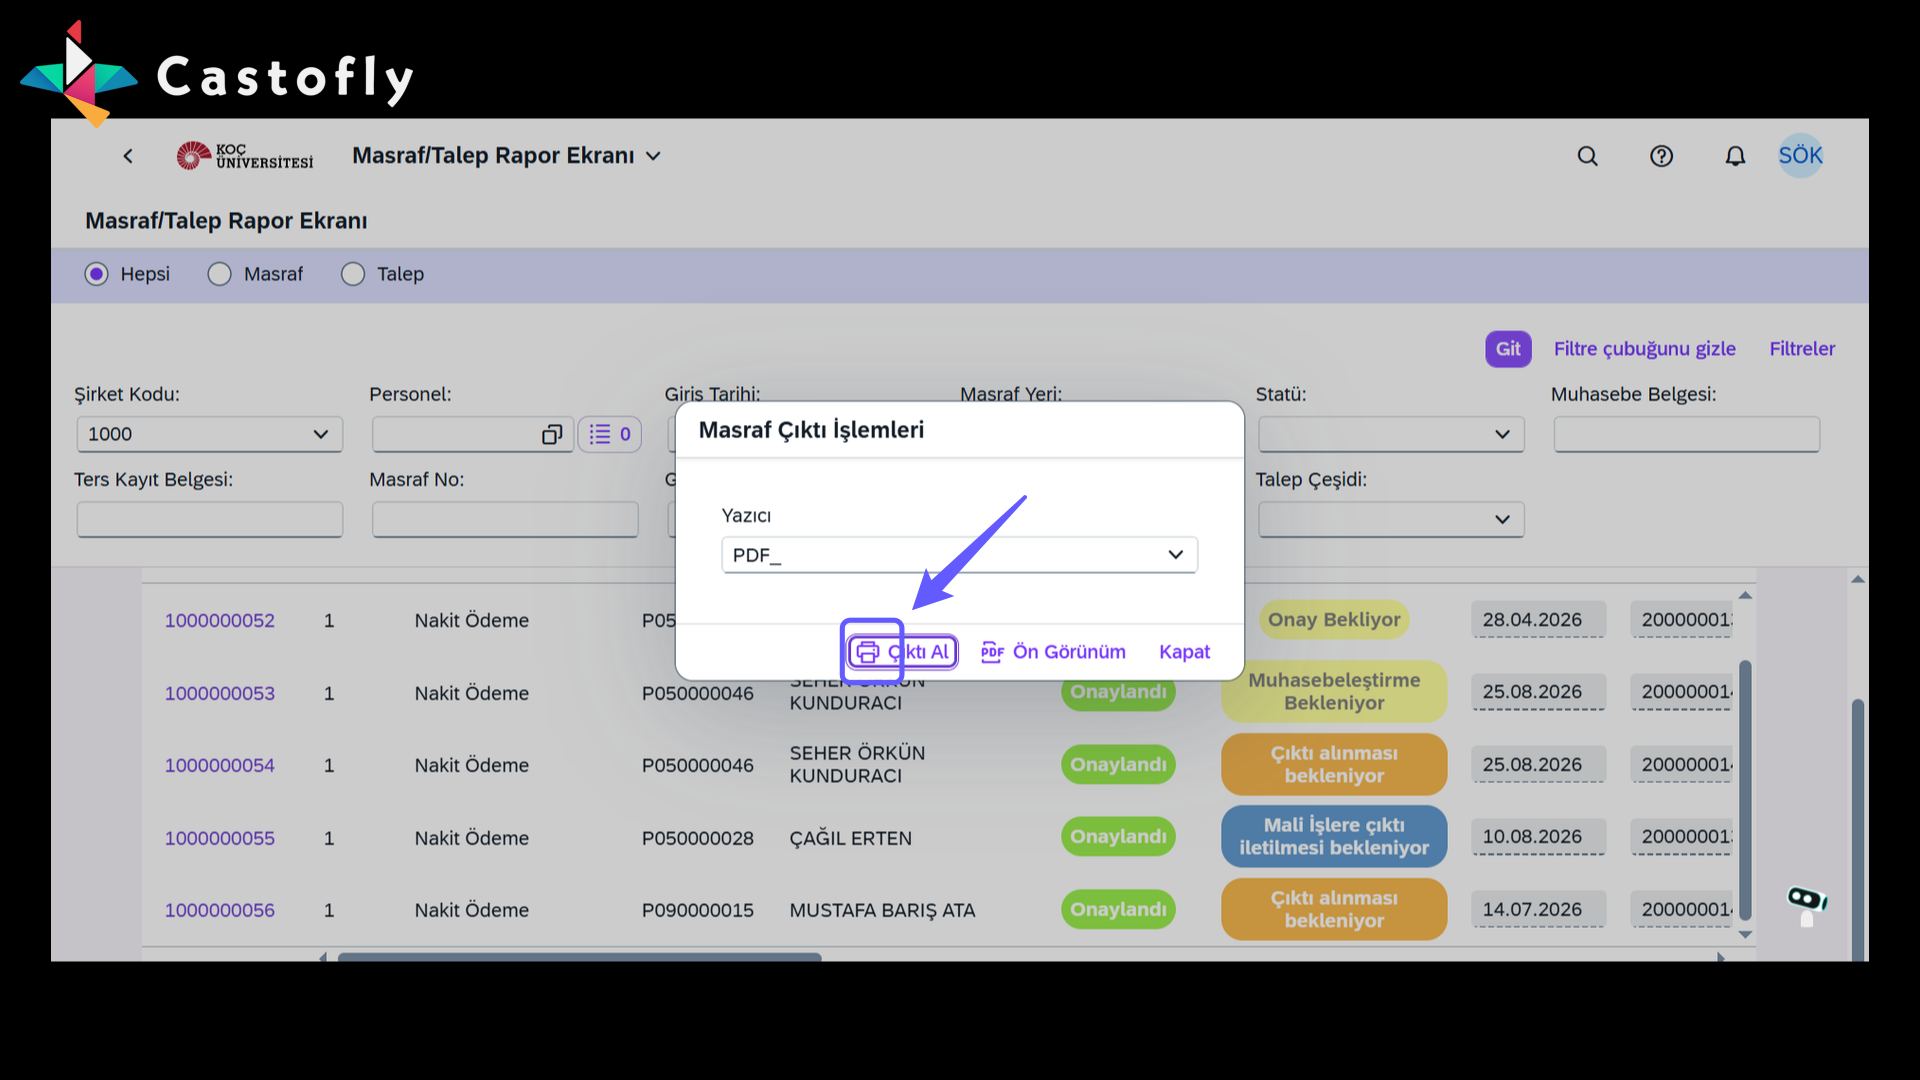
47. Print the Expense
-
Click "Print" to start printing the expense report. After printing, forward it to the Financial Affairs department.
48. Financial Processing Instructions
-
Forward the printed expense report to Financial Affairs. Before sending, check the status; if necessary, inform the relevant authority and follow up on the process.
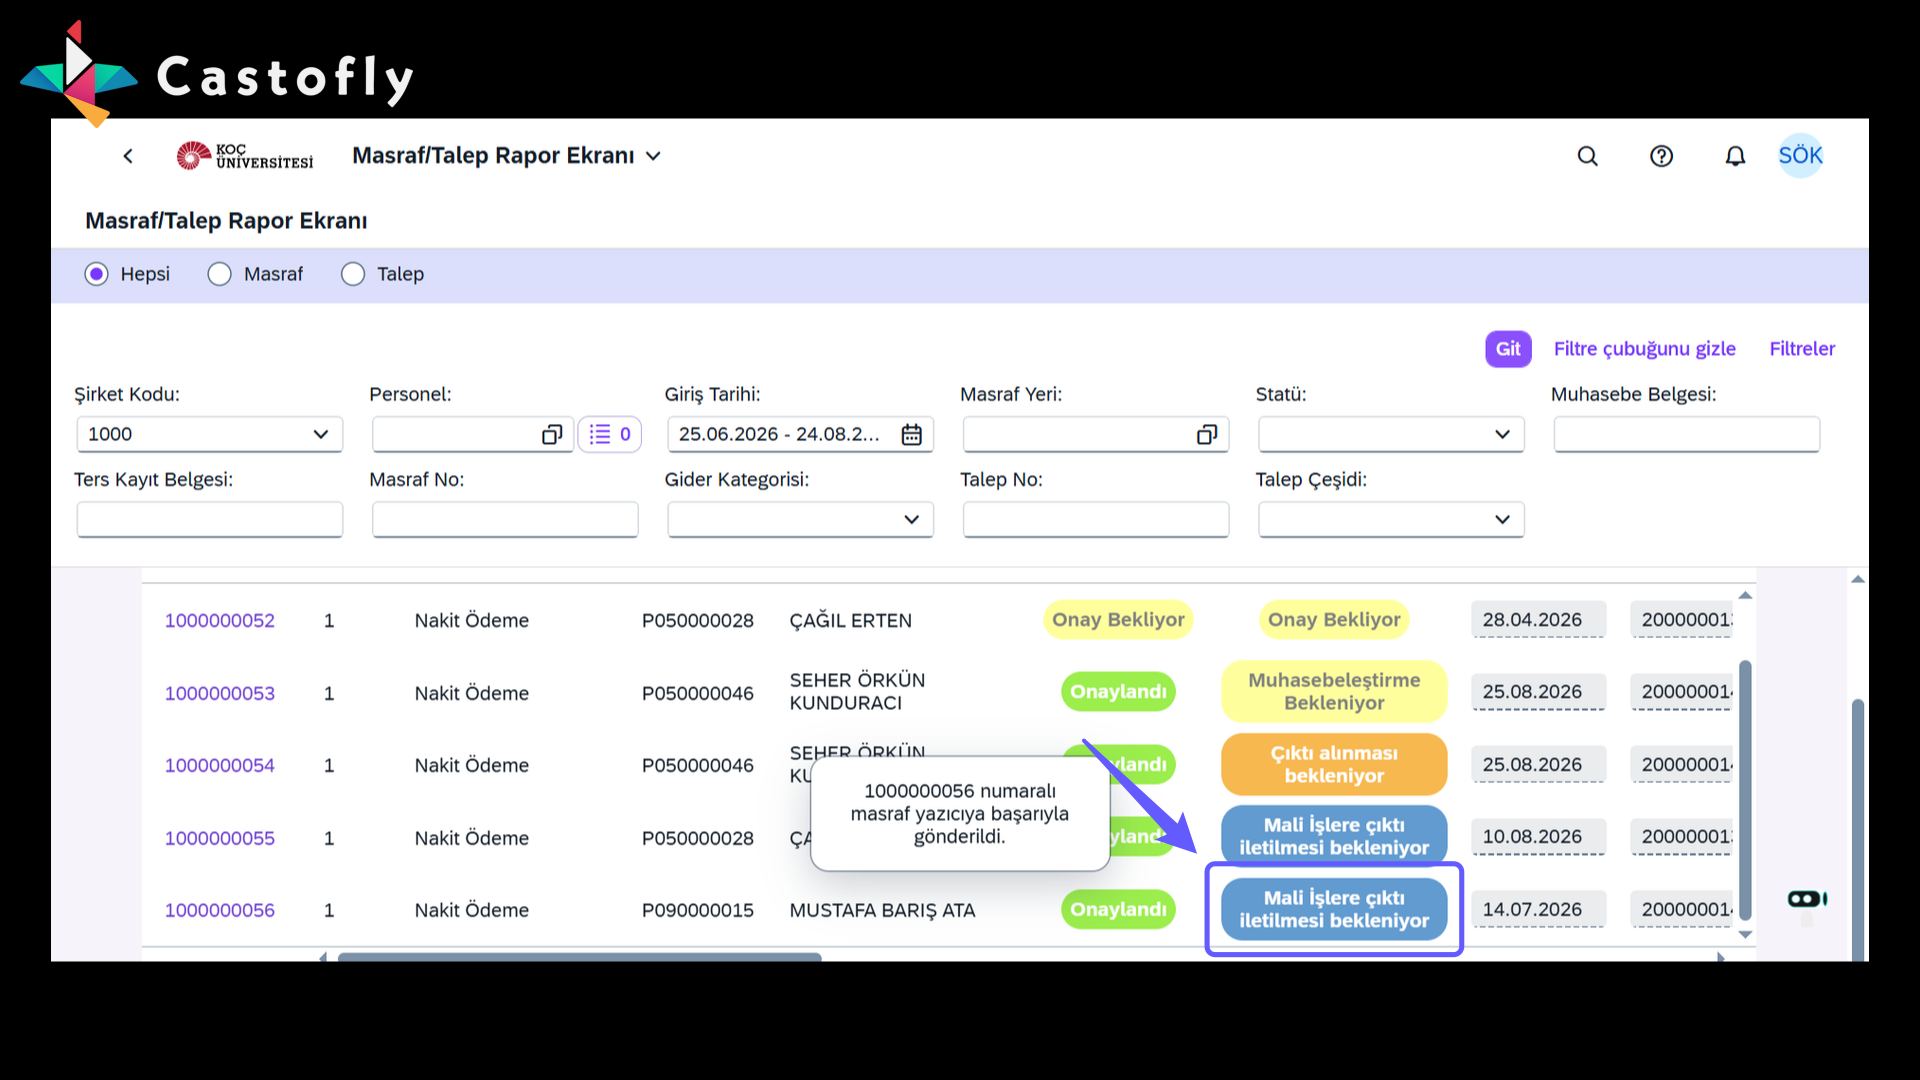
1. Masraf Talep İşlemleri
-
Menüden 'Masraf-Talep İşlemleri' seçeneğini tıklayın. Detaylı işlemleri görüntülemek için bu bölüme erişim sağlayın.
2. Masraf Talep Girişi Yap
-
Masraf talep girişini başlatmak için simgeye tıkla ve gerekli bilgileri doldur.
3. Talep Girişi Menüsüne Erişin
-
Talep Girişi butonuna tıklayın ve yeni bir talep oluşturun. İşlem menüsünde seçenekleri dikkatlice inceleyin ve ihtiyacınıza uygun olanı seçin.
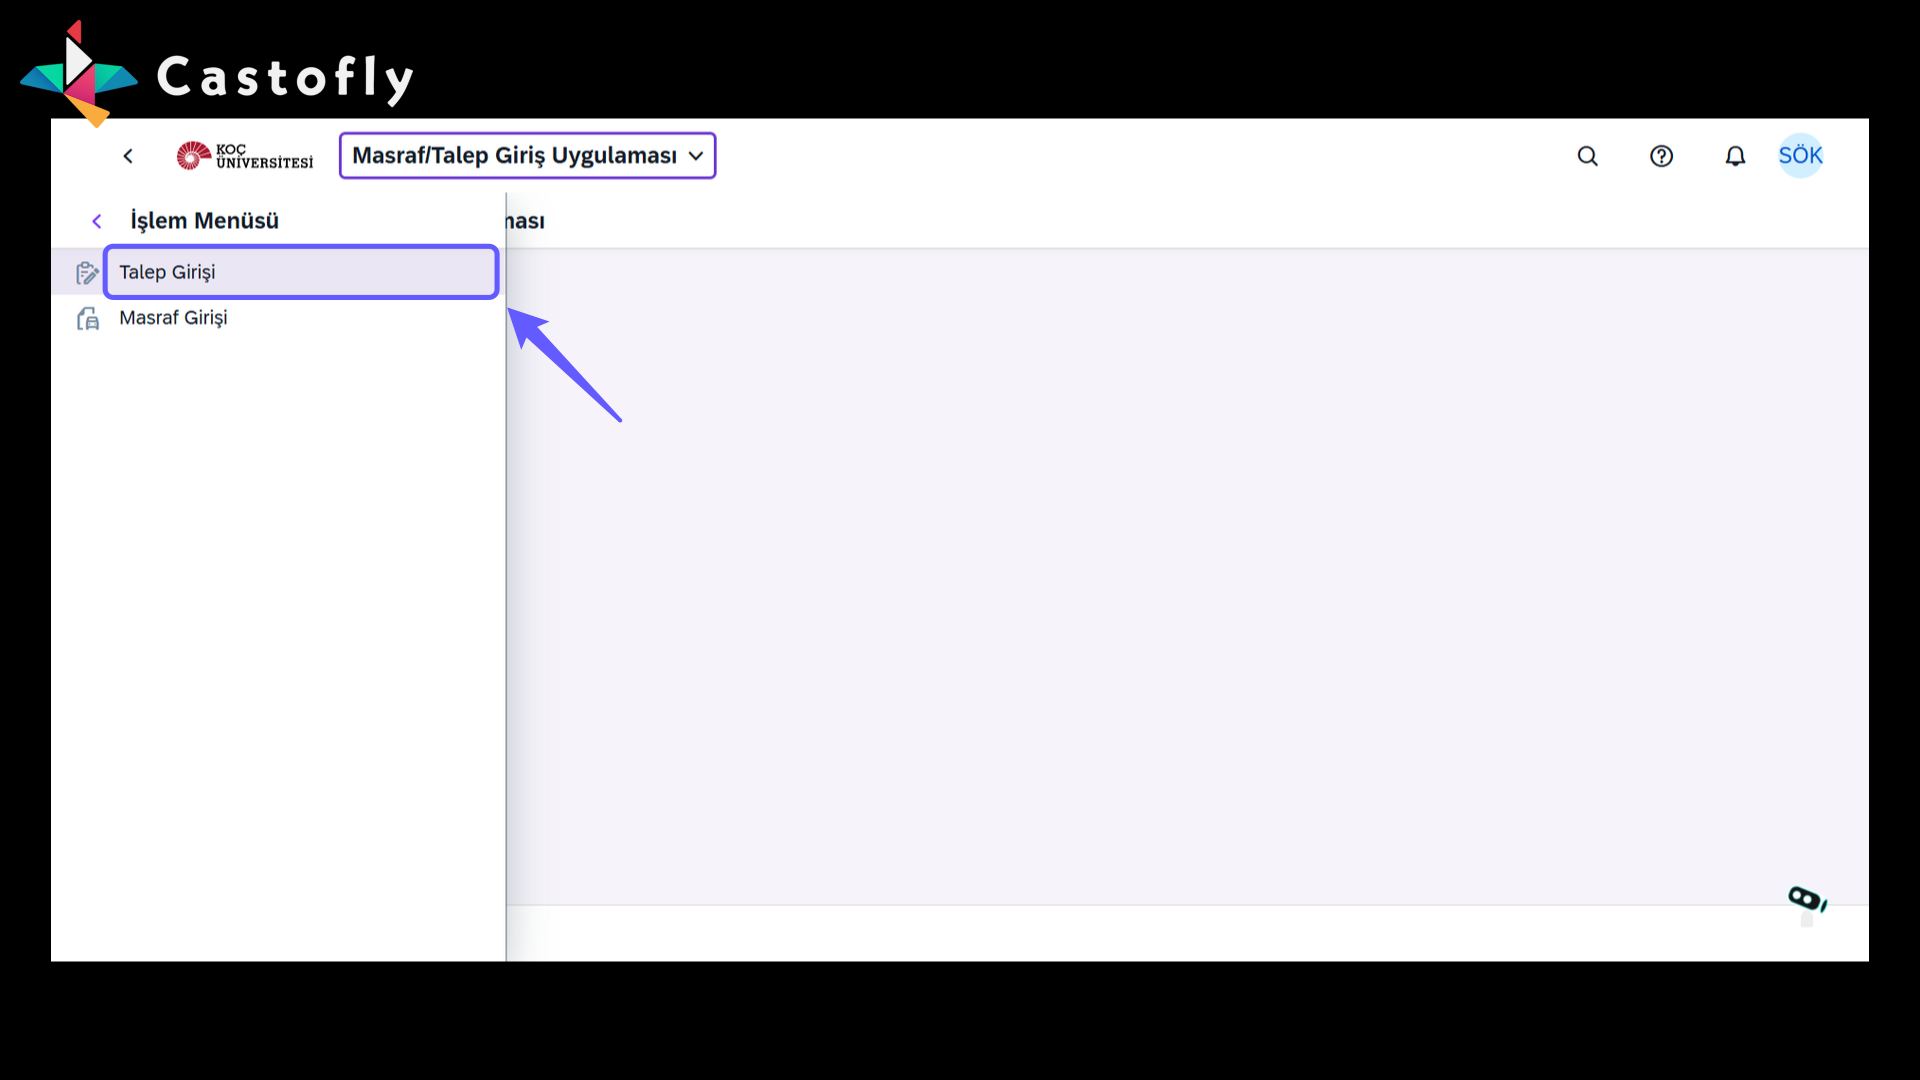
4. Şirket Kodu Seçimi
-
Şirket Kodu alanındaki açılır menüye tıklayın ve uygun seçeneği seçin.
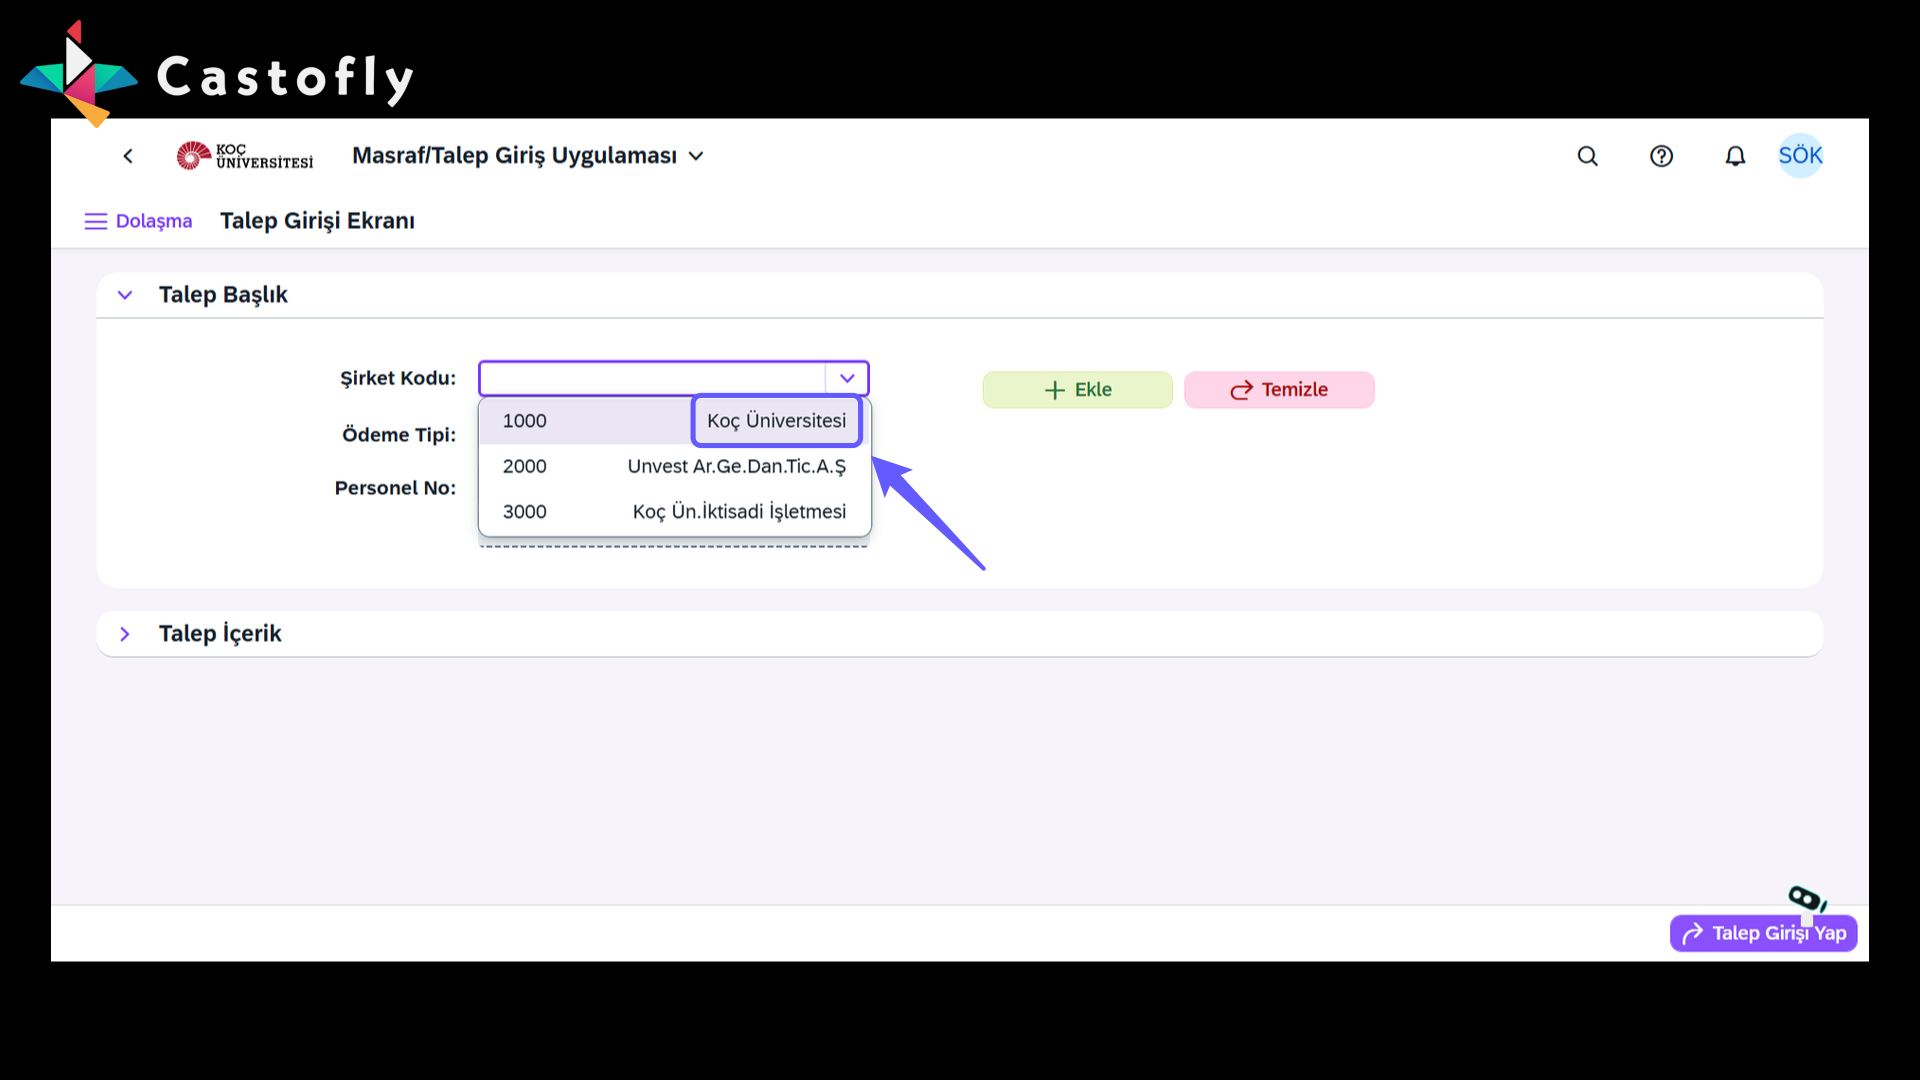
5. Ödeme Tipi Seçimi
-
Ödeme tipi seçeneklerini açmak için aşağı ok simgesine tıkla. İstediğin ödeme türünü liste içerisinden seç.
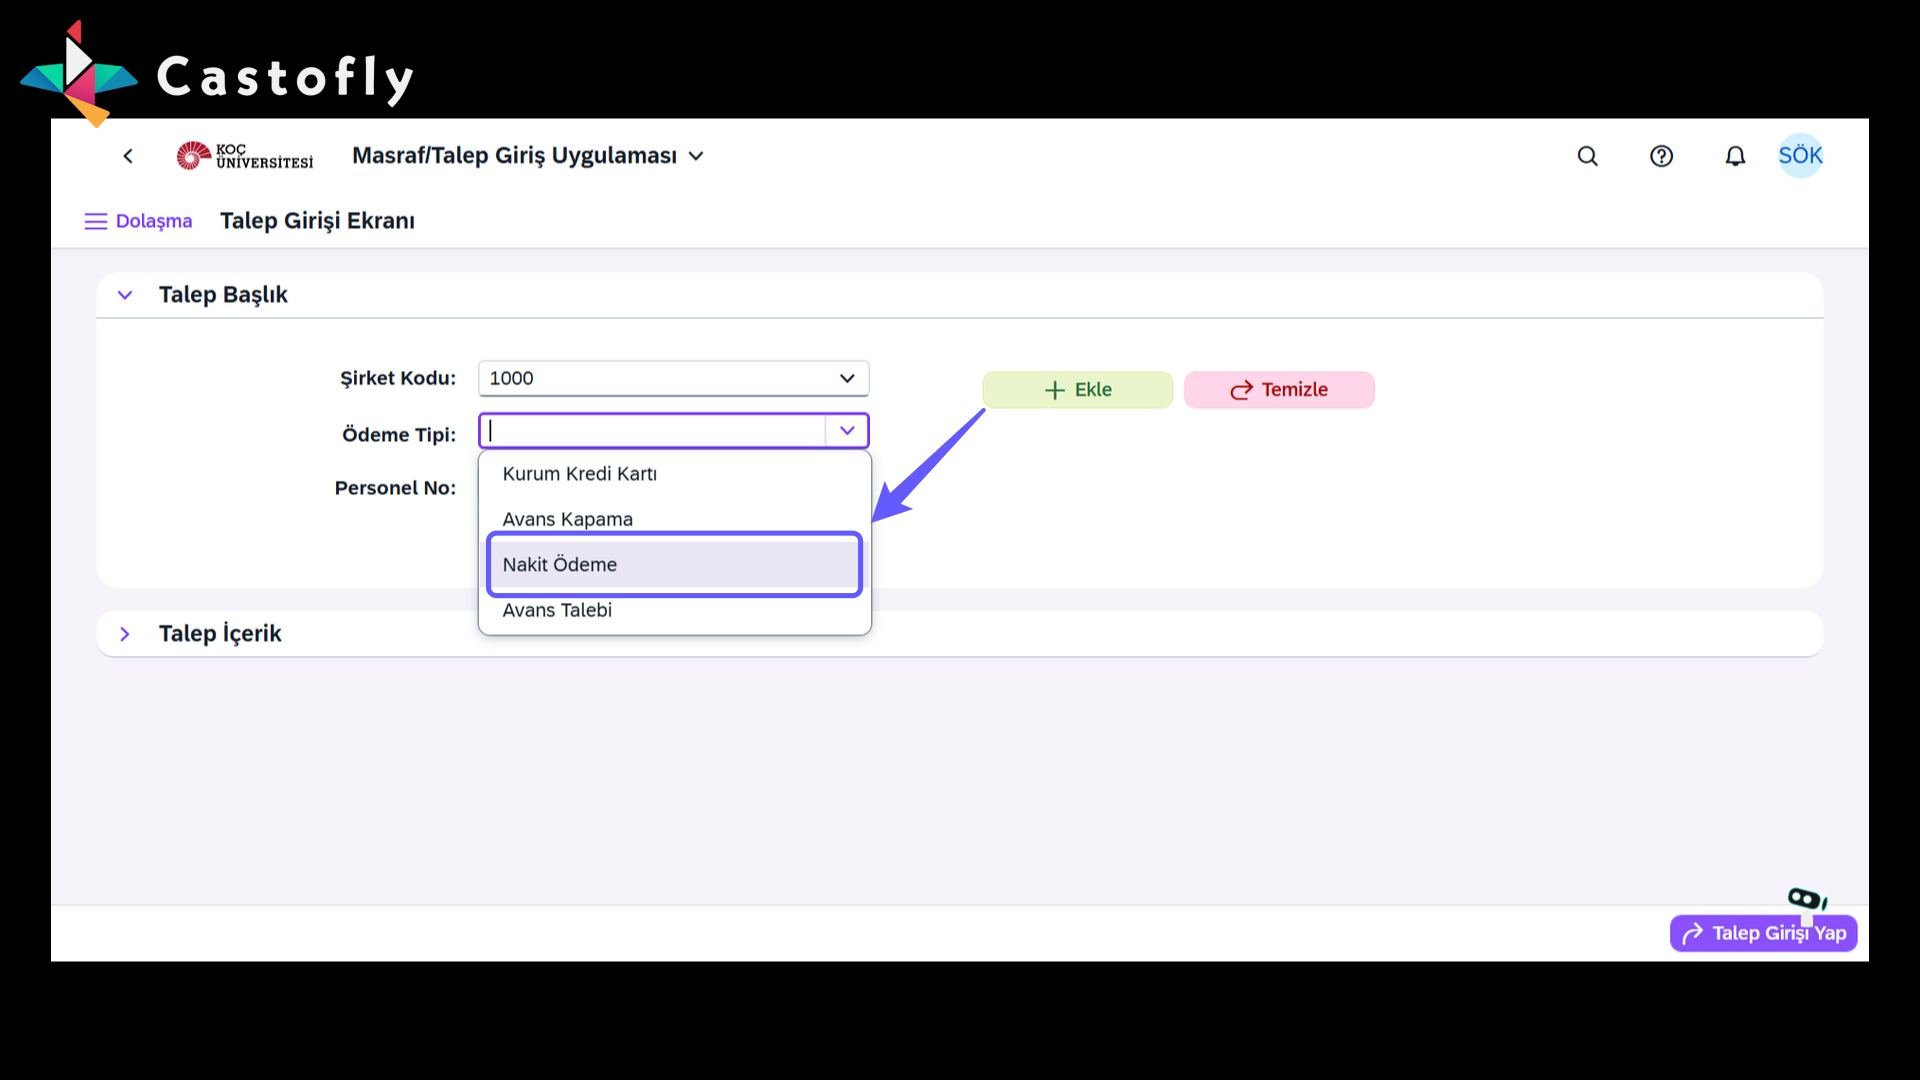
6. Nakit Ödeme Seçimi
-
Ödeme Tipi menüsünden masraf seçeneğini seçin.
7. Personel Seçimi
-
Personelinizi seçin ve işleme devam edin.
8. Talep İçeriğinin Doldurulması
-
Talep içeriğine ilgili bilgileri girin ve doğruluğunu kontrol edin. İstenen detayları eksiksiz ve doğru şekilde belirtin. Giriş işlemi sonrası kaydedin.
9. Proje ve Fon Seçimi
-
Proje ve Fon sekmesine tıklayıp ihtiyacınız olan proje veya fonu seçin. Bu adım, masraf kaydınızı doğru bir şekilde oluşturmanızı sağlayacaktır.
10. Talep Ekleyin
-
Yeni bir talep eklemek için 'Ekle' butonuna tıklayın.
11. Projeyi Seç
-
İlgili projeyi seçmek için simgeye tıkla.
12. Proje Kodu Seçimi
-
Listeyi açarak uygun proje kodunu seç.
13. Proje Seçimi Yap
-
Lütfen bir proje numarası seçmek için listeden tercih yapın. Aramak istediğiniz proje kodunu kutucuğa yazarak ve büyüteç simgesine tıklayarak doğrulayın. Ardından, seçim yaparak ilerleyin.
14. Proje Seçimi
-
Bir projeyi seçmek için üzerine tıkla ve onayla.
15. Mal Grubu Seçimi
-
İlgili talebin gider kategorisini belirlemek için dosya simgesine tıklayın
16. Temizlik Sarfını Seç
-
Talep kategorisini seçerek mal grubunu belirleyin. Masraf girişini tamamlamak için bu adım gereklidir.
17. Tutar Bilgisini Girin
-
Bu alana talep edilen tutar miktarını girin. Doğru ve eksiksiz bilgi girmeye özen gösterin.
18. Para Birimi Seçimi
-
Para birimi seçimi alanına tıklayın ve istediğiniz para birimini seçin.
19. Açıklama Alanını Doldurun
-
Açıklama alanına proje ile ilgili detayları girin.
20. Talep Girişi Yap
-
Talep girişi işlemini başlatmak için buraya tıkla. İşlemi tamamlamak için gerekli bilgileri kontrol et ve son adımı onayla.
21. Menüye Erişim
-
Talep girişini başarıyla oluşturduktan sonra, talebi masrafa dönüştürmek için tekrar menü alanına gidin.
22. Masraf Girişi
-
Masraf girişi seçeneğine tıkla.
23. Şirket Kodunu Seçin
-
Şirket Kodu alanındaki açılır menüyü tıklayın ve doğru seçeneği tekrar belirleyin
24. Personel Seçimi
-
Talebin masrafa dönüştürülebilmesi için talep sahibini yeniden tanımlayın.
25. Dosya Yükleme İşlemi
-
Yüklemek istediğiniz dosyayı seçmek için 'Gözat' butonuna tıklayın. Ardından, 'Yükle' butonuna basın ve dosyanızı sisteme aktarın.
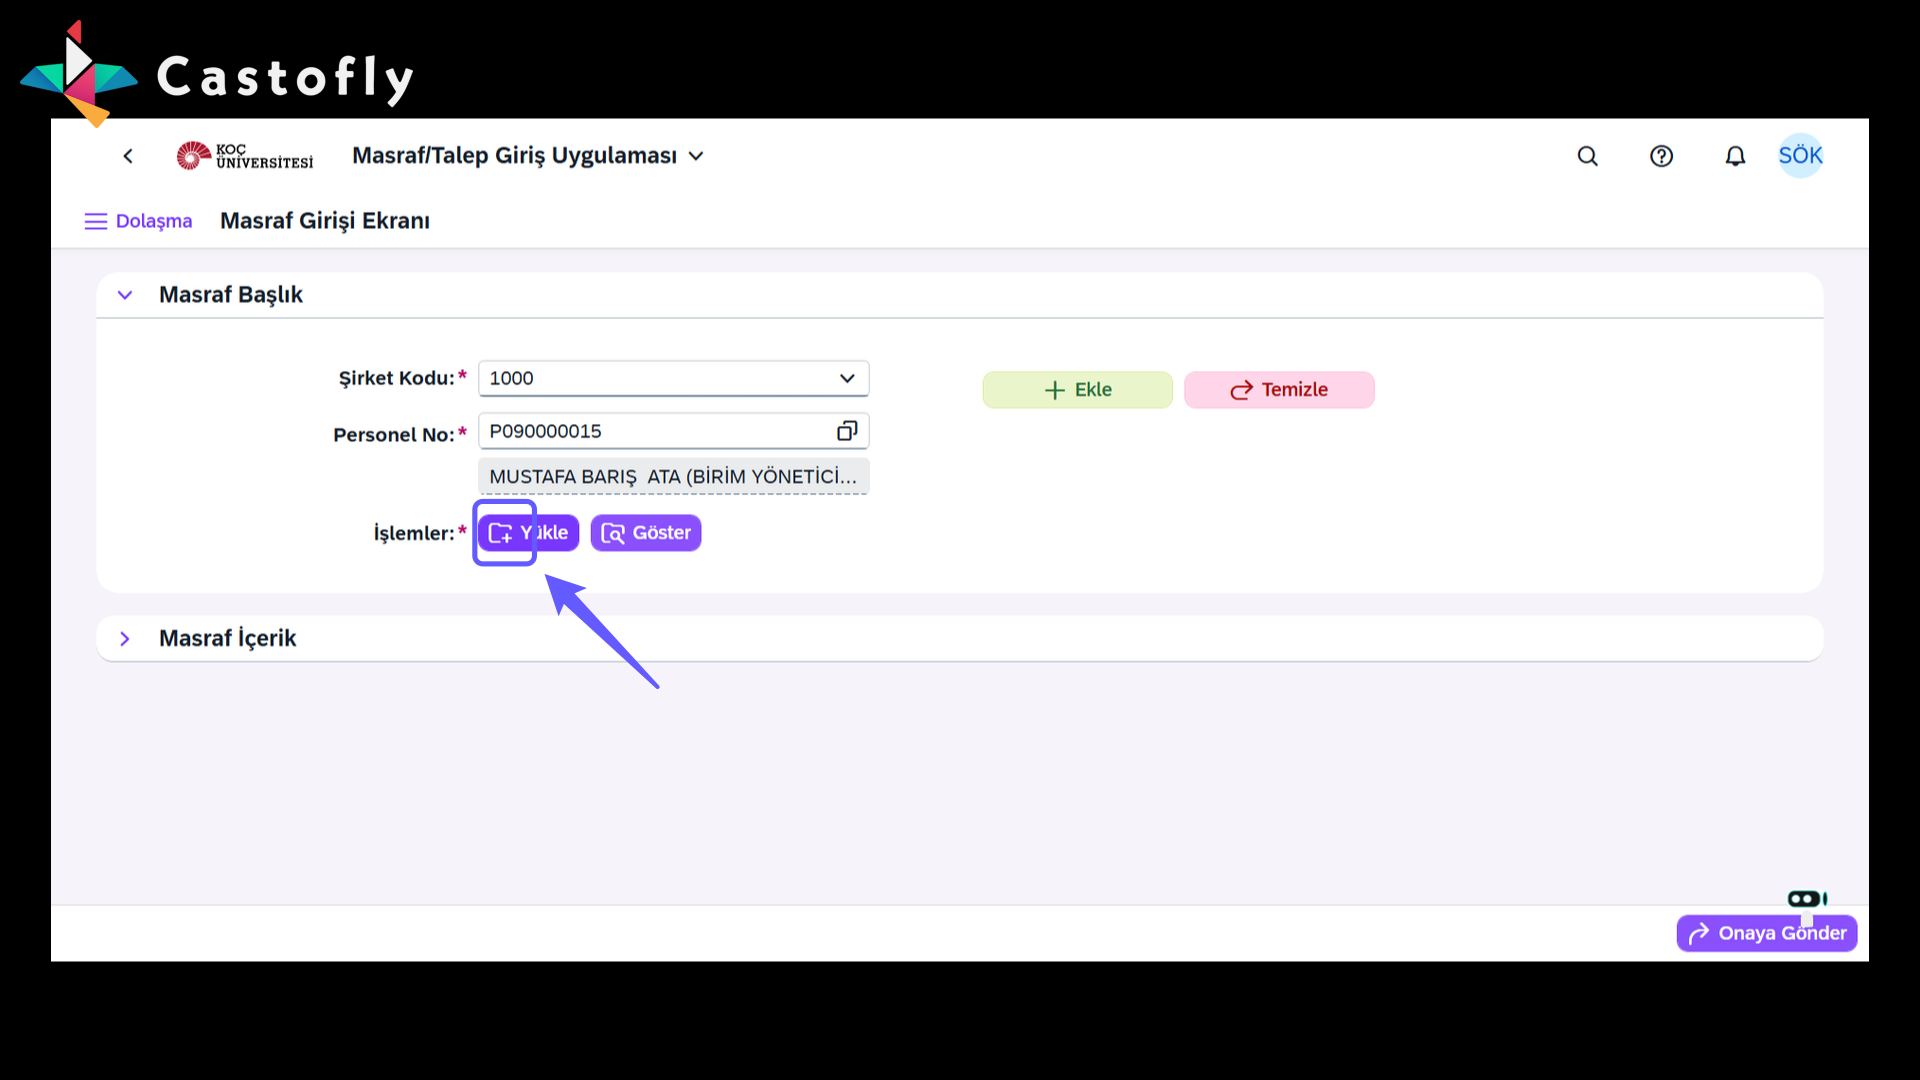
26. Dosyayı Yükle
-
Belirtilen dosyayı yüklemek için 'Yükle' butonuna tıklayın. İşlemi tamamladıktan sonra, 'Göster' butonuna tıklayarak yüklü dosyalarınızı görüntüleyebilirsiniz.
27. Masraf Girişi Ekleme
-
Masraf içeriği kısmına lütfen talep edilen masrafın ayrıntılarını giriniz. Yeni bir masraf girişi eklemek istediğinizde 'Ekle' butonuna tıklayınız.
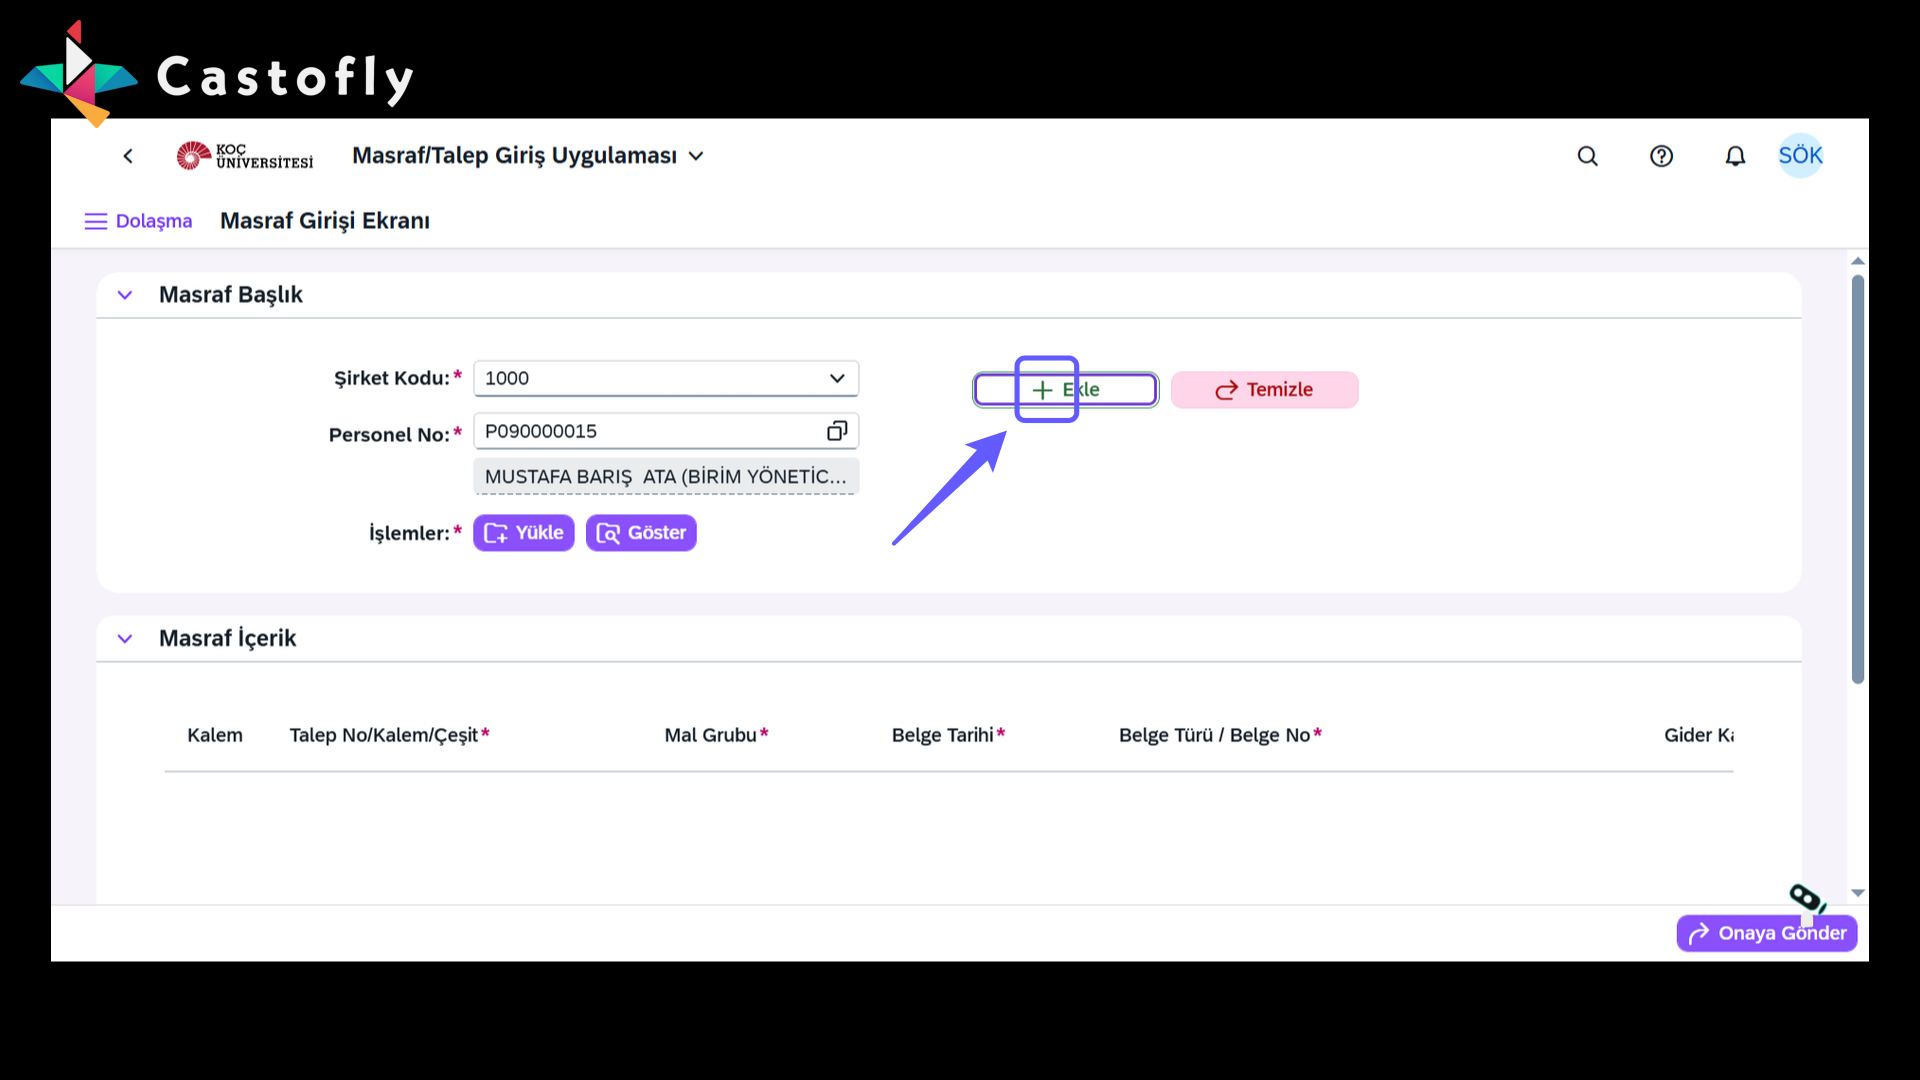
28. Talep Bilgisi Ekle
-
Talep numarasını seçmek için kutucuğa tıklayın ve gerekli bilgileri girin.
29. Belge Tarihi Seçimi
-
Tarih simgesine tıklayarak mevcut belgenin tarihini seçin. Ancak, tarih seçimine geçmeden önce mutlaka doğru belgenin yüklü olduğunu kontrol etmeyi unutmayın.
30. Belge Türünü Seçin
-
Belge Türü menüsüne tıklayın ve belgenizin türünü seçiniz.
31. Belge Numarasını Girin
-
Belge numarasını bu alana girin ve gerekli kontrolü yapın.
32. Gider Kategorisi Seçimi
-
Aşağı ok simgesine tıklayarak gider kategorisi listesine ulaşın ve uygun seçeneği belirleyin.
33. Ek Veriler Düzenleme
-
Ek veriler simgesine tıklayarak gerekli bilgileri gir ya da güncelle.
34. Açıklama Alanı Kullanımı
-
Lütfen açıklama kutusuna harcama detaylarını giriniz. Bu alanın doldurulması gerektiğini unutmayın.
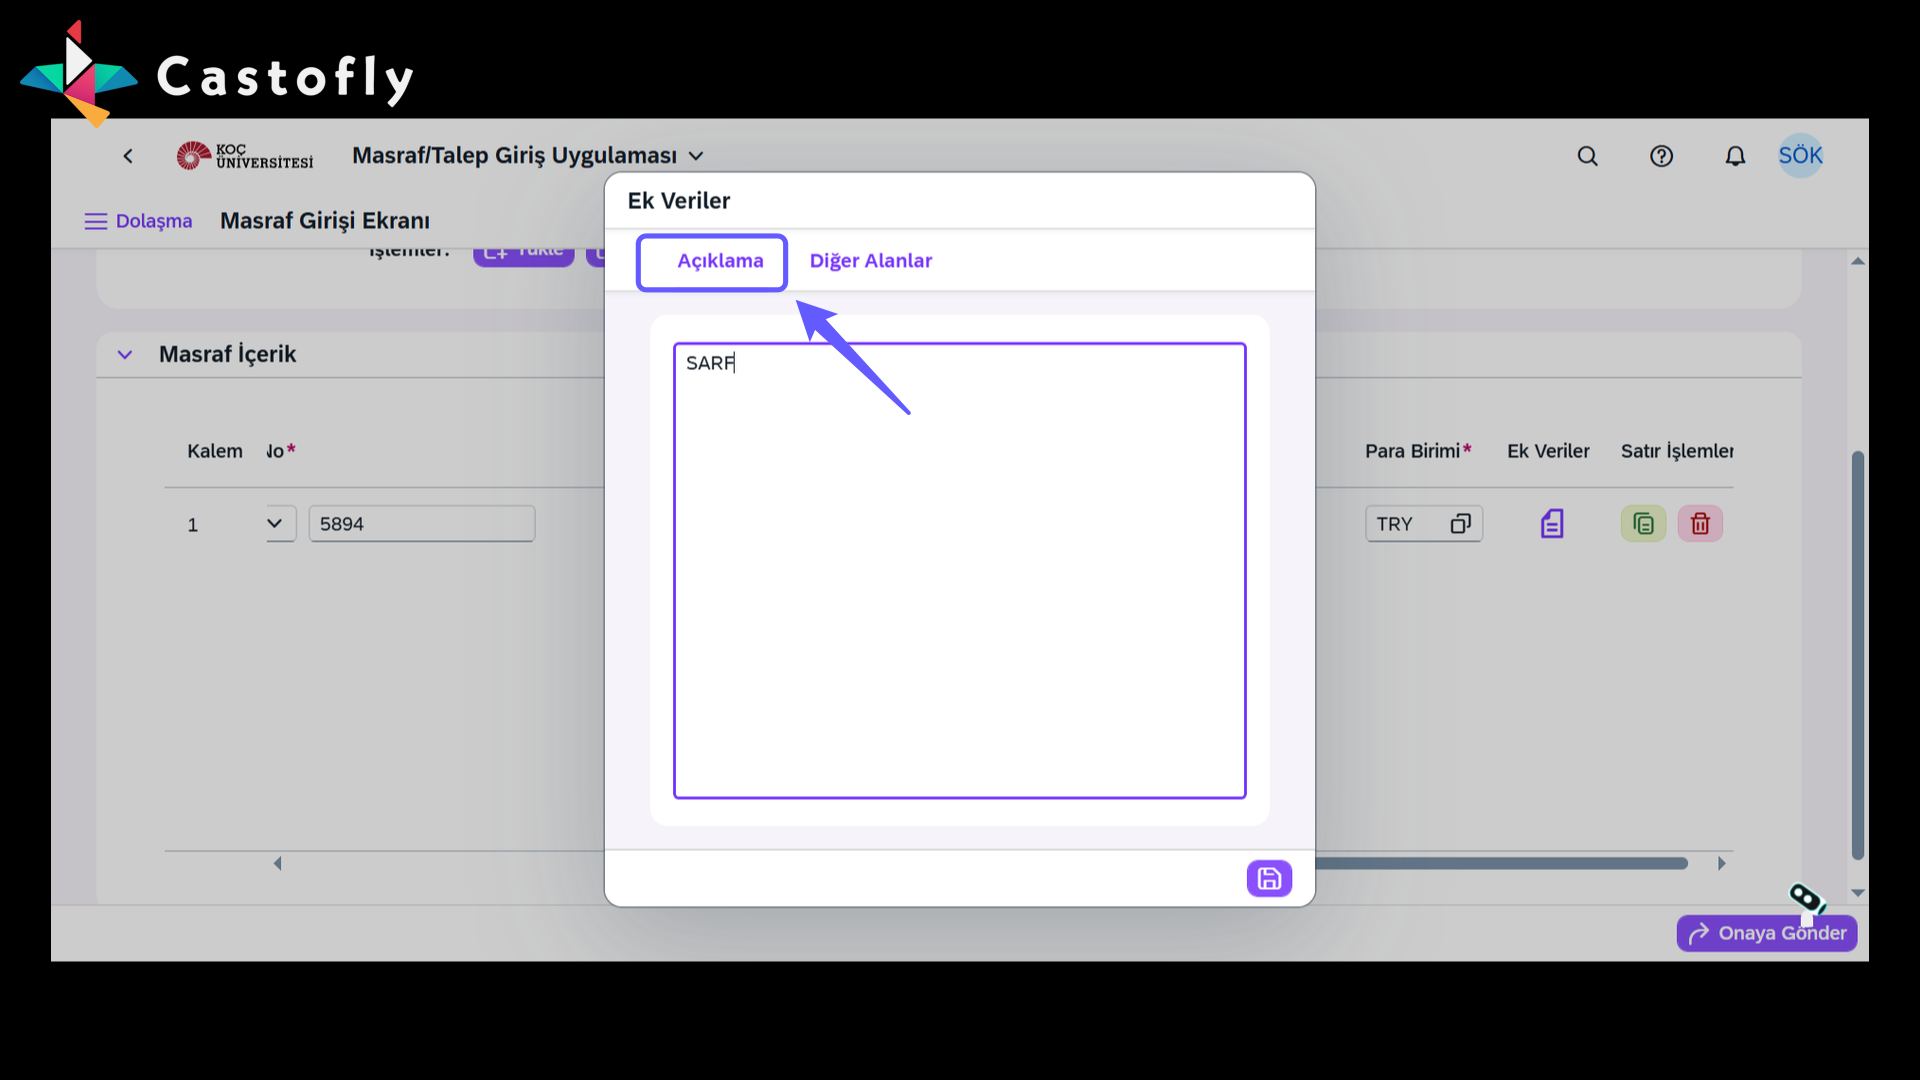
35. Diğer Alanlar Alanını Doldurma
-
Vergi göstergesi alanını doldurmak için gerekli bilgiyi girin. Bu alan boş kalmamalıdır.
36. Vergi Seçimi Yap
-
KDV göstergenizi seçmek için G0, G1, G2 veya G3 seçeneklerinden birine tıklayın.
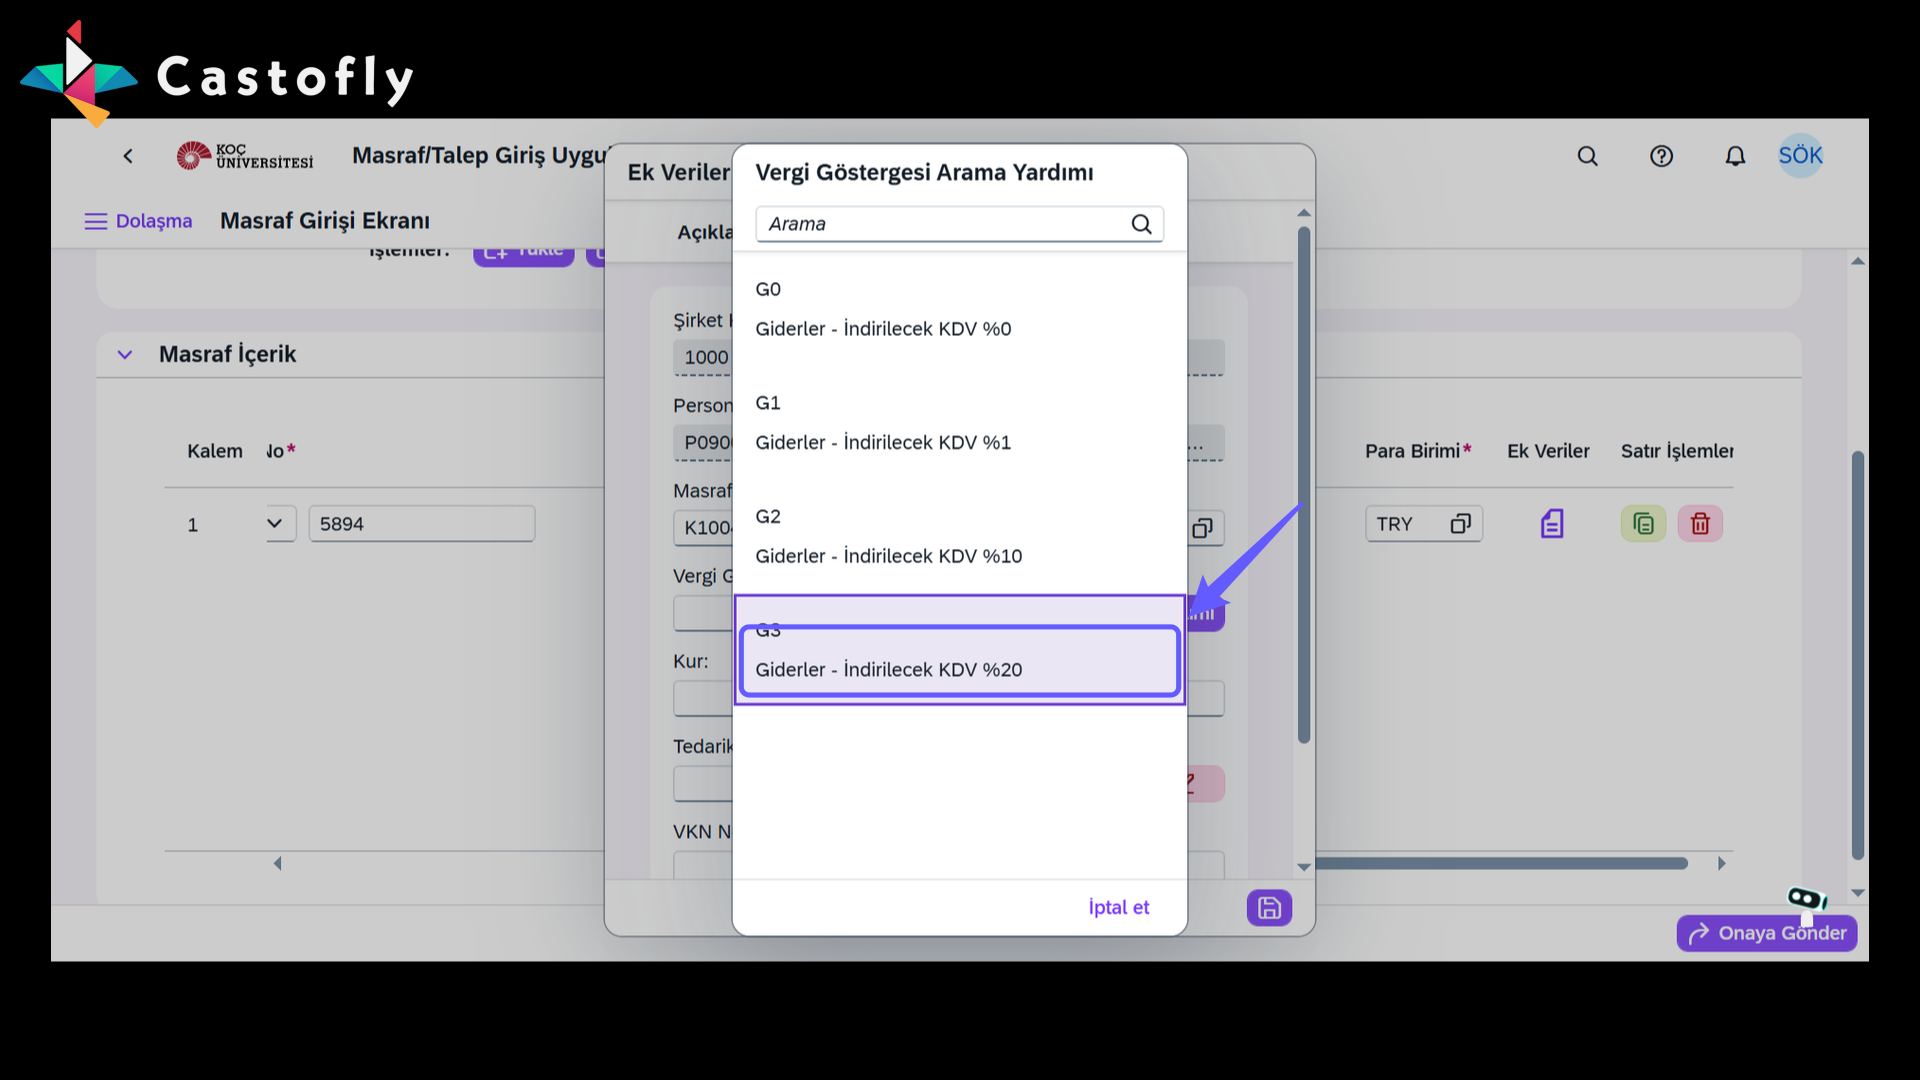
37. Verileri Kaydet
-
Koç Üniversitesi adına düzenlenen faturalar için tedarikçi bilgilerini eksiksiz ve doğru bir şekilde doldurun. Tüm gereken bilgilerin tam ve doğru olduğundan emin olduktan sonra, sağ alt köşedeki disket simgesine tıklayarak kaydedin.
38. Giriş Onayına Gönderme
-
Gerekli bilgilerin tümünün eksiksiz ve doğru olduğuna emin olun, ardından 'Onaya Gönder' butonuna tıklayarak işleminizi tamamlayın. Başarıyla gönderildiğinden emin olmak için kontrol etmeyi unutmayın.
39. Masraf Girişi
-
Gönderinizin başarıyla iletildiğinden emin olmak için mutlaka kontrol edin.
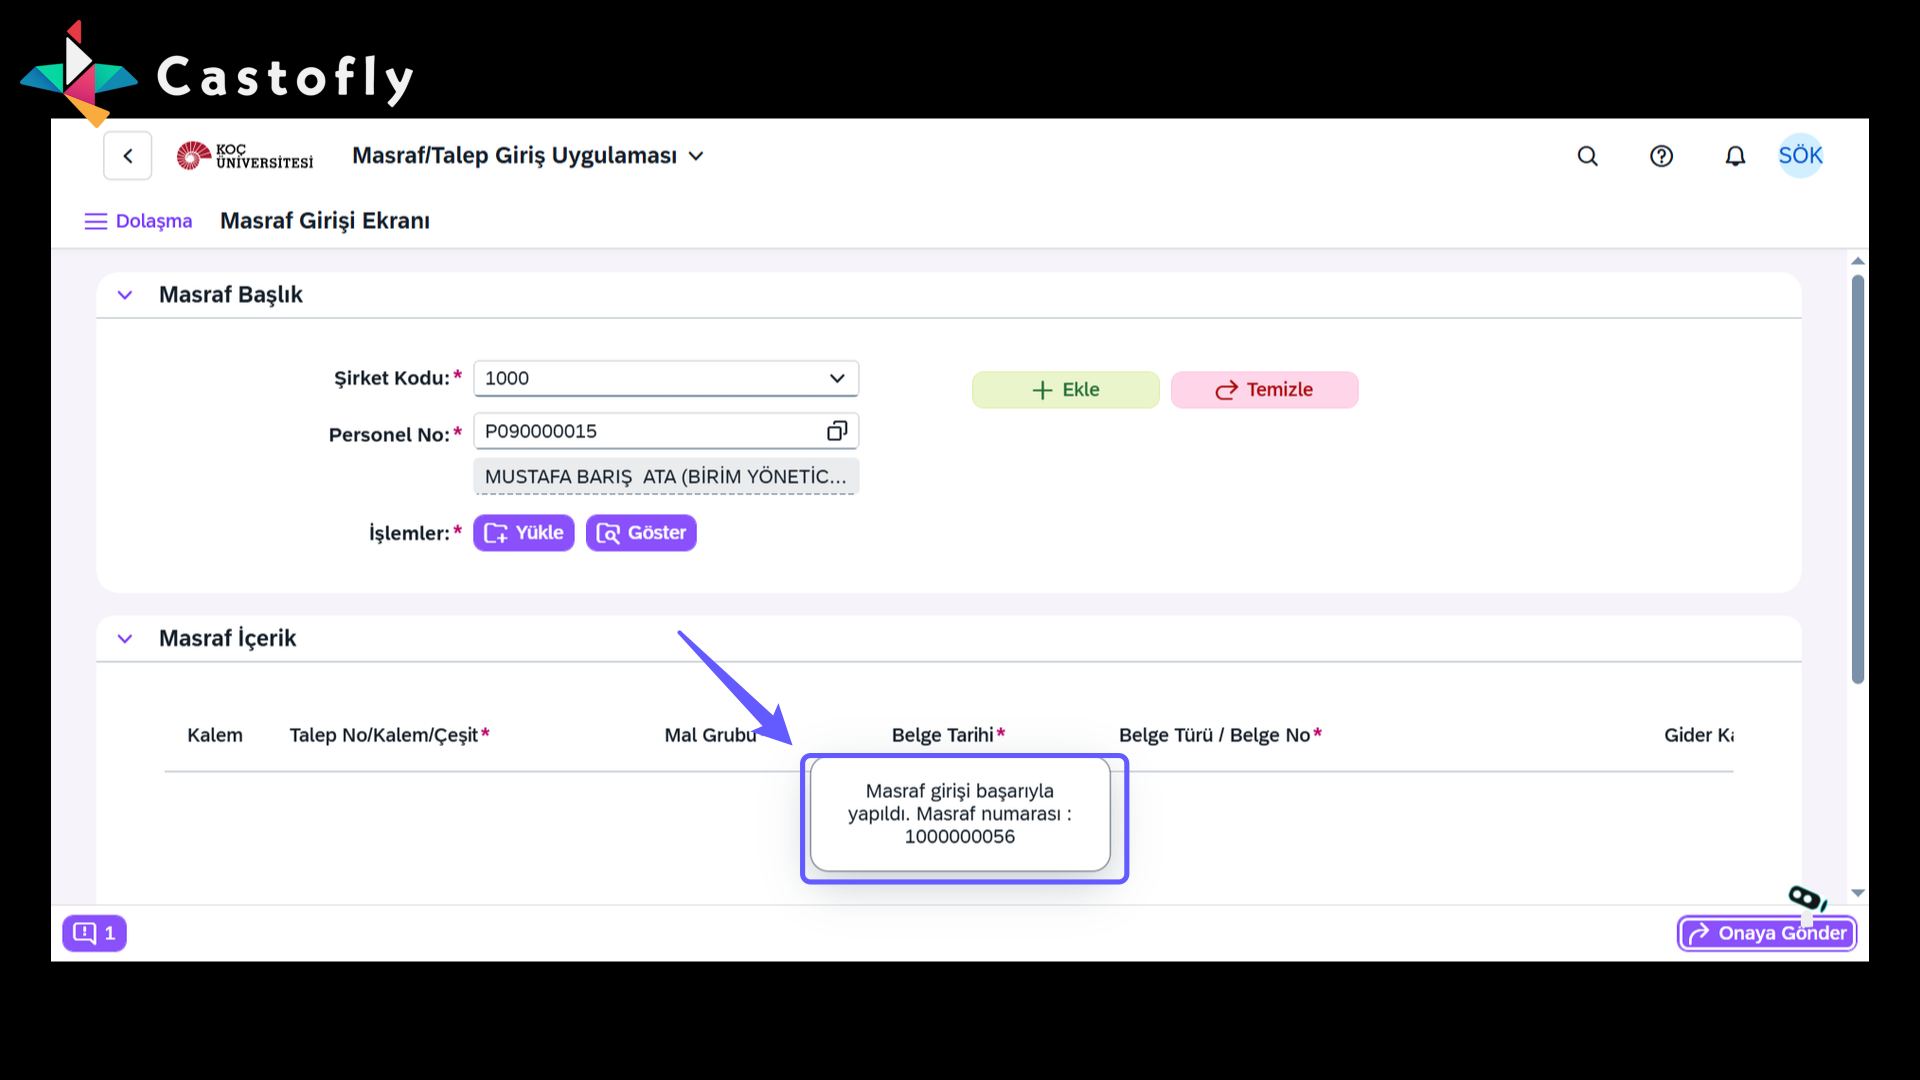
40. Masraf Talep Onayı
-
Masraf talebi ilgili projenin yürütücüsünün onayına sunuldu. Lütfen onay için ilgili kişiyi bilgilendirin.
41. Masraf Onayını Tamamla
-
Masraf onayını tamamlamak için yürütücünüzün 'Onayla' butonuna tıklamasını sağlayın. Ayrıca, yürütücünüze ve onay hiyerarşisindeki diğer ilgili kişilere bilgi verdiğinizden emin olun.
42. Masraf Talep Raporu Aç
-
Bu butona tıklayarak tüm taleplerinizi ve onay hiyerarşisini inceleyin. Masraf taleplerinizin detaylarını gözden geçirin ve eksik onaylarla ilgili yetkili kişilerin bilgilerine kolayca erişin.
43. Şirket Seçimi
-
Lütfen açılır menüden uygun şirket kodunu seçin.
44. Git Butonuna Tıklayın
-
Git butonuna tıklayarak işlemi başlatın. Buton, filtrelerle belirlediğiniz kriterlere uygun sonuçları gösterir. Eğer başka seçim yapmadıysanız, mevcut listeyi görüntüler.
45. Yeni Masraf Kalemi
-
Masraf numarasının onay durumunu ve muhasebe sürecini kontrol edin; detayları dikkatlice gözden geçirin. Gerektiğinde ilgili bölümlerle iletişim kurun.
46. Çıktı Alma ve Süreç Seçenekleri
-
Masraf numarasına tıklayarak onay durumunu ve muhasebe sürecini kontrol edin. Gerekli durumlarda ilgili bölümlerle iletişime geçin. Onay süreci tamamlanmış masraflar için çıktı almak adına seçim yapmayı unutmayın.
47. Masraf Çıktısı Al
-
“Çıktı Al” seçeneğine tıklayarak masraf yazıcısında yazdırma işlemini başlatın. Yazdırma işleminin ardından masrafı Mali İşler birimine iletin.
48. Mali İşlem Talimatı
-
Yazıcıdan aldığın masraf raporunu Mali İşler'e ilet. Göndermeden önce statüyü kontrol etmeyi unutma; gerekirse ilgili yetkiliye bilgi ver ve sürecin takibini özenle yap.