
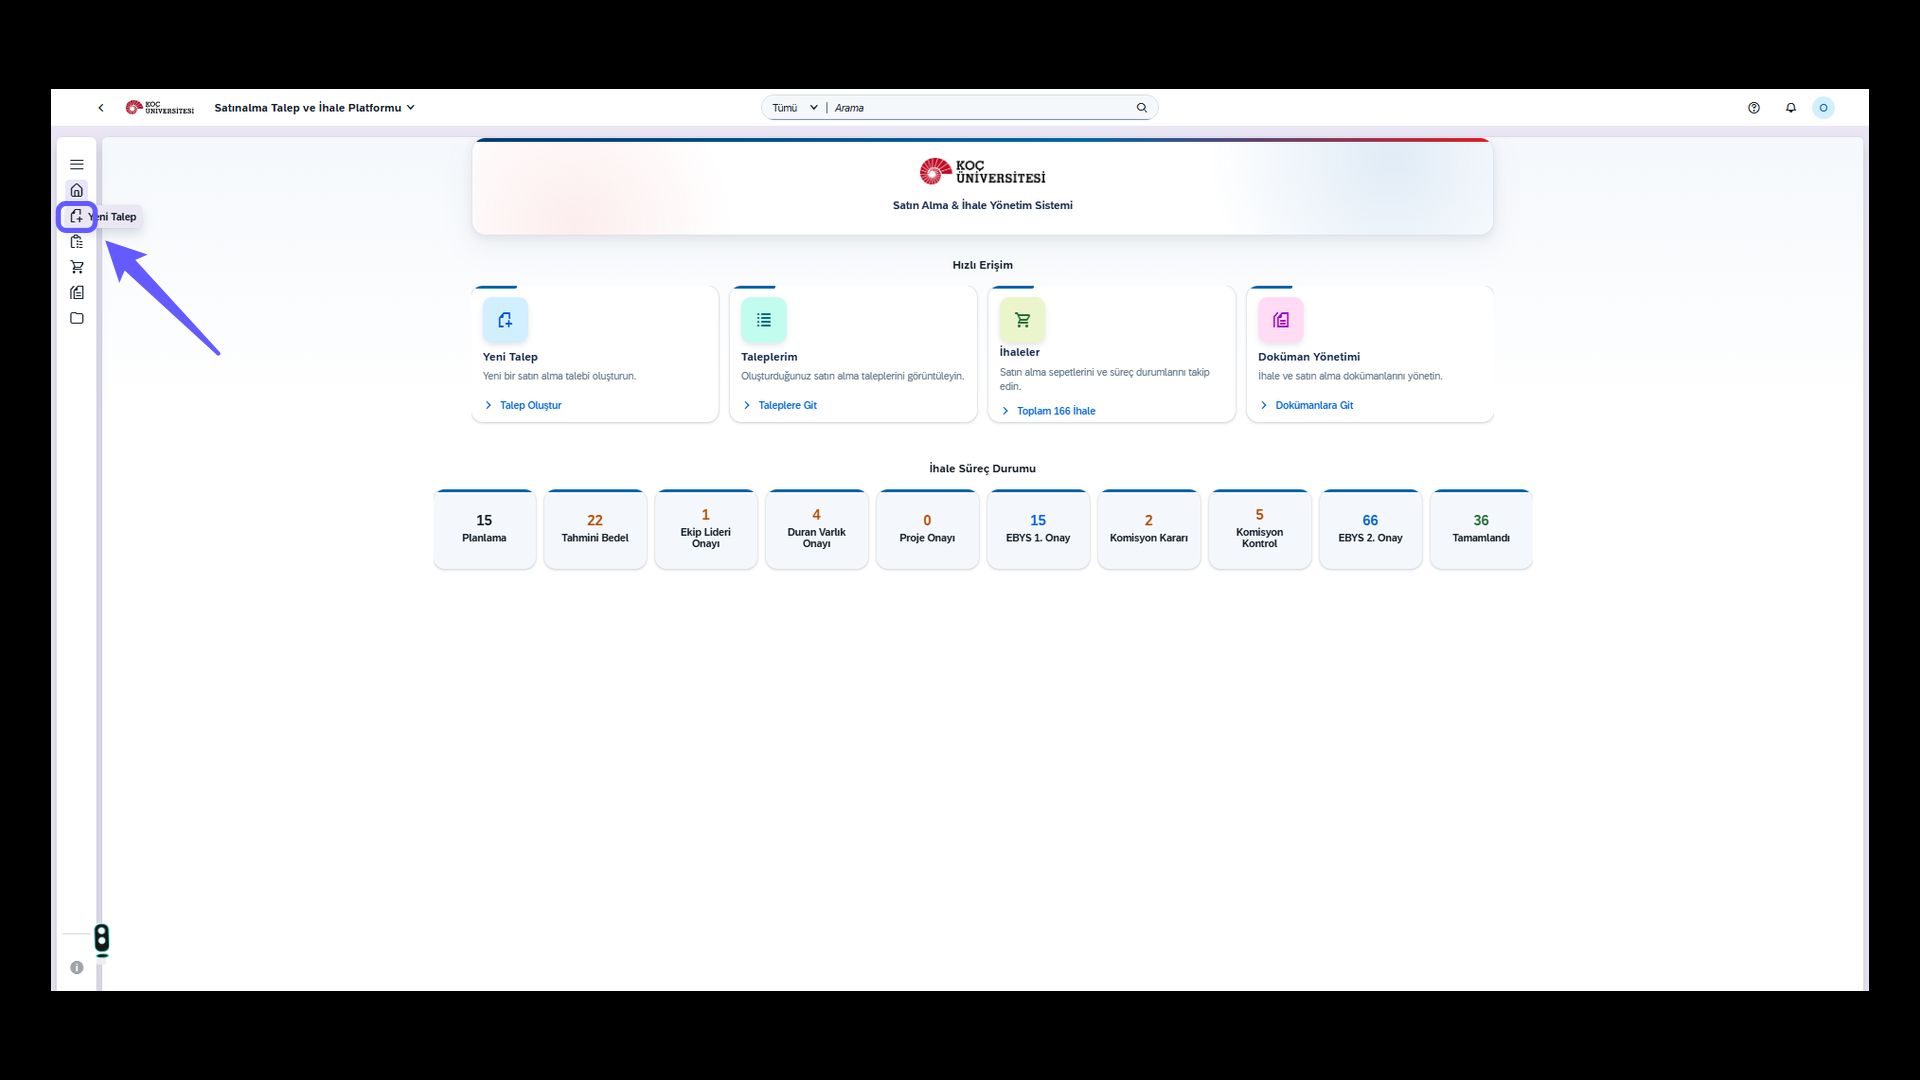
1. Create New Request
-
Click this icon to create a new procurement request.
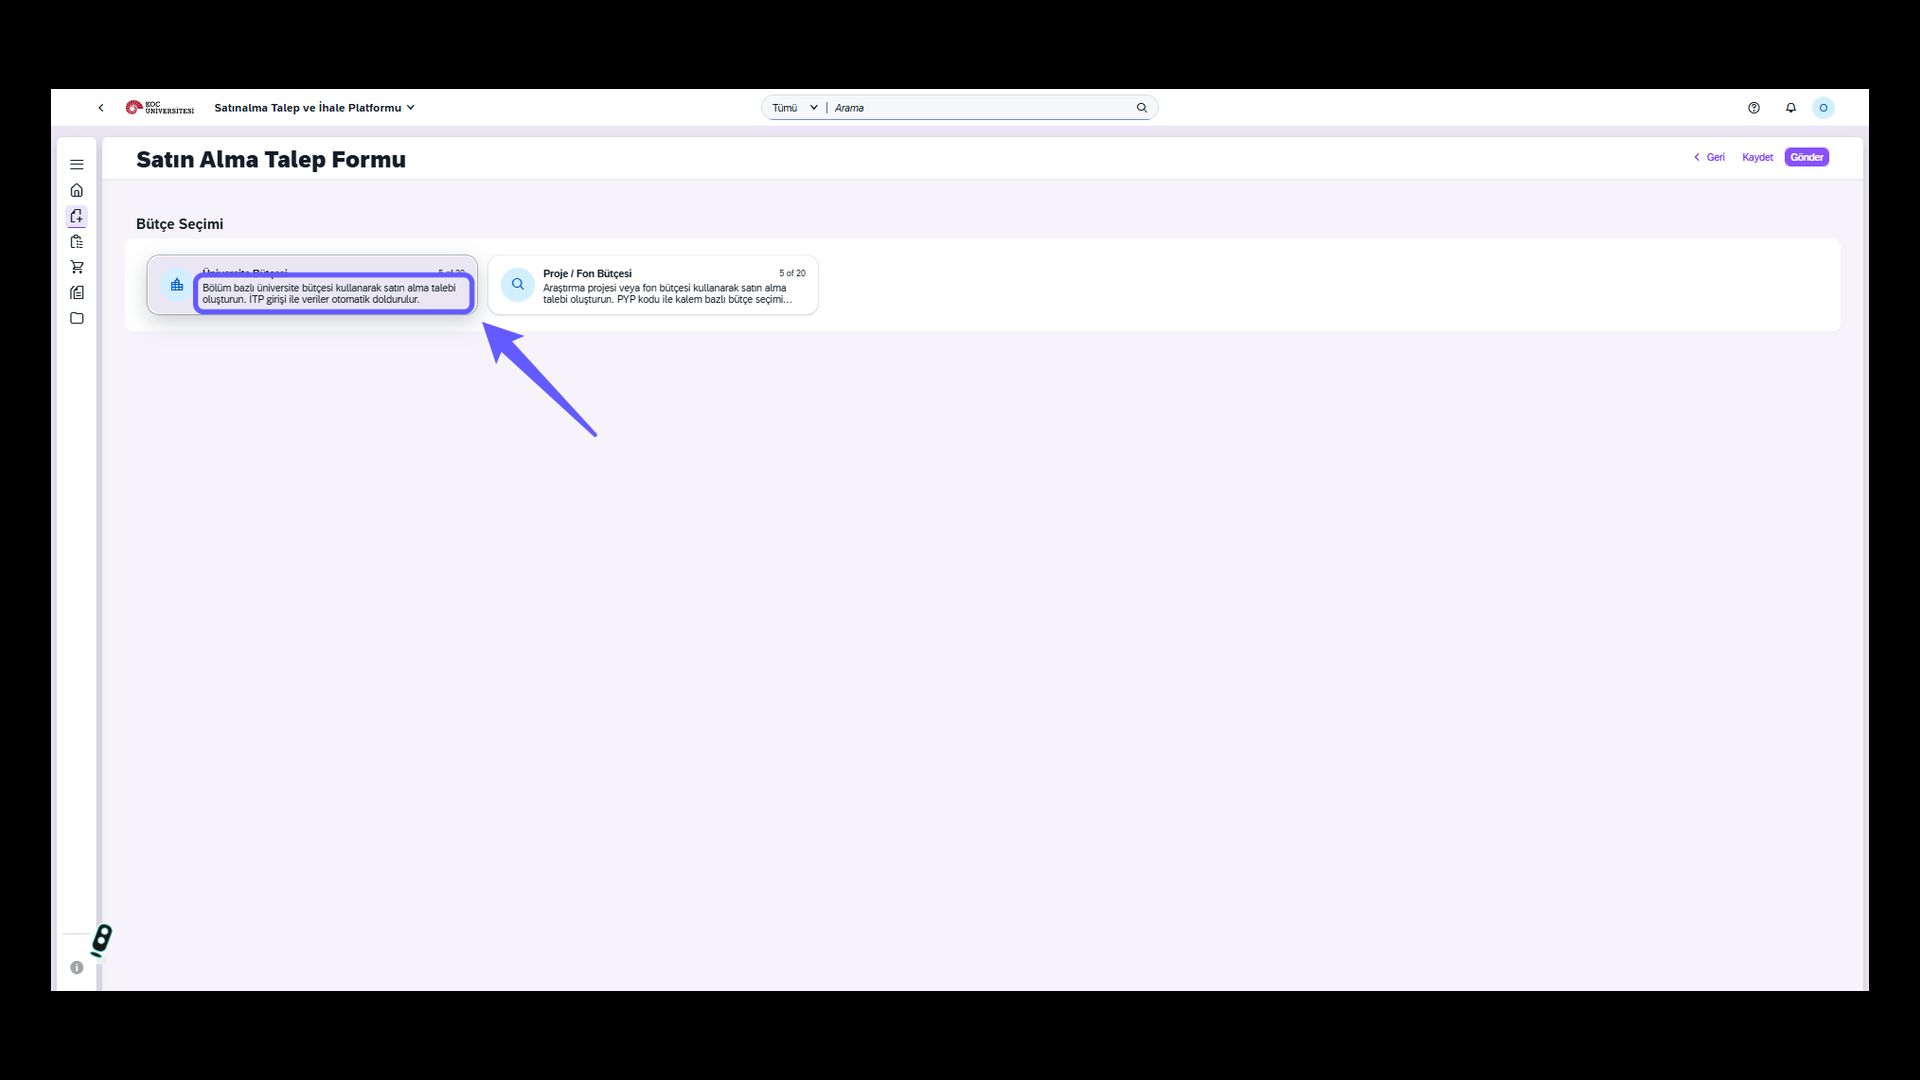
2. Select Budget
-
When this screen opens, select the university budget or project-fund budget field according to the type of budget you will use, to proceed to the request creation template.
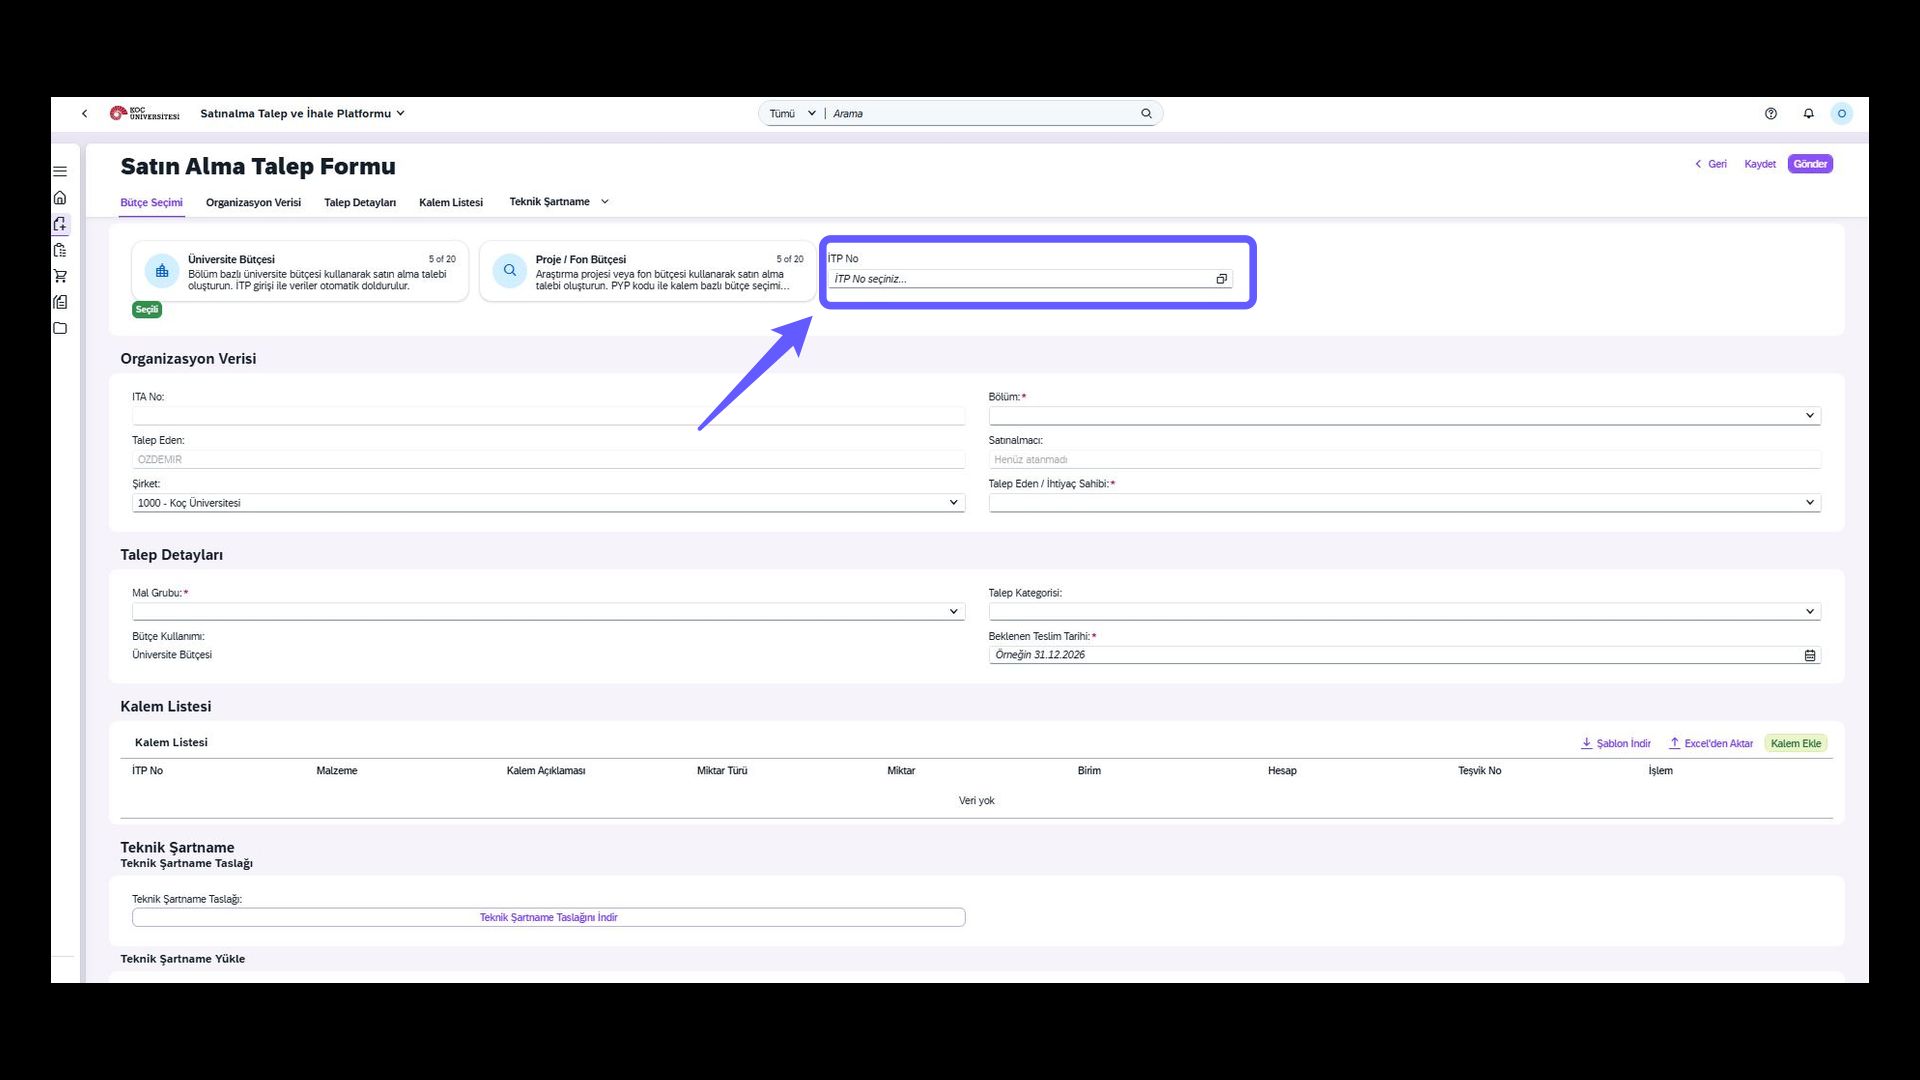
3. ITP Selection Field
-
If you know which ITP you will use, select it from this field to have the company code, department information, and material group fields on the screen filled in automatically. ITP selection is not available for Project-Fund budgets.
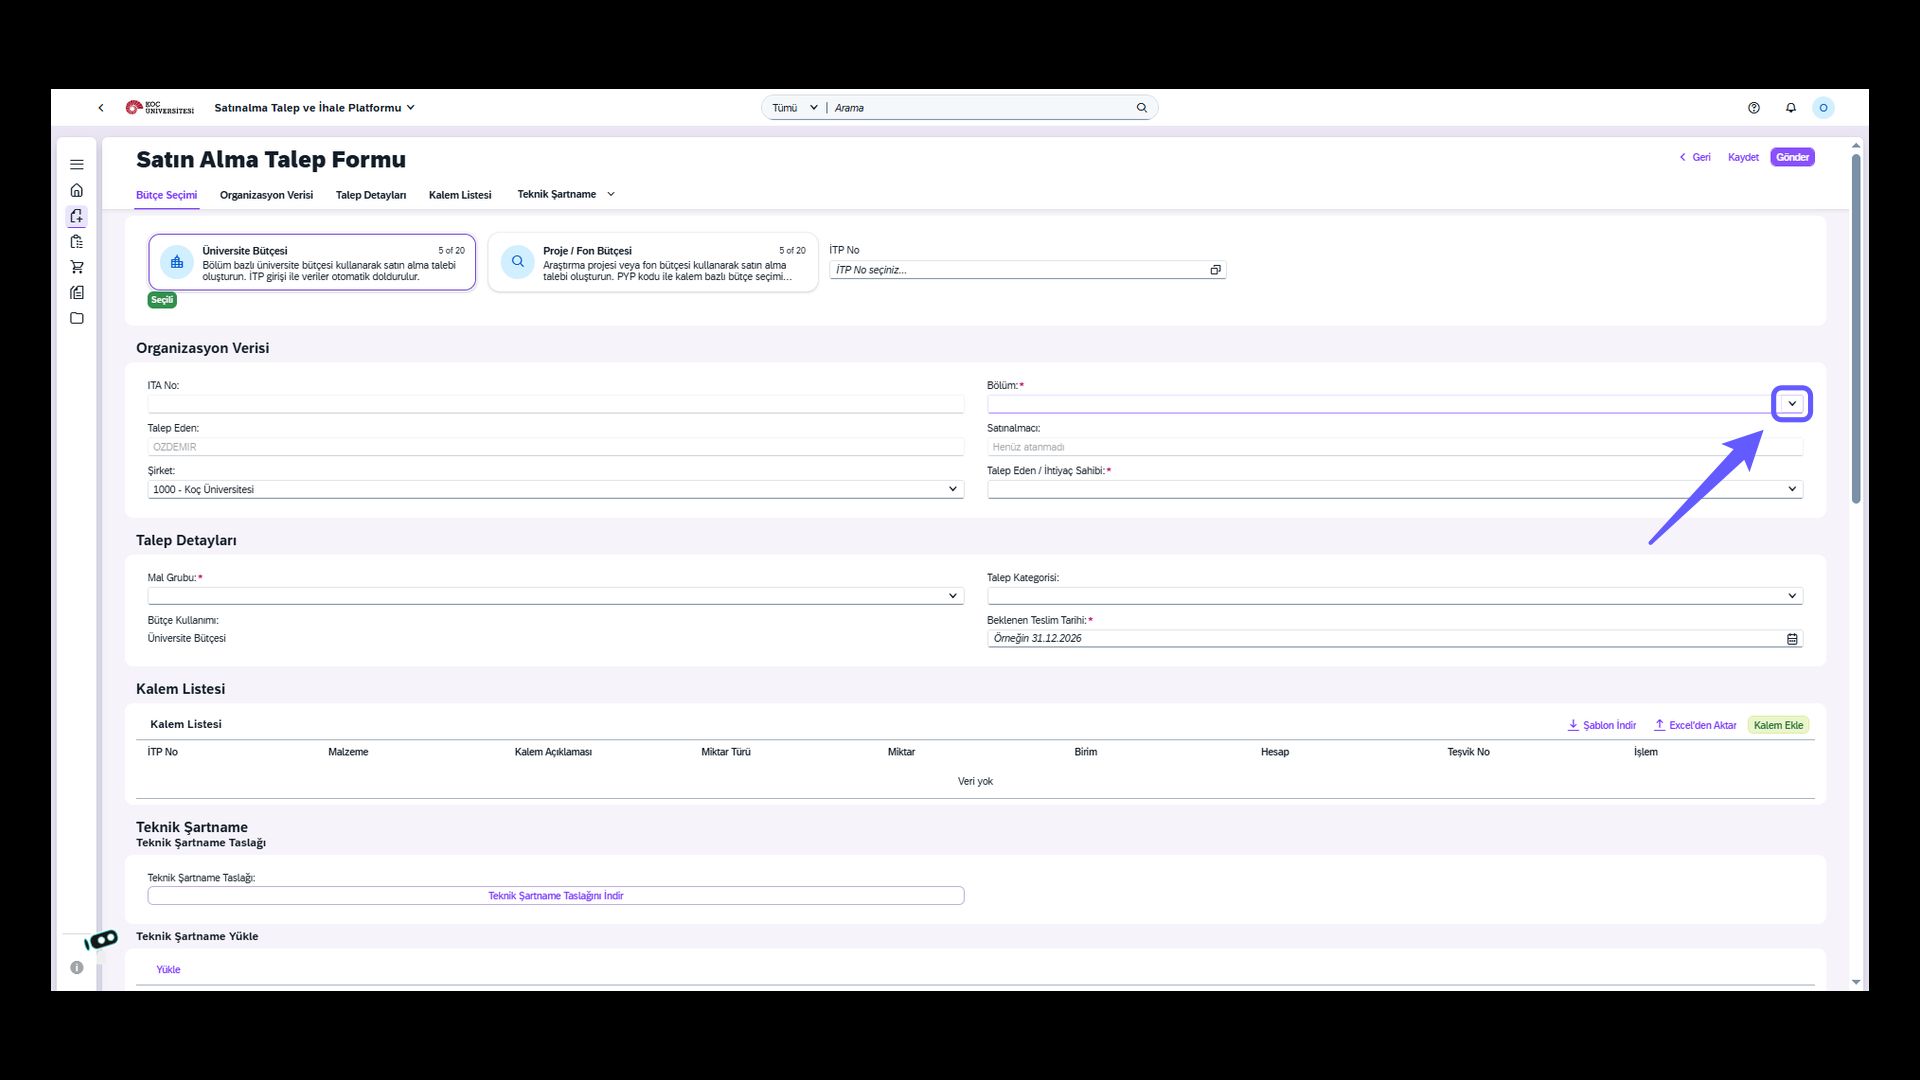
4. Expand Options
-
Click the department code box to select your department from the list.
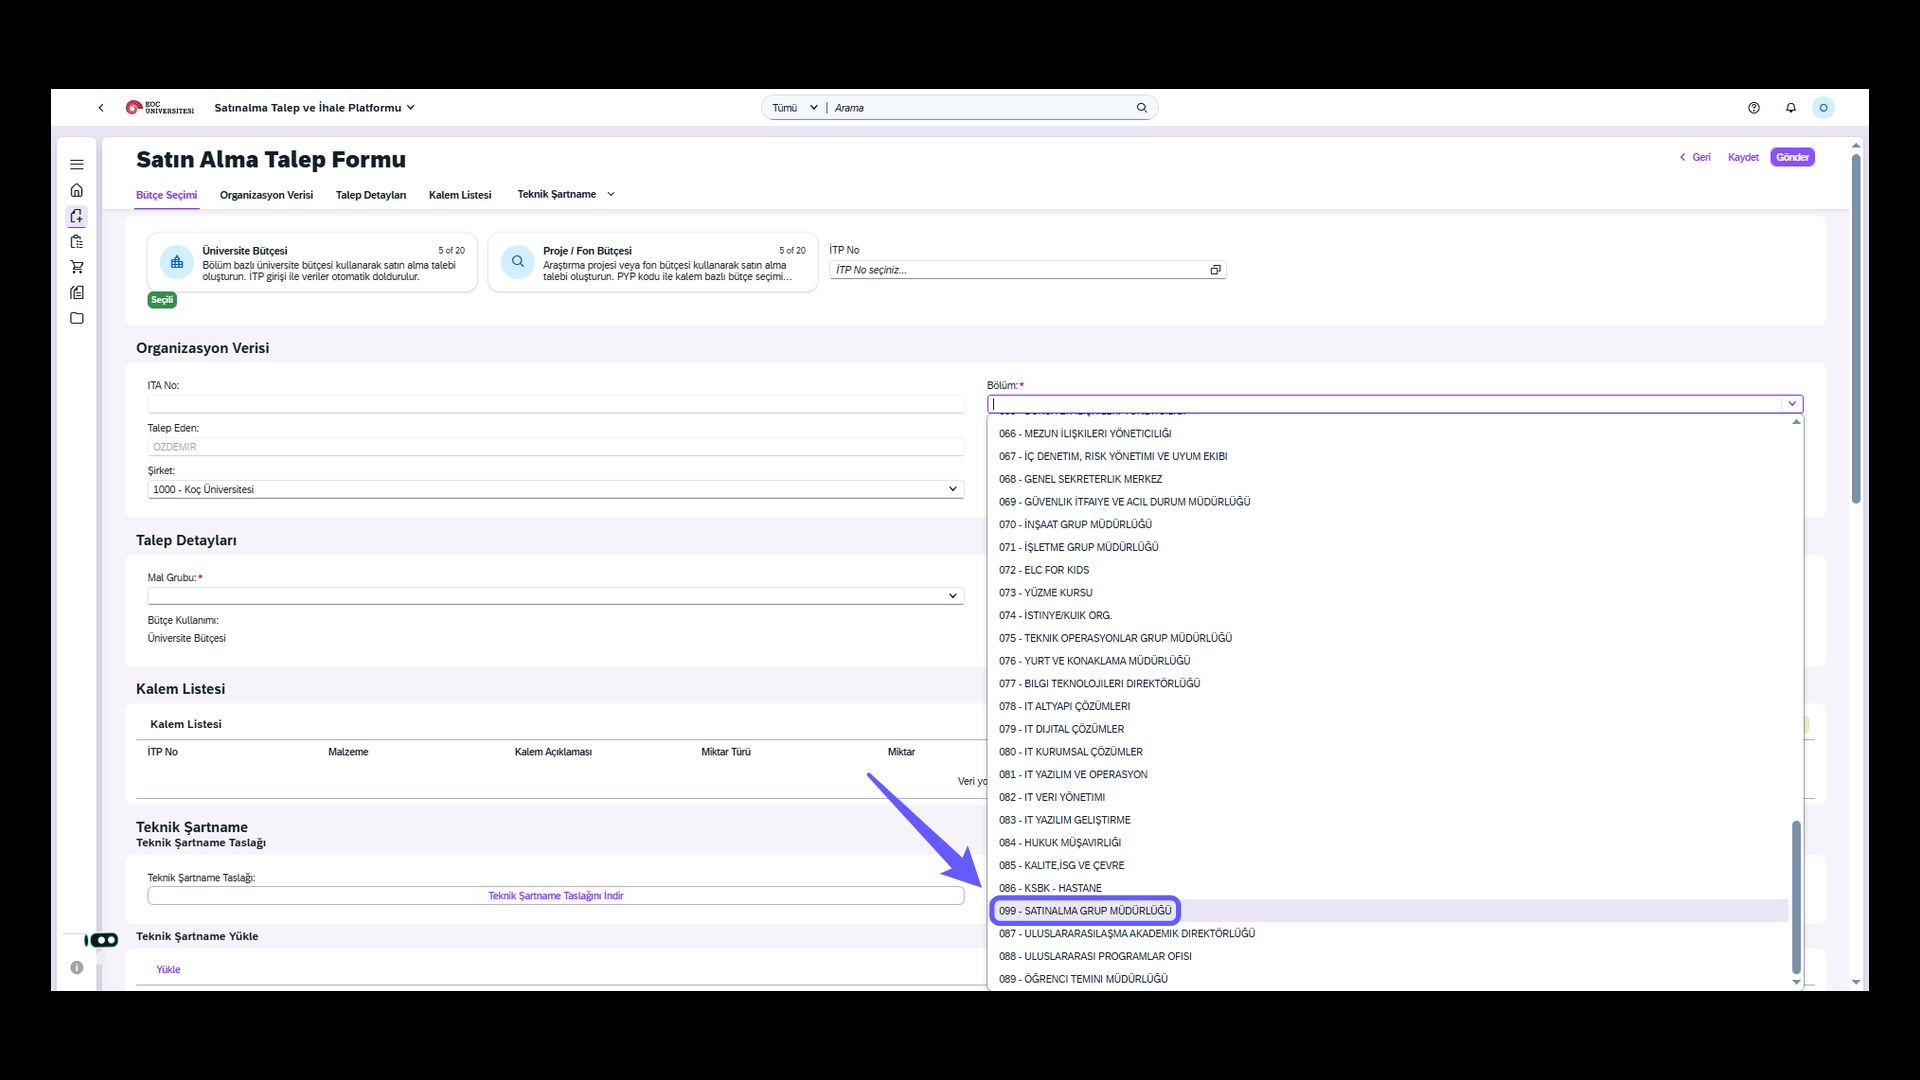
5. Select Department
-
You must select the department you are defined under from the list.
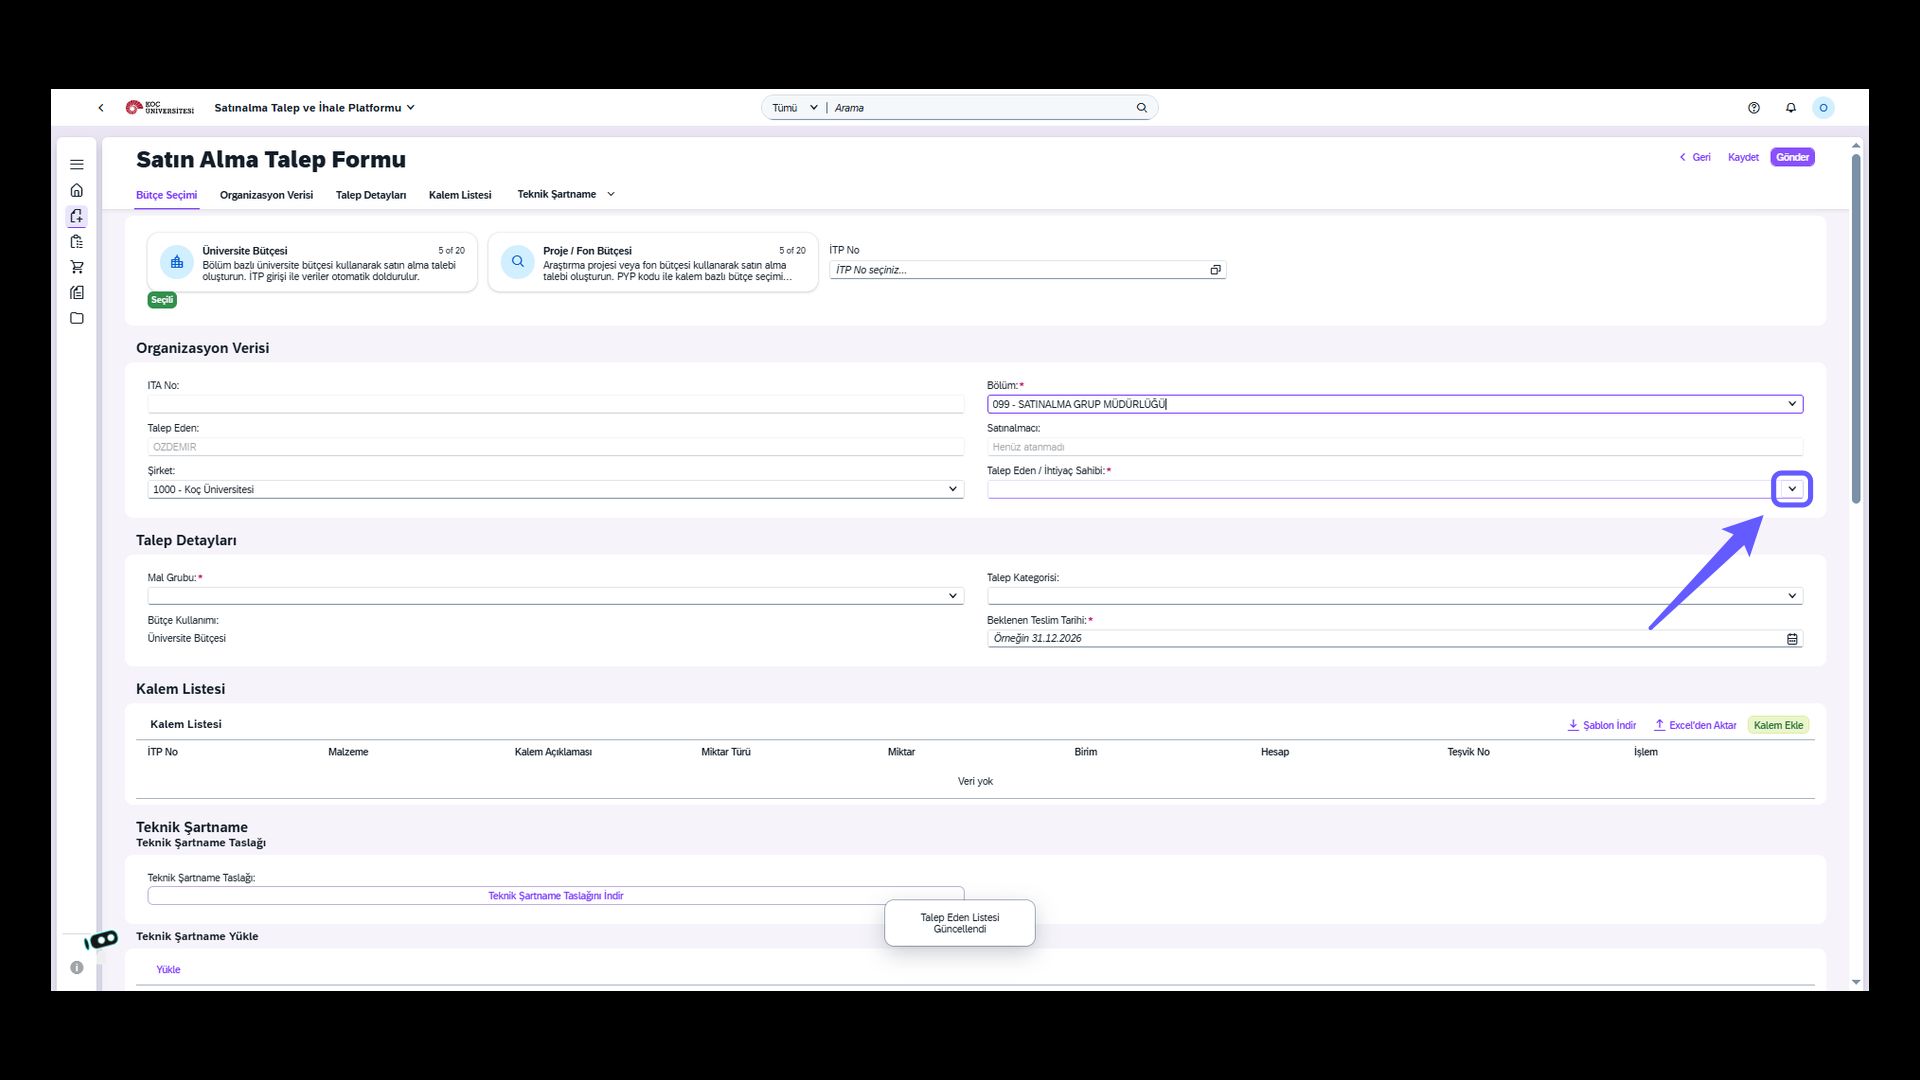
6. Select Requester
-
You must select the person you are opening the request for from the requester list.
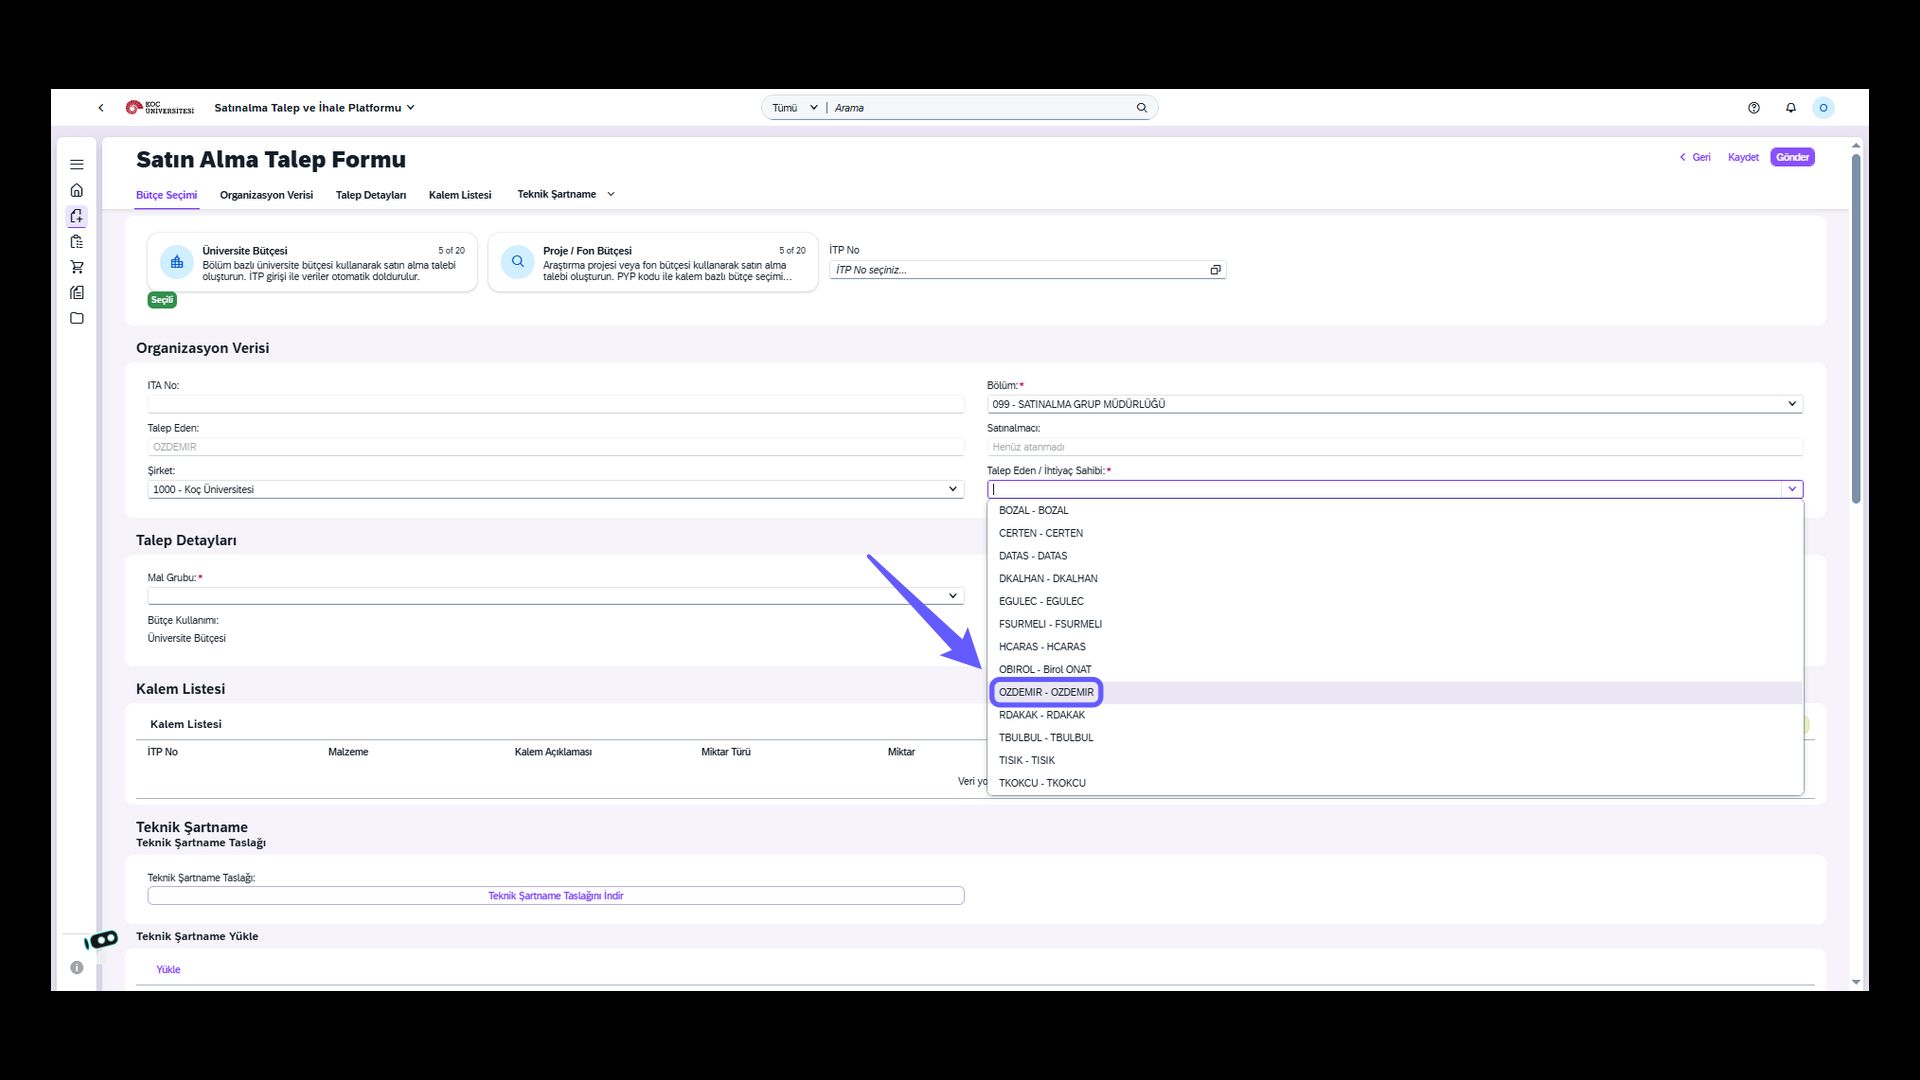
7. Selecting the Requester
-
The requester can be selected from the dropdown list.
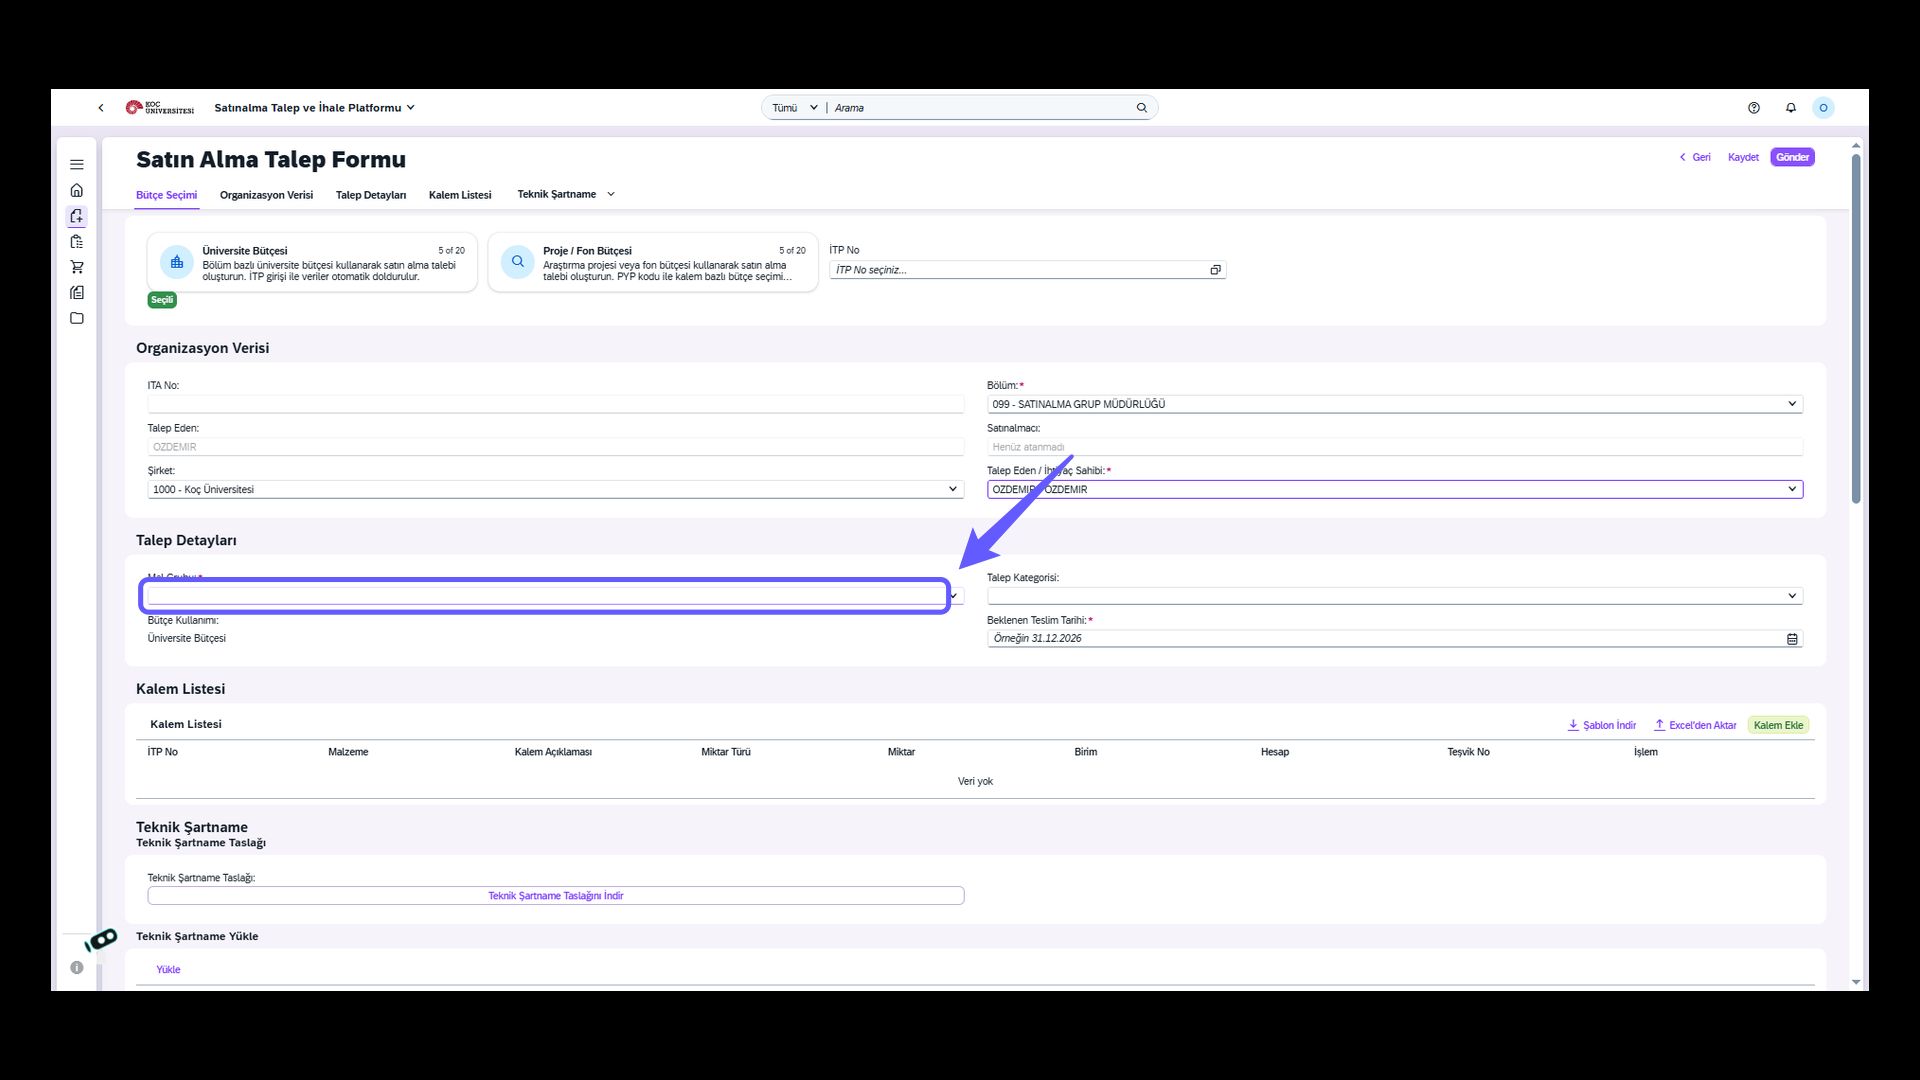
8. Select Material Group
-
You must select the material group that the budget you want to use for this request belongs to, from the list.
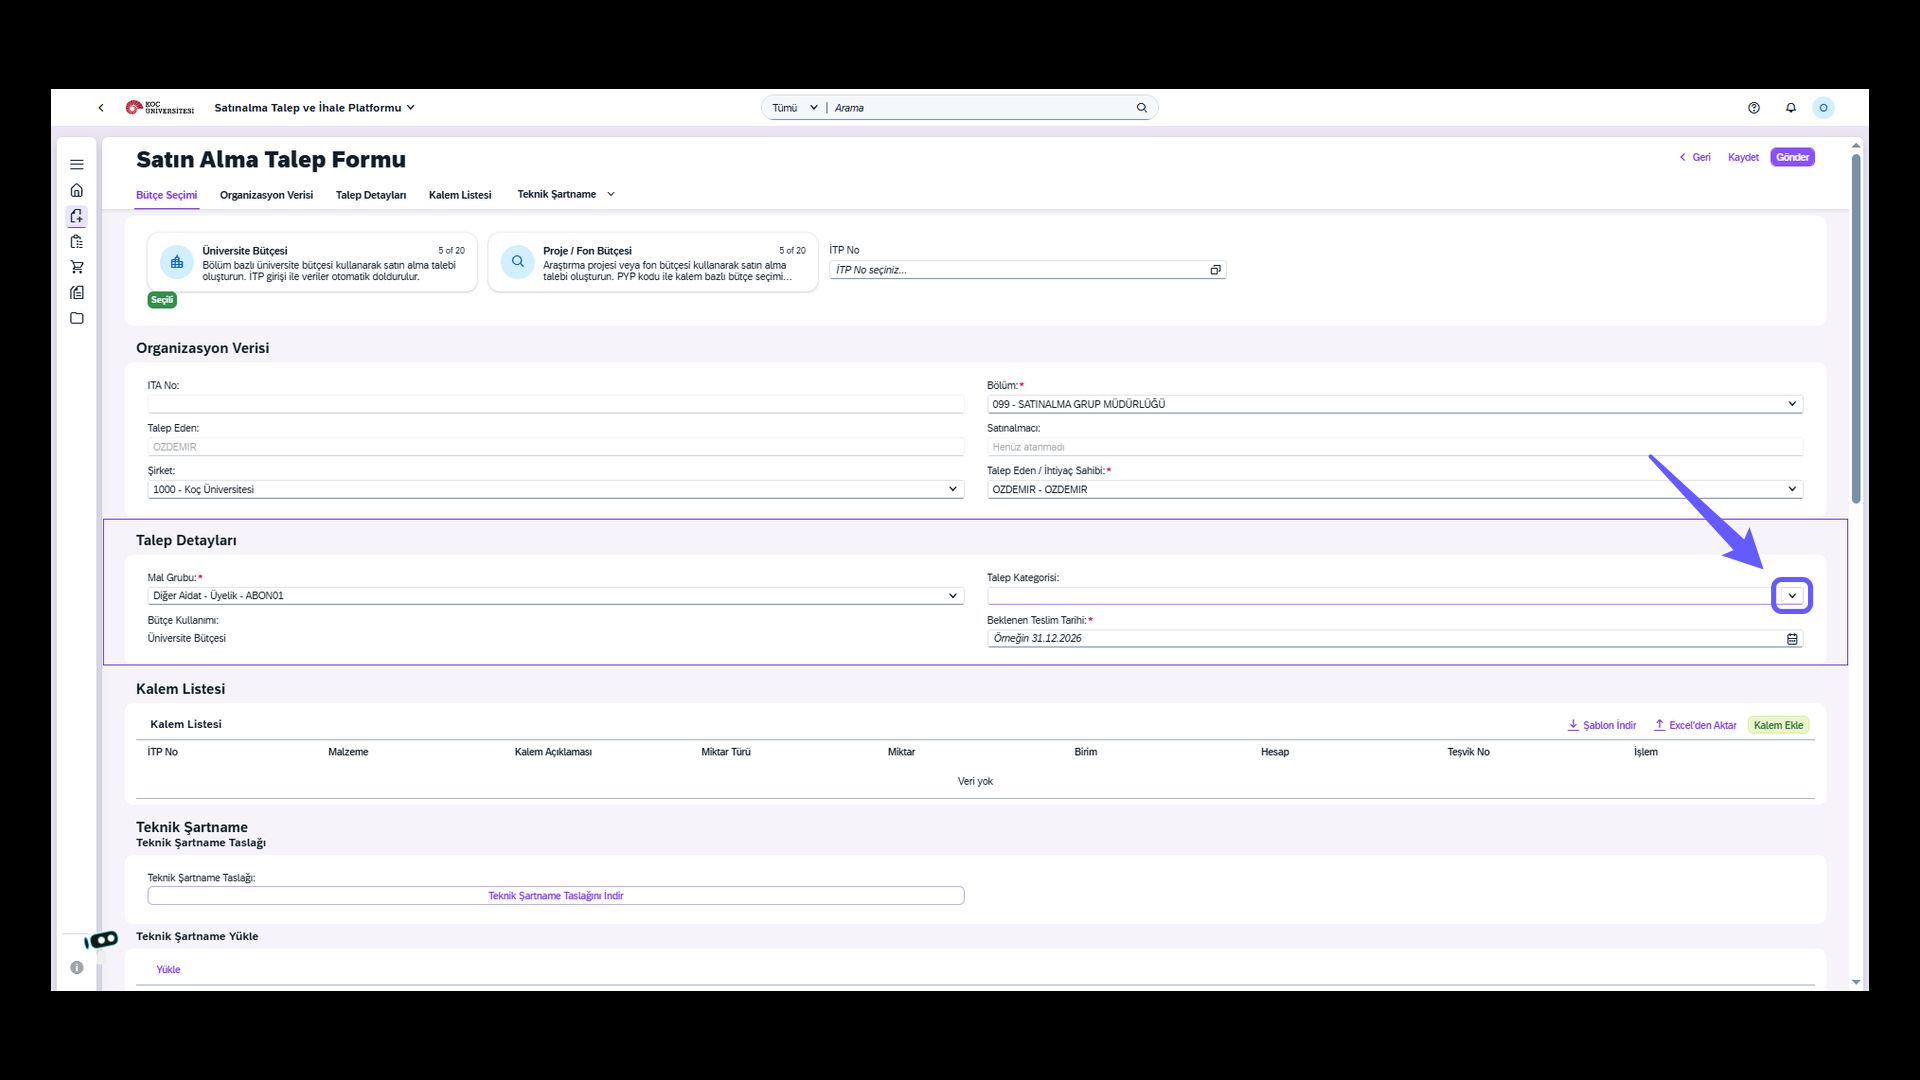
9. Select Category
-
If the request you are creating is linked to a project or an event, you may select the relevant category from the list. Thisfield is not mandatory.
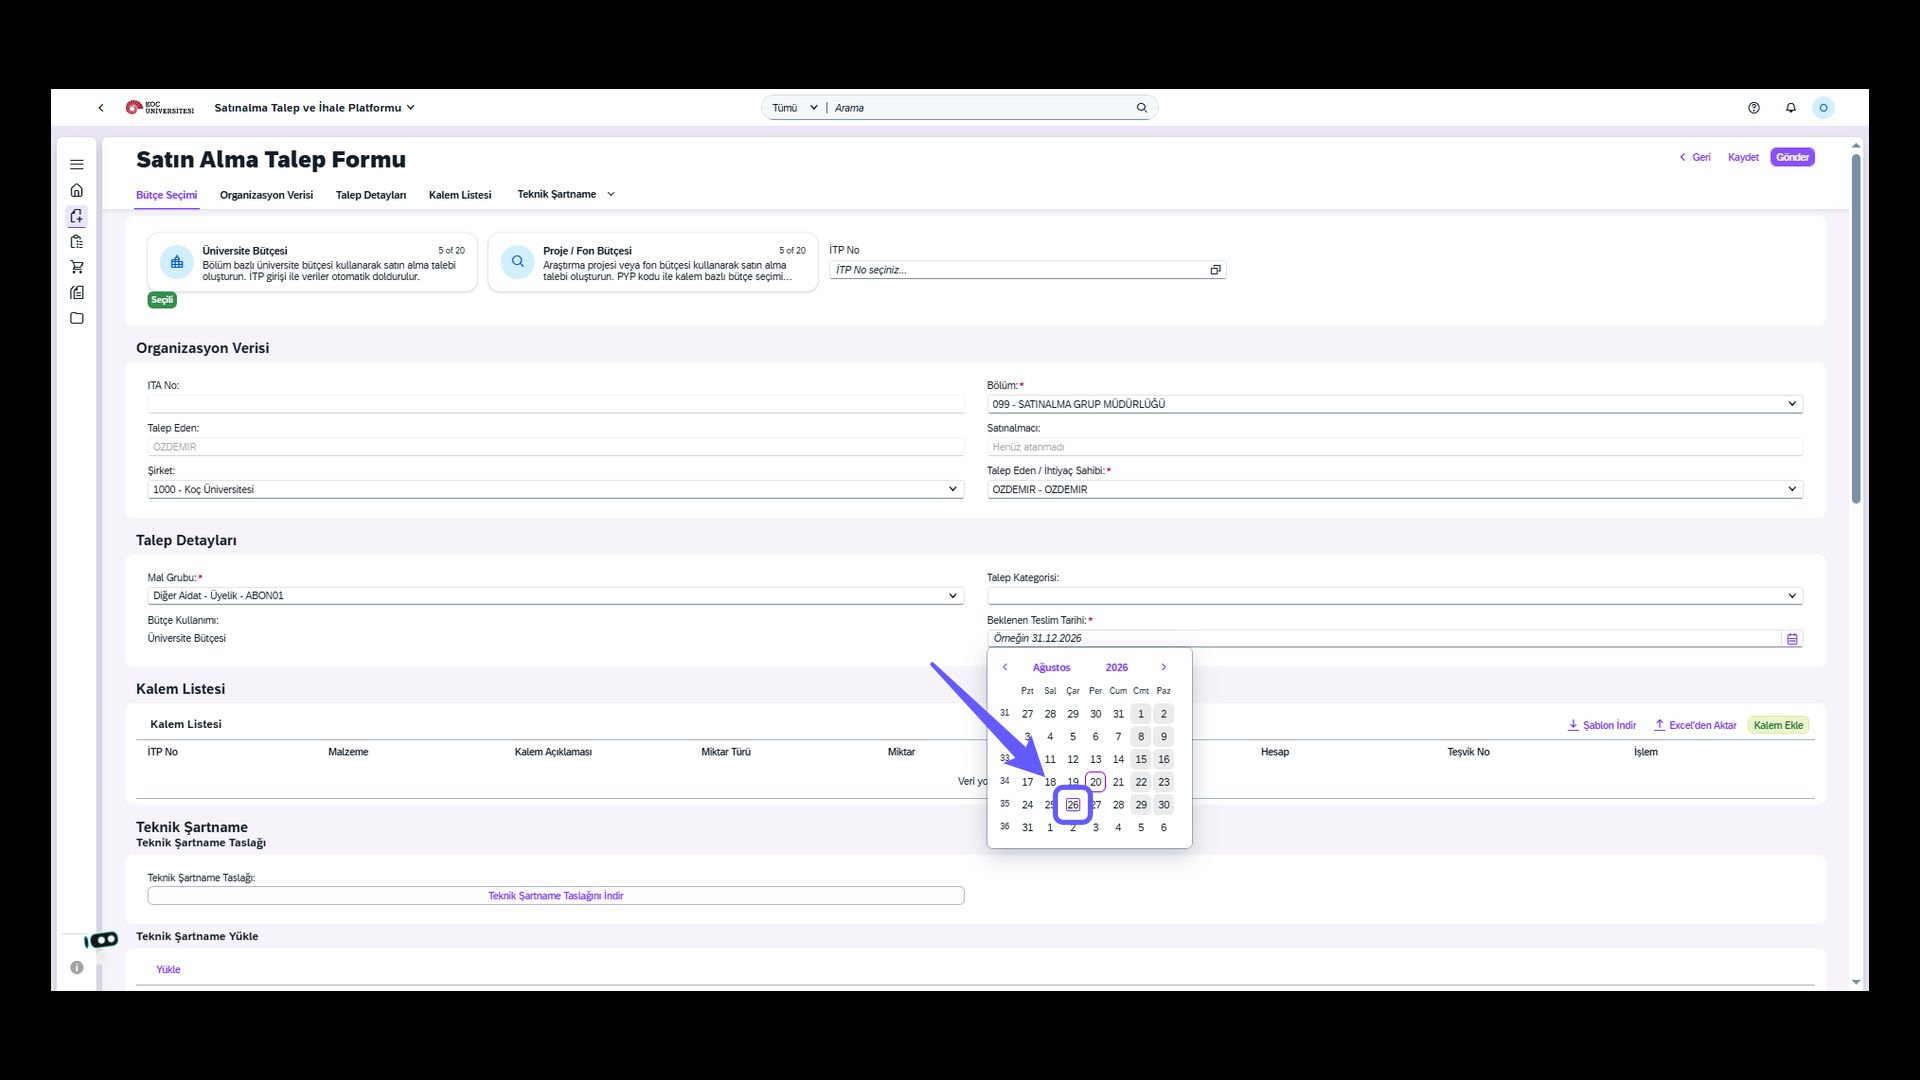
10. Expected Delivery Date
-
You must select the date by which you expect the request to be delivered.
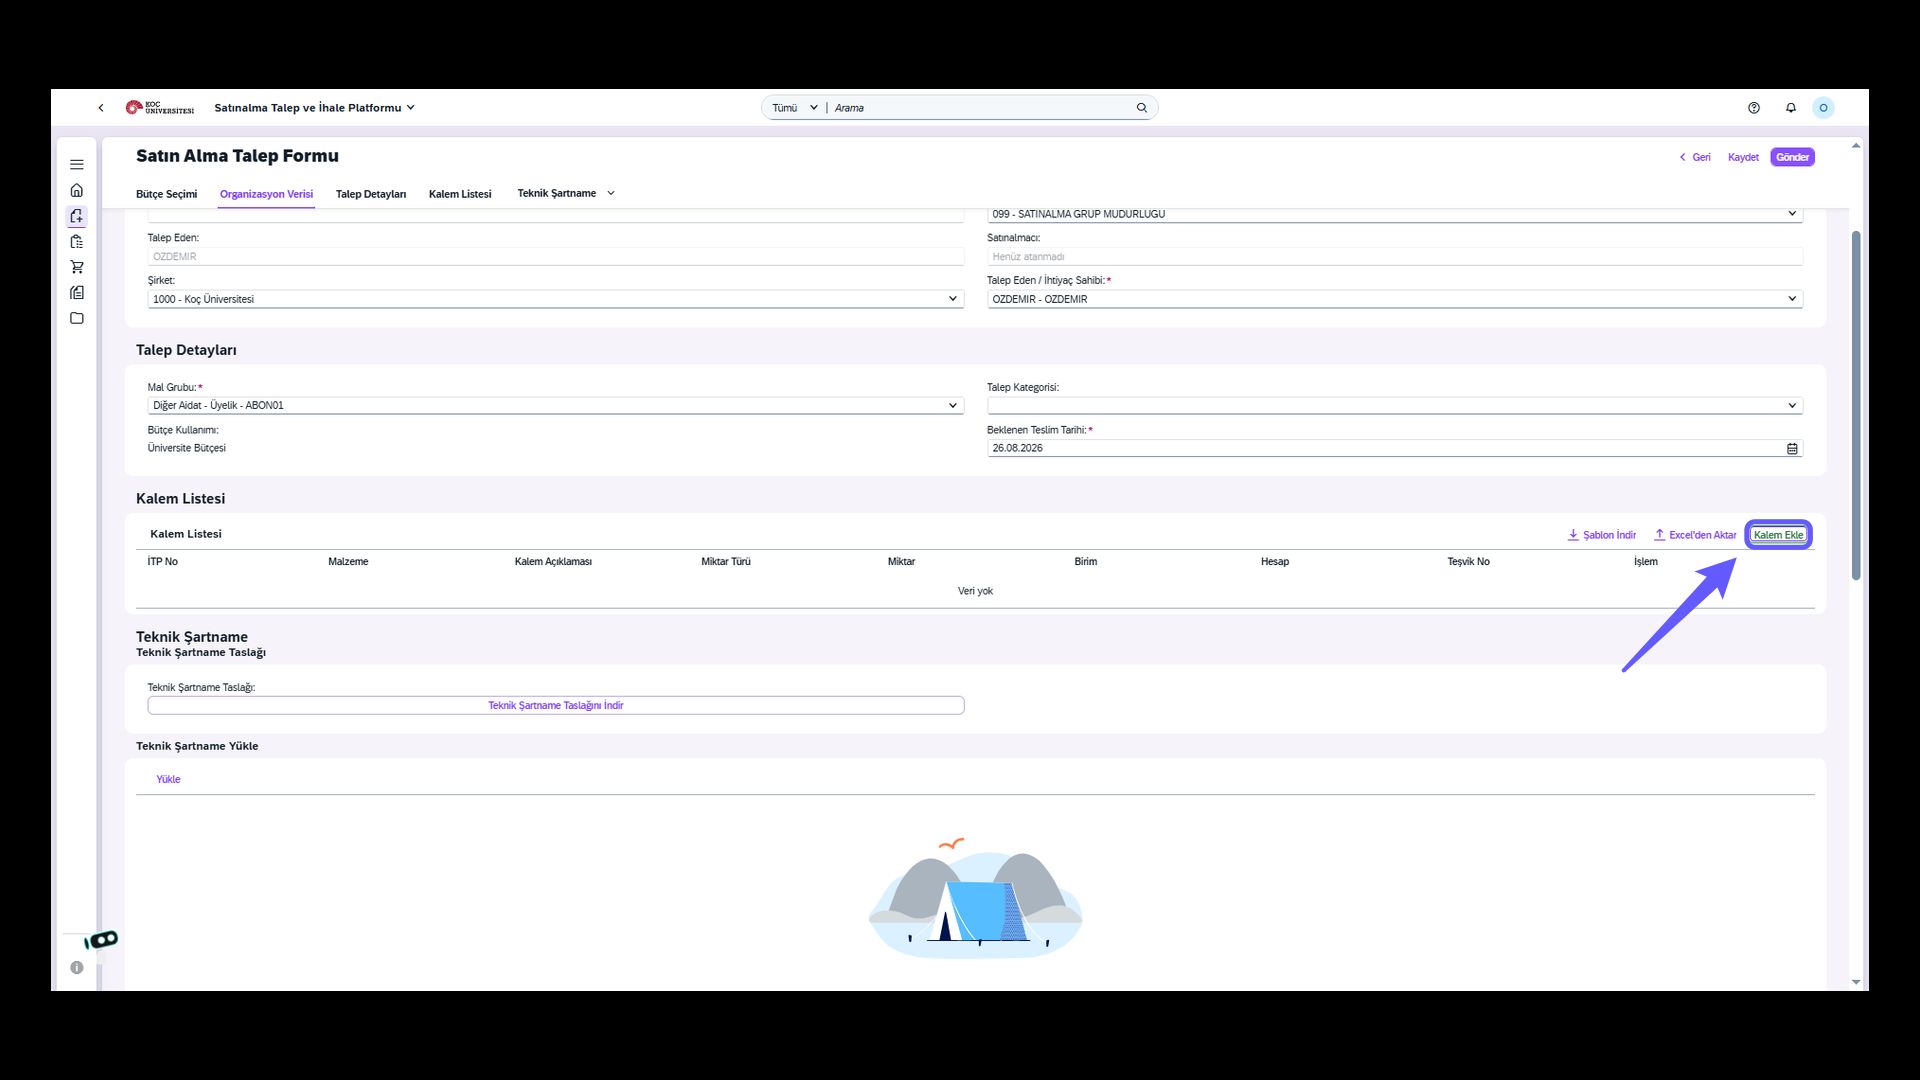
11. Add Item
-
Click the 'Add Item' button to add a new item.
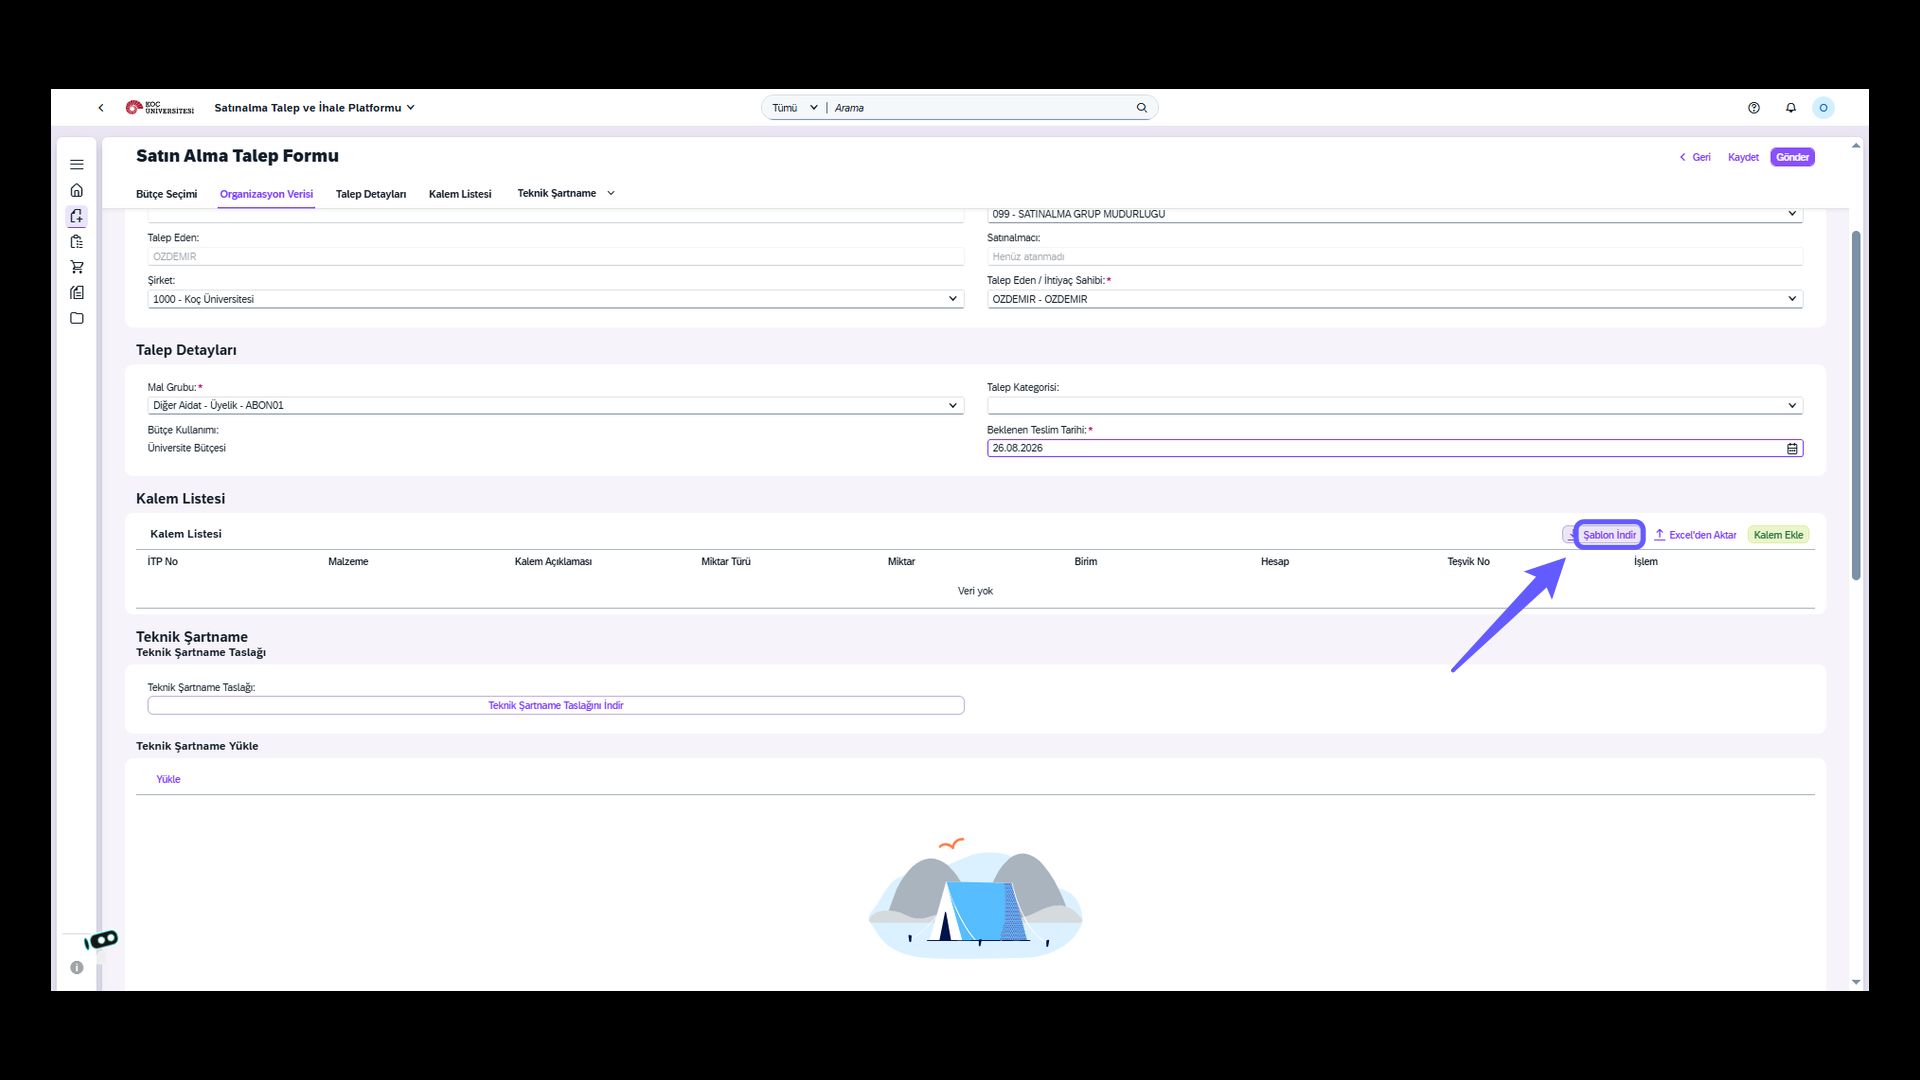
12. Download Template
-
If you are creating a multi-item procurement request, you can download the template from this field.
13. Import from Excel
-
After entering data into the downloaded template, save the Excel file and upload it to the system using the 'Import from Excel' button. It is important that the data entered in Excel is correct and that the fields are not altered, for a correct import. How to use this template is explained in the Fiori Request Screen user guide.
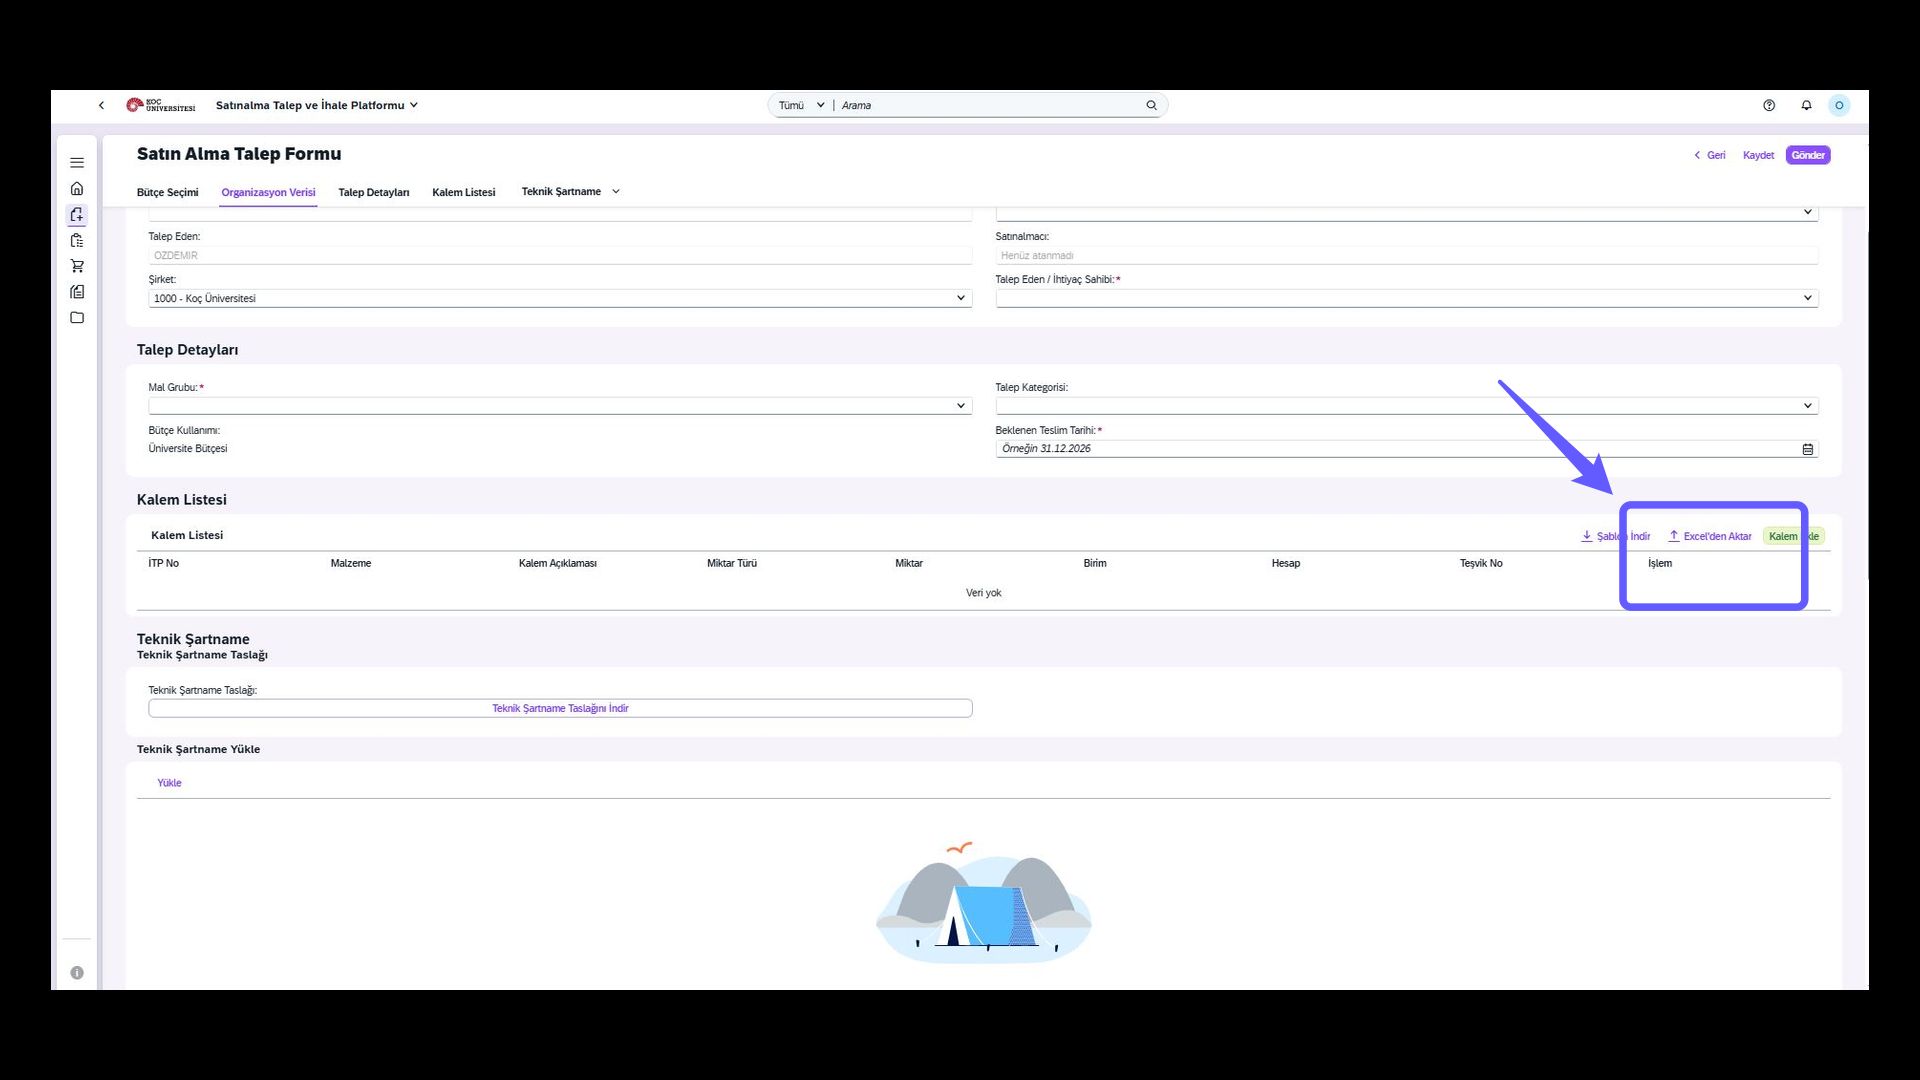
14. Select ITP
-
Easily view the ITPs belonging to your selected department and material group here.
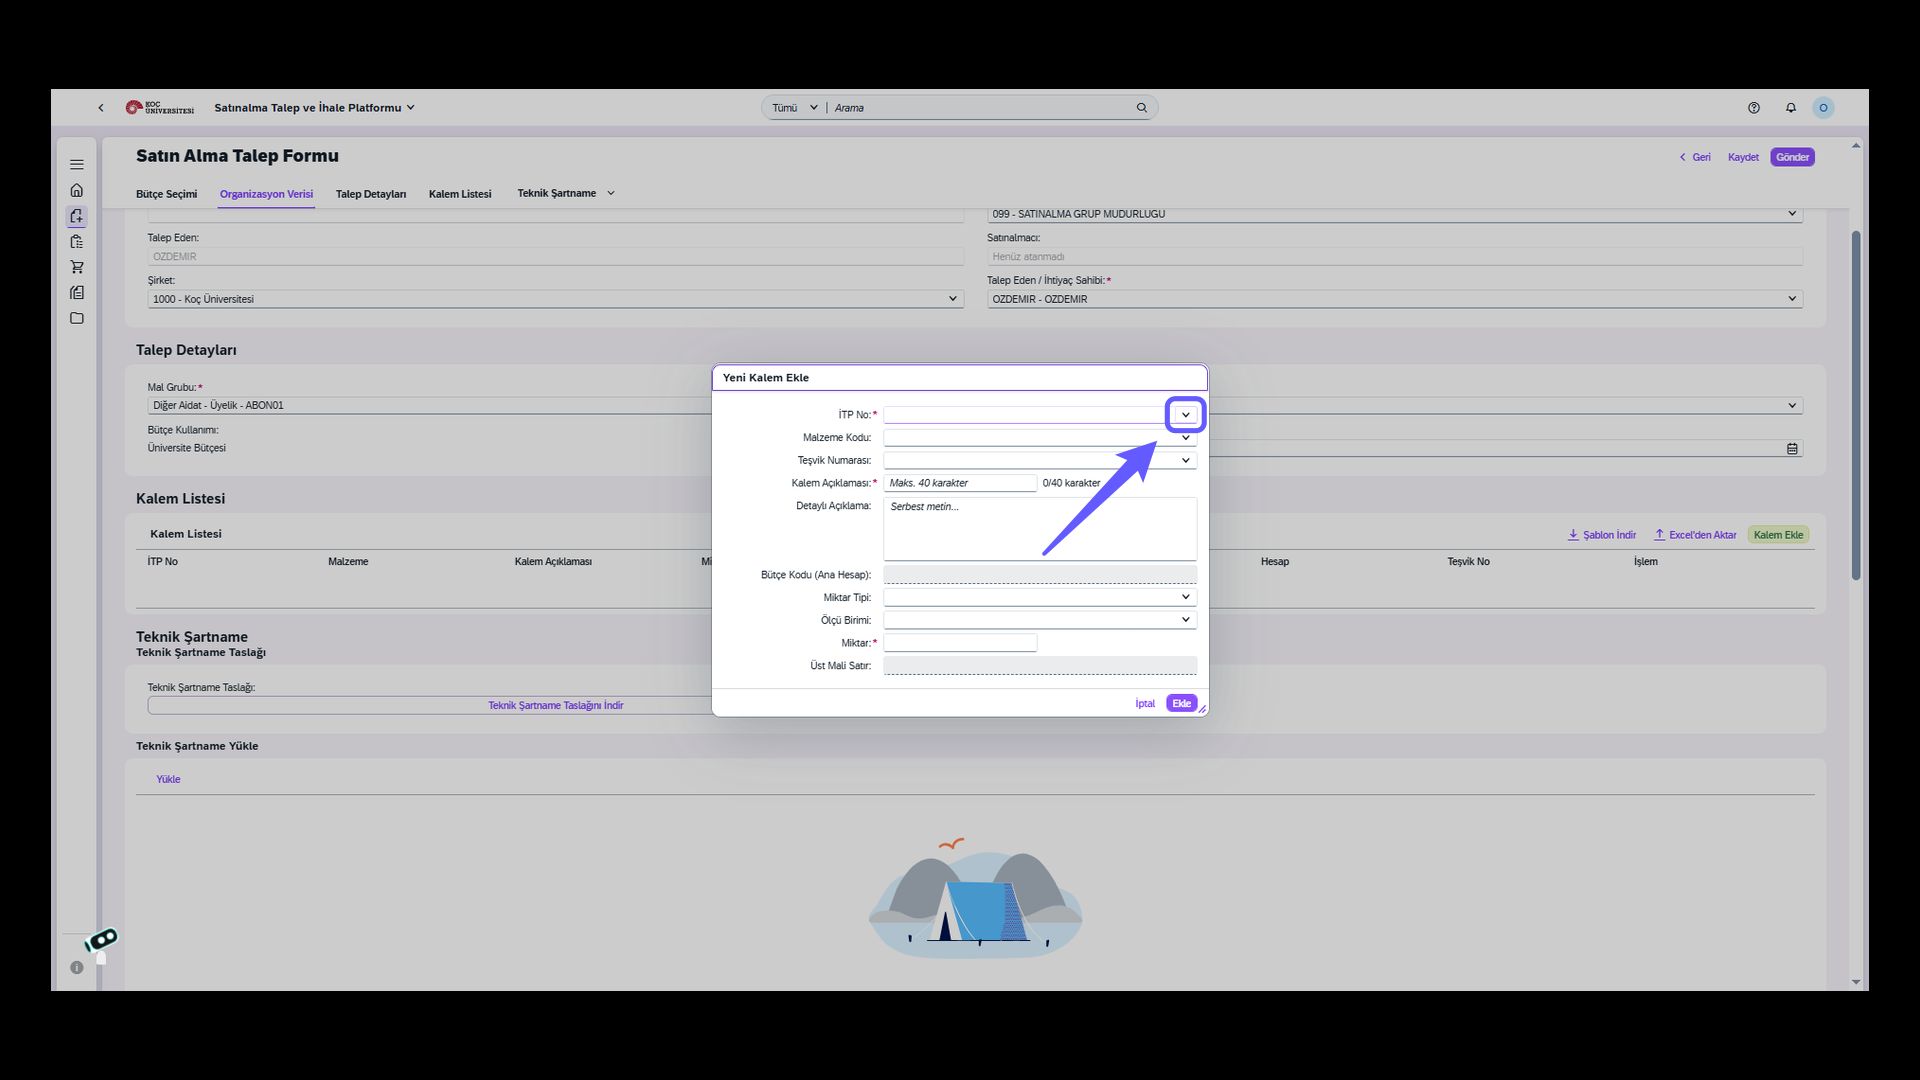
-
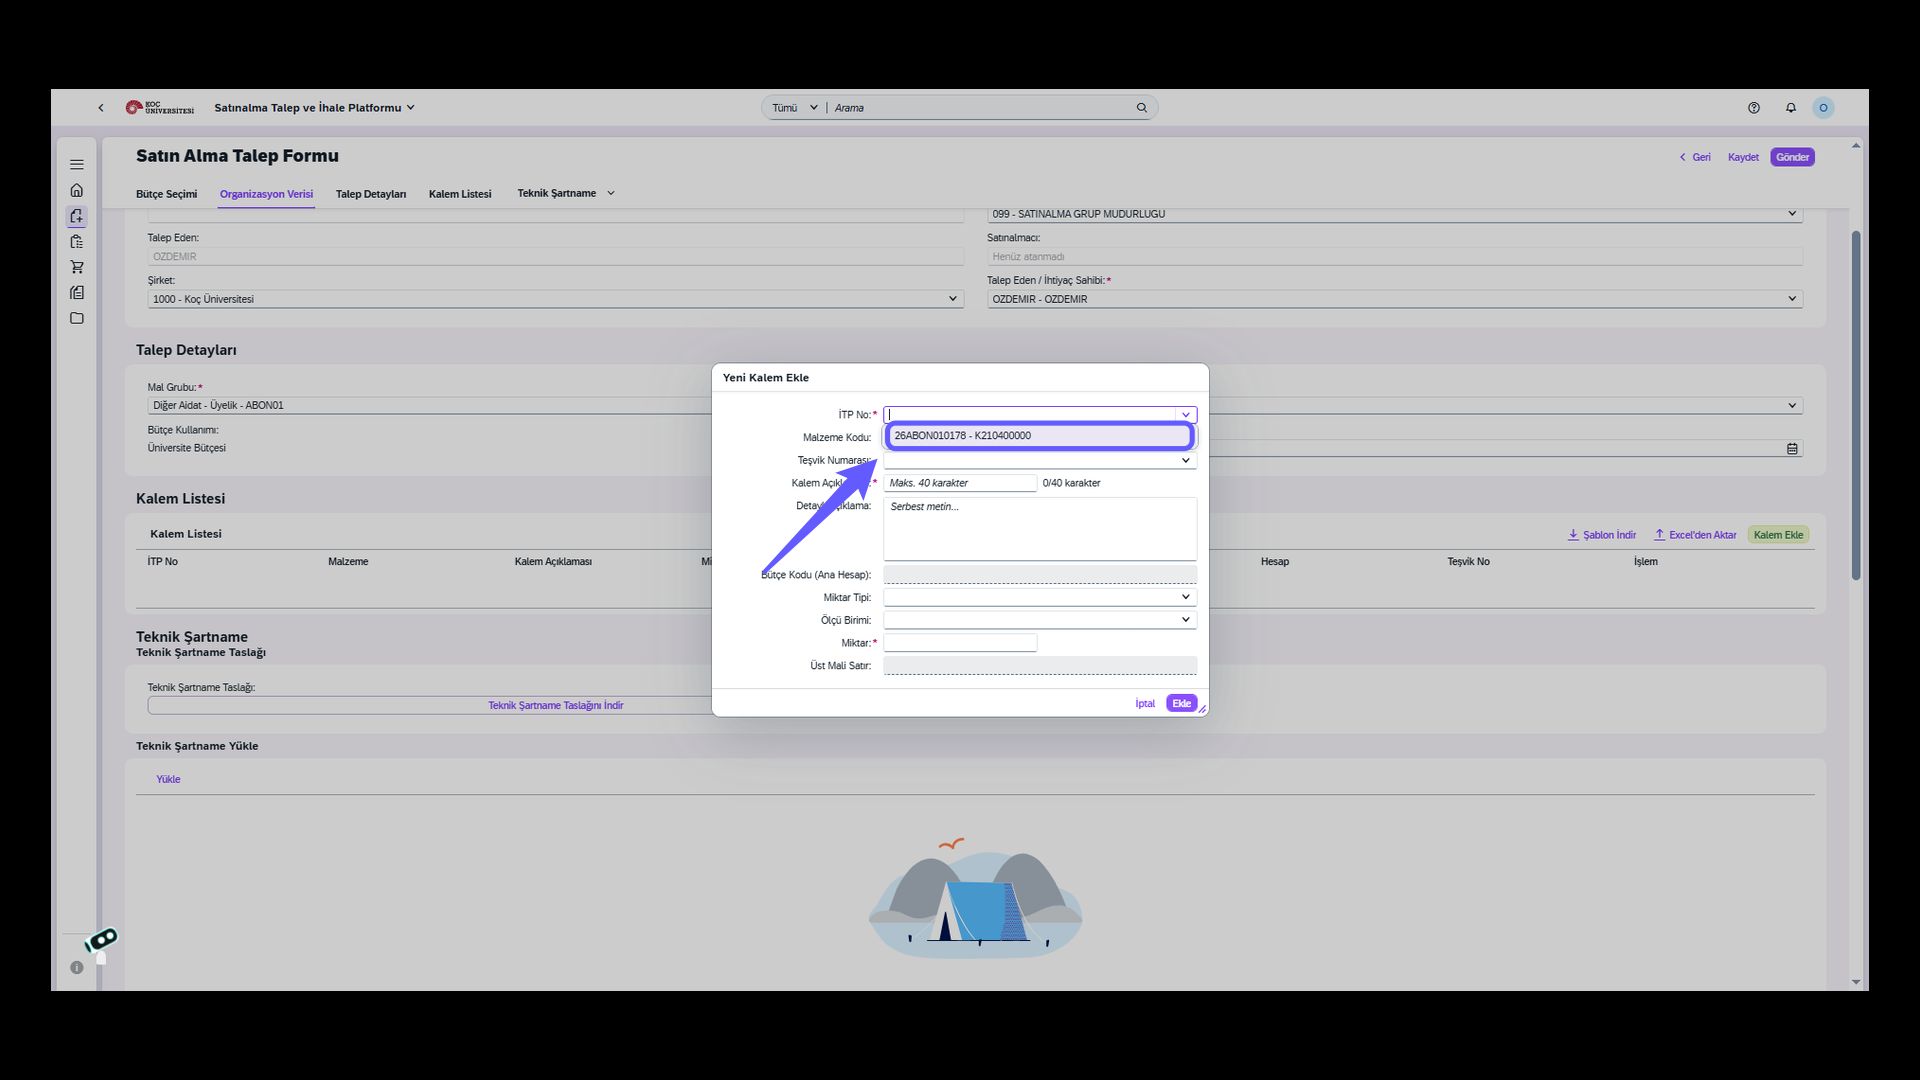
Select the correct ITP from the menu that opens.
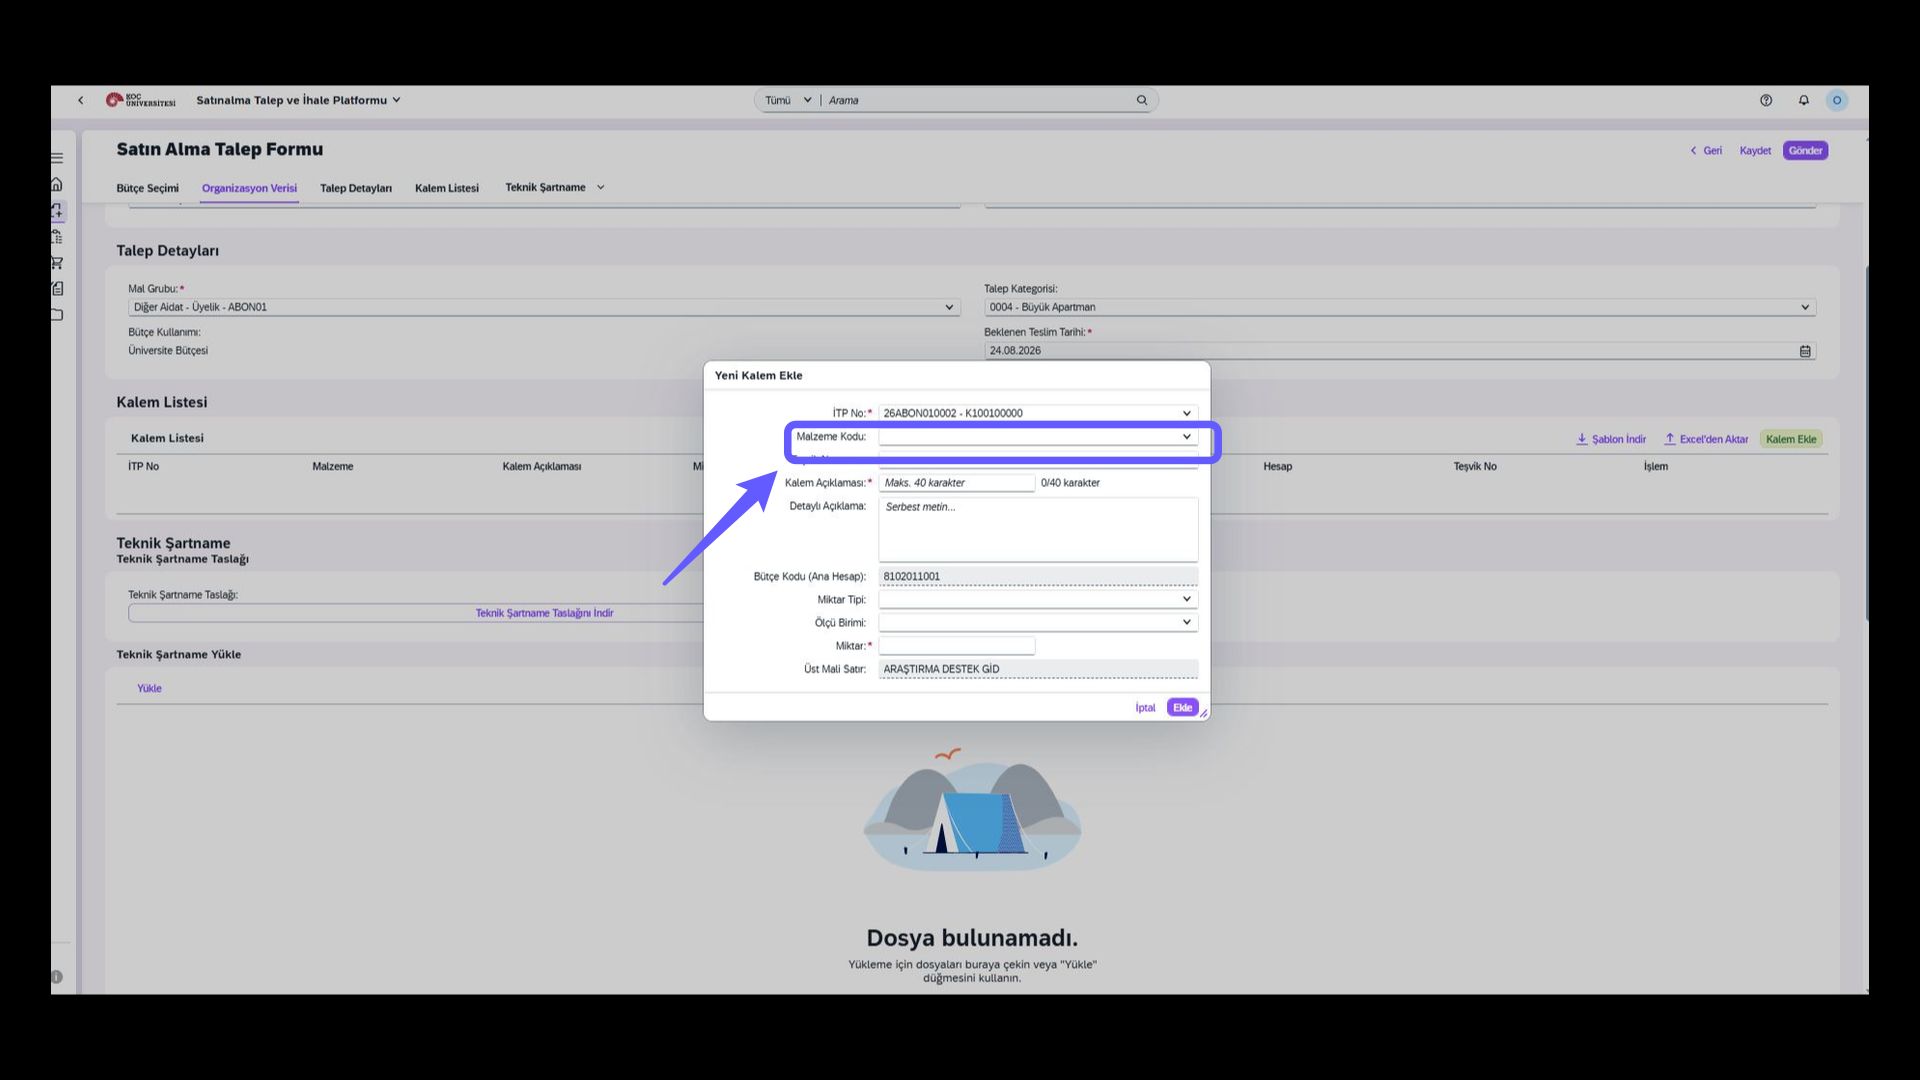
15. Select Material Code
-
If your purchase is linked to a material code, you can select your material code from the relevant field.
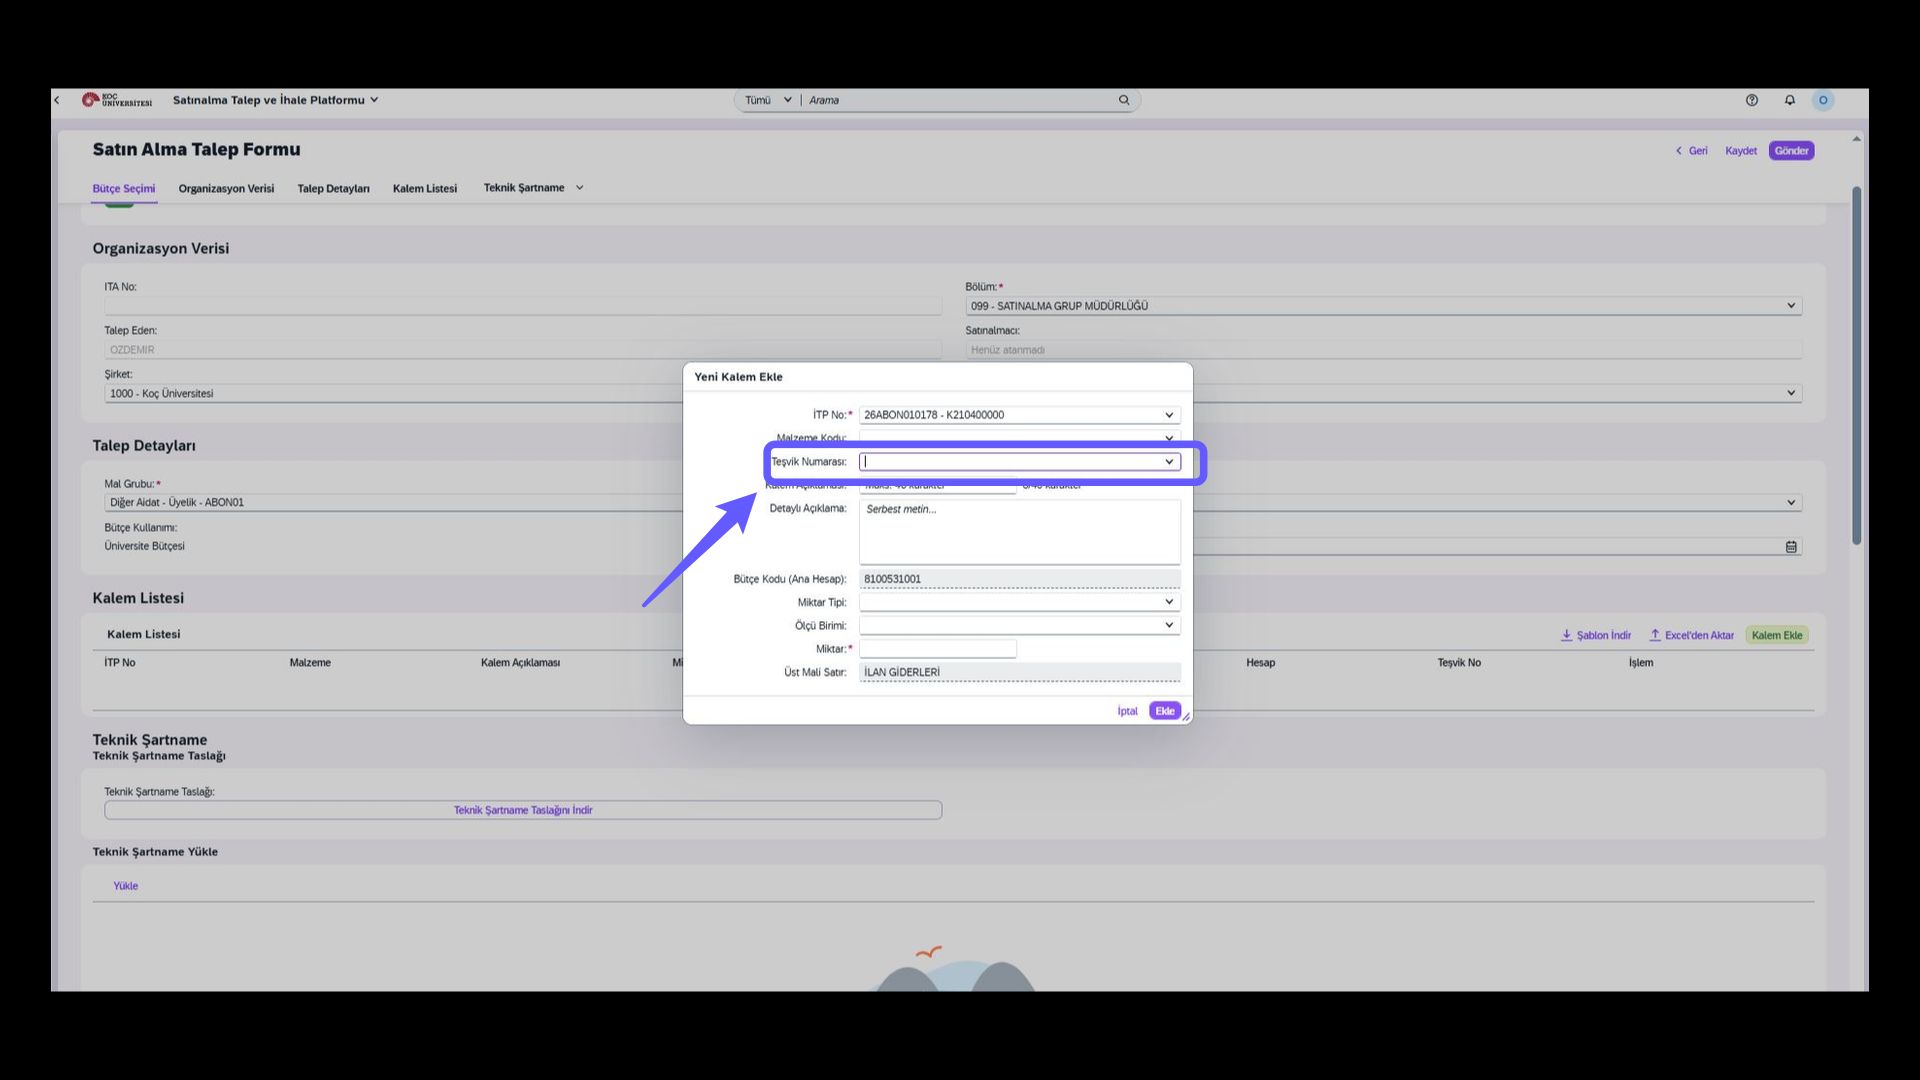
16. Select Incentive
-
If you want to create your request as incentivized, you must make an incentive selection in this field.
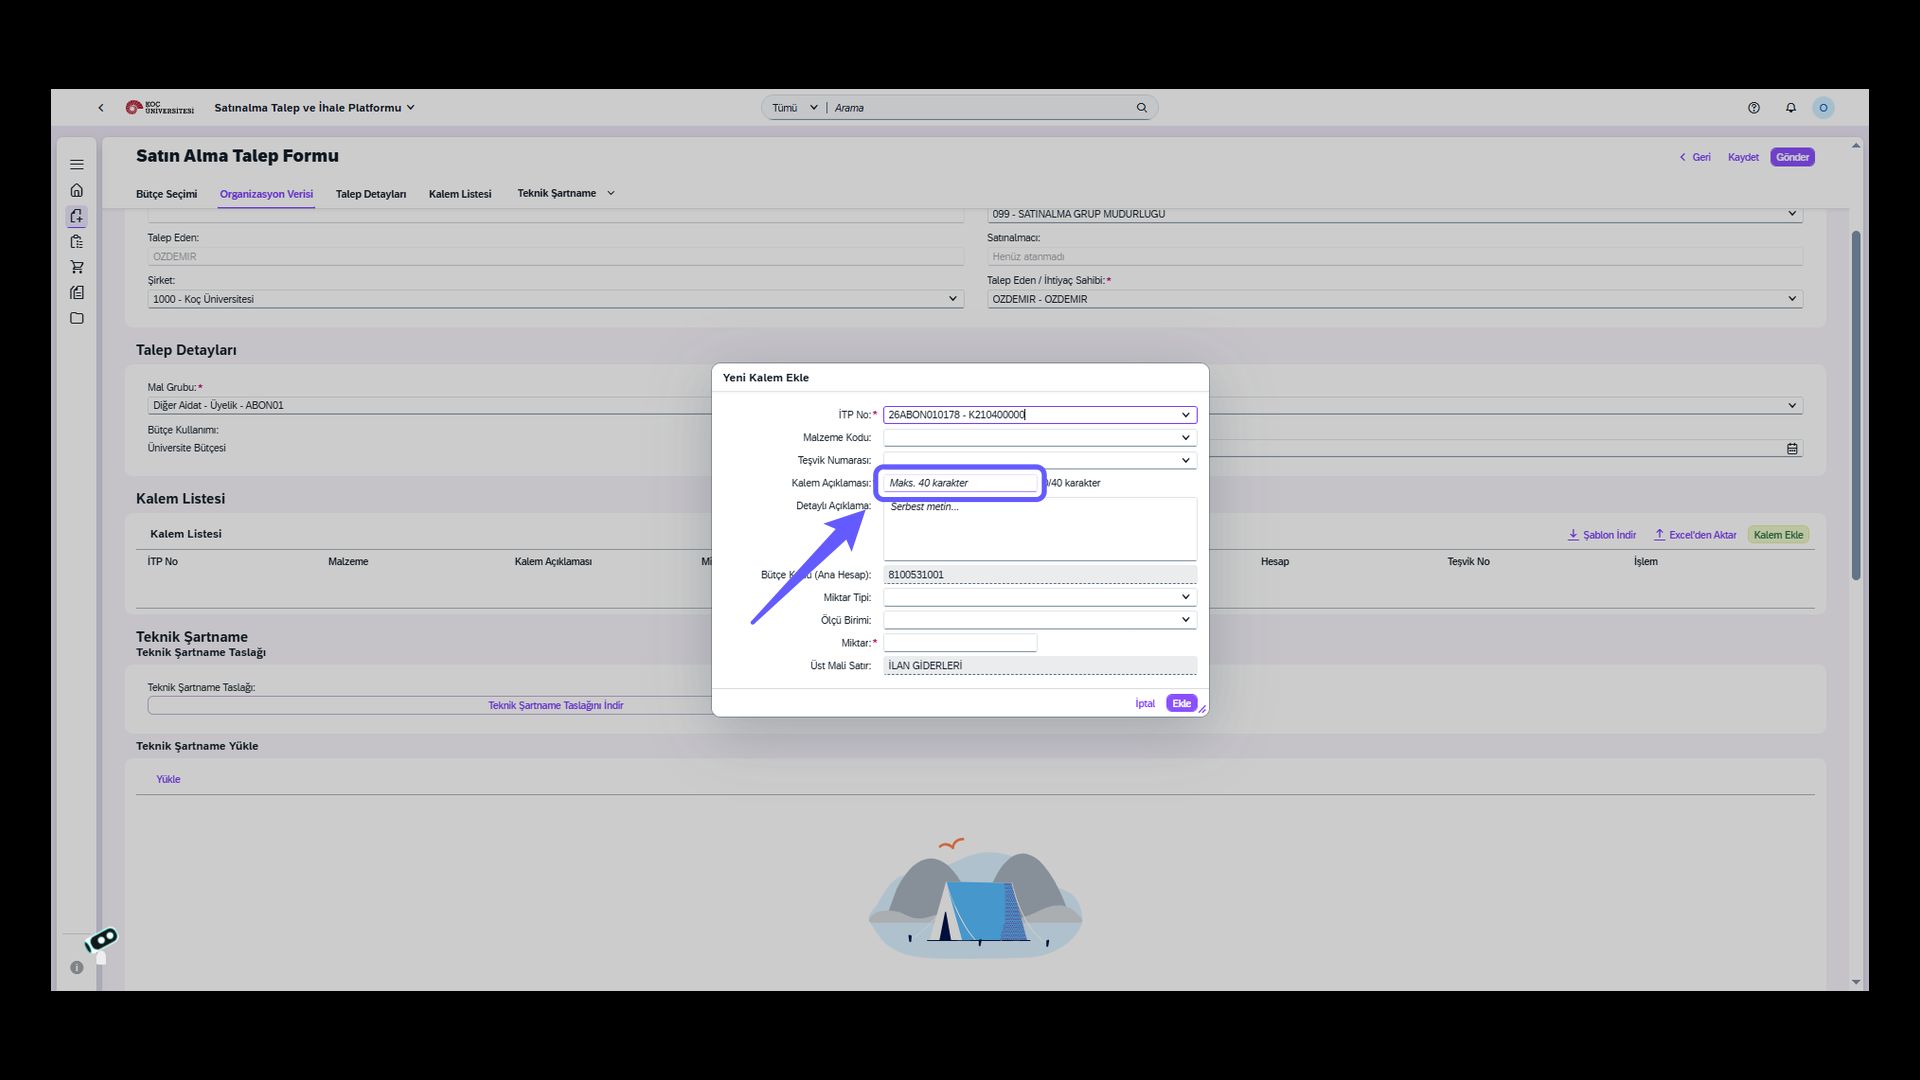
17. Enter Item Description
-
Enter the item description using at most 40 characters. If you have selected a material code, this field will be filled in automatically.
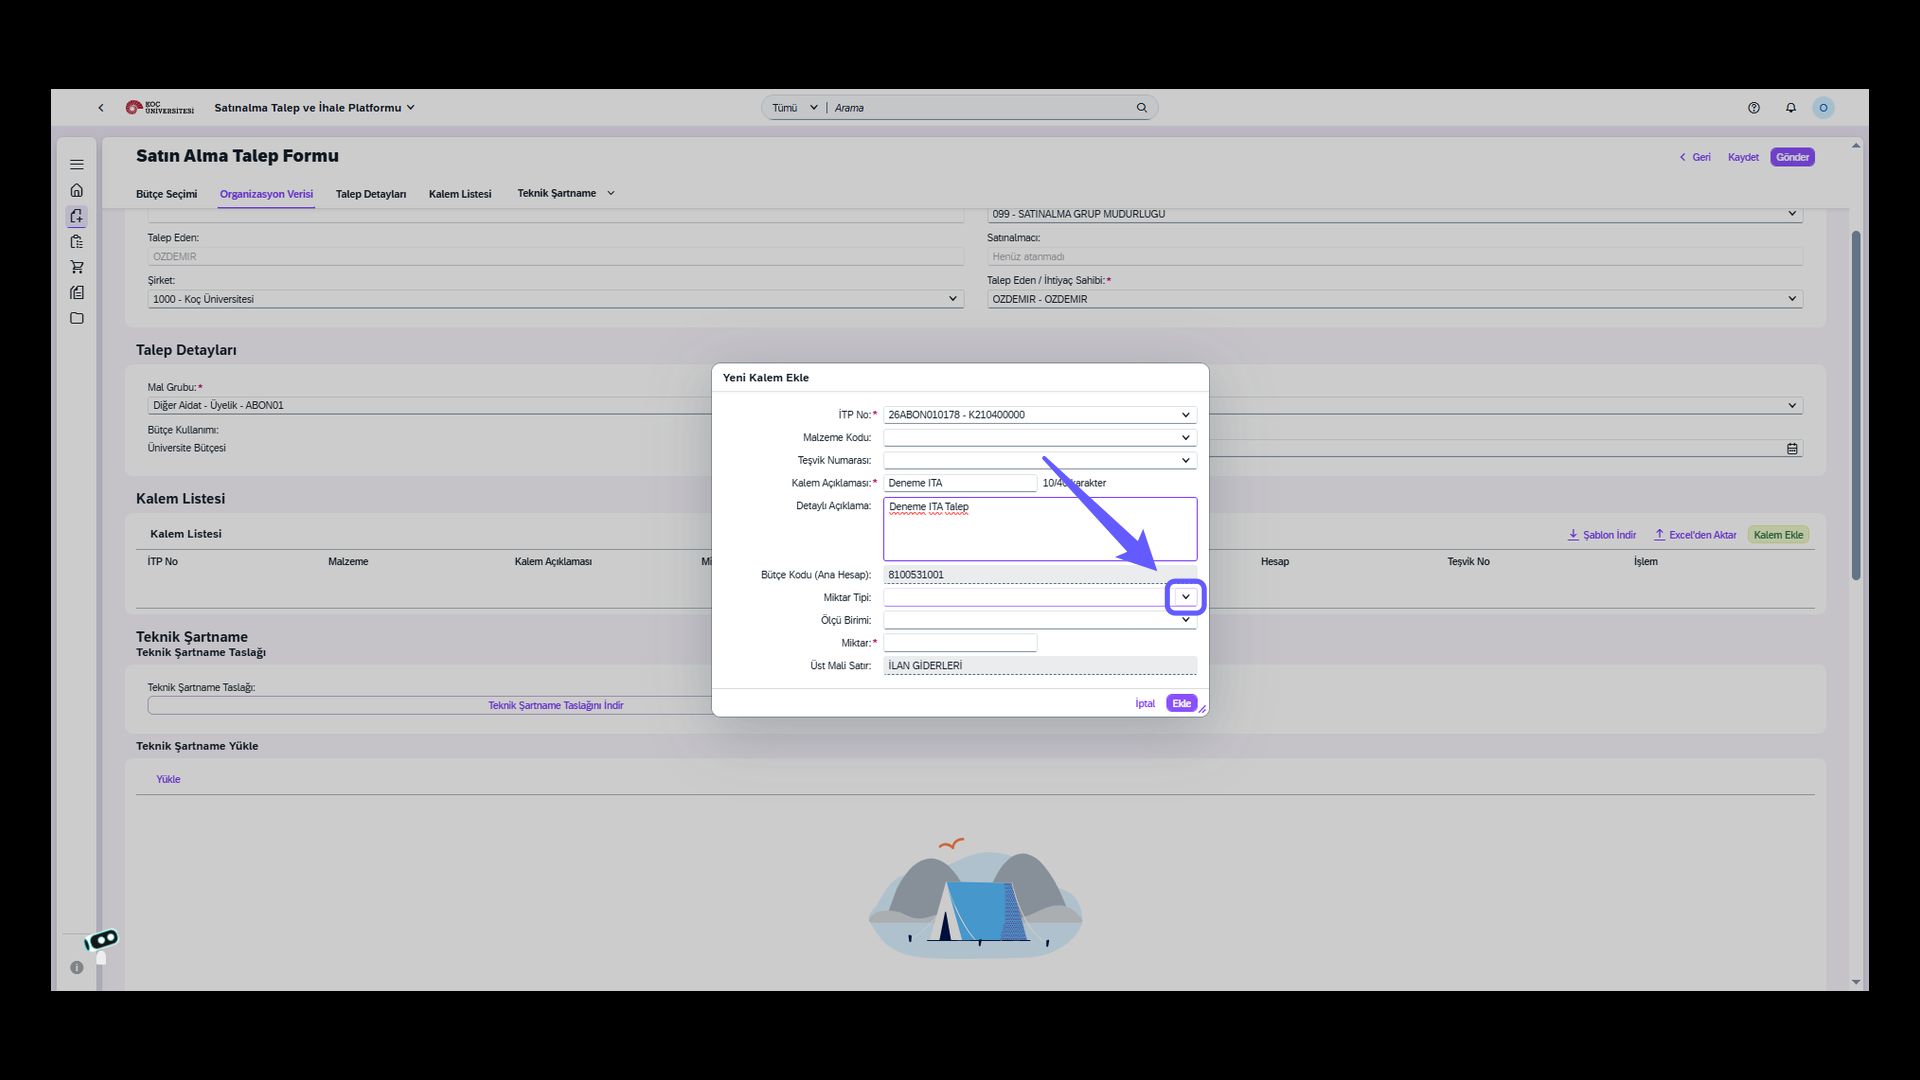
18. Select Quantity Type
-
Use the dropdown menu to determine the quantity type.
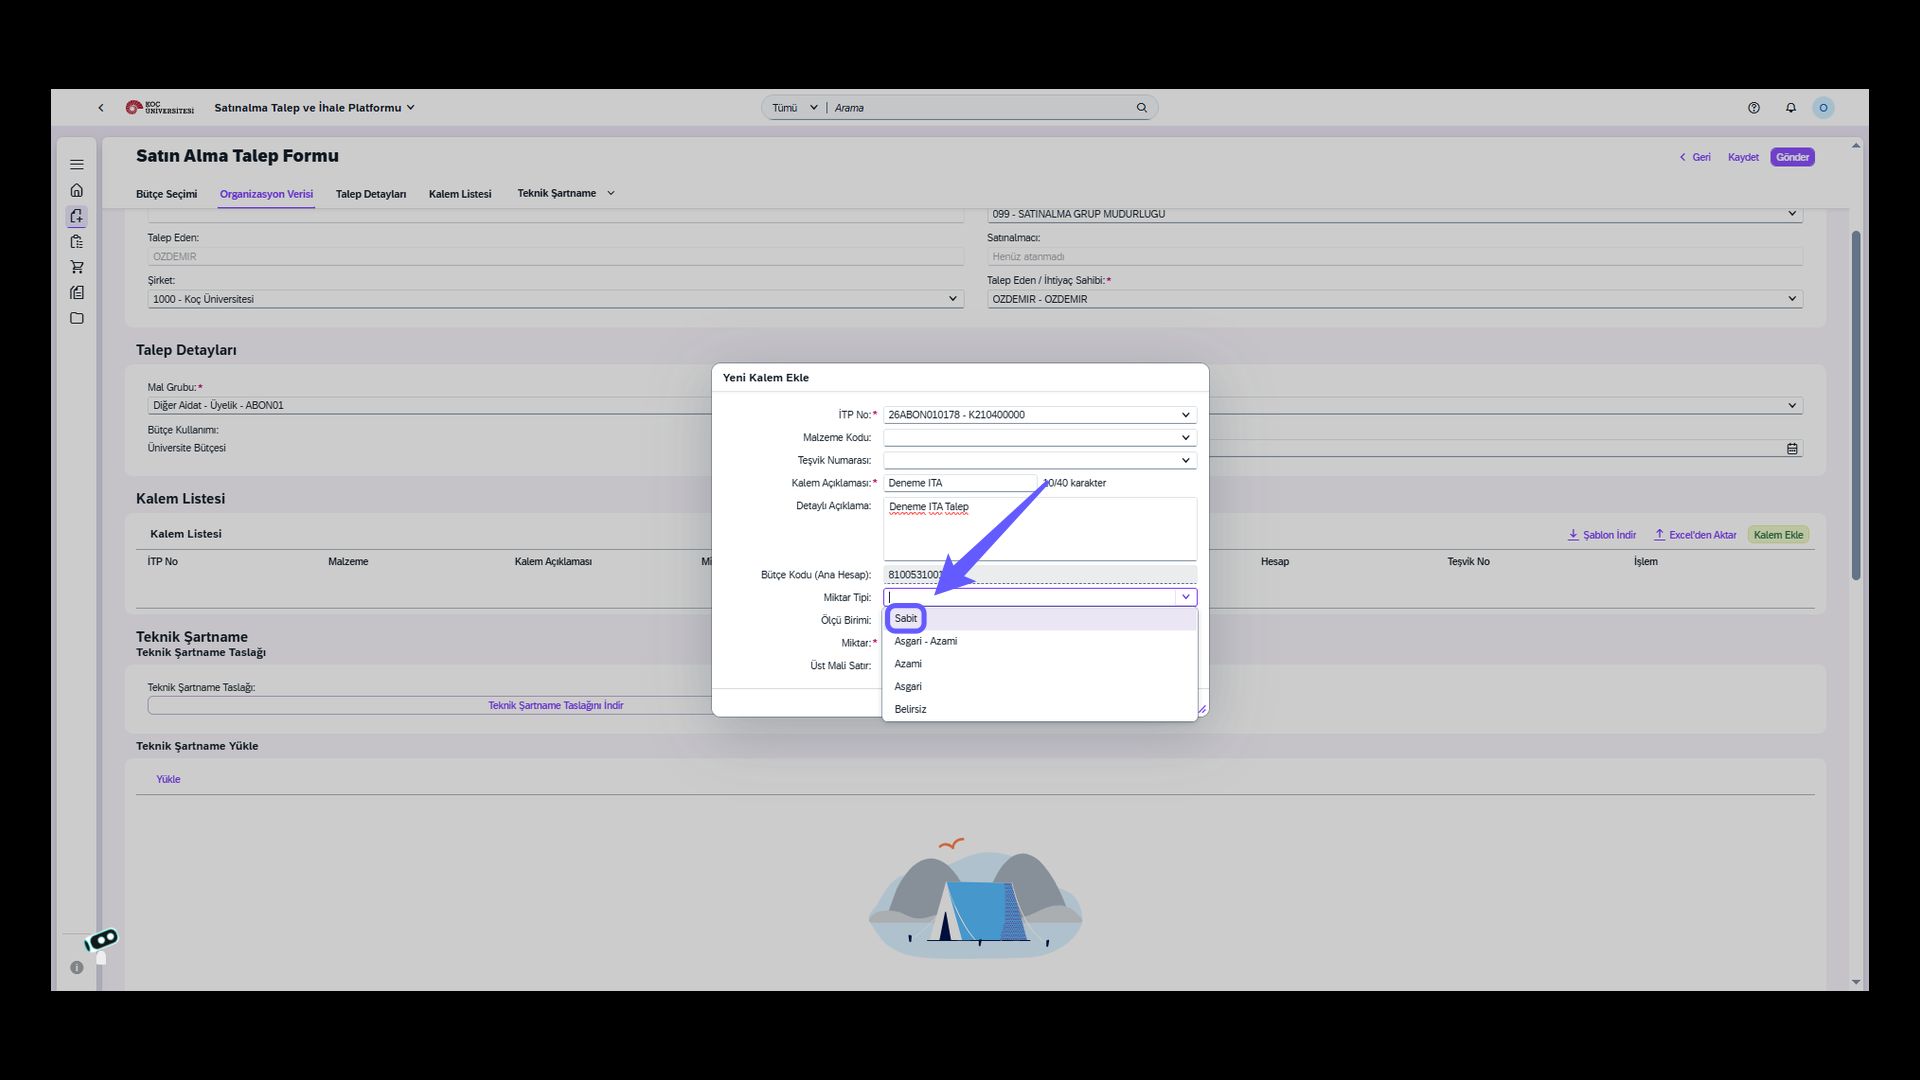
19. Set Quantity Type as Fixed
-
Select the "Quantity Type" field from the dropdown according to your purchase.
20. Select Unit of Measure
-
Select the unit of measure appropriate for your product or service.
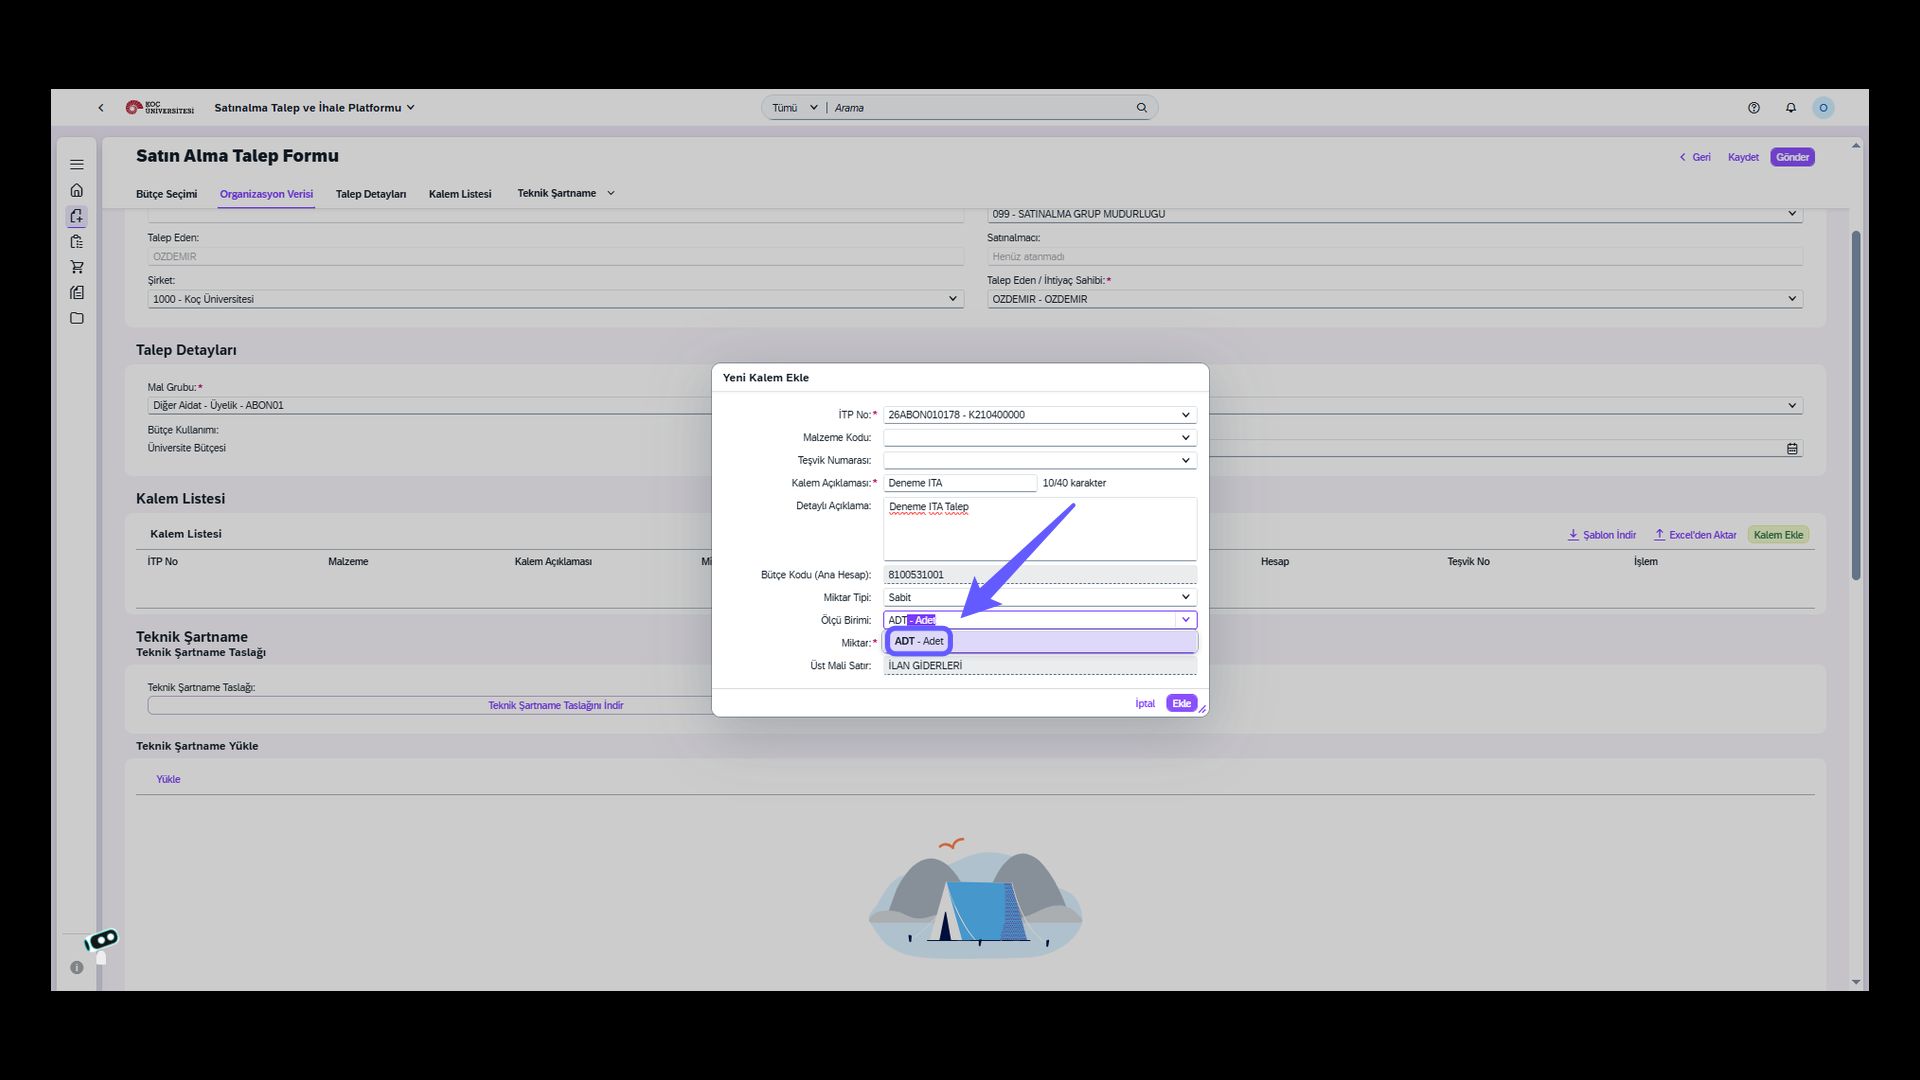
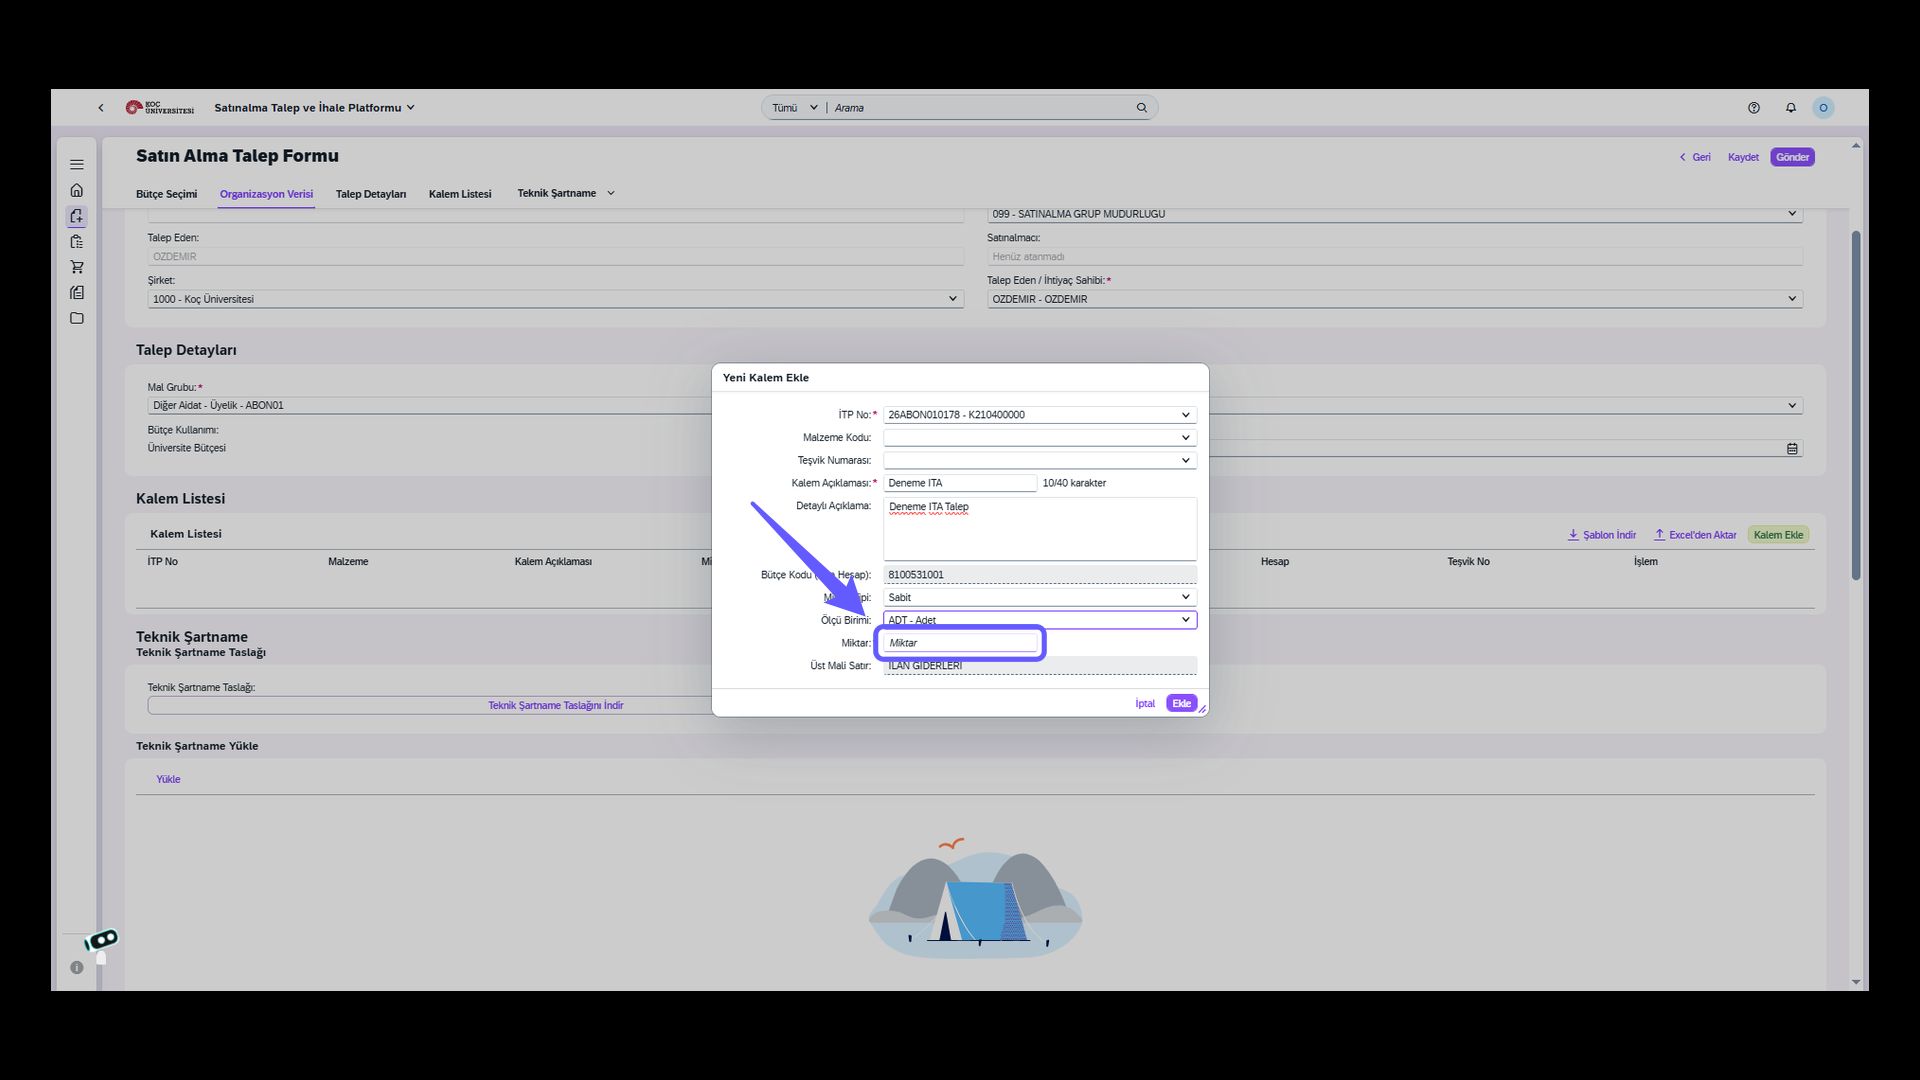
21. Change Quantity
-
Enter the quantity of the relevant item of your request in the quantity field.
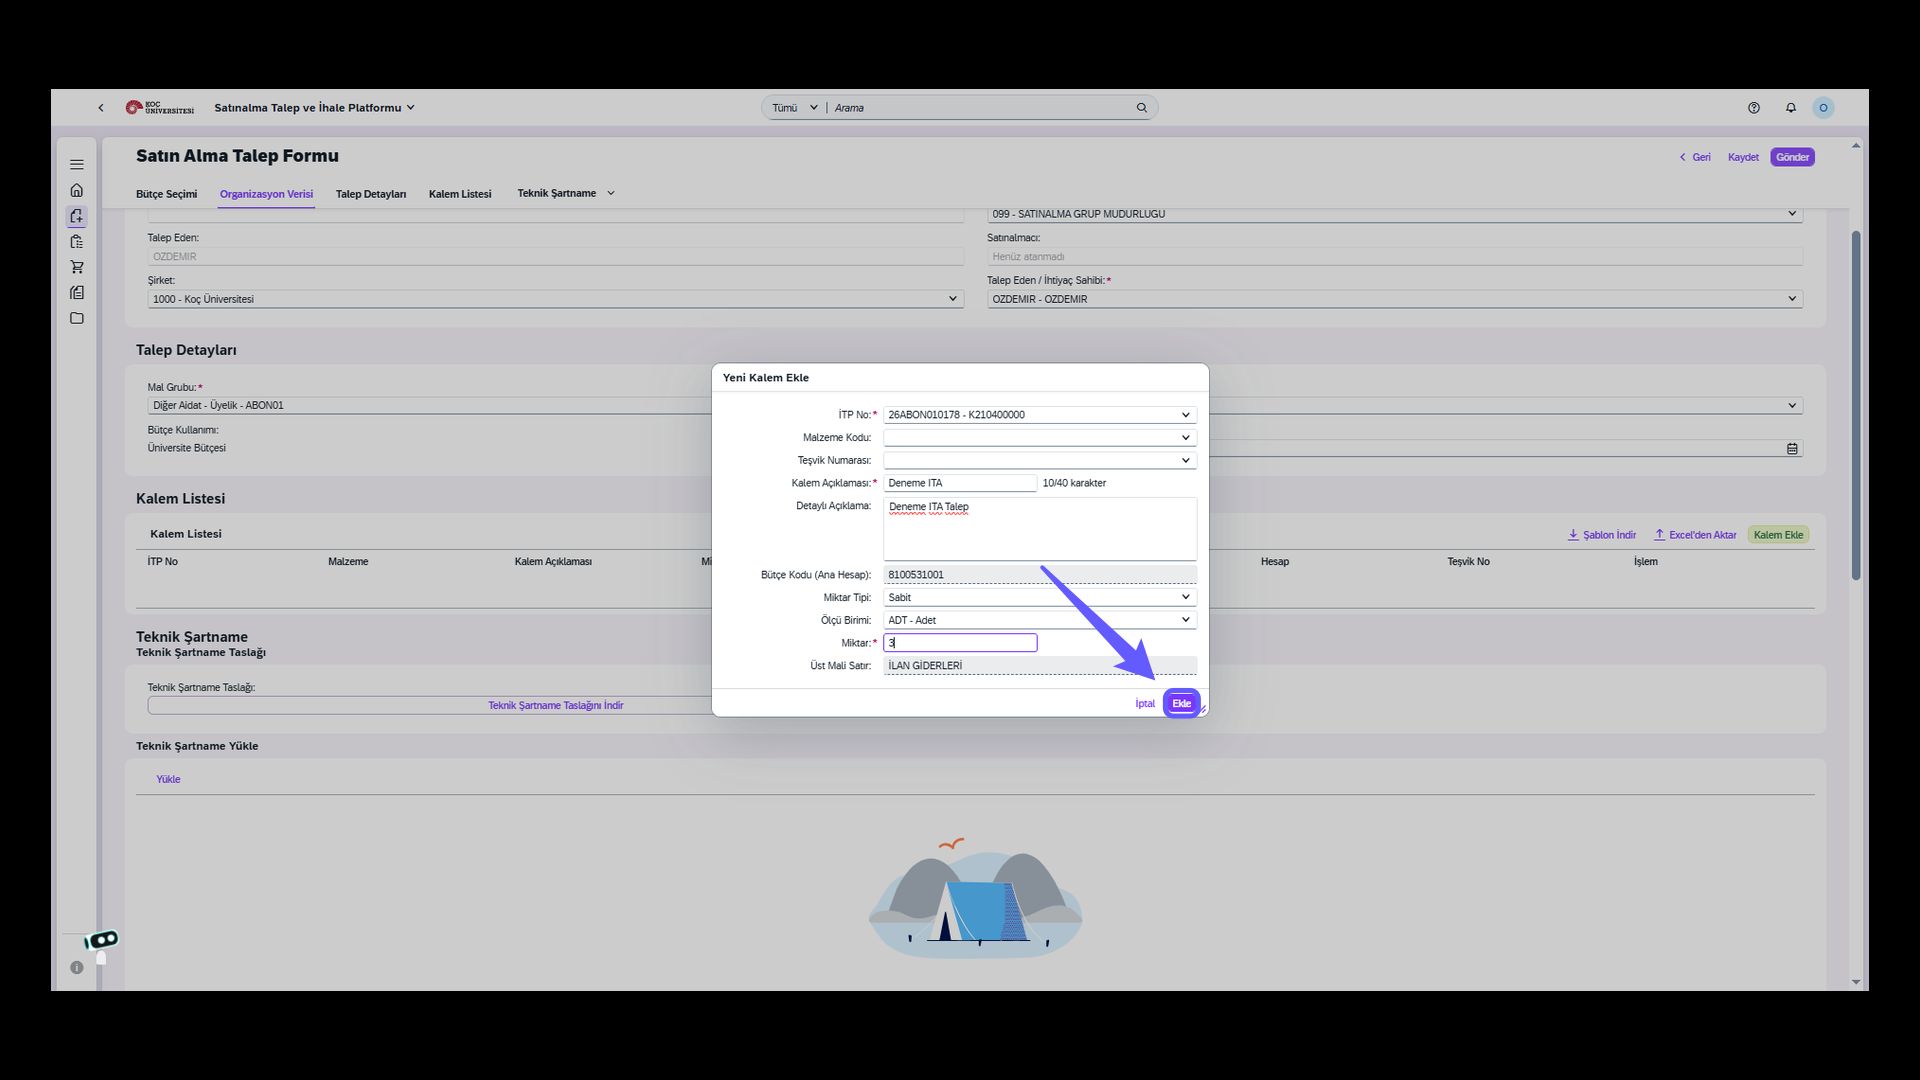
22. Save Item
-
You can easily save the item you have entered data for by clicking the 'Add' button.
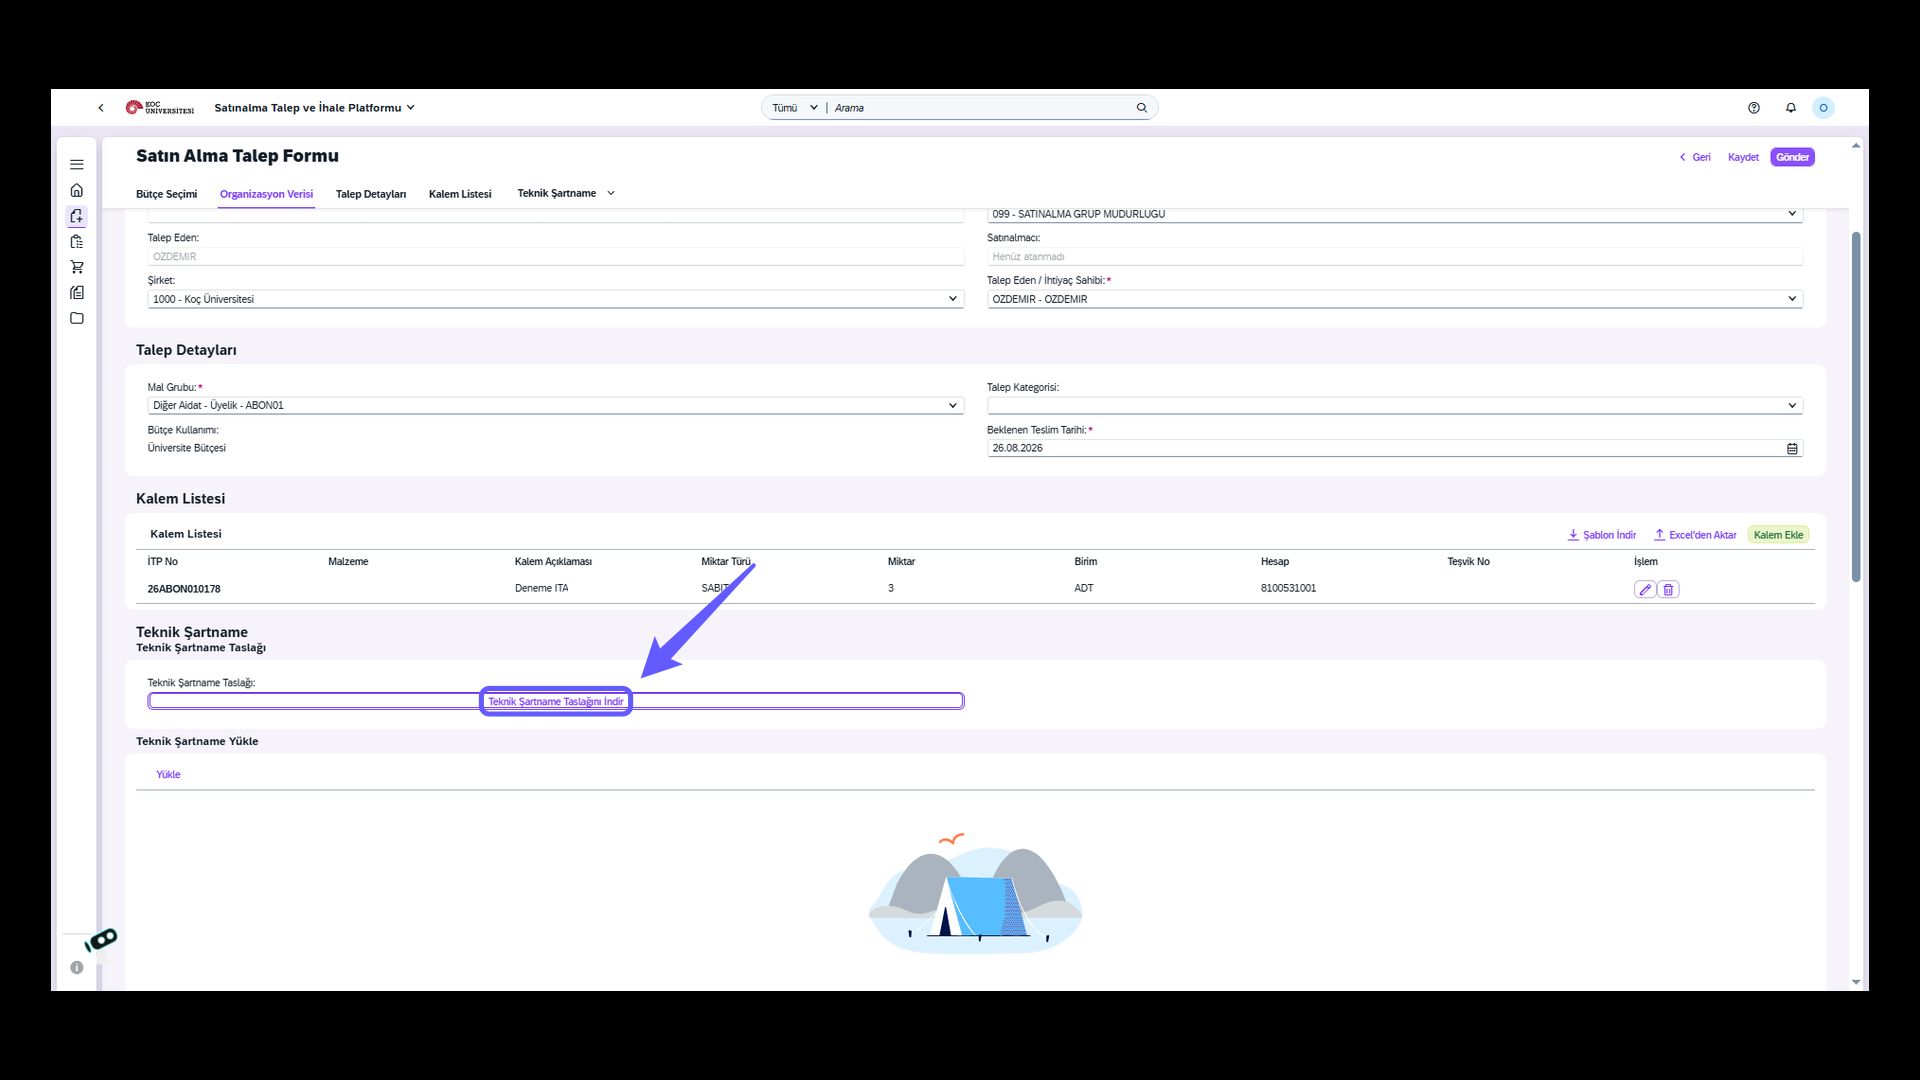
23. Download Technical Specification Template
-
Click the "Download Technical Specification Template" link to download the specification template file.
24. Technical Specification Upload Field
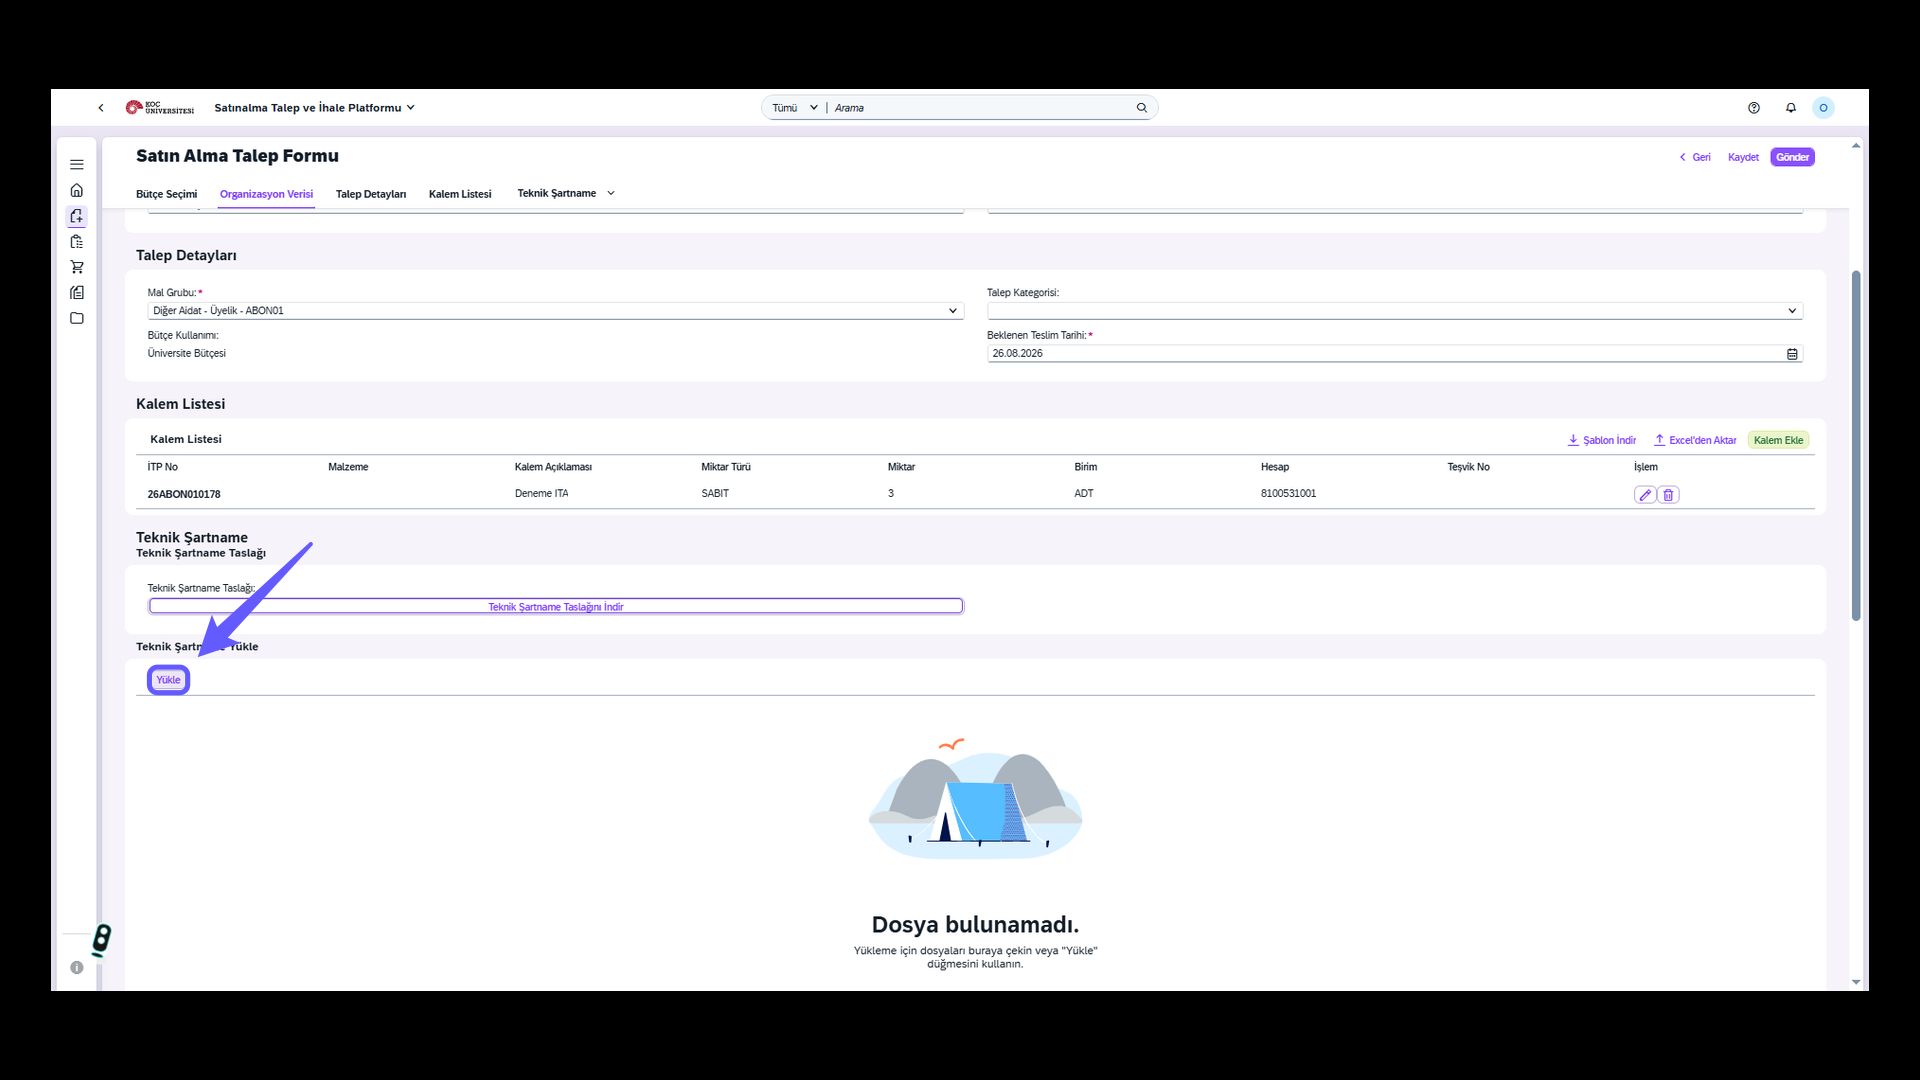
-
If you have prepared your technical specification or already have one, you must upload it to the relevant field only in PDF format.
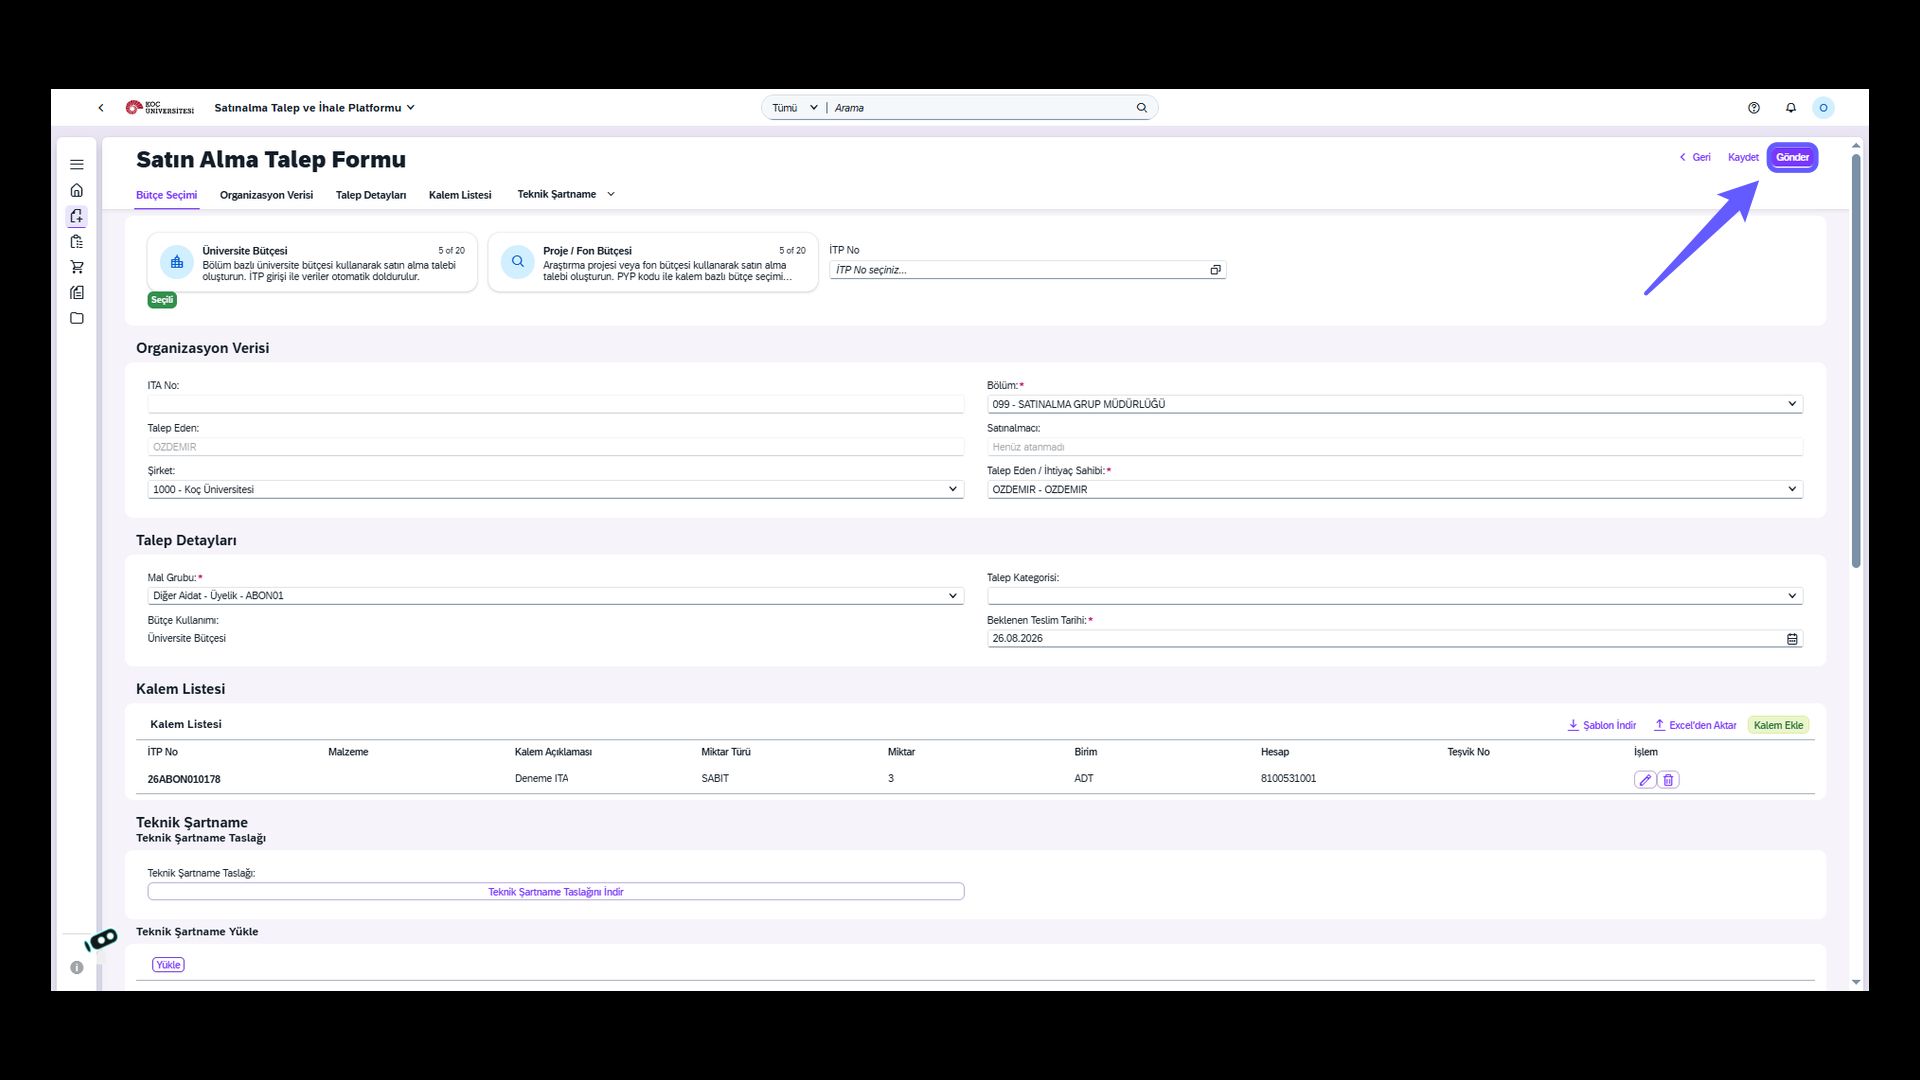
25. Submit Form
-
After completing all mandatory fields on the form, click the "Submit" button; you will then be easily directed to the budget entry field.
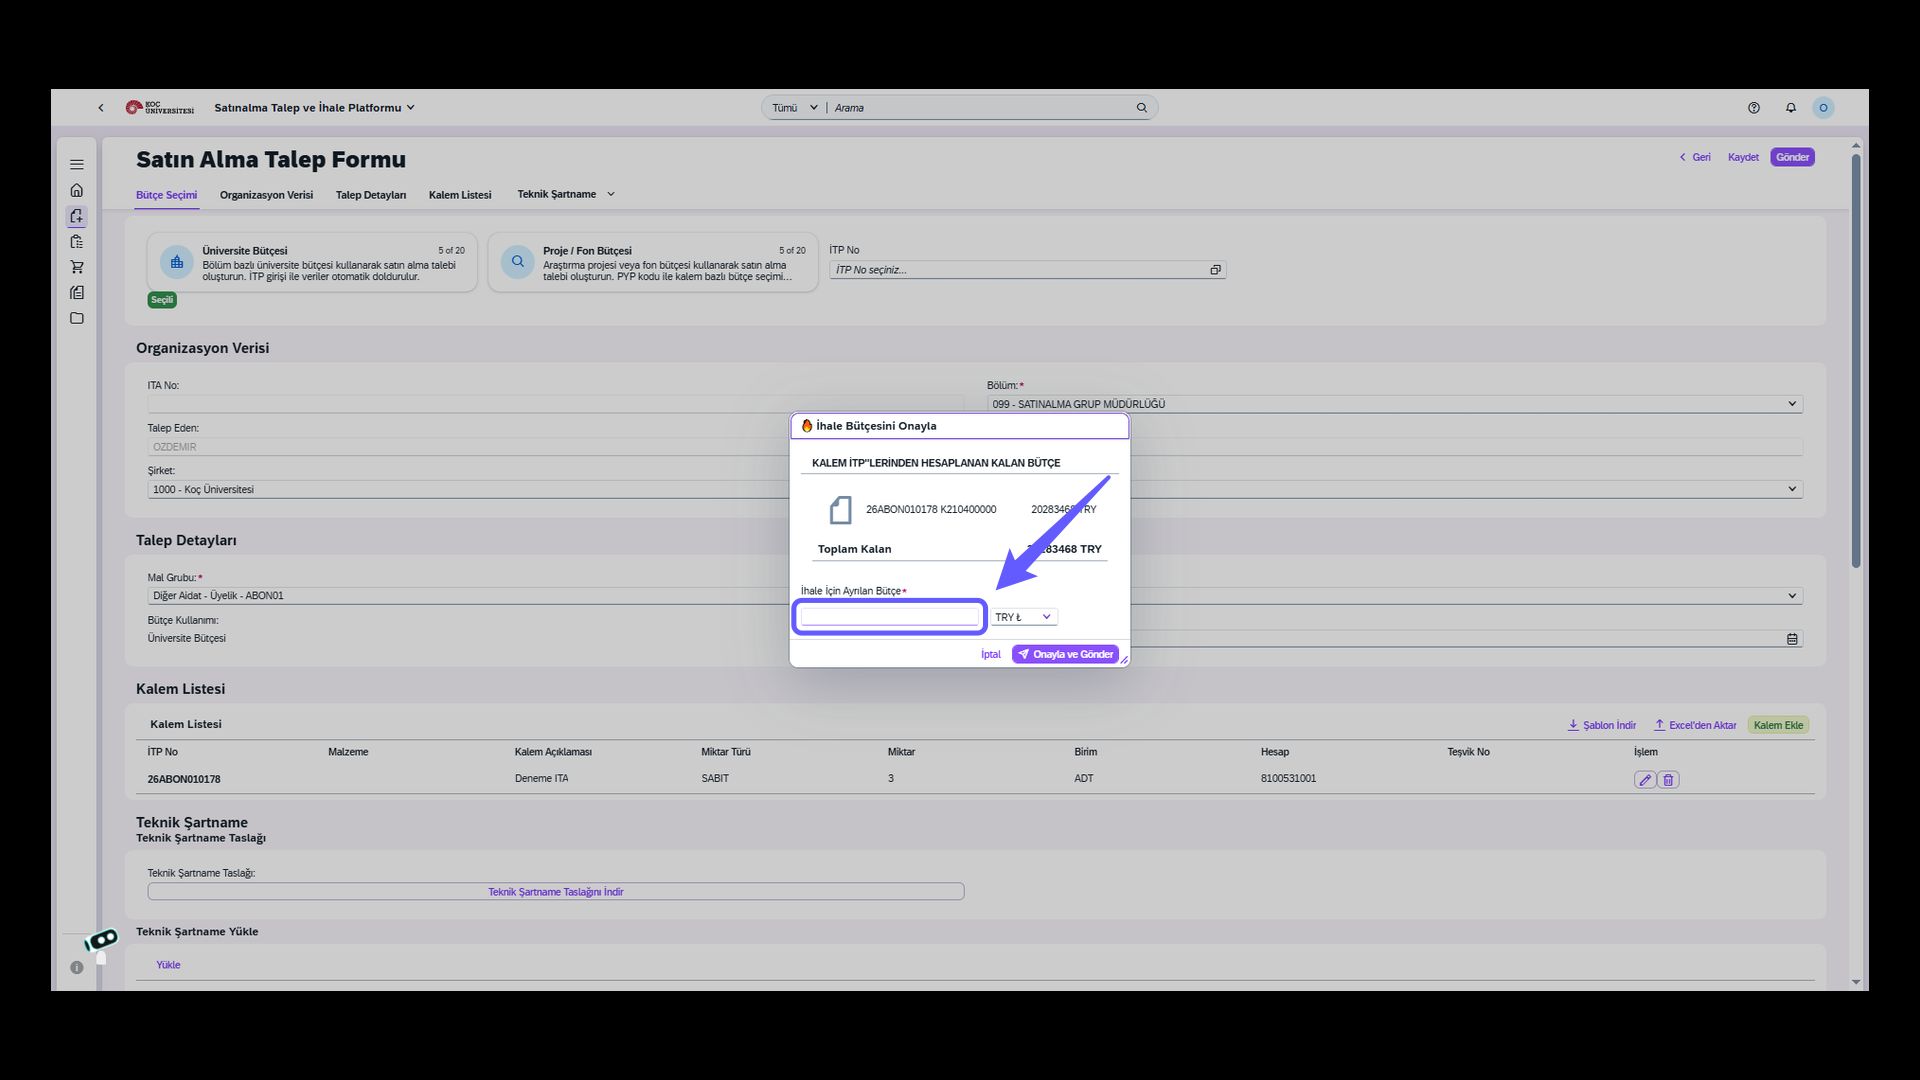
26. Enter Budget Information
-
Enter the estimated budget allocated for the request in the relevant field.
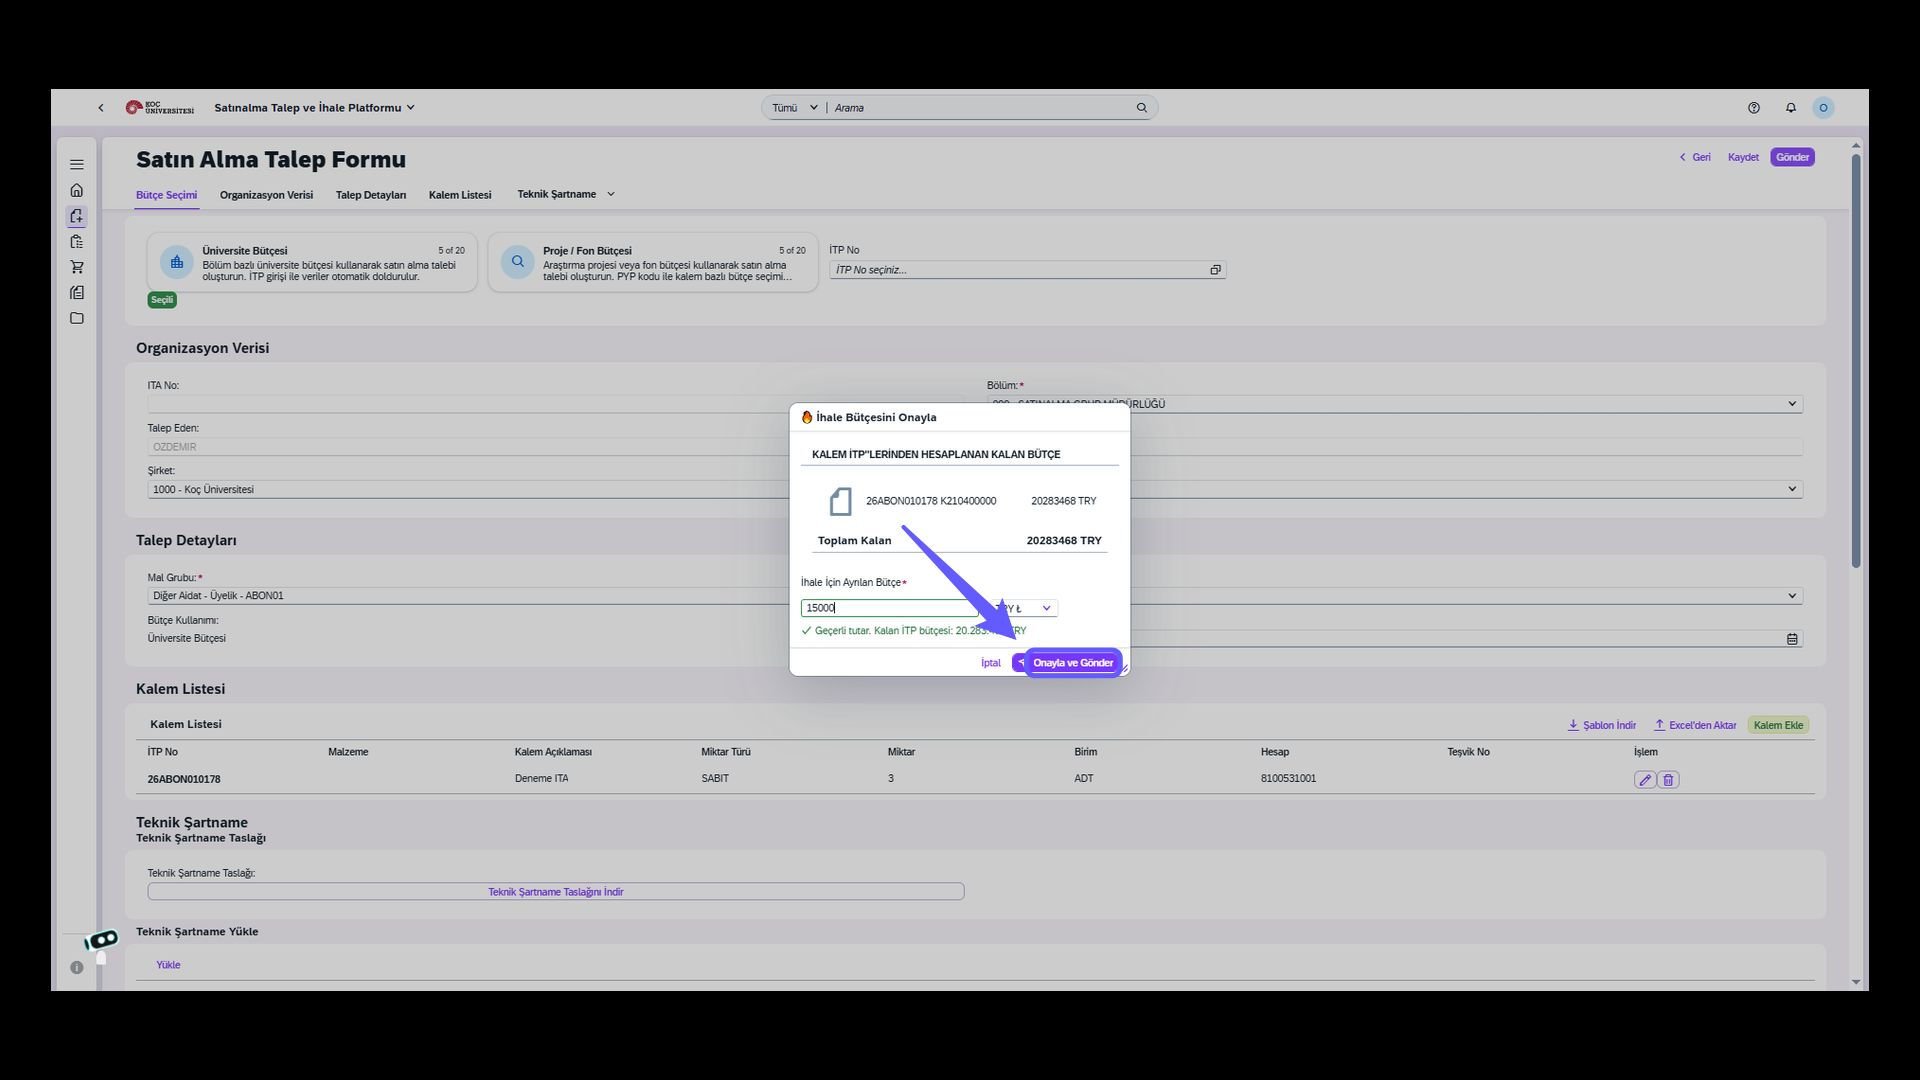
27. Approve Budget and Submit
-
Click the Approve and Submit button to approve the budget and complete the process.
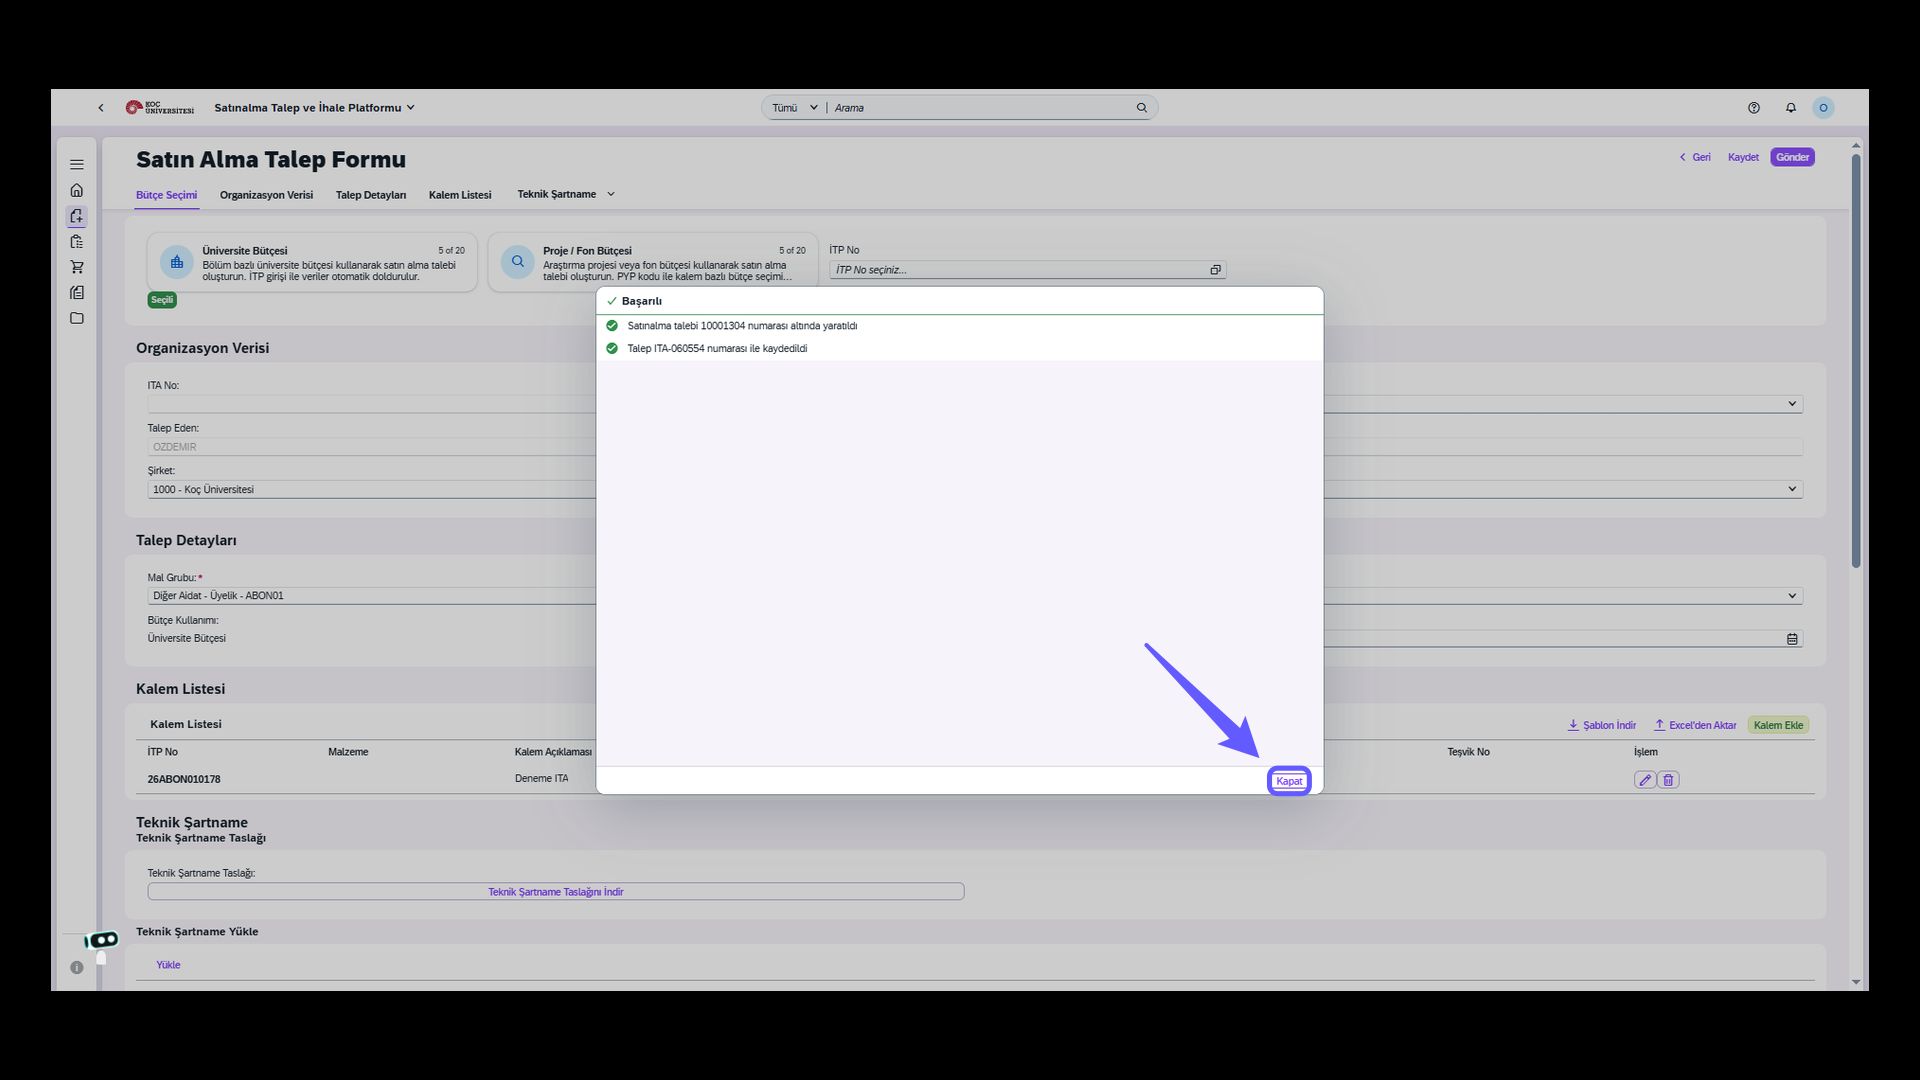
28. Request Created
-
After the request is created, copy the ITA number shown on the screen and then close the relevant window.
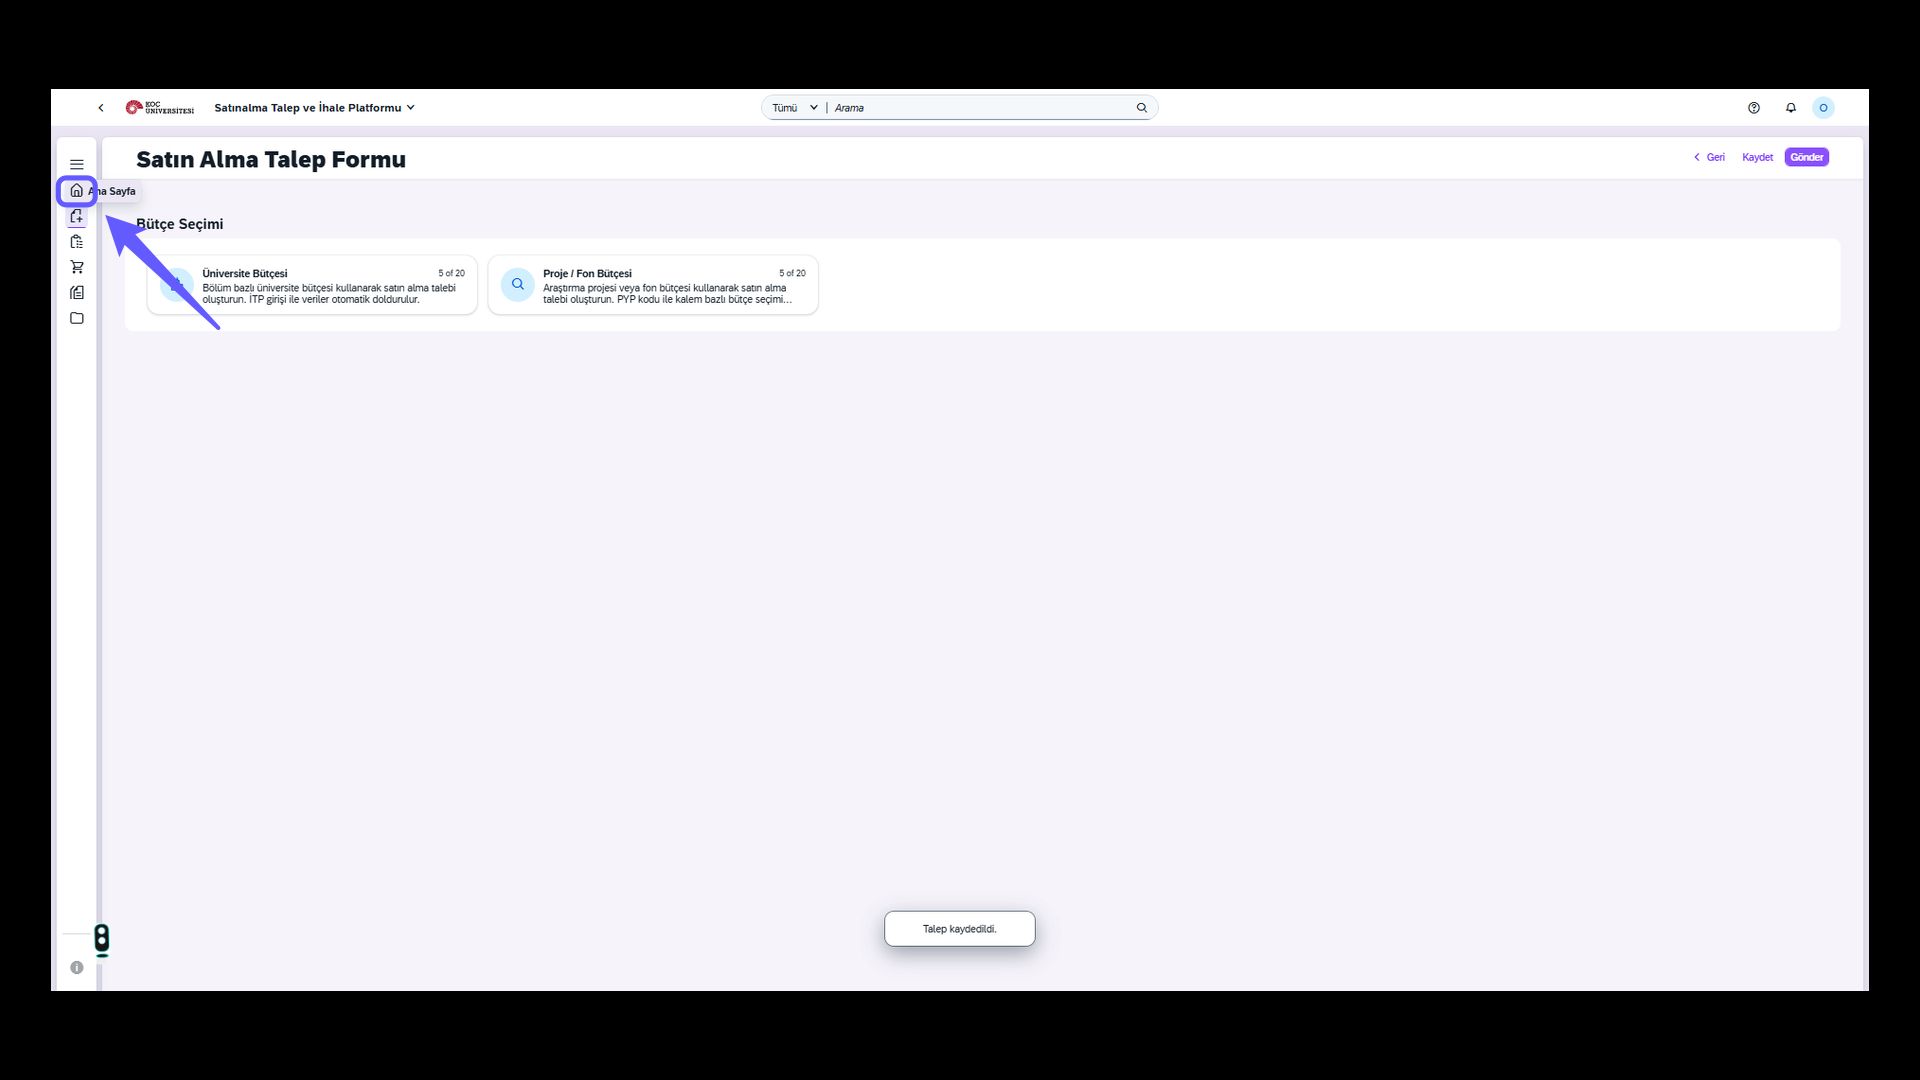
29. Return to Home Page
-
You can return to the home page by clicking the icon. This closes the current page and redirects you to the main screen.
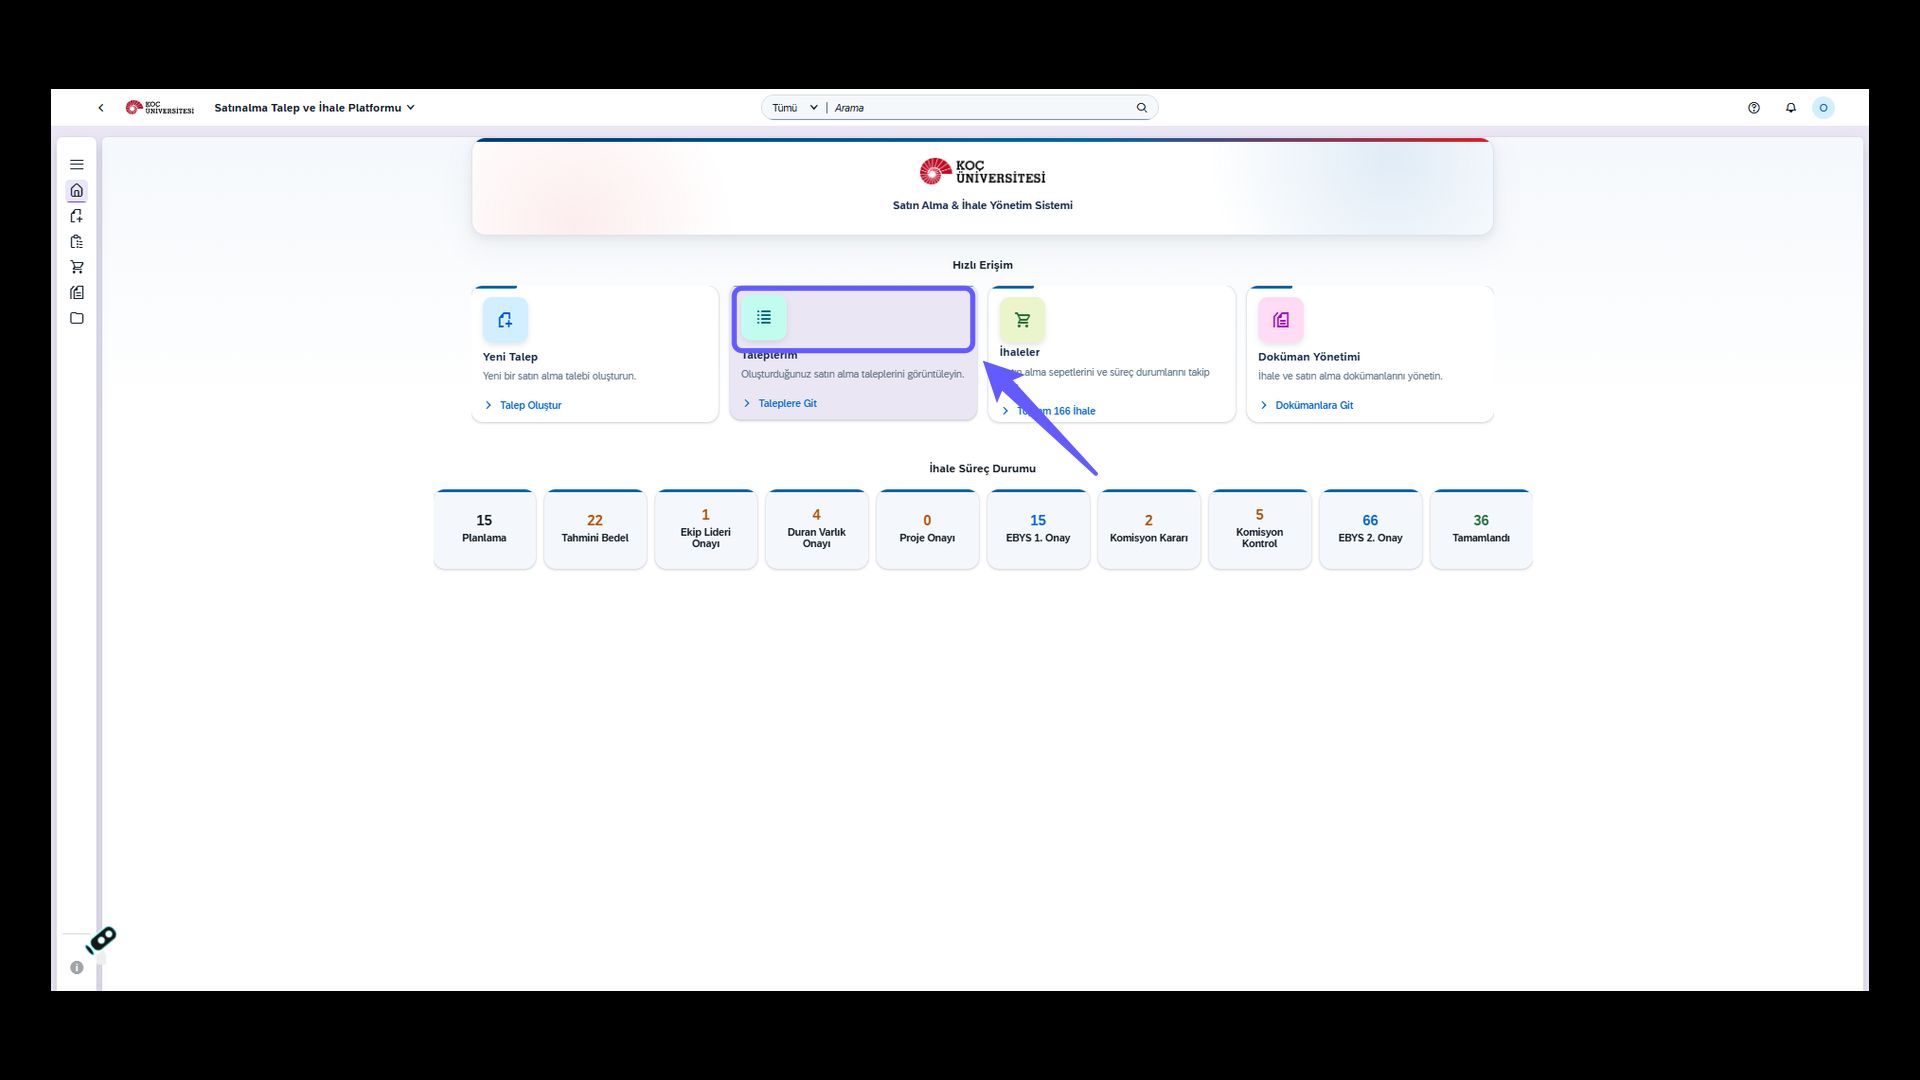
30. Go to Procurement Requests
-
View the procurement requests you have created.
31. My Requests Screen
-
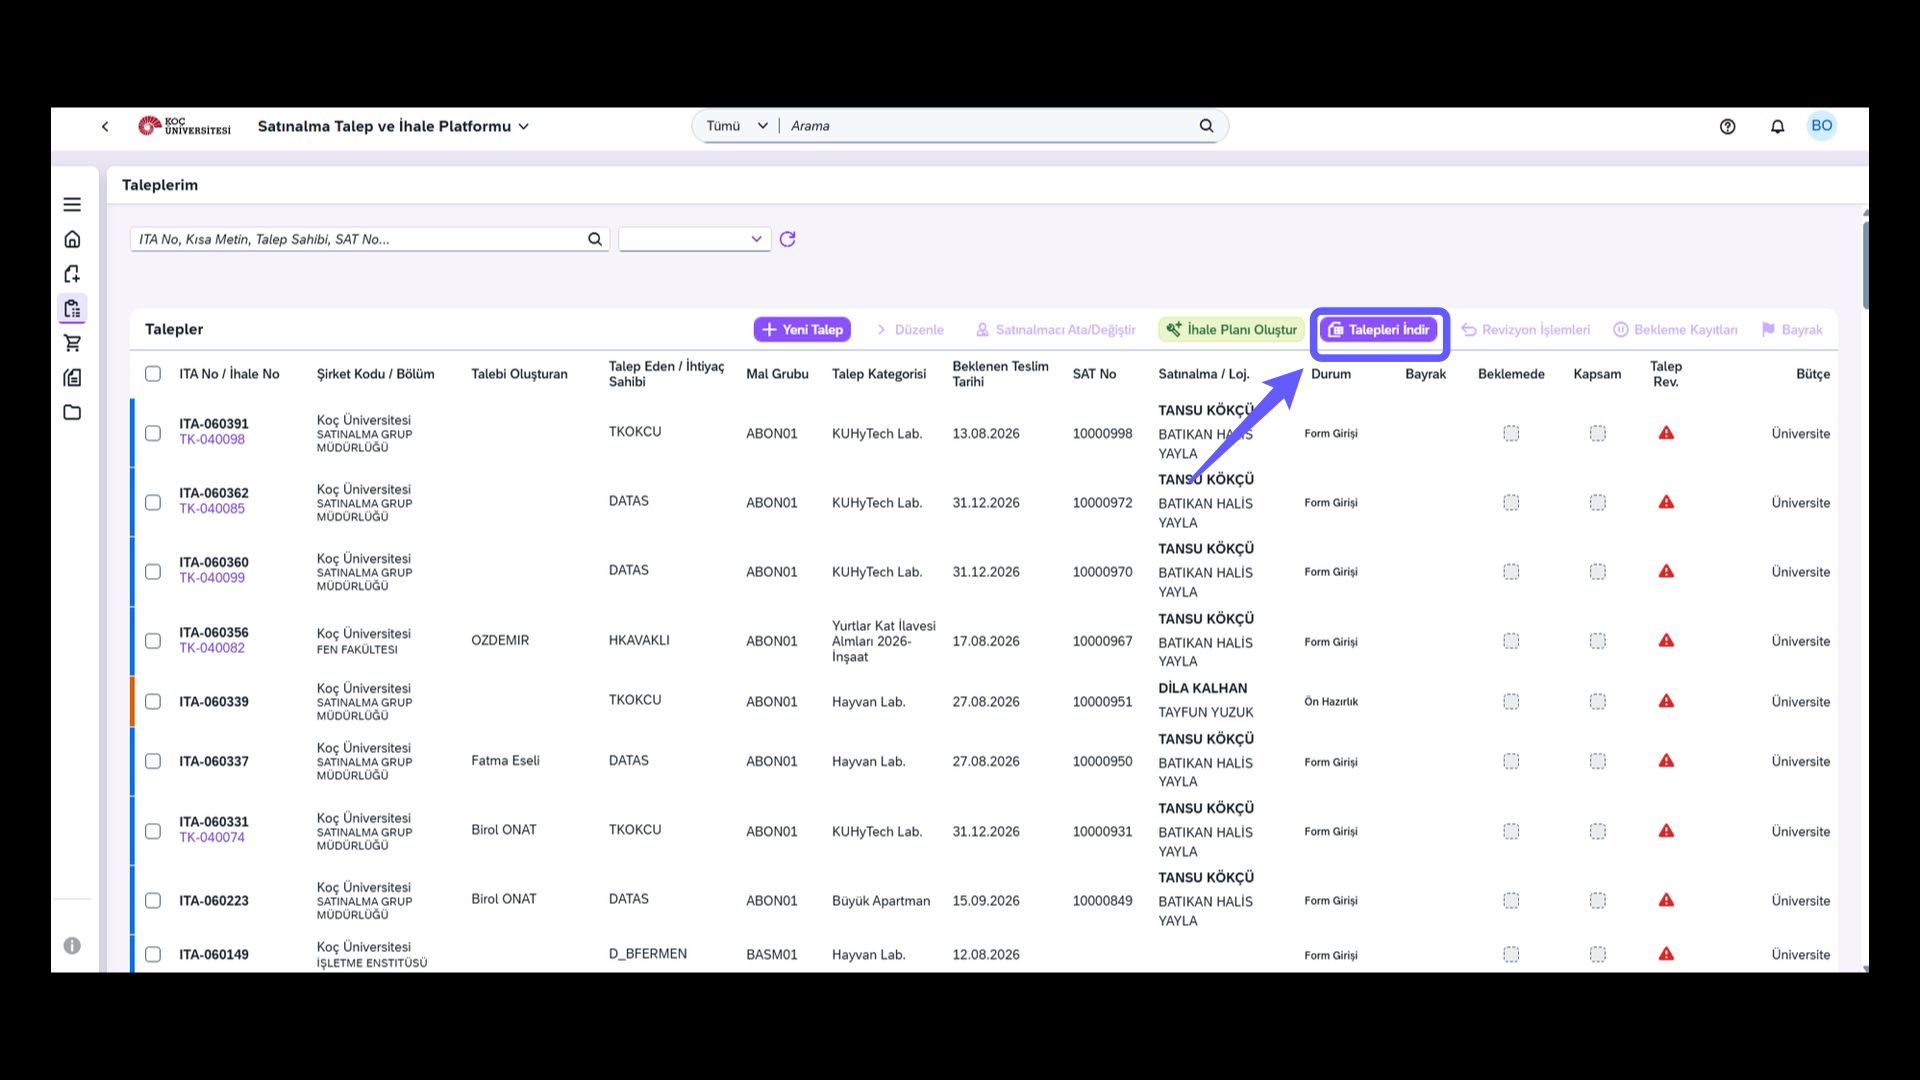
You can view the requests you currently have open from this screen.
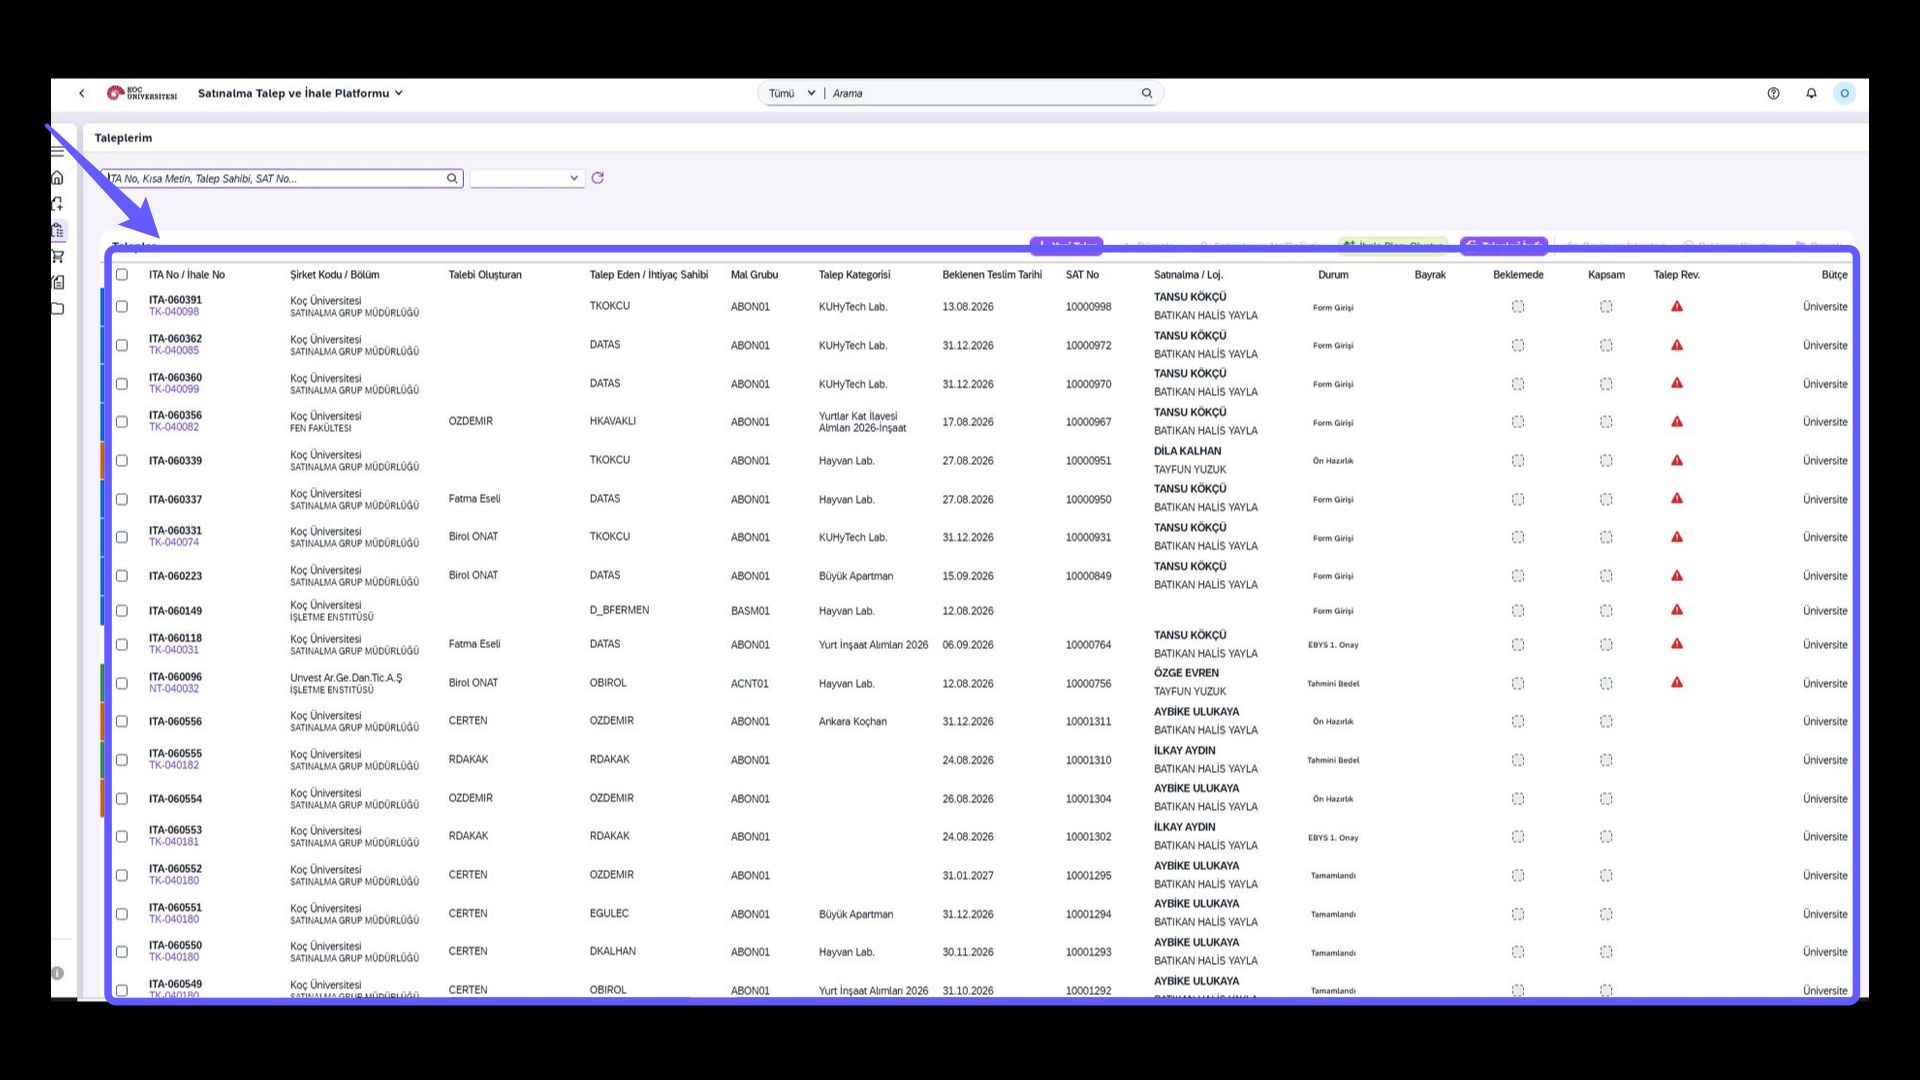
-
Go to the My Requests screen and click 'Download Requests' to easily download your requests in Excel format.
1. Yeni Talep Oluştur
-
Yeni bir satın alma talebi oluşturmak için bu simgeye tıklayın.
2. Bütçe Seçimi Yap
Bu ekran açıldığında kullanacağınız bütçenin türüne göre üniversite bütçesi veya proje-fon bütçesi alanı seçilerek talep oluşturma şablonuna gidilir.
3. ITP Seçim Alanı
Eğer kullanacağınız ITP'yi biliyorsanız bu alandan seçim yaparak ekrandaki şirket kodu, bölüm bilgisi ve mal grubu alanlarının otomatik doldurulmasını sağlayabilirsiniz. Proje-Fon bütçelerinde ITP seçimi yapılmayacaktır.
4. Seçenekleri Genişlet
-
Bölüm kodunuzun kutucuğunu tıklayarak listeden bölüm seçilebilir.
5. Bölüm Seçimi Yapınız
-
Listeden tanımlı olduğunuz bölümü seçmelisiniz.
6. Talep Eden Seçimi Yap
-
Talep açacağınız kişiyi talep eden listesinden seçmelisiniz.
7. Talep Edeni Seçme
-
Açılır listeden talep eden kişi seçilebilir.
8. Mal Grubu Seçimi
-
İlgili talepte kullanmak istediğiniz bütçenin bağlı olduğu mal grubunu listeden seçmelisiniz.
9. Kategori Seçimi
-
Eğer yaratacağınız talep bir proje ya da bir etkinliğe bağlı bir talep ise; listeden ilgili kategoriyi seçebilirsiniz. Bu alan zorunlu değildir.
10. Beklenen Teslimat Tarihi
-
Talebin teslim edilmesini beklediğiniz tarihi seçmelisiniz.
11. Kalem Ekle
-
Yeni bir kalem eklemek için 'Kalem Ekle' butonuna tıkla.
12. Şablon İndir
-
Eğer çok kalemli bir Satınalma talebi oluşturacaksanız şablonu bu alandan indirebilirsiniz.
13. Excel'den Aktar
-
İndirilen şablona yapılan veri girişleri sonrası excel kaydedilip ''Excel'den Aktar'' butonuyla sisteme yüklenir. Excel'e girilen verilerin doğru olması ve alanları değiştirilmemesi doğru aktarım için önemlidir. İlgili şablonun nasıl kullanılacağı Fiori Talep Ekranı kullanım kılavuzunda açıklanmıştır.
14. ITP Seçimi Yap
-
Seçtiğiniz bölüm ve mal grubuna ait ITP'leri buradan rahatlıkla görüntüleyin.
-
Açılan menüden doğru ITP'yi seçiniz.
15. Malzeme Kodu Seçimi
-
Eğer alımınız bir malzeme koduna bağlı ise; ilgili alandan malzeme kodunuzu seçebilirsiniz.
16. Teşvik Seçimi
-
Talebinizi teşvikli olarak oluşturmak istiyorsanız, bu alandan teşvik seçiminde bulunmalısınız.
17. Kalem Açıklaması Gir
-
Kalem açıklamasını en fazla 40 karakter girin. Malzeme kodunu seçtiyseniz, bu alan otomatik dolacaktır.
18. Miktar Tipini Seç
-
Açılır menüyü kullanarak miktar tipini belirle.
19. Miktar Tipini Sabit Olarak Seç
-
Açılır menüden "Miktar Tipi" alanını alımınıza uygun olarak seçiniz.
20. Ölçü Birimi Seçimi
-
Ölçü birimi olarak ürün ya da hizmetinize uygun olan ölçü birimini seçiniz.
21. Miktar Değişikliği
-
Miktar alanına talebinizin ilgili kaleminin miktarını giriniz.
22. Kalem Kaydetme İşlemi
-
'Ekle' düğmesine tıklayarak veri girişinde bulunduğunuz öğeyi kolayca kaydedebilirsiniz.
23. Teknik Şartname Taslağını İndir
-
"Teknik Şartname Taslağını İndir" bağlantısına tıklayın ve şartname taslağı dosyasını indirebilirsiniz.
24. Teknik Şartname Yükleme Alanı
-
Teknik şartnamenizi hazırladıysanız veya elinizde mevcut bir teknik şartname varsa, sadece PDF formatında ilgili alana yüklemelisiniz.
25. Formu Gönder
-
Formda bulunan zorunlu alanları eksiksiz doldurduktan sonra "Gönder" butonuna tıklayın; böylece bütçe giriş alanına kolayca yönlendirileceksiniz.
26. Bütçe Bilgisi Girişi
-
İlgili alana talep için ayrılan tahmini bütçeyi giriniz.
27. Bütçe Onayı ve Gönder
-
Onayla ve Gönder butonuna tıklayarak bütçeyi onayla ve işlemi tamamlayabilirsiniz.
28. Talep Oluşturuldu
-
Talep oluşturulduktan sonra, ekranda görünen İTA numarasını kopyalayın ve ardından ilgili pencereyi kapatın.
29. Ana Sayfaya Geri Dön
-
Simgeye tıklayarak ana sayfaya dönebilirsiniz. Bu işlem, mevcut sayfayı kapatır ve ana ekrana yönlendirir.
30. Satın Alma Taleplerine Git
-
Oluşturduğunuz satın alma taleplerini görüntüleyin.
31. Taleplerim Ekranı
-
İlgili ekrandan açmış olduğunuz mevcut talepleri görüntüleyebilirsiniz.
-
Taleplerim ekranına gidip 'Talepleri İndir' seçeneğine tıklayarak taleplerinizi Excel formatında kolayca indirebilirsiniz.